Creating user accounts for your company
If you can access the Create User page, you can create a sub user.
1. Go to Menu > Security > Work with Users > Create User.
The Create User page opens.
2. In each section, enter or select the appropriate information for the user.
Create User section
Required field: *
Field | Definition |
|---|---|
User Name* | Enter the user's login ID. |
Password* | Enter the user's password. A password is a secret code that the user must enter when they sign into the application. The administrator sets password requirements, such as length and special characters. The user will use this password for their initial access to the application. During their initial login, each user might be prompted to change their password, according to how the administrator has set up the system. Notes: 1. The password is case-sensitive: each letter that is uppercase or lowercase must always be entered that way when a user enters their password. 2. User passwords do not appear. If a user forgets their password, you can assign a new password. 3. For security reasons, when you enter a password, it appears as a series of dots. |
Confirm Password* | Re-enter the password. The entry you type must match exactly what you entered in the Password field. |
First Name | Enter the user's actual first name. |
Last Name | Enter the user's actual last name. |
E-mail Address | Enter the e-mail address you can use to contact the person. |
Optional - Profile Details section
The optional profile fields can be completed or changed by new users after they have logged in successfully.
Field | Definition |
|---|---|
First Name | Enter the user's actual first name. |
Last Name | Enter the user's actual last name. |
E-mail Address | Enter the e-mail address you can use to contact the user. |
Culture Override | This field is available if your administrator allows you to determine the format in which dates, times, numbers, and currency symbols appear. The default value in this field is the global culture option defined for all users of the site. Users you create can change this value in their profile page. Options are: English (United States) English (Canada) English (United Kingdom) English (Australia) English (New Zealand) French (France) French (Canada) Spanish (Mexico) |
Landing Page Override | Not available. |
Role Assignments section
Use this section to assign one or more roles to each user that you create, change an assigned role, or remove an assigned role. Each role is authorized and configured to access specific features. When assigning a role to a user, you are authorizing that user to access those features. Because each role provides access to only limited features, you may need to assign multiple roles to a user.
This section contains two lists:
Field | Definition |
|---|---|
Available Roles | Lists the roles for which you have authorization to assign, but have not been assigned to the user |
Assigned Roles | Lists the roles that have been assigned to the user |
a. In the Available Roles list, hold CTRL and click on each role that you want to assign.
b. Click the  button.
button.The selected roles move to the Assigned Roles list.
Each role can access different webpages. For more information, see Determining roles to assign
Additional Settings tab
Field | Definition |
|---|---|
Product Families | If more than one product family is available, hold CTRL and click on each product line appropriate for the user. |
3. Click Create User in the upper right of the page.
A message indicates that the new user account was created successfully.
Note: If not saved correctly, information regarding incomplete or missing field information appears. Correct the error and click Create User again.
4. If you want to create another user account, click Continue.
5. Give each sub user their user name and password.
After you have created sub users and assigned them roles, you must give each sub user their user name and password.
They must also know the following:
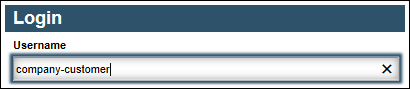
In the Username field of the Login page, they must enter your user name, followed by a hyphen, and then their assigned user name.
They can enter either uppercase or lowercase letters, but not spaces between characters.
In the Password field, they must enter the password as initially assigned to them.
The password is case-sensitive: each letter that is uppercase or lowercase must always be entered that way when a user enters their password. For security reasons, when they enter a password, it appears as a series of dots.
To avoid having to enter a user name the next time they log in, they can select the Remember My Username check box by clicking in the box.
Note: To use this feature, the user must have cookies enabled in their browser.
After they log in, they must complete a User Registration by entering their mailing address and telephone number, reading and accepting the Terms and Conditions, possibly changing their password, and setting up security questions that will be used to verify their identity if they forget their password.