Entering multiple values for a row or column heading
In some pay rate tables, the same rate amount may apply for multiple row entries or column entries. Although you can record the rate repeatedly for each entry to which it applies, you also have the option to enter multiple values in a row or column heading so that the rate can be entered just once.
You can enter multiple values only for these row/column selections:
1. Axle Count | 2. Dest. Zip (Full) | 3. PassThruState/Prov |
4. Bill To | 5. Driver ID | 6. Revenue Type 1-4 |
7. Billto Othertypes 1-2 | 8. Driver Terminal | 9. Seniority (months) |
10. Commodity | 11. Driver Type 1-4 | 12. Stop Othertypes1-2 |
13. Commodity Class | 14. Event | 15. Tractor Terminal |
16. Day of Week | 17. Event Type | 18. Trailer Terminal |
19. Dest. Co. (Order) | 20. Orig Co. (Order) | 21. Tractor Type 1-4 |
22. Dest. Company | 23. Origin Company | 24. Trailer Type 1-4 |
25. Dest. State | 26. Origin State | 27. Trip Type |
28. Dest. Zip (3-digit) | 29. Other Type 1-2 |
To use this feature, do the following:
1. Define your rows and/or columns. (To do so, make the appropriate selection in the Rows field and/or Col.’s field in the rate header.)
2. Double-click the heading of the row or column in which multiple values are to be entered. The Multiple Selection window is displayed. It is shown here with sample data:
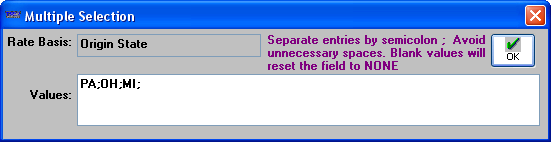
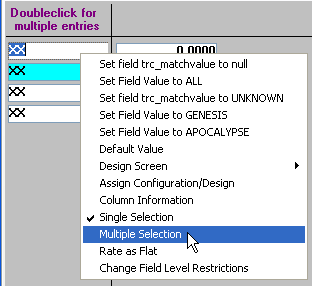
Note: Another way to access the Multiple Selection window is to right click the heading of the row or column. Then select Multiple Selection.
3. Enter the appropriate values. Use a semicolon to separate entries. Do not use spaces.
4. When your entries are complete, click OK. After the Multiple Selection window closes, note that the row or column heading now shows in teal to indicate that multiple values exist. In addition, an asterisk (*) is shown to the left of the first entry. Only the first few entries are visible. For example:

5. In the appropriate cell, enter the rate that applies to all the values you entered.