Parts Catalog master records
The Parts Catalog is the master repository of part records. Before you can charge a part to an order, the part must be added to the Parts Catalog or to the Shop Inventory.
|
Adding parts to a shop’s inventory instead of the Parts Catalog can cause part discrepancies between shops. Trimble recommends that you add parts to the Parts Catalog and not to individual shop inventories. Best practice is to set the |
Using the Parts Catalog:
-
Makes sure that all shops use the same part ID, description, manufacturer, unit of measure, and so on, for a part
-
Provides uniform inventory records for all shops
-
Reduces data entry time when setting up shop inventories
Go to Menu > Masters > Parts Catalog to open the Parts Catalog page.
Layout of the Parts Catalog page
When you open the Parts Catalog, it shows the part with the lowest ID number, such as 00030. The tabs you see depend on the part type.
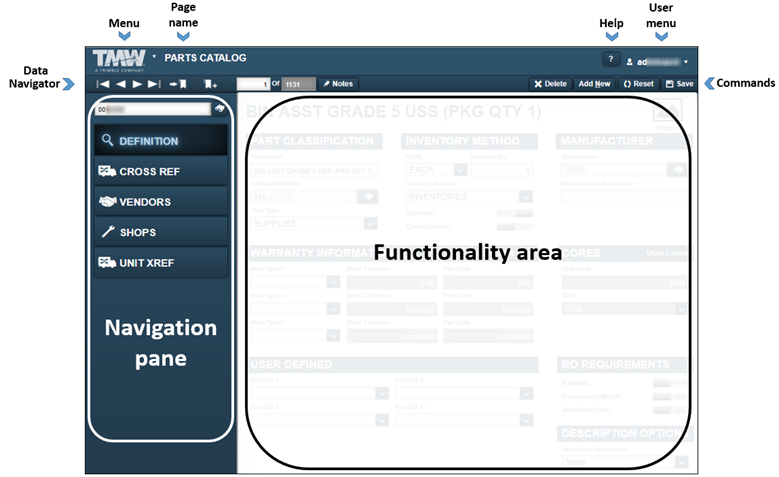
When the displayed part is a standard part, you see these tabs:
-
Definition
-
Cross Ref
-
Vendors
-
Shops
-
Unit Xref
This illustration shows the Parts Catalog page when regular parts are loaded.
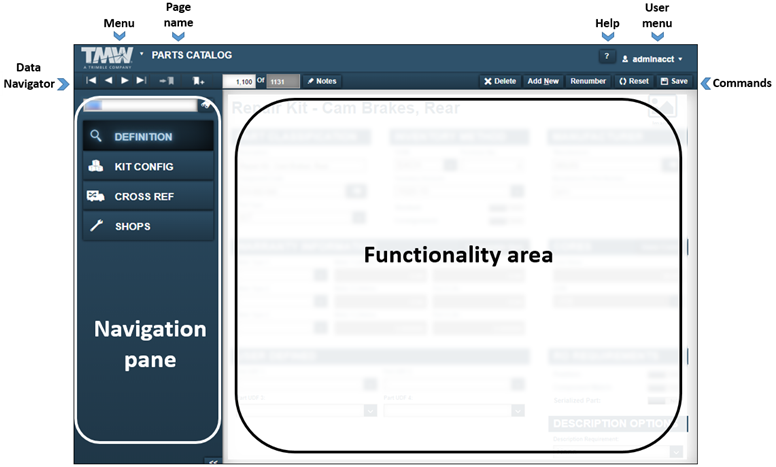
If the part is a kit, you see these tabs:
-
Definition
-
Kit Config
-
Cross Ref
-
Shops
This illustration shows the Parts Catalog page when part kits are loaded.
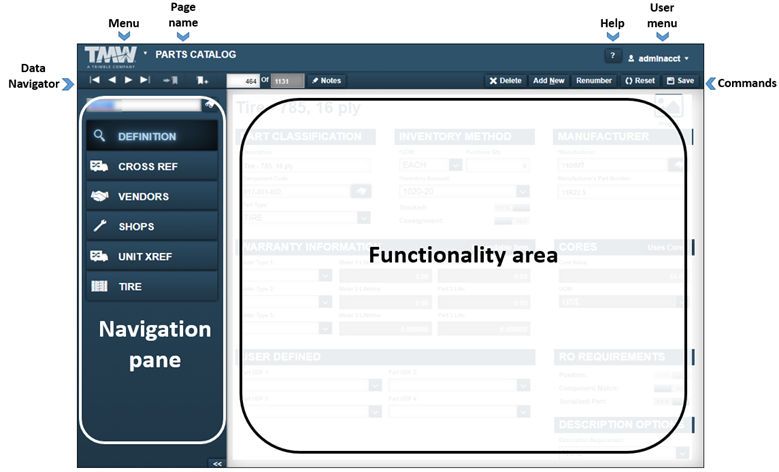
If the part is a tire, these tabs are shown:
-
Definition
-
Cross Ref
-
Vendors
-
Shops
-
Unit Xref
-
Tire
This illustration shows the Parts Catalog page when tires are loaded.
The Parts Catalog page provides easy access to the:
-
Menu that lists application menu items
-
User menu that lists user-specific menu items
-
Command buttons that allow you to delete, add, reset, and save part records
-
Data Navigator used to page through part records
For details, see Searching and navigating the application. -
Functionality area used to enter information into the system
-
Navigation pane that includes the Part lookup field and the
 Search icon
The identification number used to look up a part is user defined. You can enter up to 24 letters and/or numbers in this field. Best practice is to use the OEM part number without any supplier prefix, such as entering 10250Y instead of TL10250Y.
Notes:
-
The identification number can be the manufacturer’s part number or a number used by your company for the part.
-
The part number cannot start with blanks. The system removes any blanks entered on a part automatically.
-
Definition tab
The Definition tab shows eight sections: Part Classification, Inventory Method, Manufacturer, Warranty Information, Cores, User Defined, RO Requirements, and Description Options. Use this tab to include basic information about a part.
This illustration shows the Definition tab sections.

Part Classification section
The Part Classification section shows the part’s description, component code, and part type information.
All fields are required.
| Field | Definition |
|---|---|
Description |
Part’s description |
Component Code |
Component codes are based on the ATA standard component codes for Systems, Assemblies, and Parts on a unit. The codes are developed in three sets of three digits. They are separated by dashes:
|
Part Type |
Classifies the part Valid part types include:
|
Inventory Method
The Inventory Method section allows you to specify inventory method details.
Required field: *
| Field | Definition |
|---|---|
UOM * |
Unit of measure for the part quantity (such as Each, Dozen, Foot) Valid choices are selected from the Length, Quantity, and Volume Units of Measure. |
Purchase Quantity |
Number of parts purchased |
Inventory Account * |
For part transactions to be reflected with period close, all parts must have an account type selected. Notes:
|
Stocked |
Identifies whether the part is a stocked part in inventory Options are:
Notes:
|
Consignment |
Determines whether the part is a consignment part Consignment parts are parts in inventory that are not purchased from the vendor until they are installed on a unit or used. Options include:
Notes:
|
Manufacturer
The Manufacturer section includes fields for the manufacturer name.
Required field: *
| Field | Definition |
|---|---|
Manufacturer * |
Manufacturer’s ID code |
Manufacturer’s Part Number |
Manufacturer’s specified number for the part |
Warranty Information
This section allows you to identify the part as having a warranty.
If the part does not have a warranty, click Expendable Item. The system turns off the fields used to record warranty information.
| Field | Definition |
|---|---|
Meter Type 1, 2, or 3 |
Meter type used to measure warranty information (such as ECM, Odometer, Days, Hour Meter) |
Meter 1, 2, or 3 Lifetime |
Warranty’s duration based on the selected meter type (such as 35,000 miles or 365 days) |
Part 1, 2, or 3 Life |
Number that represents the complete life of a part |
Cores
The Cores section contains the core parts fields: Core Value and UOM (unit of measure). These fields are used only in custom reporting. They have no other function.
The Uses Cores button toggles the Cores fields on and off. The field background color shows whether the fields are in use.
-
Gray background
The fields are turned off.
-
White background
The fields are turned on.
Click Uses Cores to turn the fields off or on, as needed.
| Field | Definition |
|---|---|
Core Value |
Core’s exchange dollar value |
UOM |
Shop’s default currency (such as US$, CN$) |
RO Requirements
The Repair Order Requirements section determines requirements for charging a part on a repair order.
| Field | Definition |
|---|---|
Position |
Determines whether a position is required to charge the part on a repair order (RO) Options are:
Note: To change the value, toggle to the needed option. |
Component Match |
Determines whether the part’s component code must match the component code shown in the repair order section to charge that part out to the repair order For example, if the part component code is 034-001-001, the section component code must be 034 or 034-001 before you can charge the part on that section. Options are:
Note: To change the value, toggle to the needed option. |
Serialized Part |
Determines whether a serial number is required when charging a part to a repair order Options are:
Note: To change the value, toggle to the needed option. |
Description Options
The Description Options section controls when a part description can be changed.
| Field | Definition |
|---|---|
Description Requirement |
Identifies whether the part description can be changed when you charge out the part on a repair order Options are:
|
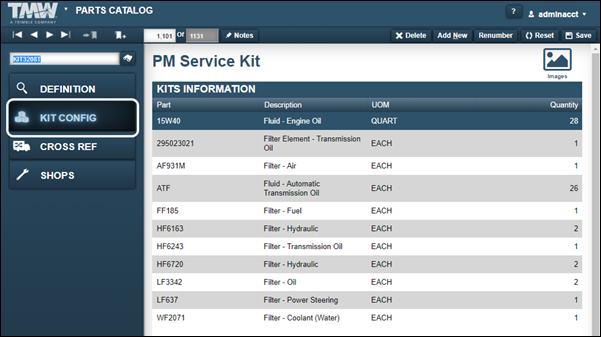
Kit Config tab
The Kit Config tab displays when the selected part is a KIT. It contains the Kits Information section. This section lists the parts that make up this kit and the quantity for each part. Using kits allows you to enter a single part number on an order and charge all the parts that make up the kit as line items on the order automatically.
| You cannot add a kit to a purchase order because kits are made from existing parts in your inventory. You can only add kits to repair orders. |
| Field | Definition |
|---|---|
Part |
Part number |
Description |
Part description |
UOM |
Part’s unit of measure |
Quantity |
Number of parts required for this kit |
Cross Ref tab
The Cross Ref tab contains the Cross Reference Information section. You use it to identify three types of parts: Substitute Parts, Superseded Parts, or Cross-referenced parts.
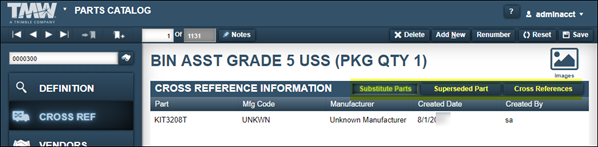
The system allows you to choose between three cross-reference types:
-
Substitute
Substitute parts each have their own part number, but you can use one part to replace another. For example, assume you stock both the Donaldson P55958 lube filter and the Fleetguard LF3000 lube filter. You can mark each filter as a substitute part for the other.When you use a substitute part number on an RO, the program automatically uses the correct part in inventory or shows a list of the parts for that substitute part number. You set up substitute parts in the Parts Catalog.
-
Superseded
A vendor may replace an older part number with a newer one. When you create a part with the new part number, you set it to replace the old number. The old part number then becomes a superseded part.When you select a superseded part number on an order, the program automatically uses the newer part number if it is in the inventory.
-
Cross References
Parts are cross-referenced when you use one part number to cover several similar parts. For example, assume you stock three fuel filters:-
Baldwin BF957
-
Donaldson P550105
-
Fleetguard FF105
You can use Baldwin BF957 as your official shop part number. Then you can cross-reference the Donaldson and Fleetguard filters under it. When you select Baldwin BF957 on an order, you can use any one of the three parts. The order shows the part number Baldwin BF957, no matter which part you used.
All cross-referenced parts use the same part number. If you need to know which specific part was used in an order, you may want to use substitute parts instead.
-
| The system displays the same columns for all three cross-referenced part types. |
| Field | Definition |
|---|---|
Part |
Part number or kit number |
Mfg Code |
Manufacturer’s code or ID |
Manufacturer |
Manufacturer’s name |
Created Date |
Date the cross-reference part was created |
Created by |
User ID of the person who created the cross-reference part |
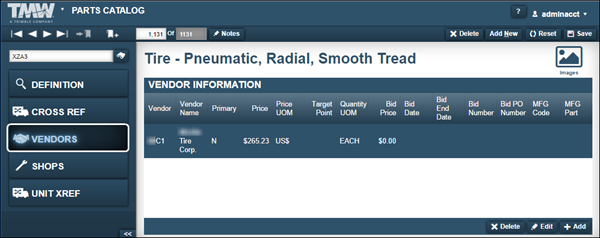
Vendors tab
The Vendors tab includes the Vendor Information section. This tab identifies the vendors from which you purchase this part. When a part is available from multiple vendors, you can identify the preferred vendor as the Primary vendor.
This illustration shows the Vendor Information tab section.
Required field: *
| Field | Definition |
|---|---|
Vendor * |
Vendor’s ID number |
Vendor Name |
Vendor’s name |
Primary |
Identifies a primary (preferred) vendor |
Price |
Amount the vendor charges for the part |
Price UOM * |
Vendor’s default currency (such as US$, CN$) |
Target Point |
Stocking level for the part This value is part of the formula used for reordering parts. |
Quantity UOM * |
Quantity unit of measure (such as Each, Foot, Quart) |
Bid Price |
Vendor’s contractual purchase price for the part Normally part of a contractual agreement. |
Bid Date |
Start date of a part’s contractual purchase price |
Bid End Date |
End date of a part’s contractual purchase price |
Bid Number |
Reference number for the vendor’s pricing contract |
Bid PO Number |
Purchase order number used when purchasing a contracted part from a vendor Referred to as a Blanket PO in the system. |
MFG Code * |
Part manufacturer’s ID Note: The system uses the standard ATA codes for the manufacturer’s ID. |
MFG Part |
Vendor’s specified number for the part |
Shops tab
The Shops tab contains the Shops Information section. The Shops tab includes the last cost, the quantity on hand, and the quantity on order. Use this information to decide how many parts to buy for a shop, or whether parts should be transferred from one shop to another.
This illustration shows the Shops tab.
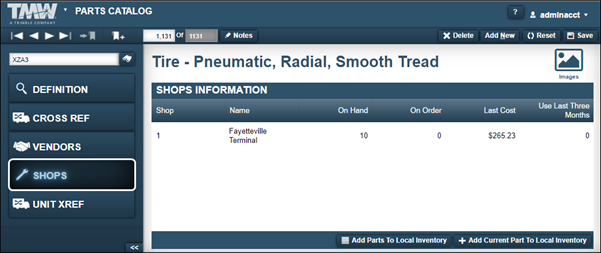
On this tab, you can:
-
Add Parts To Local Inventory
Use this command to populate a Shop Inventory using the Parts catalog. You can select a single part, multiple parts, or all parts. -
Add Current Part To Local Inventory
Use this command to add the selected part record to a Shop Inventory.
| Field | Definition |
|---|---|
Shop |
Shop’s ID |
Name |
Shop’s name |
On Hand |
Number of parts available at the shop |
On Order |
Number of parts on order at the shop |
Last Cost |
Last cost listed for the part |
Use Last Three Months |
Number of times the part was used in the last three months |
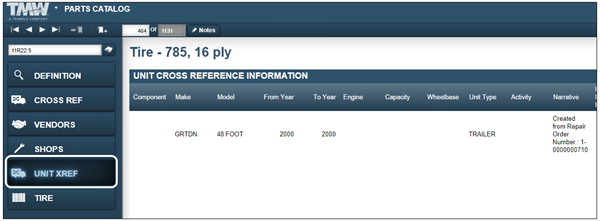
Unit Xref tab
The Unit Xref tab contains the Unit Cross Reference Information section. This page cross-references parts to a group of like units. The Advance Search feature in Shop Inventory uses Unit Cross Reference Information to search for parts used by a group of units. This can be useful to identify parts that are no longer needed and that can be returned as the units are retired.
This illustration shows the Unit Cross Reference Information tab section.
|
The units you can see and use depend on the Application option Before V.2020.3, this Application option was named |
| Field | Definition |
|---|---|
Component |
Part’s component code |
Make |
Unit’s manufacturer |
Model |
Manufacturer’s model number for the unit |
From Year |
First year that this part was used on this unit |
To Year |
Last year that this part was used on this unit |
Engine |
Unit’s engine model |
Capacity |
Maximum amount or number that the unit can receive or contain (such as how much fuel a vehicle holds, and how many pounds a unit can haul) Note: The system recognizes 80000, 80,000, and 80K as three different capacities. |
Wheelbase |
Distance between axles on the unit |
Unit Type |
Describes a vehicle (such as mixer, reefer, forklift, tract, and trailer) |
Activity |
Unit’s purpose The options in this field are user defined field (such as Recycling, Maintenance, Line Haul, Short Haul, Shuttle, etc.). |
Narrative |
Free form text field Use this field enter comments about the unit. |
Tire tab
The Tire tab is activated when the select part’s Part Type is Tire. The Tire tab contains two sections: Tire Information and Tire Depths.
| This tab is available when you are licensed for the Tire Module. |
This illustration shows the Tire tab sections.
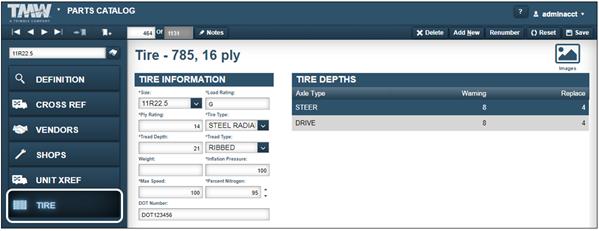
Tire Information
This section displays basic tire information.
Required field: *
| Field | Definition |
|---|---|
Size * |
Size of the tire (such as 11R22.5, 295/75R22.5, 455/50R22.5) |
Load Rating * |
Tire’s maximum load Note: Contact the tire’s manufacturer or dealer for this information. |
Ply Rating * |
Tire’s load, based on the tire’s established pressure Note: Contact the tire’s manufacturer or dealer for this information. |
Tire Type * |
Type of tire (such as Block-lug, Rib or ribbed, Rib-block) |
Tread Depth * |
Tread depth |
Tread Type * |
Type of tread/tread pattern Note: Contact the tire’s manufacturer or dealer for this information. |
Weight |
Tire’s weight Note: Contact the tire’s manufacturer or dealer for this information. |
Inflation Pressure * |
Tire’s suggested pounds per square inch (PSI) |
Max Speed * |
Maximum speed tire is rated to handle Note: Contact the tire’s manufacturer or dealer for this information. |
Percent Nitrogen * |
Percentage of nitrogen inside tire when inflated Note: For solid or pneumatic tires, this value will be zero. |
DOT Number |
Tire’s Department of Transportation compliance number |
Tire Depths
This section displays additional tire information.
All fields are required.
| Field | Definition |
|---|---|
Axle Type |
Identifies which axle types support this tire Note: Your company determines the options available in this field. Examples:
|
Depth Warning |
Tread depth at which the tire should be replaced |
Depth Replace |
Tread depth at which the tire must be replaced |