Shop Inventory master records
Before your company can track parts in the system, you must create part records. The system allows you to set up parts in the Shop Inventory or the Parts Catalog.
-
Shop Inventory
Parts set up in the Shop Inventory are local parts. Parts you set up in the Parts Catalog are not. Local parts are unique to a specific shop. For example, a bumper used on a tractor by a single client. These parts are not synchronized with the Parts Catalog. They do not appear in other shop inventories, unless you add them to that shop’s inventory.Note: As a best practice, Trimble recommends that you set the system to require that parts exist in the Parts Catalog before anyone can add them to the Shop Inventory. To do so, open the Application Options page and toggle the
[Inventory] Allow Local Partsoption to NO. -
Parts Catalog
Parts set up in the Parts Catalog are global parts. These parts are common to all shops, such as 10W30 engine oil. The system lets you add these parts to multiple shop inventories. When you do, all instances of global parts have the same description. When you make changes to the Parts Catalog, the system makes changes to the Shop Inventory automatically.
Go to Menu > Masters > Shop Inventory to open the Shop Inventory page.
Layout of the Shop Inventory page
This illustration shows the Shop Inventory page.
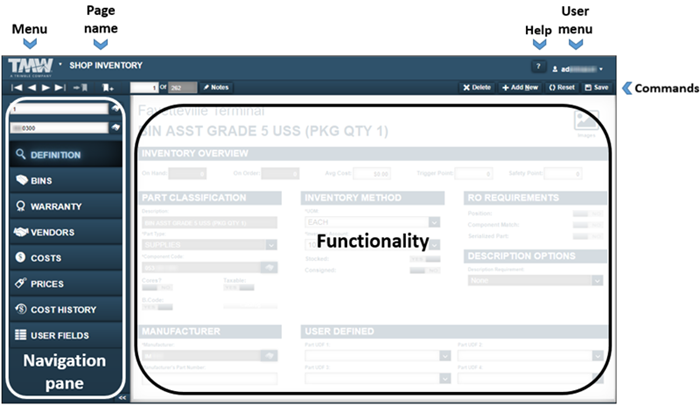
| Pages are designed so that menus and functionality areas appear the same way throughout the application. While some elements are not part of every page, the basic layout of the page is consistent. |
The Shop Inventory page provides easy access to the:
-
Menu that opens the application menu
-
User menu that lists user-specific menu items
-
Command buttons used to Delete, Add, Reset, and Save shop inventory records
-
Functionality area where you enter information into the system
-
Navigation pane includes the Shop and Part lookup fields, and
 Search icons
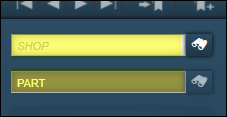
All fields are required.
Field Definition Shop
User defined shop identification number
Enter up to 12 alphanumeric characters.
Part
User defined part identification number (either a user defined number or a manufacturer’s part number)
Enter up to 12 alphanumeric characters.
Notes: . You cannot start a part number with a blank space. The system ignores blank spaces. . The Vehicle Maintenance Reporting Standards (VMRS) component codes are provided in the part records and therefore do not need to be used in the part ID.
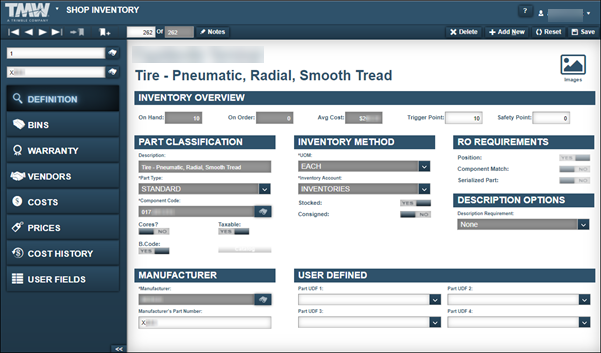
Definition tab
The Definition tab shows the Inventory Overview, Part Classification, Inventory Method, RO Requirements, Description Options, Manufacturer, and User Defined sections.
Inventory Overview
| Field | Definition |
|---|---|
On Hand |
Total quantity of parts currently on hand Notes:
|
On Order |
Total quantity ordered on a purchase order but not received The value in this field is used in the On-Hand Based Reorder formula. |
Avg Cost |
Calculated as total cost divided by total quantity on hand This amount is maintained by the system as the quantity on hand changes. |
Trigger Point |
Amount used to determine when to reorder parts The value in this field is used in the On-Hand Based Reorder formula. |
Safety Point |
The value in this field is used in the On-Hand Based Reorder formula. |
Part Classification
Required field: *
| Field | Definition |
|---|---|
Description |
Part’s description |
Part Type * |
Classifies the part Options include:
|
Component Code * |
Component codes are based on the ATA standard component codes for Systems, Assemblies, and Parts on a unit. The codes are developed in three sets of three digits. They are separated by dashes: XXX: The first three digits represent a system on a unit. This is the highest level of a component. For example, 013 is the component code for brakes. XXX-XXX: The second set of three digits represents an assembly on a unit. For example, 013-001 is the component code for the front brakes and drums. XXX-XXX-XXX: The last three digits represent a part on a unit. For example, 013-001-014 is a front brake shoe. |
Cores |
Identifies whether the part uses cores Options are:
Note: To change the value, toggle to the needed option. |
Taxable |
Determines whether the part is taxed when purchased Options are:
Note: To change the value, toggle to the needed option. |
B.Code (Bar Code) |
Determines whether the system will print barcode labels for ordered parts Options are:
Notes:
|
Catalog/Local |
Indicates where the part was added
|
Inventory Method
Required field: *
| Field | Definition |
|---|---|
UOM * |
Part’s unit of measure (such as Each, Dozen, Gross) |
Inventory Account * |
For part transactions to be reflected with period close, all parts must have an account type selected Notes:
|
Stocked |
Identifies whether the part is a stocked part in inventory Options are:
Notes:
|
Consigned |
Identifies whether the part is a consignment part Options are:
Notes:
|
RO Requirements
| Field | Definition |
|---|---|
Position |
Determines whether a position is required to charge the part on a repair order Options are:
Note: To change the value, toggle to the needed option. |
Component Match |
Determines whether the part’s component code must match the component code shown in the repair order section to charge that part out to the repair order For example, if the part component code is 034-001-001, the section component code must be 034 or 034-001, before you can charge the part on that section. Options are:
Note: To change the value, toggle to the needed option. |
Serialized Part |
Determines whether a serial number is required when charging a part to a repair order Options are:
Notes:
|
Description Options
| Field | Definition |
|---|---|
Description Requirement |
Identifies the part description requirements Options are:
|
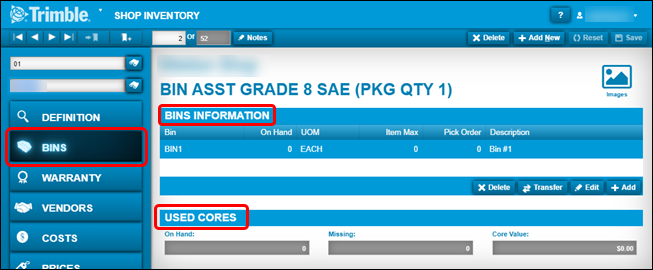
Bins tab
You use bins to track inventory in a shop with greater accuracy. When you run a physical inventory, the count sheets print the bin ID with the part number. In addition, you can run physical inventories for a single bin or range of bins and sort the count sheets by bin ID.
You must include at least one bin when setting up parts in inventory. If you create a part when no default bin exists, the Set Default Bin for Shop ## tab opens. It shows NON-STOCK (N/S) for the default bin ID. You can accept the ID or create a new default ID.
The Bins tab shows two sections:
-
Bins Information
-
Used Cores
Required field: *
| Field | Definition |
|---|---|
Bin |
Bin identification number where this part is stored |
On Hand |
Total parts on hand in the selected bin |
UOM |
Unit of measure for the part quantity (such as Each, Dozen, Gross) You select valid options from the Length, Quantity, and Volume Units of Measure. |
Item Max |
Maximum number of parts the selected bin can hold A zero indicates that there is no maximum established. |
Pick Order |
Determines the order in which you remove parts from inventory. For example, if BIN A has a picking order of 0 and BIN B has a picking order of 1, you remove the part from BIN A first. If BIN A has no parts, then you use BIN B. The bin with 0 as the pick order value is the primary bin. This bin prints on the purchase order when you order parts. Parts with only one bin assigned must have a pick order of 0. |
| A part included in an Open Physical Inventory is not editable. Open Inventory displays in the title bar to indicate that there is an open physical inventory on the part. |
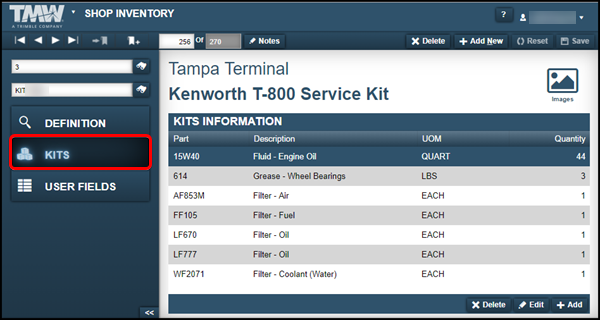
Kits tab
The Kits tab shows the Kits Information section.
| You cannot add a kit to a purchase order because kits are made from existing parts in your inventory. You can only add kits to repair orders. |
| Field | Definition |
|---|---|
Part |
Part number that will be charged out when the Kit number is used on the order Kits are only available for use on repair orders, indirect charges, and direct sale invoices. |
Description |
Part’s description |
UOM |
Unit of measure for the part quantity (such as Each, Dozen, Gross) You select valid options from the Length, Quantity, and Volume Units of Measure. |
Quantity |
Quantity that will be charged out for the part number in the Kit. |
Warranty tab
The Warranty tab shows the Warranty Information section.
Use the Warranty tab to track the part after-market warranty. Enter up to three different meter types for this warranty.
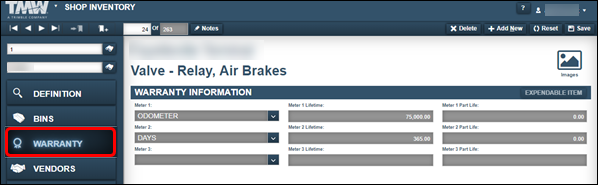
When you select Expendable Item in the Warranty Information section, the Meter Type, Meter Lifetime, and Part Life fields are disabled. As a result, the system does not create warranty records for the part.
| Field | Definition |
|---|---|
Meter 1, 2, or 3 |
Meter type used to measure warranty information (such as Odometer, Days, Hour Meter) Note: You can edit this field in the Shop Inventory only if the part is a local part. Local parts are not entered in the Parts Catalog. |
Meter 1, 2, or 3 Lifetime |
Number that represents the duration of the warranty based on the selected meter type For example, use number of miles for Odometer, and number of days for Days. Note: You can edit this field in the Shop Inventory only if the part is a local part. Local parts are not entered in the Parts Catalog. |
Meter 1, 2, or 3 Part Life |
Tracks the complete life of a part |
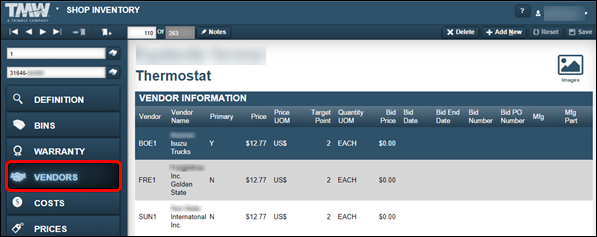
Vendors
The Vendors tab shows the Vendor Information section.
Use this tab to identify the primary and secondary vendors for a part. When you purchase a part from a vendor but no vendor record exists for that part, the system creates a vendor record automatically. The record includes the vendor ID, pricing information, and a target-default value based on the quantity ordered for the first time.
Required field: *
| Field | Definition |
|---|---|
Vendor |
Vendor supplying the part for purchasing Note: For additional information, see |
Vendor Name |
Vendor’s name |
Primary |
Identifies whether this is the primary vendor for this part |
Price |
Vendor’s price for the part Note: For additional information, see |
Price UOM |
Vendor’s default currency (such as US$, CN$) |
Target Point |
Stocking level for the part This value is part of the formula used for reordering parts. Note: For additional information, see: |
Quantity UOM |
Vendor’s part unit of measure based on the price (such as Each, Dozen, Foot) |
Bid Price |
Vendor’s contractual purchase price for the part |
Bid Date |
Start date of the vendor’s contractual purchase price for the part |
Bid End Date |
End date for the vendor’s contractual price of the part |
Bid Number |
Bid reference number for the vendor’s pricing contract |
Bid PO Number |
Purchase order number to be used when purchasing this part from the vendor Note: This is commonly a Blanket purchase order number in the system. |
Manufacturer |
Part manufacturer’s ID Note: The system uses the standard ATA codes for the manufacturer’s ID. |
Manufacturer Part |
Vendor’s specified number for the part |
Costs tab
The system tracks a part’s cost based on the cost of the part when you add it to your inventory. When you add a part to your shop’s inventory, the system adds a row to the Cost Information grid. The row shows the date, quantity, and price for the part received. When you charge a part on an order, the customer’s cost is based on the actual price of the part when you received it, and your inventory method. The Inventory Method is the accounting method you use to determine the part’s base price.
The Cost tab has two sections: Cost Information and Cost Summary.

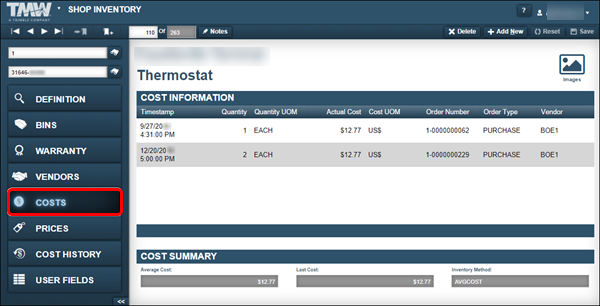
Cost Information
The Cost Information section allows you to view where parts being added and removed from inventory are tracked. The records in this section are for informational purpose and are not editable.
| Field | Definition |
|---|---|
Timestamp |
Date and time the part is added into inventory |
Quantity |
Number of parts remaining in inventory based on the timestamp |
Quantity UOM |
Unit of measure for the part quantity (such as Each, Dozen, Foot) Valid choices are selected from the Length, Quantity, and Volume Units of Measure. |
Actual Cost |
Cost of the part when it was added into inventory |
Cost UOM |
Unit of measure for the charge or price (such as US$, CN$) |
Order Number |
Order number that created the cost line If the cost row was created from a Physical Inventory, the field is blank. |
Order Type |
Order type (Purchase, Transfer, etc.) shown on the order that created the cost line If the cost row was created from a Physical Inventory, the field is blank. |
Vendor |
Vendor listed on the order that created the cost line If the cost row was created from a Physical Inventory, the field is blank. |
Cost Summary
| Field | Definition |
|---|---|
Average Cost |
Calculated as total cost divided by total quantity on hand The system maintains this number as the quantity on hand changes. |
Last Cost |
Last cost of the part |
Inventory Method |
Accounting method used to track inventory within the system Options are:
|
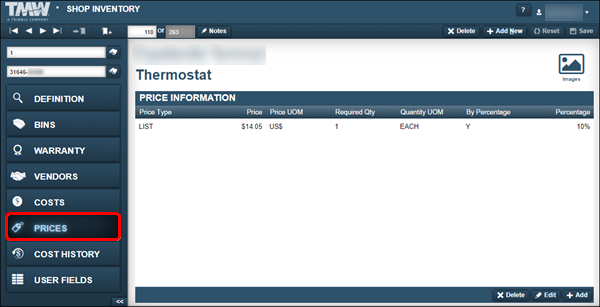
Prices tab
You use part prices to invoice customers for parts or submit parts for warranty consideration. You can specify different price categories such as Retail Pricing, Wholesale Pricing, and Contract Pricing. You can use these categories when setting up Invoice Price Tables for customers and Claims Price Tables assigned to Vendors for use on Warranty Claims.
As an option, the system allows you to specify a price by percentage. When you set By Percentage? to YES, and add a value in the Percentage field, the system applies the percentage to the average cost of the part, creating the new price.
The Prices tab shows the Price Information section.
Required field: *
| Field | Definition |
|---|---|
Price Type * |
User defined category for the price You use part prices when invoicing customers for parts. The system allows different price categories such as Retail Pricing, Wholesale Pricing, Contract Pricing, etc. You can use these categories when setting up Invoice Price Tables for customers. |
Price UOM * |
Unit of measure for the charge or price (such as US$, CN$) |
Quantity UOM * |
Unit of measure for the part quantity (such as Each, Dozen, Foot) You select valid choices from the Length, Quantity, and Volume Units of Measure. |
Required Quantity |
Required quantity of the part that you must order from the vendor |
By Percentage? |
Indicates whether the system is using a percentage of the average cost to create the price for the selected part Notes:
|
Percentage |
Percentage applied to the average cost of the part to calculate the price The system calculates the price as: This calculated price appears on invoices when you create them for the selected price category. |
Price |
Price charged on an invoice when using an Invoice Price Table specifying the price category |
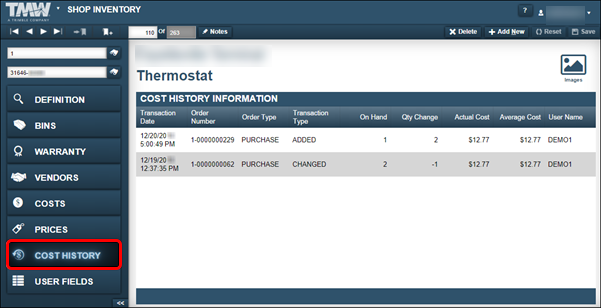
Cost History tab
The Cost History tab allows you to view historical cost data for a part. As the parts in your shop’s inventory change, the system records the changes. It tracks when a part is removed from inventory and when the cost of a part changes.
The Cost History tab shows the Cost History Information section.
| Field | Definition |
|---|---|
Transaction Date |
Date and time when the cost history record changed |
Order Number |
Order number that changed the cost history record Note: If the Order Number and the Order Type fields are blank, a user made a physical inventory adjustment. The quantity or price changed, but that change was not linked to an order. |
Order Type |
Order type (Purchase Order, Repair Order, Invoice, etc.) that changed the cost history record Note: If the Order Number and the Order Type fields are blank, a user made a physical inventory adjustment. The quantity or price changed, but that change was not linked to an order. |
Transaction Type |
How the cost history record changed There are three transaction types:
The transaction type has different meanings depending on the order type. |
On Hand |
Quantity of parts remaining in your inventory |
Qty Change |
Shows a positive or negative change in quantity, based on the number of parts added to or removed from the Cost History Record |
Actual Cost |
Cost of the parts added to or removed from the Cost History Record |
Average Cost |
Average cost for all cost history record changes |
User Name |
System ID of the person who changed the part cost record |