Installing FuelTMS applications
The FuelTMS suite of applications includes Fuel Dispatch, Inventory Services, and the Forecaster Console and Importer Service Consoles.
-
Fuel Dispatch is an add-on application specifically designed for fuel haulers. It serves as an order entry and load planning tool, and leverages the power of TMWSuite’s core system for other functions such as resource management, invoicing, and settlements.
-
Inventory Services is Trimble Transportation’s product monitoring application. Within Inventory Services, stores can be set up to have orders automatically generated (forecasted) by the system. Some stores may prefer to be set up to submit orders only as product is needed. When stores are set up for forecasting, Inventory Services provides information to the Forecaster Console.
-
The Forecaster Console is used by the FuelTMS application to create and update orders automatically. Forecaster Console functions can be applied to all stores, or to subsets of stores that have been grouped into batches.
-
The Importer Service Console is used by FuelTMS to import tank readings and fuel pricing from flat files. It includes the following services:
-
Auto Update Pickup
-
Cache Active Outage Orders
-
FTP Settings Maintenance
-
Importer Service Console
-
Delivery Maintenance Configuration
-
Pricing Maintenance Configuration
-
Reading Maintenance Configuration
Notes:
-
The instructions in this guide apply for versions 2023.x and above for installations of FuelTMS. If you are upgrading an existing installation of FuelTMS, you must uninstall the existing version of Fuel Dispatch and Inventory Services before beginning the procedures for the new installation. For assistance with earlier versions, contact Trimble Transportation Support.
-
Fuel Dispatch, Inventory Services, Forecaster Console, and Importer Service Console are licensed modules of the FuelTMS suite of applications, and must be purchased separately from the base TMWSuite system. For more information, contact your Sales representative.
-
Users granted access to Inventory Services must also have access to TMWSuite’s Order Entry application.
General requirements
Before you begin installing FuelTMS applications, check that these requirements are met:
-
TMWSuite®
Your version of TMWSuite must be the same as your version of the FuelTMS application(s). -
Microsoft® .NET Framework
Install or upgrade to the latest version of the Microsoft .NET Framework on your system. At a minimum, you should have V.4.6.2 installed.
The framework must be installed on the FuelTMS applications server, client, and administrator systems before you install FuelTMS. If it is not present, the system displays an advisory message during the installation. Install the framework before running the application. -
Internet Information Services (IIS) for Microsoft® Windows Server® IIS Microsoft Windows Server 2008 R2 or later
Starting in V.2025.3, IIS Microsoft Windows Server 2016 R2 or later -
Microsoft® SQL Server® Microsoft SQL Server 2014 or later
Starting in V.2025.3, SQL Server 2016 is the base starting server.
Note: SQL Server 2016, SQL Server 2017, SQL Server 2019, SQL Server 2022 are supported. Trimble recommends using the latest service pack of whichever version you use.
-
You must be logged into the system where you want to install the FuelTMS applications, and have administrator rights for that system.
Like most applications, FuelTMS applications can be installed locally on a user’s system. It is also possible to install FuelTMS applications on a network drive. To do so, you must be logged into the system where the drive is physically located, and have administrator rights for that system.
-
SQL Server System Administrator rights are necessary.
The installation of FuelTMS applications includes the manual application of a SQL script to the TMWSuite database. You must have a SQL Server administrator login and password to apply it.
Hardware requirements
This section lists hardware requirements and recommendations for the FuelTMS applications.
Server F1-F2: Terminal Server or Citrix
The actual quantity of concurrent users at peak workload and desire for redundancy is what determines the quantity and size of the Terminal or Citrix servers deployed. Both Remote Desktop Services (RDS) and Citrix virtualize well and require no specific change to the resources. For full desktop or VDI environments take extra care to ensure that the resources listed below are available in addition to the ancillary applications required to support the users' applications.
Memory guidelines
A conservative rule of thumb is to reserve 750MB of memory for each active session on either RDS or Citrix when using RemoteApp or published applications. Reserve the lesser of 4GB or 10% of the total memory for the operating system, and then provide additional memory for other ancillary applications as required by the software vendor. This assumes each user runs only one copy of the software.
| Total RAM on Server | 16 GB | 32 GB | 64 GB |
|---|---|---|---|
Reserved for OS |
4 GB |
4 GB |
6 GB |
Reserved for ancillary |
Consult vendors' requirements |
||
Available RAM |
12 GB |
28 GB |
60 GB |
MB Each |
750 MB |
750 MB |
750 MB |
Total User Capacity |
16 Users |
38 Users |
81 Users |
Processor guidelines
A study of existing customers' utilization shows that for systems with moderately heavy usage, (being conservative) it is reasonable to expect five to seven users per core. Emphasis should be placed on purchasing processors with high single thread performance to provide an acceptable user experience. Generally, this means current-generation processors running at least 2.6GHz for Intel and 3.2GHz for AMD.
| Cores | 1 | 2 | 4 | 8 | 16 |
|---|---|---|---|---|---|
Users |
5 |
11 |
24 |
52 |
112 |
Note: Power saving settings should be disabled and Hyper-Threading enabled in the BIOS to avoid significant performance impacts. When virtualizing, take care to prevent excessive oversubscription, a relatively safe target is 1.5 vCPU for each physical core (do not count Hyper-Threading).
Network card guidelines
A single 1 GbE network card is sufficient for most deployments, but 10GbE is recommended for virtualized systems or any environment expected to scale to larger sizes. Network card teaming is advisable for any hardware supporting more than 30 users to provide redundancy and additional bandwidth. Avoid teaming within the OS of a virtual machine. Care must be taken to ensure that all switches between the RDS/Citrix server and the SQL Server support the full bandwidth of the link without saturation.
Proximity guidelines
RDS and Citrix servers must be located in the same Data Center as the SQL Server and round trip latency should remain below 1ms latency. They must also be on the same subnet with a local and responsive domain controller. Round trip times between the client workstation and RDS or Citrix servers should be consistently less than 75ms. Lower the better for performance however up to 150ms can be used with notable delays in responsiveness.
User quantity guidelines
Full desktops will require considerably more resources to support a typical office user with an email client, browser, etc. Consult the other software providers' resources and the appropriate VDI guidelines for suggested resources necessary to support the entire workload at peak capacity and add the resources listed above.
Scenario: 30 Users
In this scenario, there are only 30 users in a company using RDS, Citrix RemoteApp, or published applications. This would require only one server to host the environment, but two are recommended for redundancy.
| Example 1 (without redundancy) 30 Users/1 Server | Example 2 (with redundancy) 30 Users/2 Servers | |
|---|---|---|
Operating System |
Windows 2012 R2 Standard |
|
CPU |
6 cores |
4 cores |
RAM |
26 GB |
24 GB |
Hard Disk Size |
150 GB+ |
150 GB+ |
Network Card |
1 GbE |
Server G: Windows Services (Agents) Server #1
This server runs Windows Services, which are used to communicate with devices and customers outside of the company firewall. It is required only for those with Mobile Communications units or Electronic Data Transfer agreements.
| Number of Users | 1-50 | 51-100 | 101-150 | 150+ |
|---|---|---|---|---|
Operating System |
Windows Server 2008, 2008 R2, 2012, 2012 R2 Note: Windows Server 2016 is not supported. |
For custom configuration specifications, contact a Trimble Transportation Optimization representative. |
||
CPU |
4 cores |
6 cores |
8 cores |
|
RAM |
12 GB |
24 GB |
48 GB |
|
Hard Disk Size |
350 GB |
500 GB |
750 GB |
Installation Quick Reference
Installation procedures include:
-
Download the FuelTMS installation files.
-
Install the Fuel Dispatch application, if you are licensed for it.
Note: If you want to install only the Fuel Dispatch application, follow the steps in these sections:
-
Install the Inventory Services application, if you are licensed for it.
-
Install the Forecaster Console and/or Importer Service Consoles, if you are licensed for Inventory Services.
Note: The Forecaster Console and Importer Service Console are Inventory Services features.
-
If you are installing Fuel Dispatch only, do not install either console.
-
If you are installing both Fuel Dispatch and Inventory Services, you can install either the Forecaster Console or the Importer Service Console, or both.
-
-
Apply the DBMOD SQL script to the TMWSuite database.
Note: The DBMOD SQL updates the TMWSuite database for use with FuelTMS. Even if you are using only Inventory Services, the SQL must be applied.
-
Set up your TTS50.
-
Set up the Forecaster Console.
-
Set up the Importer Service Console.
-
Set up trailer compartment configurations.
Upgrade Quick Reference
Upgrade procedures include:
-
Uninstall your current Fuel Dispatch and/or Inventory Services application.
-
Download the FuelTMS installation files.
-
Install the Fuel Dispatch application, if you are licensed for it.
Note: The DBMOD SQL updates the TMWSuite database for use with FuelTMS. Even if you are using only Inventory Services, the SQL must be applied.
-
Install the Inventory Services application, if you are licensed for it.
-
Install the Forecaster Console and/or Importer Service Consoles, if you are licensed for Inventory Services.
-
Apply the DBMOD SQL script to the TMWSuite database.
-
Update your TTS50 with new settings.
-
Set up trailer compartment configurations.
Uninstalling Fuel Dispatch and Inventory Services
It is highly recommended that you uninstall Fuel Dispatch and/or Inventory Services before upgrading to a new version. You can do either of the following:
-
Run the .MSI file that you used to install the current version. The file will detect the installed version and provide an option for removing the software.
-
Use the Add or Remove Programs feature in your Windows Control Panel.
Notes:
-
You must use the same .MSI file to uninstall as you used to install the application. The .MSI file checks the version and build level. If you do not have the correct file, use the Control Panel to uninstall Fuel Dispatch.
-
You do not uninstall the Forecaster or Importer consoles.
Uninstalling using the .MSI file
To uninstall Fuel Dispatch or Inventory Services using the .MSI file, follow these steps.
-
Double-click the FuelDispatchInstall.msi or InventoryServicesInstall.msi file.
-
In the Setup Wizard, select Remove Fuel Dispatch or Remove Inventory Services.
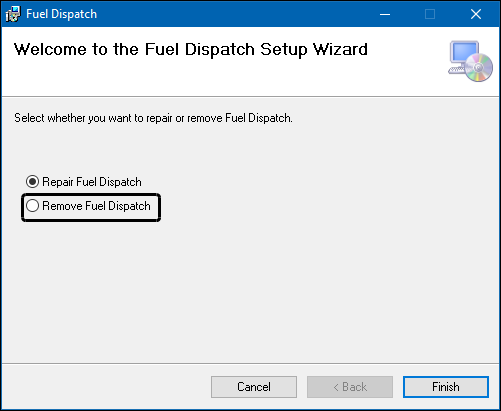
-
Click Finish.
Note: If you select Repair Fuel Dispatch or Repair Inventory Services, the application will be reinstalled when you click Finish.
-
In the Installation Complete window, select Close.
Uninstalling through the Control Panel
To uninstall Fuel Dispatch or Inventory Services through the Control Panel, follow these steps.
Note: These instructions are based on using Windows 10 as your operating system. If you are using a different version of Windows, you should consult its user documentation for instructions.
-
In the Control Panel, do one of the following:
-
If you have the Control Panel View By field set to Category:
-
Double-click Programs.
-
Under Programs and Features, select Uninstall a program.
-
-
If you have the Control Panel View By field set to Small icons or Large icons, click Programs and Features.
-
-
In the Programs and Features window, select Fuel Dispatch or Inventory Services.
-
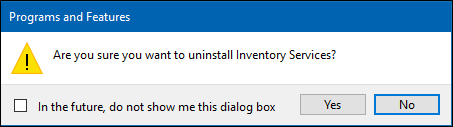
Click Uninstall.

-
In the confirmation message, select Yes.
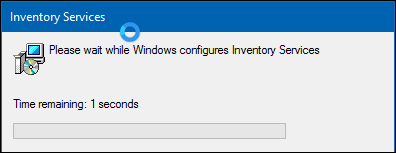
-
A window opens to indicate the time remaining. When the uninstall procedure completes, the window closes automatically.
-
Close the Programs and Features window and the Control Panel.
Downloading the FuelTMS installation files
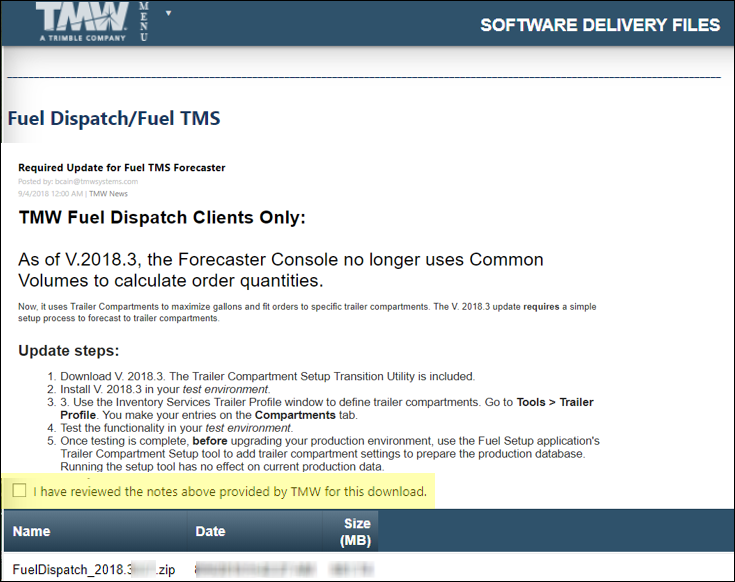
Whether you are installing only Fuel Dispatch or Fuel Dispatch, Inventory Services, and the Forecaster and Importer consoles, you download the FuelTMS installation files from the ClientCenter. You will find them in the Build Delivery section. Use the Line of Business, Product, and Build lists to locate the FuelTMS build that you want to download. The build files appear below the download filters.
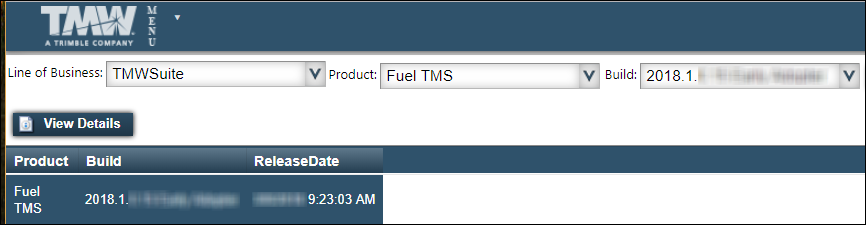
Click on the row for the build you want, and then click View Details.
On the Software Delivery Files page, select the I have reviewed the notes above provided by TMW for this download check box. Click Download next to the FuelTMS .zip file. This file contains all the folders, application files, and SQL scripts necessary to configure and install the FuelTMS applications.
Note: Fuel Dispatch and Inventory Services each have their own online help systems. Release notes are included in the online help.
Typically, the download will include these files:
| File | Contents |
|---|---|
ForecasterConsoleInstaller.msi |
File for installing the Forecaster Console |
FuelDispatchInstall.msi |
File for installing the Fuel Dispatch application |
FuelINISettings.ini |
Settings that must be copied to your TMWSuite TTS50 |
ImporterServiceConsoleInstaller.msi |
File for installing the Importer Service Console |
Inventory ServicesInstall.msi |
Files for installing the Inventory Services application |
Use an application such as WinZip or 7-Zip to extract the files from the .ZIP file and save them to the current folder, or to another location on your computer or network.
Notes: For more information about downloading files from ClientCenter, see "Downloading product updates" in the ClientCenter online help.
Providing telemetry data to Trimble Transportation
If you are a system administrator for the application, the first time you log in you will see the Application Telemetry window. By default, the feature is enabled.
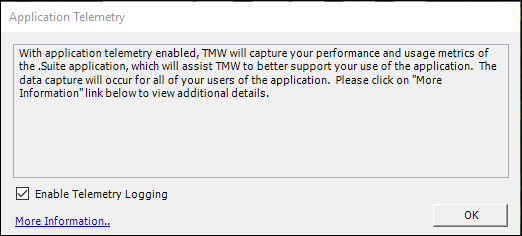
It gathers data on how you use the system and how the system is performing:
-
Actions user perform, such as opening windows, clicking icons and buttons, and their responses to errors
-
How quickly the system performs functions, such as saving and loading trips, opening a window, and retrieving records in a data grid
-
Environment information, such as the application version, database SQL level, user name, license values, machine statistics, and operating system version
This information helps Trimble Transportation to identify potential problems and plan improvements.
Because the information is sent using the store-and-forward method when the machine has open cycles, there is no drain on performance.
If you want to see the type of data retrieved, click More Information. A second, read-only window opens.
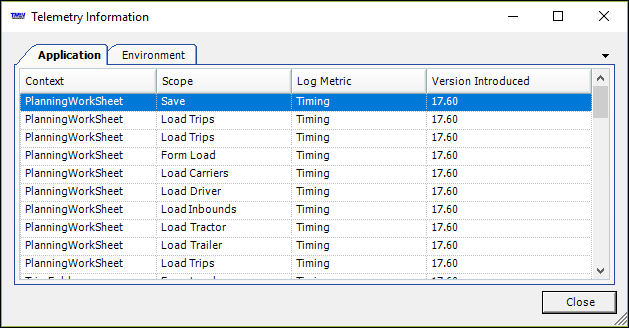
The Application tab shows:
-
The type of data being retrieved
-
Where it originates
-
The type of metric that uses it
-
Which version of the application each data type was first available for tracking
The Environment tab shows:
-
The machine name
-
The operating system
-
The user’s name
-
The IP address
-
The physical location (city, state/province, Country/Region)
Do one of the following:
-
If you want to share data, leave the Enable Telemetry Logging check box selected.
-
If you do not want to share data clear the Enable Telemetry Logging check box.
Your choice is applied and the Application Telemetry window is not shown the next time you log into the application. However, if you later decide to stop or start sharing data, you can do so. Go to Help > Application Telemetry to access the Application Telemetry window. Clear or select the Enable Telemetry Logging check box.
Installing Fuel Dispatch
If you are licensed for the Fuel Dispatch module, follow these steps to install Fuel Dispatch.
Note: If you are upgrading to a new version of Fuel Dispatch, you must uninstall the old version first.
-
Go to the folder where you extracted the ZIP file you downloaded from ClientCenter.
-
Double-click the FuelDispatchInstall.msi file.
-
In the Fuel Dispatch Setup Wizard window, click Next to continue.
Note: Most installation windows include a Back button and a Cancel button. You can use these buttons at any time to return to the previous window, or to cancel the installation.
-
In the Select Installation Folder window, the Folder field defaults to the path where the Fuel Dispatch files will be installed.
Note: To install to a different folder, click Browse and go to the folder where you want to install Fuel Dispatch.
-
To specify who will have access to the application, select the appropriate radio button:
-
Everyone
If other users will be accessing the application from this computer. -
Just me
If you will be the only person accessing the application from this computer.
-
-
Click Next to continue.
-
In the Confirm Installation window, click Next.
-
In the Continue window, click Next.
The Installing Fuel Dispatch window indicates the progress of the installation, which may take a few minutes.
-
When the process is done, the Installation Complete window is displayed. Click Close.
The
 shortcut should appear on your desktop.
Installing TMW Crystal Reports Redistributable
Fuel Dispatch comes with default driver, trip, and company reports. You can run these reports from the Card Planner, the Planning Worksheet, and the Reports window. To use them, you must install the TMW Crystal Reports Redistributable.
Note: The TMW Crystal Reports Redistributable is also required when using SQL Server Reporting Services (SSRS) to generate the default reports. Contact Trimble Systems Business Intelligence at [email protected] for assistance.
-
Go to the folder where you extracted the ZIP file you downloaded from ClientCenter.
-
Double-click the TmwCrystalRedistributable.msi.
-
In the TMW Crystal Reports Redistributable Setup Wizard window, click Next to continue.
Note: Most installation windows include a Back button and a Cancel button. You can use these buttons at any time to return to the previous window, or to cancel the installation.
-
In the Select Installation Folder window, the Folder field defaults to the path where the TMW Crystal Reports Redistributable files will be installed.
Note: To install to a different folder, click Browse and go to the folder where you want to install TMW Crystal Reports Redistributable.
-
To specify who will have access to the application, select the appropriate radio button:
-
Everyone
If other users will be accessing the application from this computer. -
Just me
If you will be the only person accessing the application from this computer.
-
-
Click Next to continue.
-
In the Confirm Installation window, click Next.
-
In the Installation Complete window, click Close.
-
Ensure the TTS50 reporting settings are correct. See Updating the TTS50 for reporting.
Installing Inventory Services
Follow these steps to install Inventory Services.
| If you are upgrading to a new version of Inventory Services, you must uninstall the old version first. |
-
Go to the folder where you extracted the ZIP file you downloaded from ClientCenter.
-
Double-click the InventoryServicesInstall.msi file.
-
In the Inventory Services Setup Wizard window, click Next to continue.
Note: Most installation windows include a Back button and a Cancel button. You can use these buttons at any time to return to the previous window, or to cancel the installation.
-
In the Select Installation Folder window, the Folder field defaults to the path where the Inventory Services files will be installed.
Note: To install to a different folder, click Browse and go to the folder where you want to install Inventory Services.
-
To specify who will have access to the application, select the appropriate radio button:
-
Everyone
If other users will be accessing the application from this computer. -
Just me
If you will be the only person accessing the application from this computer.
-
-
Click Next to continue.
-
In the Confirm Installation window, click Next.
-
In the Installation Complete window, click Close.
The
 shortcut should be displayed on your desktop.
Viewing results of TMW’s Inventory Count Pre-flight application
Inventory Services is a licensed module of the FuelTMS suite of applications. The Inventory Services forecaster function generates fuel orders automatically, based on a store’s fuel sales data, tank readings, and fuel delivery data.
Setting the forecaster to manage a store’s inventory requires licensing. You must have a license for every store you want to set as a forecasted site. The number of managed stores should not exceed the number of forecaster licenses in your database.
Note: TMW’s Store Inventory Count Pre-flight application (InvServLicenseCheck.exe) performs a license check prior to the installation of Fuel TMS. For more information, contact your Trimble Support Team.
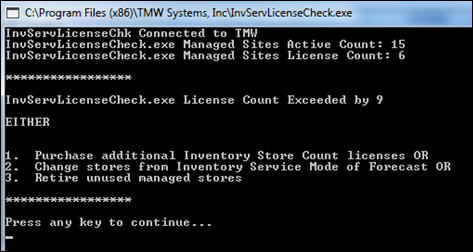
The application counts the number of forecaster locations and licenses in your database and reveals the numbers as follows:
-
Managed Sites Active Count
This count represents the number of forecaster stores listed in your database.
-
Managed Sites License Count
This count represents the number of forecast licenses available in your database.
A valid license count occurs when the store count is equal to or less than the license count. In this illustration, the store and license counts are the same. The user has valid licensing for the number of managed sites listed in the database.

When the active store count exeeds the license count, the application issues a warning message that identifies the discrepancy and the options available to resolve the issue.
-
InvServLicenseCheck.exe License Count Exceeded by 9
-
EITHER
-
Purchase additional Inventory Store Count licenses OR
-
Change stores from Inventory Service Mode of Forecast OR
-
Retire unused managed stores
Installing the Forecaster Console and Importer Service Console
Used by clients who deliver fuel to gas stations, the Forecaster Console generates orders automatically based on a store’s historical sales data, actual inventory readings, and delivered product data. The Forecaster Console functions can be applied to all stores, or to subsets of stores that have been grouped into batches.
The Importer Service Console imports tank readings and fuel pricing data from flat files. It includes the following services:
-
Auto Update Pickup
-
Cache Active Outage Orders
-
FTP Settings Maintenance
-
Importer Service Console
-
Pricing Maintenance Configuration
-
Reading Maintenance Configuration
Note:
-
The Forecaster Console and Importer Service Console are Inventory Services features. If you are installing Fuel Dispatch only, do not install either console. If you are installing both Fuel Dispatch and Inventory Services, you can install either the Forecaster Console or the Importer Service Console, or both.
Creating users to represent the Forecaster Console and Importer Service Console
When you check logs in Fuel Dispatch or Inventory Services, you can easily identify operations performed by the Forecaster Console.
To identify database changes made by the Forecaster Console when it is run as a Windows scheduled task, you create a virtual user in System Administration before installing the Forecaster Console. A virtual user account is one for which an actual user does not exist. The virtual user login ID and password create a connection between the Forecaster Console and the TMWSuite database. If you use an existing user account to set up the connection, you cannot tell whether an operation was performed by the user or by the scheduled task.
Before installing the Importer Service Console, you should also create the Importer virtual user in System Administration. The virtual user login ID and password will create a connection between the Importer Service Console and the TMWSuite database.
Note: For more information about creating users, see:
System Administration | Establishing User Profiles on the Learning Center.
To create user accounts to represent the Forecaster Console and Importer Service Console, follow these steps.
-
Log into the TMWSuite System Administration application with administrator rights.
-
In the frame toolbar, click
 User to display the User Maintenance window.
 -
After logging in, click
Profile in the sheet toolbar. -
In the Edit User Profiles window, enter the user’s Login ID and Password.
Note: For example, for the Forecaster Console, enter Forecaster for both the login ID and password. For the Importer Service Console, enter Importer for both the login ID and the password.
-
To give system administrator rights to the user, select Yes in the System Administrator field.
-
Click
 to add the user record, and then close the Edit User Profiles window.
 -
In the User List, locate and select the new user.
-
In the Applications list, click
 Insert.
 -
In the Select module(s) to add list, select the following:
-
File Maintenance
-
Order Entry
-
FuelDispatch
-
-
Click OK.
-
If you are using the Importer Service Console, repeat Steps 3 through 10 to create a user to represent the Importer Service Console.
-
Exit the System Administration application.
-
Verify that:
-
A TTS50 file exists for the console.
-
A TTSLocal INI file exists for the user
-
The path to the user’s TTSLocal INI file appears in the [INIPath] section of your TTS50.
Make a note of the names and paths for both INI files.
-
Installing the Forecaster Console
Follow these steps to install the Forecaster Console for the first time.
-
Go to the folder where you extracted the ZIP file you downloaded from ClientCenter.
-
Double-click the ForecasterConsoleInstaller.msi file.
-
In the Welcome window, click Next to continue.
Note: Most installation windows include a Back button and a Cancel button. You can use these buttons at any time to return to the previous window, or to cancel the installation.
-
In the Select Installation Folder window, the Folder field defaults to the path where the Forecaster Console files will be installed.
Note: To install to a different folder, click Browse and go to the folder where you want to install the Forecaster Console.
-
To specify who will have access to the application, select the appropriate radio button:
-
Everyone
If other users will be accessing the application from this computer.
-
Just me
If you will be the only person accessing the application from this computer.
-
-
Click Next to continue.
-
In the Confirm Installation window, click Next.
-
In the Installation Complete window, select Close.
Installing the Importer Service Console
Follow these steps to install the Importer Service Console for the first time.
-
Go to the folder where you extracted the ZIP file you downloaded from ClientCenter.
-
Double-click the ImporterServiceConsoleInstaller.msi file.
-
In the Welcome window, click Next to continue.
Note: Most installation windows include a Back button and a Cancel button. You can use these buttons at any time to return to the previous window, or to cancel the installation.
-
In the Select Installation Folder window, the Folder field defaults to the path where the Importer Service Console files will be installed.
Note: To install to a different folder, click Browse and go to the folder where you want to install the Importer Service Console.
-
To specify who will have access to the application, select the appropriate radio button:
-
Everyone
If other users will be accessing the application from this computer.
-
Just me
If you will be the only person accessing the application from this computer.
-
-
Click Next to continue.
-
In the Confirm Installation window, click Next.
-
In the Installation Complete window, select Close.
Providing connection information to the Forecaster Console
By default, the ForecasterConsole.exe file is located in the Forecaster Console folder. This file is used to:
-
Create a connection to the TMWSuite database
The first time you run ForecasterConsole.exe, you must supply information the Forecaster Console needs to connect to the TMWSuite database. This information is recorded in the connection.txt file.
-
Run the Forecaster Console
After the connection.txt file has been created, you run ForecasterConsole.exe with a parameter list to create and update orders, update sales models, etc.
To record connection information for the Forecaster Console in the connection.txt file, follow these steps.
-
In Windows Explorer, go to the ForecasterConsole folder.
-
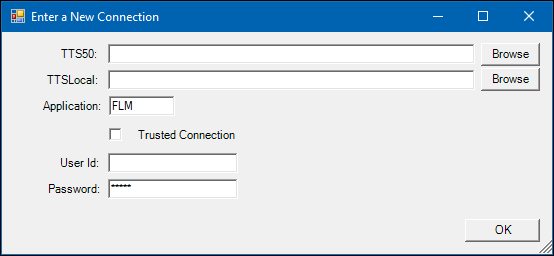
Double-click on the ForecasterConsole.exe file. The Enter a New Connection window opens:
-
Complete the fields as described below for the Forecaster virtual user, or for an actual user.
TTS50 |
Click Browse and go to the folder where the TTS50 file for the Forecaster Console user is located. Select the TTS50 file. |
TTSLocal |
Click Browse and go to the folder where the TTSLocal.ini file for the Forecaster Console user is located. Select the local .INI file. |
Application |
Accept the default of FLM. |
Trusted Connection |
If the user’s TMWSuite login relies on Windows/NT authentication rather than a SQL Server login, select the Trusted Connection check box. The User Id and Password fields will be grayed out. Otherwise, leave this check box cleared. |
User Id |
If the Trusted Connection check box is cleared, the User Id field is active. Enter the user’s login ID. |
Password |
If the Trusted Connection check box is cleared, the Password field is active. Enter the user’s password. Note: If you created a user for the Forecaster Console, enter that user’s password. For more information, refer to the xref:CreatingUsersForConsoles[Creating users to represent the Forecaster Console and Importer Service Console] section. |
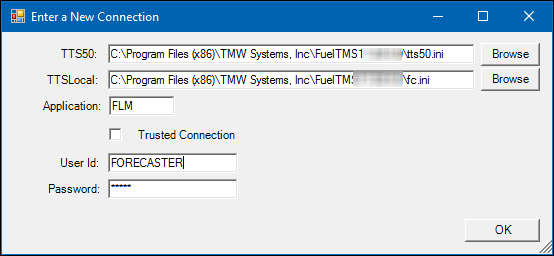
The completed window should resemble this example:
-
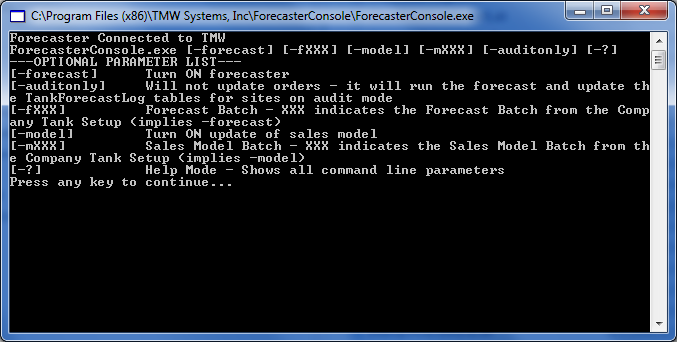
Click OK. The Enter a New Connection window closes. The command window displays the available option list for the ForecasterConsole.exe file.
-
Press any key to close the command window.
Notes:
-
You must perform these steps for every location where you copied the Forecaster Console folder.
-
If the connection.txt file has been deleted from a location, you must repeat these steps to recreate the file.
Providing connection information to the Importer Service Console
By default, the ImporterServiceConsole.exe file is located in the Importer Service Console folder. This file is used to:
-
Create a connection to the TMWSuite database.
The first time you run ImporterServiceConsole.exe, you must supply information the Importer Service Console needs to connect to the TMWSuite database. This information is recorded in the connection.txt file.
-
Run the Importer Service Console.
After the connection.txt file has been created, you run ImporterServiceConsole.exe with a parameter list to import tank readings and fuel pricing data from flat files.
To record connection information for the Importer Service Console in the connection.txt file, follow these steps.
-
In Windows Explorer, go to the Importer Service Console folder.
-
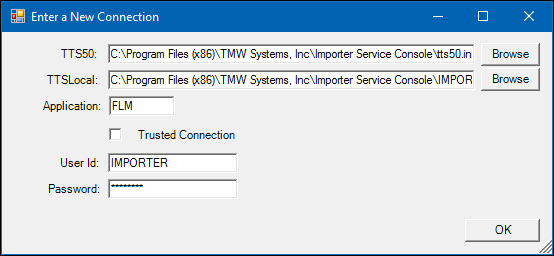
Double-click on the ImporterServiceConsole.exe file. The Enter a New Connection window opens:
-
Complete the fields as described below for the Importer virtual user, or for an actual user.
TTS50 |
Click Browse and go to the folder where the TTS50 file for the Importer Service Console user is located. Select the TTS50 file. |
TTSLocal |
Click Browse and go to the folder where the TTSLocal.ini file for the Importer Service Console user is located. Select the local .INI file. |
Application |
Accept the default of FLM. |
Trusted Connection |
If the user’s TMWSuite login relies on Windows/NT authentication rather than a SQL Server login, select the Trusted Connection check box. The User Id and Password fields will be grayed out. Otherwise, leave this check box cleared. |
User Id |
If the Trusted Connection check box is cleared, the User Id field is active. Enter the user’s login ID. |
Password |
If the Trusted Connection check box is cleared, the Password field is active. Enter the user’s password. Note: If you created a user for the Importer Service Console, enter that user’s password. For more information, see xref:CreatingUsersForConsoles[Creating users to represent the Forecaster Console and Importer Service Console]. |
The completed window should resemble this example:
-
Click OK. The Enter a New Connection window closes. The command window displays the available option list for the ImporterServiceConsole.exe file.
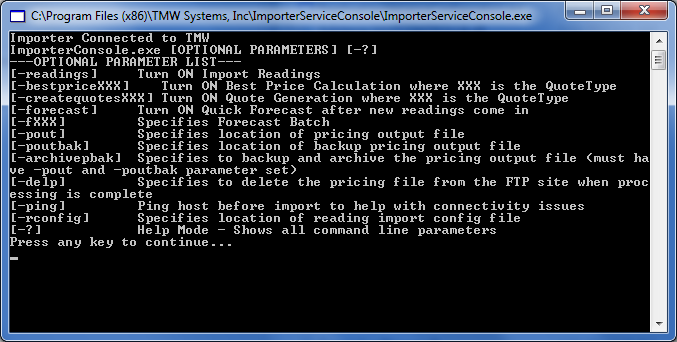
-
Press any key to close the command window.
Notes:
-
You must perform these steps for every location where you copied the Importer Service Console folder.
-
If the connection.txt file has been deleted from a location, you must repeat these steps to recreate the file.
Applying the SQL scripts to the TMWSuite database
When you install Fuel Dispatch, a sub folder containing the DBMod.sql SQL script is created in the Fuel Dispatch program folder. You must apply the SQL script in the DBMod.sql file against the TMWSuite database that will be used with Fuel Dispatch.
Note: This procedure requires a SQL Server administrator login and password for the TMWSuite database.
-
In the Fuel Dispatch folder, locate the SQL sub folder.
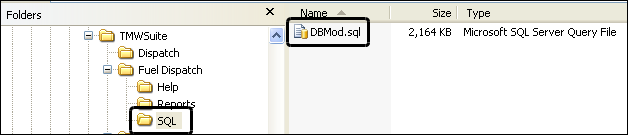
-
Using a tool such as Microsoft SQL Management Studio, run the DBMod.sql script against your TMWSuite database.
| When the SQL file is applied to your database, you should see a message stating, "Query executed successfully." If a message states that the query executed with errors, do not move on to the next part of the installation process. Contact your Trimble support representative for assistance. |
Setting up your TTS50 and TTSLocal INI files
After you save the TTS50 and TTSLocal INI files to a specific folder, you must update the TTS50 file with several groups of settings that are specific to the FuelTMS applications.
Where to store the TTS50 and TTSLocal INI files
By default, the Trimble Transportation applications, including Fuel Dispatch, are installed in the
C:\Program Files (x86)\TMW Systems, Inc\TMWSuite\ folder. You can store the TTS50 and TTSLocal INI files in that folder, or in another location.
-
If you accepted the default installation location, you can save the files directly in the C:\Program Files (x86)\TMW Systems, Inc\TMWSuite\ folder.
-
If your Trimble Transportation applications reside in the C:\Program Files\TMW Systems, Inc\TMWSuite\ folder, and you installed Fuel Dispatch at that location, you can save the files there.
-
If your TMW applications reside in the C:\TMWSuite\ folder, and you installed Fuel Dispatch at that location, you can save the files there.
Note: If you use separate TTS50 files for TMWSuite and Fuel Dispatch, store the TTS50 and TTSLocal files used for Fuel Dispatch in the Fuel Dispatch sub-folder. For example:
-
C:\Program Files (x86)\TMW Systems, Inc\TMWSuite\Fuel Dispatch\
-
C:\Program Files\TMW Systems, Inc\TMWSuite\Fuel Dispatch\
-
C:\TMWSuite\Fuel Dispatch\
Editing the TTS50 file
When you install Fuel Dispatch, the FuelINISetings.ini file is created in your Fuel Dispatch program folder. This INI file contains several groups of settings that must be copied to your TMWSuite TTS50. Follow these steps to copy the settings to your TTS50 file.
-
Using a text editor, open the FuelINISettings.ini file and your TTS50 side-by-side.
-
In the FuelINISettings.ini file, copy each of the following sections and all the settings in each section to your TTS50.
| Section | Needed for |
|---|---|
[Optimization] |
Using Fuel Dispatch with Match Advice |
[StopOrderEntry] |
Fuel Dispatch setup for Oil Field Order Entry |
[Inventory Service] |
Inventory Services |
[Fuel Dispatch] |
Fuel Dispatch |
[BOARDCONFIGURATION] |
Fuel Dispatch and Inventory Services |
[.NetMisc] |
Fuel Dispatch and Inventory Services |
-
The following sections in the FuelINISettings.ini file already exist in your TTS50. Copy just the settings in each section of the FuelINISettings.ini to the corresponding section in your TTS50.
-
[MileageInterface]
-
[Order]
-
[Misc]
-
[MobileComm]
Be very careful not to overwrite any existing settings in the TTS50 file. -
-
Check the FuelINISettings.ini file for additional new sections and/or settings. If any exist, add them to your TTS50 following the instructions in Steps 2 and 3.
Notes:
-
If you are using multiple TTS50s, you must add the settings to each one. For details, see: System Administration | Using INI files to configure the system on the Learning Center.
-
You can also find the FuelINISettings.ini file in the ZIP file downloaded from ClientCenter.
Updating the TTS50 for reporting
In the Fuel Dispatch TTS50 file, give the absolute path to the specified report template file for the following settings. By default, the report templates are in the main installation’s \Reports directory. For example:
C:\TMWSuite\Fuel Dispatch\Reports*ReportTemplate.rpt*
Notes:
-
To use the default reports, you must have [FuelDispatch]UseSSRSReports=N in your TTS50. Changing the value disables the default report templates and requires additional setup.
-
If you want to use SQL Server Reporting Services (SSRS) reports instead of the default reports, contact Trimble Systems Business Intelligence at [email protected] for assistance.
| Setting | Default report template to use |
|---|---|
BoardSummaryReportPath |
FuelDispatchBoardSummary01.rpt |
CompanyInformationReportPath |
cr_FuelMap.rpt |
DrvScheduleReportPath |
FuelDispatchDriverSchedule01.rpt |
TripSheetReportPath |
FuelDispatchTripSheet04.rpt |
TripSummaryReportPath |
FuelDispatchTripSummary01.rpt |
Setting up how the Forecaster Console will run
After you set up your stores in Inventory Services, you can assign them to batches for which the Forecaster Console will perform updates. You perform these tasks to set up the Forecaster Console:
-
Create the label options that will be used at batch identifiers.
-
Assign the batch IDs to stores.
-
Select a method for running the Forecaster Console.
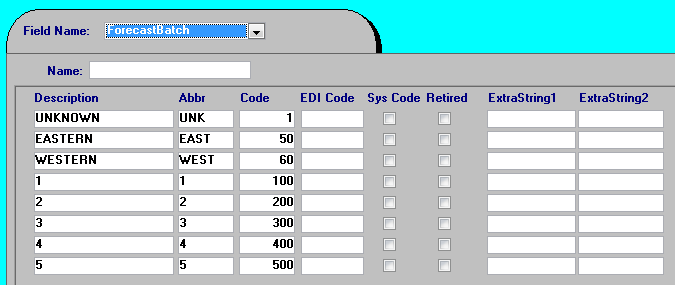
Creating label options to be used as batch IDs
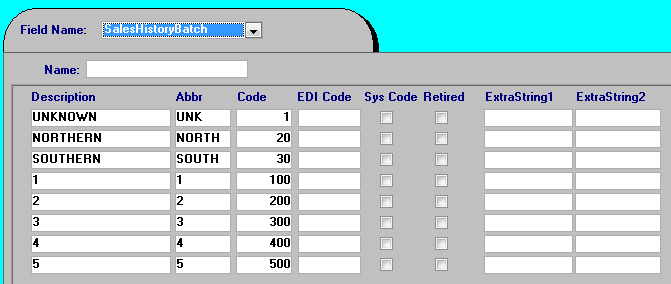
The Forecaster Console can create and update orders, or update sales models, for groups of stores organized into batches. A store can belong to a Forecast Batch, and to a Sales History Batch, both of which are assigned in the Company Tank Setup application.
The IDs used to identify batches are label options. Your company defines them using the ForecastBatch and SalesHistoryBatch labels. The system comes with options 1-5 already created for each label. You can set up other batch options as shown in the following illustrations.
Notes:
-
Do not select the Sys Code check box for any label option.
-
For details on creating label options, see: System Administration | Using the label file to customize field on the Learning Center.
Assigning batch IDs to stores [[AssignBatchIDsToStores]]
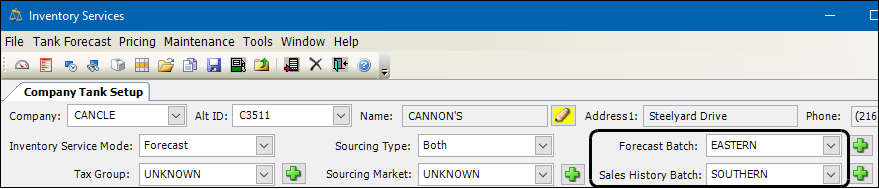
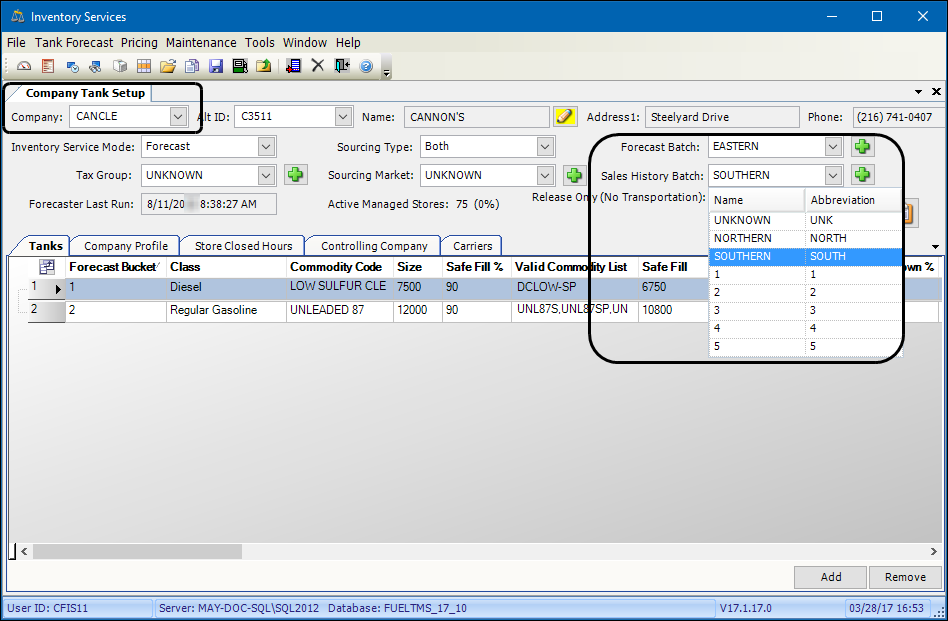
The Forecaster Console generates orders automatically based on a store’s historical sales data, actual inventory readings, and delivered product data. Stores are set up for forecasting and pricing in the Company Tank Setup window in Inventory Services.
A store must already have a profile set up in the Company Tank Setup window before you can assign it to a batch.
In the Company Tank Setup window, use the Forecast Batch and Sales History Batch fields to assign a store to processing batches.
-
In the Inventory Services application, select Maintenance > Company Tank Setup.
-
In the Company field, select the company.
-
Click
 Open.
Open. -
If needed, select Forecast in the Inventory Services Mode field.
Note: Only stores that are forecasted are assigned to batches. If Threshold or Audit Only is selected, orders are not automatically generated by the system. These options are used when stores call in orders as they need product.
-
To forecast the store as part of a group of stores, select the appropriate batch ID in the Forecast Batch field.
-
To assign the store to a group of stores for pricing purposes, select the appropriate batch ID in the Sales History Batch field.
-
Click
 Save.
Save.
Note: For more information about setting up stores to use the Forecaster Console, see: Inventory Services | Performing preliminary setup on the Learning Center.
Selecting a method for running the Forecaster Console
The method used to run the Forecaster Console depends on your company’s business practices and the accuracy of your sales models. You can run the Forecaster Console manually, using a desktop shortcut or batch file, or you can run it automatically by creating a scheduled task in Microsoft Windows Task Scheduler.
Running the Forecaster Console manually
Using a desktop shortcut or a batch file is suitable when the Forecaster Console has been installed on multiple user machines, and each user manages one or more groups or batches of stores. The user can determine when, and for which stores, to run the Forecaster Console.
The desktop shortcut or batch file command is in this form:
ForecasterConsole.exe -[parameter]
To run the Forecaster Console for all stores at the same time, you would use the -Forecast parameter. For example:
C:\ForecasterConsole\ForecasterConsole.exe -forecast
To run a batch for a specific group of stores, you would use -fx, replacing x with the batch ID. For example:
C:\ForecasterConsole\ForecasterConsole.exe -f1
Note: For information about batch IDs, refer to the Assigning batch IDs to stores section.
Running the Forecaster Console automatically
Scheduling a task in Task Scheduler is suitable when you want to run the Forecaster Console automatically at regular intervals.
-
In Windows XP, the parameters for the scheduled tasks are entered as command line options, just as they would be entered for a desktop shortcut.
-
In Windows Vista or Windows 7, the parameters for the scheduled tasks are entered as arguments on the Actions tab of the Create Task window.
Follow these guidelines when creating the Importer task.
-
Access the Task Scheduler through the Windows Control Panel, under Administrative Tools.
-
In the Task Scheduler’s General tab, enter the task Name; for example, CompanyAForecast.
-
In the Security Options tab, select the Run whether user is logged on or not check box.
-
In the Triggers tab, select New and then set up the scheduled dates and times for the task.
-
In the Actions tab:
-
Select New.
-
In the Program/script field, click Browse, go to the ForecasterConsole.exe file, and click on the file name.
The text in the field will look something like this:
"C:\Program Files (x86)\TMW Systems, Inc\ForecasterConsole\ ForecasterConsole.exe"
-
At the end of the text in the Target field, after the quotation mark, add -forecast or
-fx (replacing x with the batch ID). -
Click OK to save the task and close the window.
-
In the Task Scheduler, verify that the status for the task is Running.
Notes:
-
Do not* set up batch files, shortcuts, or scheduled tasks to run simultaneously. For example, if you create a scheduled task that runs ForecasterConsole.exe -forecast every hour, do not set up additional Forecaster tasks to run at the same time.
-
The procedure for creating and scheduling Windows tasks depends on your Windows version. Different optional parameters are entered for each version. For more information about creating and managing scheduled tasks, see your Windows documentation.
Updating a site’s remaining projected orders
If a site has multiple forecasted orders scheduled and changes are made to an order, by default the system does not update the remaining orders. However, you can set up your system so that the forecaster does update the remaining forecasted orders automatically.
With this feature set up, the system automatically reforecasts when any of these changes occur:
-
The ordered volume is changed
-
An ordered commodity is added or removed
-
Its status changes to Completed, Canceled, or Canceled Billable
Note: The forecaster ignores the changed order.
To enable this feature, you must have TMW’s Workcycle installed. A workflow template triggers the forecaster to rerun a forecast at a particular site. This functionality does not interfere with your daily operations. No user interaction is required.
For initial setup, please contact the Trimble Support Team.
Setting up how the Importer Service Console will run
You perform these tasks to set up the Importer Service Console:
-
Set up folders for readings, pricing, and delivery files.
-
Set up the Importer Service Console to work with Fuel Dispatch.
-
Set up the Importer reading configuration file.
-
Set up the Importer delivery configuration file.
-
Create the Importer shortcut for your Windows desktop.
-
Select a method for running the Importer Service Console.
Setting up folders for readings, pricing, and delivery
Readings, pricing, and delivery information is stored in sub folders in the Fuel Dispatch folder. Use these steps to create the folders where this information is stored.
-
In Windows Explorer, locate the Fuel Dispatch folder.
-
Create the following sub folders:
-
ReadingsArchive
ReadingsStaging -
PricingStaging
PricingArchive -
DeliveryArchive
DeliveryStaging
-
Note: If you import readings or delivery data for several customers, you can create an archive folder for each customer. For example, ReadingsCompanyA, ReadingsCompanyB, DeliveryCompanyA, DeliveryCompanyB, and so on.
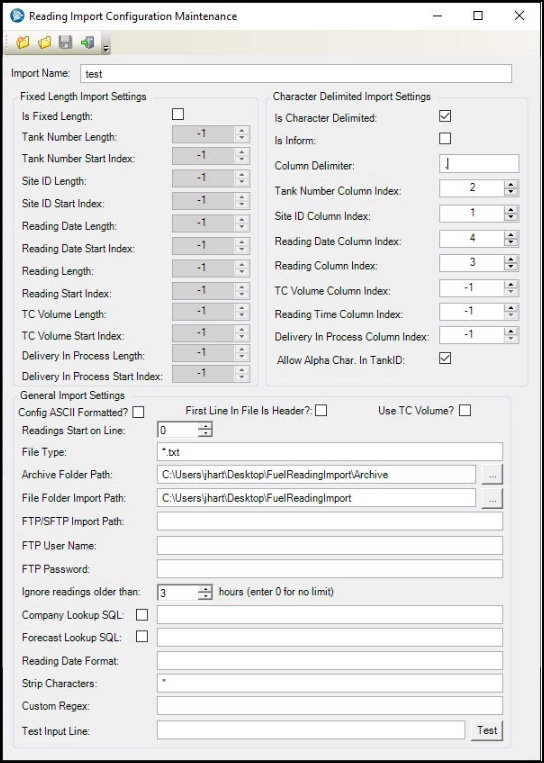
Setting up the Importer reading configuration file
You use the Reading Import Configuration Maintenance window to create a configuration file. The file specifies the format and content of each tank reading file, and indicates whether the file is accessed from a network directory or FTP network. It can be a fixed-length flat file or it can use character-delimited format. The tank reading file records can include the following information:
-
Tank number
-
Site ID
-
Reading date/time
-
Tank reading
-
Temperature corrected volume
-
Path to the archive folder
-
Path to the import folder
You can also provide additional information about file type and path, information for storing data on an FTP site, SQL lookup information, and characters to be stripped from the input string.
Creating or modifying the reading configuration file
To create the reading configuration file, or to modify an existing file, follow these steps.
-
To open the Reading Import Configuration Maintenance window, double-click on ReadingMaintenanceConfiguration.exe.
Note: ToolTip text is available for many of the fields. To display the ToolTip for a field, hold the cursor over the field name. This example shows the ToolTip for the Is Inform field.

-
Do one of the following:
-
To create a new configuration file, click
 New.
New. -
To modify an existing configuration file:
-
-
Click
 Open.
Open. -
In the Open window, go to the file location.
-
Select the configuration file, and click Open.
-
In the Import Name field, enter the store name.
Note: This field is required. -
If the reading files will be in fixed-length format, complete the information in the Fixed Length Format section of the window:
Note: If the reading file will be in character-delimited format, skip to Step 5.
-
Select the Is Fixed Length checkbox.
Note: Starting in V.2023.2.
When you select this checkbox, the fields under the Is Character Delimited checkbox will become read only. This lets you work in one section at a time.
-
In the following fields, specify the length of each field in the reading configuration file.
Note: To exclude a field from the reading files, accept the default of -1.
Tank Number Length |
Select the number of characters in the tank ID. |
Tank Number Start Index |
Select the exact position of the tank ID field in each file record. For example, enter 1 if it starts at character 1. |
Site Id Length |
Select the number of characters in the company/site ID. |
Site Id Start Index |
Select the exact position of the company/site ID field in each file record. For example, if it follows the tank ID, which starts at position 1 and is four characters long, the company/site ID would start at position 5 in each file record. |
Reading Date Length |
Select the number of characters in the reading date. |
Reading Date Start Index |
Select the exact position of the reading date field in each file record. |
Reading Length |
Select the number of characters in a tank reading. |
Reading Start Index |
Select the exact position of the reading field in each file record. |
Tc Volume Length |
Select the number of characters in the temperature corrected (TC) volume field. |
Tc Volume Start Index |
Select the exact position of the TC volume field in each file record. |
Delivery In Process Length |
Select the number of characters used to show that a delivery is in progress. |
Delivery In Process Start Index |
Select the exact position of the Delivery In Process field in each file record. |
-
To specify additional information about the configuration file, continue with Step 6.
-
If the reading files will be in character-delimited format, complete the information in the Character Delimited Import section of the window:
-
Select the Is Character Delimited checkbox.
-
Note: If the reading file should be in fixed-length format, return to Step 4.
Starting in V.2023.2.
When you select this checkbox, the fields under the Is Fixed Length checkbox will become read only. This lets you work in one section at a time.
-
If your readings are coming from an Inform box, select the Is Inform checkbox.
Note: Files in the Inform format include the company ID in the file name. Selecting the checkbox allows the system to create special formatting for importing the Inform files.
-
In the Delimiter field, enter the character(s) used to separate the individual fields.
-
In the Character Delimited Import fields, specify the sequence number of each field in the reading configuration file.
Note: If a column should not be included in the reading files, accept the default of -1.
Tank Number Column Index |
Select the sequence number for the tank number column. For example, enter 1 if it is the first column shown in the file. |
Site ID Column Index |
Select the sequence number for the company/site ID column. For example, enter 2 if it is the second column shown in the file. |
Reading Date Column Index |
Select the sequence number for the reading date column. For example, enter 3 if it is the third column shown in the file. |
Reading Column Index |
Select the sequence number for the reading column. For example, enter 4 if it is the fourth column shown in the file. |
TC Volume Column Index |
Select the sequence number for the temperature corrected volume column. For example, enter 5 if it is the fifth column shown in the file. Note: If including the TC volume in the reading files, select the Use TC Volume check box in the Misc Import Fields section of the window. |
Reading Time Column Index |
Select the sequence number for the reading time column. For example, enter 6 if it is the sixth column in the file. Note: Specify a sequence number for the time only if a delimiter separates the reading date and the reading time. Otherwise, accept the default of -1. |
Delivery In Process Column Index |
Select the sequence number of the delivery in process flag. |
Allow Alph Char In TankID |
Determines if tank IDs contain alphabetical characters
|
-
To specify additional information about the configuration file, continue with Step 6.
-
In the Misc Import Fields section, complete the appropriate information for the configuration file:
Config Ascii Formatted? |
Controls how the configuration file is saved
|
First Line In File Is Header? |
Select the check box if the first line in the reading file displays the column names. |
Use TC Volume |
Select the check box if you are using temperature corrected volume for the reading. Note: If including the TC volume in the reading files, specify the field length and start index in the Fixed Length Import section, or the column number in the Character Delimited Format section. |
File Type |
Enter the file name extension for the reading files, for example, csv or txt. |
Archive Folder Path |
Click The file will be moved to this folder after it has been processed and timestamped. Notes:
|
File Folder Import Path |
Click Notes:
|
FTP Import Path |
If you are saving the files to your company’s FTP site, enter the FTP path. |
FTP/SFTP Import Path |
Enter the FTP/SFTP path where the files reside. Note: Uses FTP by default if the path does not specify FTP or SFTP. |
FTP User Name |
Enter the user name used to access your company’s FTP site. |
FTP Password |
Enter the password used to access your company’s FTP site. |
Ignore Readings Older Than |
Available starting in V.2023.2. Enter an integer value to ignore readings that are older than the number of hours. This lets the system ignore duplicate readings if imported again. Those readings will be skipped and logged in the Audit log where they could be reviewed if needed. |
Company Lookup SQL |
Select the check box and enter the SQL code for mapping the company ID in the file to the company ID in the TMWSuite database. For example: Select cmp_id from company where cmp_misc1=@cmp_id Note: The SQL statement must include @cmp_id, which will be the site ID from the file. |
Forecast Lookup SQL |
Select the check box and enter the SQL code for mapping the forecast ID in the file to the forecast ID in the TMWSuite database. |
Reading Date Format |
Enter the format for the reading date/time. For example, if the reading date in the file is 20101015 060200, the Reading Date Format would be yyyyMMdd HHmmss. Note: Leave blank if using a standard date format. |
Strip Characters |
Enter the characters to be stripped from each line of the file. Make your entry in comma-separated format. For example, enter ',:,* to strip single quotation marks, colons, and asterisks. Notes:
Double quotation marks are stripped from the file automatically unless entered in the Delimiter field. |
Custom Regex |
If the file cannot be parsed using the entry in the Delimiter field, you can enter a custom regular expression for parsing the file. Notes:
|
-
Click
 Save to save the .RCONFIG file.
Note: If you want, you can test the configuration settings.
-
Copy a line of text from a tank reading file into the Test Input Line field.
-
Click Test.
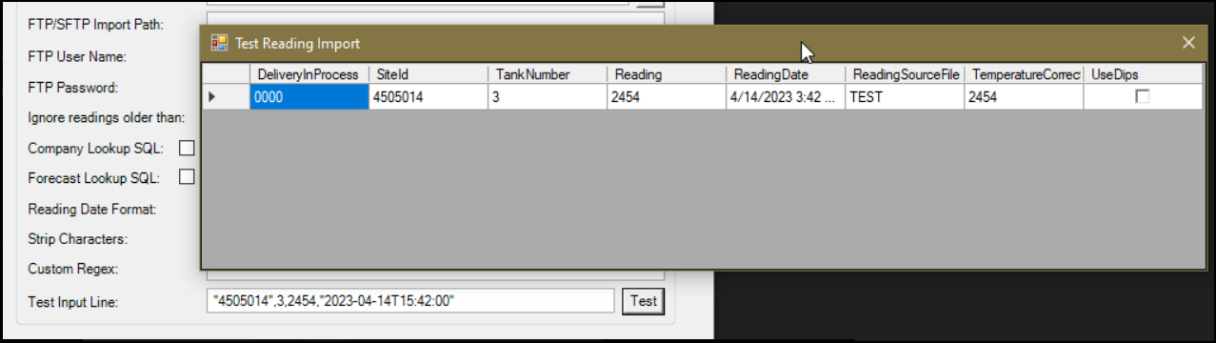
The Test Reading Import window shows information from the code you entered code. This information includes tank number, reading, reading date, import status, and temperature correction volume.
If the code cannot be parsed correctly, a message provides detailed error information. If you receive an error, contact your Trimble Transportation Support representative for assistance.
-
In the Save As window, go to the folder where you want to save the configuration file. Assign a file name and click OK.
Setting up the Importer delivery configuration file
The Forecaster projects when orders are needed, and how much product should be delivered. By default, the Forecaster uses the latest tank reading to calculate the fuel level inside a tank.
If you have [InventoryService]CheckForDeliveryReadings=Y in your TTS50, the Forecaster imports and stores data from automatic tank gauges (ATG). During a delivery, the Forecaster records ATG information. It uses these values to calculate the fuel level inside a tank. If there is no ATG information, the Forecaster uses the most current tank reading.
To use the setting, you must set up the Importer delivery configuration file to record ATG information, including:
-
Tank number
-
Site ID
-
Delivery start date
-
Delivery end date
-
Starting volume
-
Ending volume
You use the Delivery Import Configuration Maintenance window to create the delivery configuration file. The file can be a fixed-length flat file or it can use character-delimited format.
Creating or modifying the delivery configuration file
To create the delivery configuration file, or to modify an existing file, follow these steps.
-
To open the Delivery Import Configuration Maintenance window, double-click on DeliveryMaintenanceConfiguration.exe.
The information entered here is saved in the .DCONFIG configuration file.
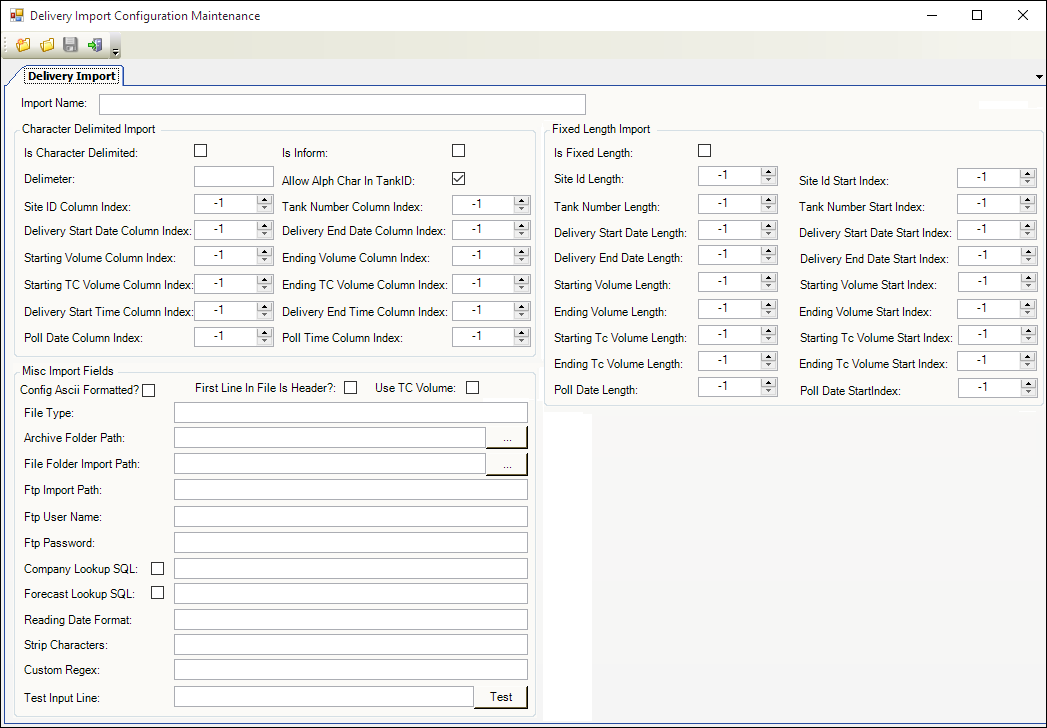
Note: ToolTip text is available for many of the fields. To display the ToolTip for a field, hold the cursor over the field name. This example shows the ToolTip for the Starting TC Volume Column Index field.
![]()
-
Do one of the following:
-
To create a new configuration file, click
 New.
New. -
To modify an existing configuration file:
-
Click
 Open.
Open. -
In the Open window, go to the file location.
-
Select the configuration file, and click Open.
-
-
-
In the Import Name field, enter the store name.
Note: This field is required.
-
If the delivery files will be in fixed-length format, complete the information in the Fixed Length Format section of the window:
Note: If the delivery file will be in character-delimited format, go to Step 5.
-
Select the Is Fixed Length check box.
-
In the following fields, specify the length of each field in the delivery configuration file.
Note: To exclude a field from the delivery files, accept the default of -1.
Site Id Length |
Select the number of characters in the company/site ID. |
Site Id Start Index |
Select the exact position of the company/site ID field in each file record. For example, if it follows the tank ID, which starts at position 1 and is four characters long, the company/site ID would start at position 5 in each file record. |
Tank Number Length |
Select the number of characters in the tank ID. |
Tank Number Start Index |
Select the exact position of the tank ID field in each file record. For example, if it starts at character 1, enter 1. |
Delivery Start Date Length |
Select the number of characters in the delivery start date. |
Delivery Start Date Start Index |
Select the exact position of the delivery start date field in each record. For example, if it starts at character 1, enter 1. |
Delivery End Date Length |
Select the number of characters in the delivery end date. |
Delivery End Date Start Index |
Select the exact position of the delivery end date field in each record. For example, if it starts at character 1, enter 1. |
Starting Volume Length |
Select the number of characters in the starting volume. |
Starting Volume Start Index |
Select the exact position of the starting volume field in each record. For example, if it starts at character 1, enter 1. |
Ending Volume Length |
Select the number of characters in the ending volume. |
Ending Volume Start Index |
Select the exact position of the ending volume field in each record. For example, if it starts at character 1, enter 1. |
Starting Tc Volume Length |
Select the number of characters in the temperature corrected (TC) starting volume field. |
Starting Tc Volume Start Index |
Select the exact position of the starting TC volume field in each file record. For example, if it starts at character 1, enter 1. |
Ending Tc Volume Length |
Select the number of characters in the TC ending volume field. |
Ending Tc Volume Start Index |
Select the exact position of the ending TC volume field in each file record. For example, if it starts at character 1, enter 1. |
Poll Date Length |
Select the number of characters in the poll date. |
Poll Date StartIndex |
Select the exact position of the poll date field in each record. For example, if it starts at character 1, enter 1. |
-
To specify additional information about the configuration file, continue with Step 6.
-
If the delivery files will be in character-delimited format, complete the information in the Character Delimited Import section of the window:
-
Select the Is Character Delimited check box.
Note: If the delivery file should be in fixed-length format, return to Step 4. -
If your readings are coming from an Inform box, select the Is Inform check box.
Note: Files in the Inform format include the company ID in the file name. Selecting the check box allows the system to create special formatting for importing the Inform files. -
In the Delimiter field, enter the character(s) used to separate the individual fields.
-
Select the Allow Alph Char In TankID check box to allow alphabetic characters in the tank ID.
-
In the Character Delimited Import fields, specify the sequence number of each field in the delivery configuration file.
-
Notes:
-
To exclude a column from the delivery files, accept the default of -1.
-
For each column field, indicate its column number in the file. For example, if it is the second column shown in the file, enter 2.
Site ID Column Index |
Select the sequence number for the company/site ID column. |
Tank Number Column Index |
Select the sequence number for the tank number column. |
Delivery Start Date Column Index |
Select the sequence number for the delivery start date column. |
Delivery End Date Index Column Index |
Select the sequence number for the delivery end date column. |
Starting Volume Column Index |
Select the sequence number for the starting volume column. |
Ending Volume Column Index |
Select the sequence number for the ending volume column. |
Starting TC Volume Column Index |
Select the sequence number for the starting temperature corrected (TC) volume column. Note: If including the starting TC volume in the delivery files, select the Use TC Volume check box in the Misc Import Fields section of the window. |
Ending TC Volume Column Index |
Select the sequence number for the ending TC volume column. Note: If including the ending TC volume in the delivery files, select the Use TC Volume check box in the Misc Import Fields section of the window. |
Poll Date Column Index |
Select the sequence number for the poll date column. |
Poll Time Column Index |
Select the sequence number for the poll time column. |
-
To specify additional information about the configuration file, continue with Step 6.
-
In the Misc Import Fields section, complete the appropriate information for the configuration file:
Config Ascii Formatted? |
Select the check box to save the configuration file as ASCII text. |
First Line In File Is Header? |
Select the check box if the first line in the delivery file displays the column names. |
Use TC Volume |
Select the check box if you are using TC volume for the delivery. Note: If including the TC volumes, specify the following for each TC volume field:
|
File Type |
Enter the file name extension for the delivery files, for example, csv or txt. |
Archive Folder Path |
Click The file will be moved to this folder after it has been processed and timestamped. Notes:
|
File Folder Import Path |
Click Notes:
|
Ftp Import Path |
If you are saving the files to your company’s FTP site, enter the FTP path. |
Ftp User Name |
Enter the user name used to access your company’s FTP site. |
Ftp Password |
Enter the password used to access your company’s FTP site. |
Company Lookup SQL |
Select the check box and enter the SQL code for mapping the company ID in the file to the company ID in the TMWSuite database. For example: Select cmp_id from company where cmp_misc1=@cmp_id Note: The SQL statement must include @cmp_id, which will be the site ID from the file. |
Forecast Lookup SQL |
Select the check box and enter the SQL code for mapping the forecast ID in the file to the forecast ID in the TMWSuite database. |
Reading Date Format |
Enter the format for the reading date/time. For example, if the reading date in the file is 20101015 060200, the Reading Date Format would be yyyyMMdd HHmmss. Note: Leave blank if using a standard date format. |
Strip Characters |
Enter the characters that will be stripped from each line of the file, in comma-separated format. For example, enter ',:,* to strip single quotation marks, colons, and asterisks. Notes:
|
Custom Regex |
If the file cannot be parsed using the entry in the Delimiter field, you can enter a custom regular expression for parsing the file. Notes:
|
-
Click
Save to save the .DCONFIG file.
Note: If you want, you can test the configuration settings.
-
Copy a line of text from a delivery file into the Test Input Line field.
-
Click Test.
The Test Delivery Import window shows information from the code you entered code. This information includes tank number, reading, reading date, import status, and temperature correction volume.
-
In the Save As window, go to the folder where you want to save the configuration file. Assign a file name and click OK.
Creating the Importer shortcut on your Windows desktop
After you create the .RCONFIG Importer readings file, you can run the Importer Service Console. Use the following steps to create a shortcut on your Windows desktop. This will allow you to run the Importer Service Console to import readings more quickly.
Note: For information about creating the .RCONFIG file, refer to the Setting up the Importer reading configuration file section.
-
In the ImporterServiceConsole folder, right-click on ImporterServiceConsole.exe.
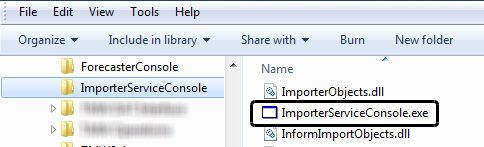
-
From the shortcut menu, select Send to > Desktop (create shortcut).
-
Go to your desktop, right-click on the shortcut for ImporterServiceConsole and rename the shortcut Importer.
If the shortcut includes the .exe file name extension, you must include the file name extension in the name shortcut’s Target line when you enter its Properties.
Selecting a method for running the Importer Service Console
You can run the Importer Service Console manually using a desktop shortcut or batch file, or you can run it automatically by creating a scheduled task in Microsoft Windows Task Scheduler.
Running the Importer Service Console manually
Using a desktop shortcut or a batch file is suitable when the Importer Service Console has been installed on multiple user machines. To use the Importer Service Console to import readings, you would use the -rconfig parameter. For example:
C:\ImporterServiceConsole\ImporterServiceConsole.exe -rconfigC:\ImporterServiceConsole\Import.rconfig
Note: Make sure there is a space between the .exe and -rconfig portion. The bolded text is the path that you will need to enter.
To add the -rconfig parameter to the Importer desktop shortcut, follow these steps.
-
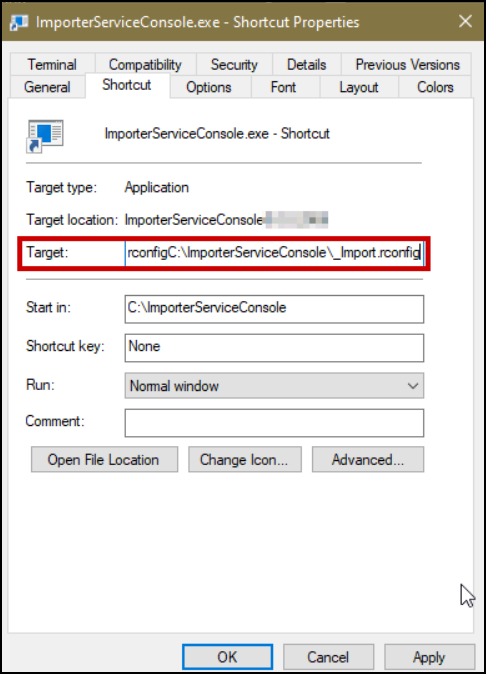
On your desktop, right-click on the Importer shortcut and select Properties in the shortcut menu.
On the Shortcut tab, the Target field displays the path and file name for the Importer Service Console executable file.
Note: You created the Importer desktop shortcut when following the steps in the Creating the Importer shortcut on your Windows desktop section.
-
At the end of the text in the Target field, after the quotation mark, add -rconfig and enter the path and file name for the .RCONFIG file. For example:
-rconfig"C:\Program Files\TMW Systems, Inc\ImporterServiceConsole\ ReadingImport.rconfig"
-
Click OK.
Running the Importer Service Console automatically
Scheduling a task in Windows Task Scheduler is suitable when you want to run the Importer Service Console automatically at regular intervals, from a single user machine.
Follow these guidelines when creating the Importer task.
-
Access the Task Scheduler through the Windows Control Panel, under Administrative Tools.
-
In the Task Scheduler’s General tab, enter the task Name; for example, Readings Import.
-
In the Security Options tab, select the Run whether user is logged on or not check box.
-
In the Triggers tab, select New and then set up the scheduled dates and times for the task.
-
In the Actions tab:
-
Select New.
-
In the Program/script field, click Browse, go to the ImporterServiceConsole.exe file, and click on the file name. The text in the field will look something like this:
-
"C:\Program Files (x86)\TMW Systems, Inc\ImporterServiceConsole\ ImporterServiceConsole.exe"
-
At the end of the text in the Target field, after the quotation mark, add -rconfig and enter the path and file name for the .RCONFIG file. For example:
"C:\Program Files (x86)\TMW Systems, Inc\ImporterServiceConsole\ ImporterServiceConsole.exe" -rconfig"C:\Program Files (x86)\TMW Systems, Inc\ImporterServiceConsole\ReadingImport.rconfig"
-
Click OK to save the task and close the window.
-
In the Task Scheduler, verify that the status for the task is Running.
Notes:
-
Do not set up batch files, shortcuts, or scheduled tasks to run simultaneously. For example, if you create a scheduled task that runs ImporterServiceConsole.exe -rconfig every hour, do not set up additional tasks to run at the same time.
-
The procedure for creating and scheduling Windows tasks depends on your Windows version. Different optional parameters are entered for each version. For more information about creating and managing scheduled tasks, see your Windows documentation.
Defining a trailer compartment setup
Defining a trailer compartment setup is the first step when setting up trailer compartments. Once you define a setup, you can then assign a default trailer to a consignee and clone the compartment configuration.
-
Go to the Fuel Pre-Upgrade Tool installation directory and double-click the FuelPreUpgradeTool.Main.exe.
The Fuel Setup login window opens. -
Enter your Inventory Services login and password, and then click Logon.
-
Go to Application > Trailer Compartment Setup.
The TrailerProfile window opens.Note: A warning displays if you have not run TrailerCompartmentSetupDBMods.SQL against the target database. See Applying the SQL scripts to the TMWSuite database.
-
In the Trailer field, enter the trailer’s ID.
-
Press ENTER.
-
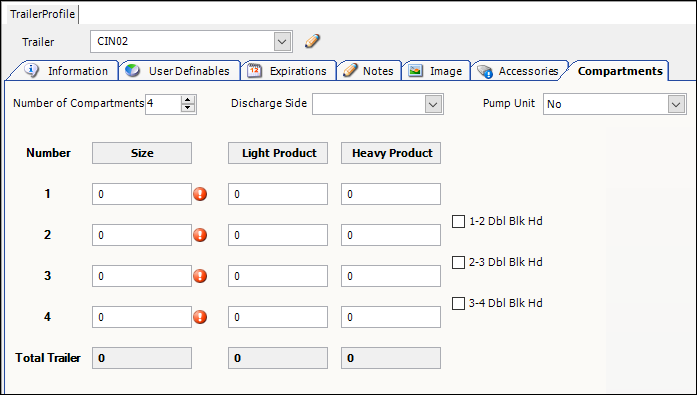
Select the Compartments tab.
-
Make entries in the fields that pertain to the trailer as a whole.
Number of Compartments |
Total number of compartments on the trailer |
Discharge Side |
Identifies which side of the trailer has the outlet location Options are: * Unknown * Right * Left * Both |
Pump Unit |
Identifies whether the trailer has a built-in pump unit Options are Yes and No. |
The system adds the fields needed to configure each trailer compartment.
-
Make entries in the fields that define each trailer compartment.
Required field: *
Read-only field: §
Number §* |
Identifies the compartment’s position on the trailer Compartments are listed from front to back. |
Size * |
Maximum number of gallons the compartment holds |
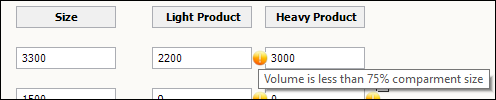
Light Product |
Maximum number of gallons of light product the compartment holds Notes:
|
Heavy Product |
Maximum number of gallons of heavy product the compartment holds Notes:
|

-
Click
 Save.
Save.
Assigning a default trailer to a consignee
After you define a trailer’s compartment setup, you can assign that trailer to one or more consignees. When the Forecaster creates orders for them, it uses the default configuration to calculate the maximum gallons and product mix on a load.
-
Go to the Fuel Pre-Upgrade Tool installation directory and double-click the FuelPreUpgradeTool.Main.exe.
The Fuel Setup login window opens. -
Enter your Inventory Services login and password, then click Logon.
-
Go to Application > Trailer Compartment Setup.
The TrailerProfile window opens.Note: A warning displays if you have not run TrailerCompartmentSetupDBMods.SQL against the target database. See Applying the SQL scripts to the TMWSuite database.
-
In the Trailer field, enter the trailer’s ID.
-
Press ENTER.
-
Select the Compartments tab.
-
On the right side of the window, select Set Default Trailer to Consignees.
The grid lists the companies identified as consignees. By default, it shows the companies that do not have a default trailer. If you want, click in the Show field and select All to view all consignees.

-
Do one of the following:
-
To assign a consignee to this trailer, select the check box in its row.
-
To assign all consignees to this trailer, select the Select All check box above the grid.
Note: You can clear the check box in the rows of individual consignees as needed.
-
-
Click Apply Default Trailer.
-
Click
Save.
Cloning a compartment configuration to other trailers
After you define a trailer’s compartment setup, you can clone that configuration to other trailers in your fleet.
-
Go to the Fuel Pre-Upgrade Tool installation directory and double-click the FuelPreUpgradeTool.Main.exe.
The Fuel Setup login window opens. -
Enter your Inventory Services login and password, and then click Logon.
-
Go to Application > Trailer Compartment Setup.
The TrailerProfile window opens.Note: A warning displays if you have not run TrailerCompartmentSetupDBMods.SQL against the target database. See Applying the SQL scripts to the TMWSuite database.
-
In the Trailer field, enter the trailer’s ID.
-
Press ENTER.
-
Select the Compartments tab.
-
On the right side of the window, select Set Trailer Compartments to Trailers.
By default, the grid lists all of your trailers that do not have a compartment configuration recorded. If you want, click in the Show field and select All to view all trailers. When you do, the grid shows the Compartment field for each trailer. If the trailer’s compartments are set up, the configuration appears in this field. The field shows each compartment’s size. Single bulkheads appear as a vertical line between the compartment sizes. Double bulkheads appear as two vertical lines.
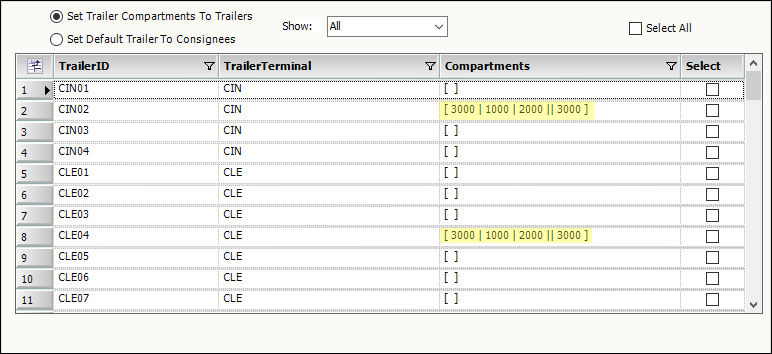
-
Do one of the following:
-
To set a trailer to this compartment configuration, select the check box in its row.
-
To set all trailers to this compartment configuration, select the Select All check box above the grid.
Note: You can clear the check box in the rows of individual trailers as needed.
-
-
Click Apply Compartments.
-
Click
Save.