 Create Quote.
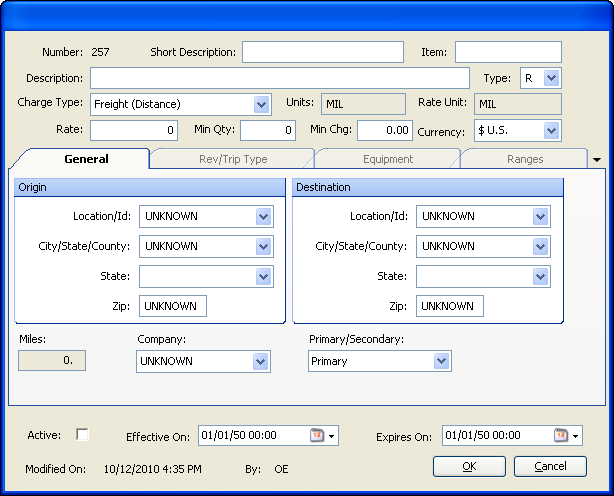
Short Description | Enter free-form text to identify the rate. The system saves a maximum of 12 alphanumeric characters. |
Item | Enter free-form text that will be used as a second form of identification. The system saves a maximum of 12 alphanumeric characters. |
Description | Enter a free-form description that summarizes the rate’s function. The system saves a maximum of 50 alphanumeric characters. |
Type* | Select the value that identifies the type of rate you are entering. Options are: • R Rate quote. This is a rate that is effective for more than one day. • S Spot quote. This is a rate that is good for a single day. When you select this option, the system automatically sets the Effective On and Expires On fields to the current date. |
Charge Type* | From the drop-down list, select the appropriate charge type for your rate. This selection determines the billing unit on which the rate will be based. For example, if the charge type is Freight (Weight) and it is based on a billing unit of 100 pounds (i.e., per hundred weight), the charge will be calculated by the following formula: freight weight ÷ 100 lbs. x single unit rate. Note: The charge types displayed in the drop-down list are determined by the rate type selected in the Primary/Secondary field, located below the Distance restriction fields on the General tab.  By default, when you first access the Quote window, the Primary/Secondary field is set to Primary. If it is left like this, you will create a line haul rate. If you want to create an accessorial rate, change the entry in the Type field to Secondary, Line Item, or Linked Line Item. When you do this, the Charge Type drop-down list will be limited to accessorial charge types. |
Units | This read-only field displays the unit of measure defined for the charge type. When the system calculates the billing charge for your rate, it will use this unit of measure. |
Rate Unit | This read-only field displays the calculation method defined for the charge type. This field cannot be modified. |
Rate* | Enter the rate per billing unit. For example, suppose the following is true: • The charge type is Freight (Weight), and is based on a billing unit of 100 pounds. • The load being rated is 40,000 pounds. An entry of 2.357 in the Rate field would result in an invoice for $942.80 in freight charges: (40,000 lbs. ÷ 100 lbs.) x 2.357 = 942.8 Note: Some secondary rates are based on a percentage of line haul revenue. In such cases, enter the percentage as a decimal. For example, if a rate is based on 45% of the revenue billed, enter .45. |
Min Qty | If applicable, enter a minimum billing quantity. An entry in this field results in a minimum charge based on this quantity, even if the actual quantity of the freight is less. For example, suppose the following is true: • The charge type is Freight (Distance), which is based on miles. • The number 100 is entered in the Min Qty field. • There are 75 billable miles for an order. The customer will be billed for 100 miles, even though the actual mileage was only 75 miles. |
Min Chg | If applicable, enter a minimum charge. In the event that the calculated charge is less than this minimum figure, an entry in this field changes the rate basis to “flat” and produces an invoice detail for the minimum charge amount. |
Currency* | This field displays the currency specified for the charge type you selected. If no currency was specified for the charge type, this field is blank. Select the currency that applies for the rate. |
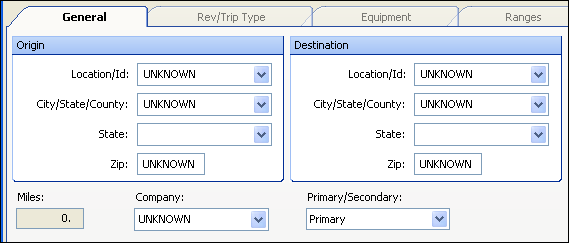
Location ID | ID code of the company where the first billable stop on the order occurs. |
City/State/County | City, state or province, and county where the first billable stop occurs. |
State | State or province, and county where the first billable stop occurs. |
Zip | ZIP or postal code for the location where the fist billable stop occurs. |
Location ID | ID code of the company where the last billable stop occurs. |
City/State/County | City, state or province, and county where the last billable stop occurs. |
State | State or province, and county where the last billable stop occurs. |
Zip | ZIP or postal code for the location where the last billable stop occurs. |
Miles | This field is not a restriction. If you have entered origin and destination restrictions, the system automatically does a mileage lookup between those locations. The result is displayed in this field. It is read-only. Notes: 1. For Bill To companies: To determine which mileage type to use, the system looks at the Bill Miles field on the Bill To profile. If the type is specified there, it uses it. If no mileage type has been recorded, it uses the type recorded in the Billing= setting in the [MileageType] section of the TTS50.ini file. 2. For any company types other than Bill To's: The system uses the type recorded in Billing= setting in the [MileageType] section of the TTS50.ini file. 3. These mileage interfaces are supported: • Rand MileMaker • All ALK mileage applications, except PC*MILER|Multiple Version Switch for Windows. |
Company | Applicable for multi-company organizations; an entry here indicates that this rate is to be used only for orders handled by the company specified in this field. Note: This is a user-defined field. Options are set up in the Company label in System Administration. |
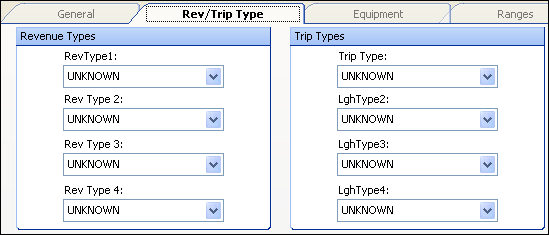
RevTypes1 - 4 | Use one or more of the RevType fields to specify the revenue classifications for which the rate schedule is applicable. When an order is rated, the system will compare the RevType1 – RevType4 fields on the order header with restrictions entered in these fields. Note: The RevType1–4 fields are user-defined. Your company defines the field names and options in the RevType1–4 labels in System Administration. |
Trip Type, i.e., LghType1 and LghTypes2 - 4 | Trip Type is an alternate name for LghType1. The LghType fields allow you to set up a rate table that is based on the LghType classifications assigned to the trip segment to which the order is associated. Notes: 1. LghTypes1-4 are user-defined. Your company defines the field names and options in the label file in System Administration. 2. Use of the LghType restrictions for billing rates is not supported for split trips, consolidated orders, or cross docked orders. 3. LghType2-4 fields do not exist as restrictions on the Edit Billing Rate Schedules Folder. Therefore, if you make entries for these fields in the Quote window, they will not be visible to anyone looking up the rates in the Rate Schedules application. |

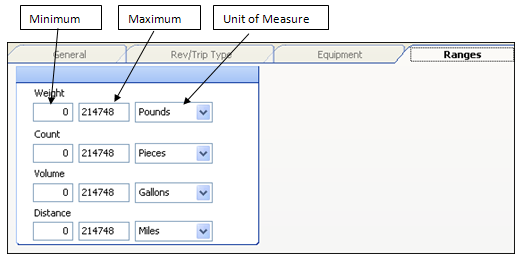
Weight | These fields allow you to specify the minimum and/or maximum total weight recorded for an order for which this rate schedule is applicable. These fields correspond to the Weight field in the Totals line on the order. Use the Units field to specify the appropriate unit of measure. For example, if you enter 40,000 in the minimum field and Pounds in the units field, the system will not use the rate schedule for any orders with cargo that weighs less than 40,000 pounds. |
Count | These fields allow you to specify the minimum and/or maximum total freight count recorded for an order for which this rate schedule is applicable. These fields correspond to the Count field in the Totals line on the order. Use the Units field to specify the appropriate unit of measure. For example, if you enter 45,000 in the minimum field and Pieces in the units field, the system will not use the rate schedule for any orders with cargo that consists of less than 45,000 pieces. |
Volume | These fields allow you to specify the minimum and/or maximum total freight volume recorded for an order for which this rate schedule is applicable. These fields correspond to the Volume field in the Totals line on the order. Use the Units field to specify the appropriate unit of measure. For example, if you enter 45,000 in the maximum field and Gallons in the units field, the system will not use the rate schedule for any orders with cargo that consists of 45,000 or more gallons. |
Distance | These fields allow you to specify the minimum and/or maximum total miles recorded for an order for which this rate schedule is applicable. These fields correspond to the total route miles (billable empty and loaded) on an order. Use the units field to specify the appropriate unit of measure. For example, if you enter 250 in the maximum field and Miles in the units field, the system will not use the rate schedule for any orders for which resource traveled 250 miles or more. |


 Load Quote in the lower right of the Quotes tab.


