Using Route Planner
First available in TMW Operations V.2025.3
The Route Planner feature lets you create and bind multiple orders into one route for planning purposes.
You can assign a driver, tractor and/or trailer to the route. The system automatically will cascade stop dates and times and create
deadhead stops as needed between trips.
The feature is accessible through a menu option in the Operations menu.
Key features of Route Planner are:
-
The ability to create, reorder and cancel a one-time route
-
The ability to plan a one-time route by assigning a driver, tractor and/or trailer
-
Drag and drop orders onto the window to build a contiguous route
-
Dispatch of an entire route or a single trip associated with a one-time route
-
Cascade dates and times and create deadhead stops automatically during planning and route creation
-
Multiple trip grids to display trips available for route planning
-
Swap resources between two or more routes through a Driver Swap window
-
A Gantt bar visual indicator of trips assigned to a given route to help with planning decisions
This illustration provides an overview of the layout of the Route Planner window.
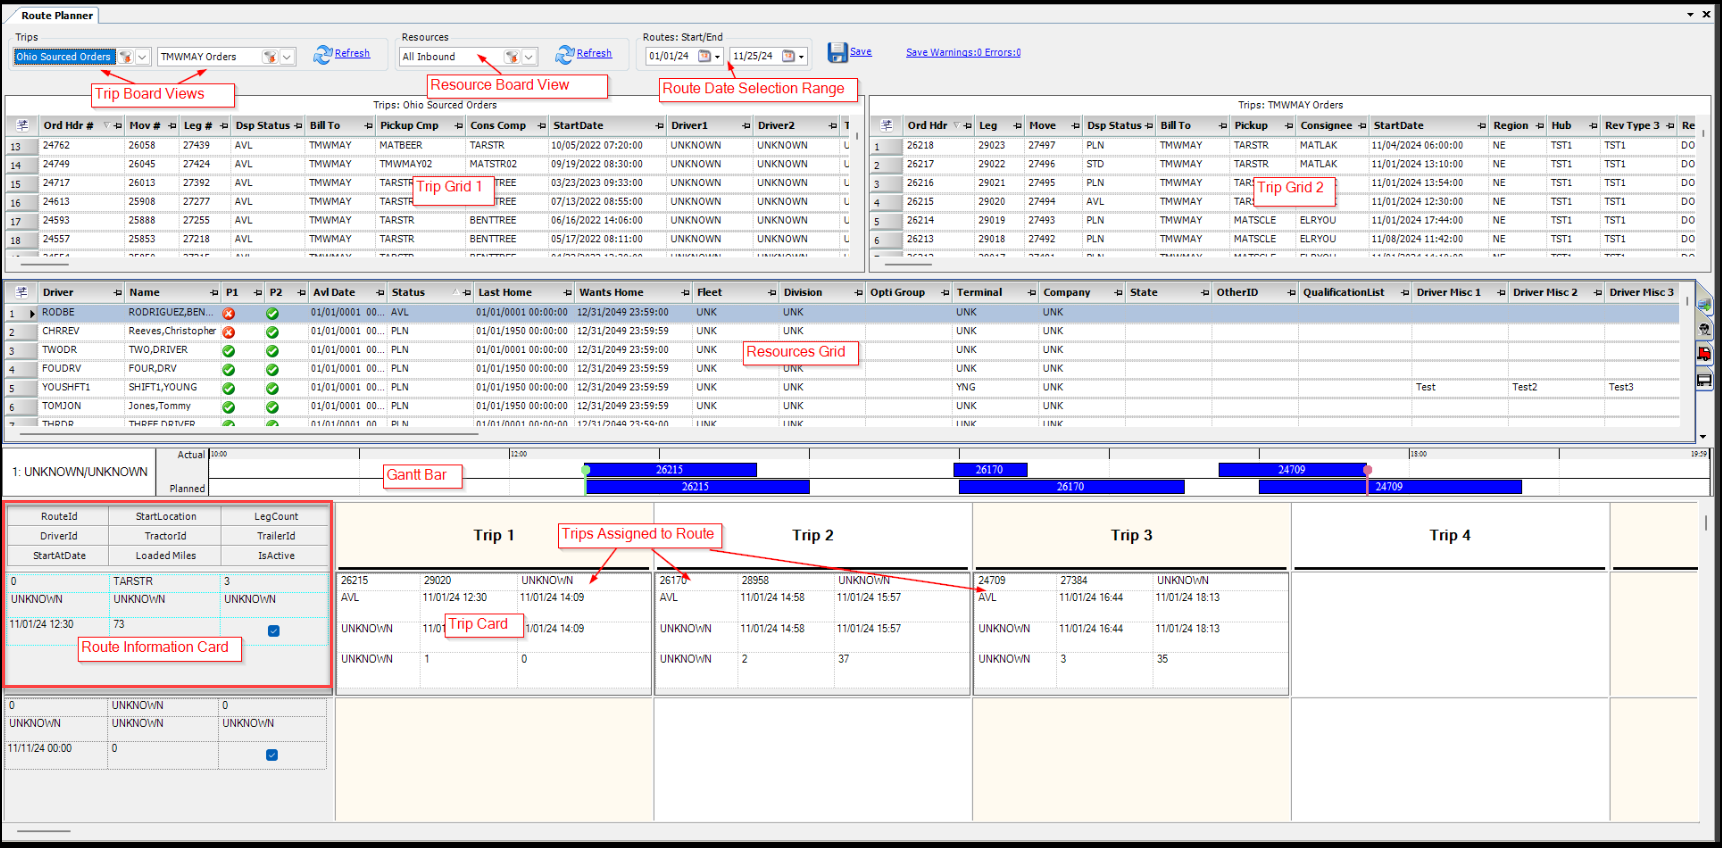
| You must expand and widen the columns in the Route Information card grid using Cell Designer when you first open the Route Planner window. After you save the layout, you will no longer need to change the columns again. |
Creating and Planning a one-time route
To begin creating a one-time route, follow these steps:
-
Go to Operations > Route Planner
The Route Planner window opens. -
Make selections in the Trips view, Resources view and Routes Start/End date selection range.

-
Select the Refresh button in the Trips view to retrieve trips for both trip grids.
-
Select the Refresh button in the Resources view to load the Resources grid below the Trip grid.
-
Select an order from the Trip grid and drag it to the Trip 1 cell of the desired route.
The order will be added to the route and will be removed from the Trip grid.
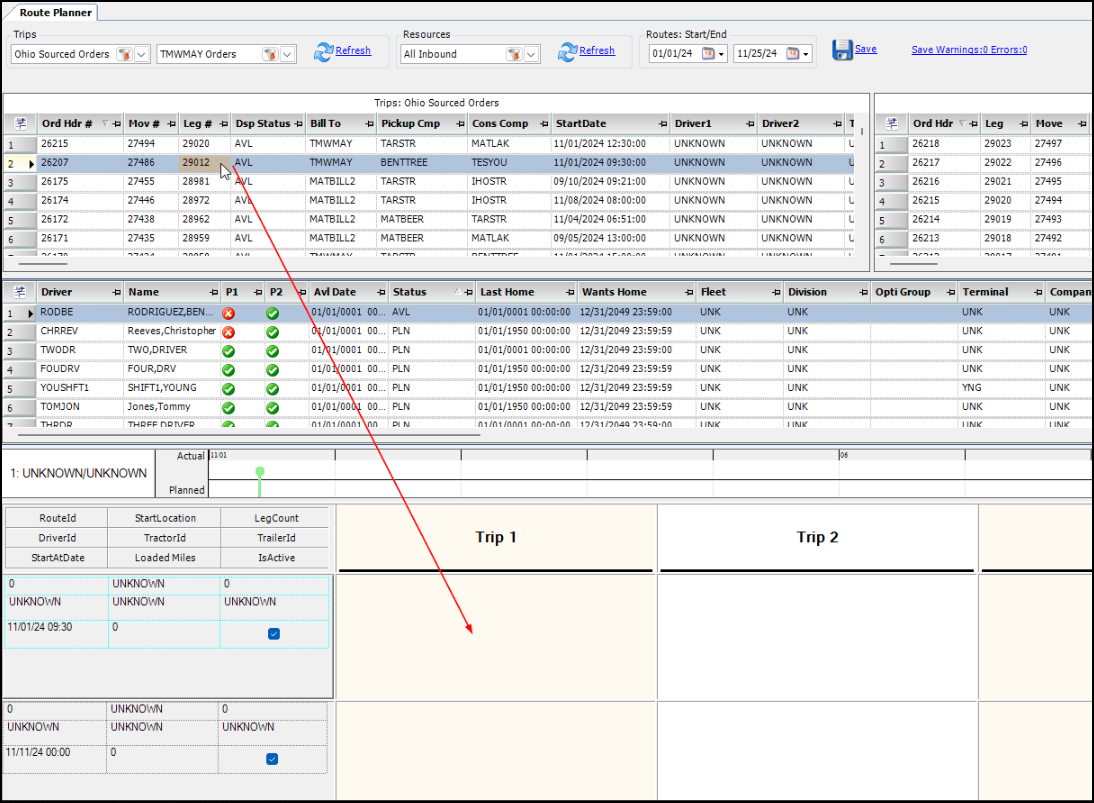
The Gannt bar will populate and show the markers for the route Start and End and display the trip’s Actual duration compared to the Planned.
Note: The green vertical line is the Route Start; the red vertical line is the Route end.

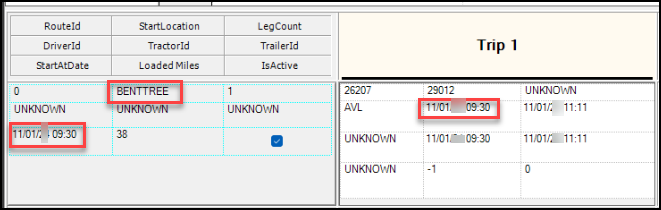
The Start date and location of the route will be updated to reflect the arrival time and location of the first stop associated with the first trip that is planned on the route.
This illustration example shows the updates based on the order selected.
Assigning assets to a route
To assign an asset, select from the Resources grid and drag the asset to the Route Information Card. This will assign a driver to the route and associated legs.
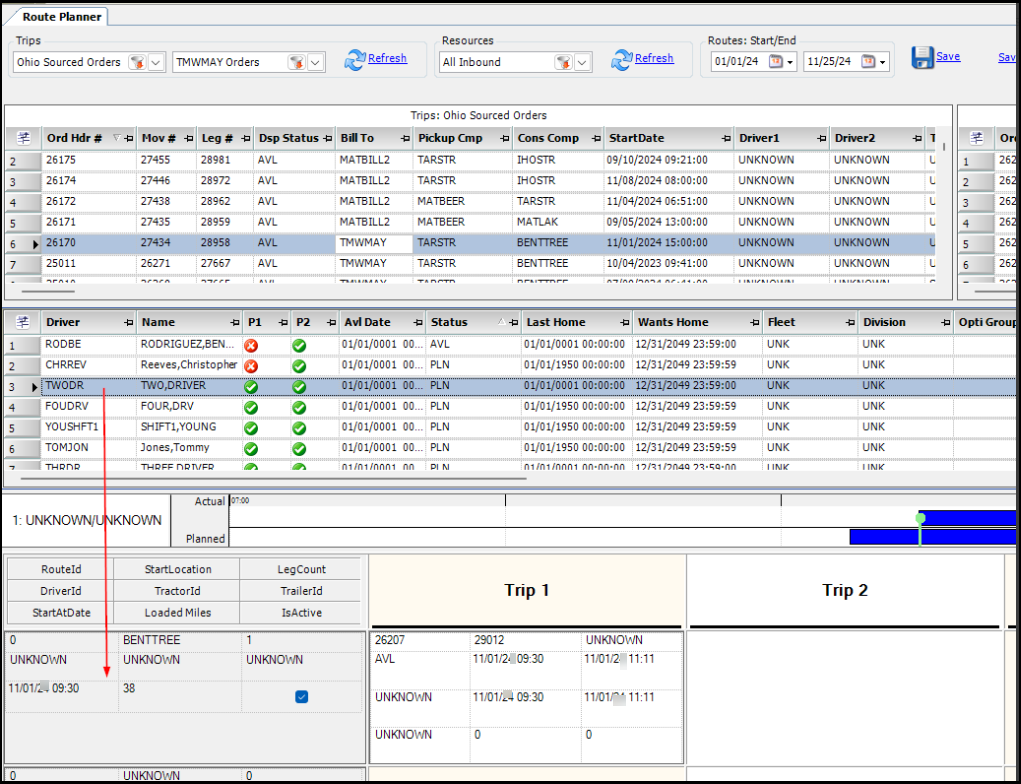
Once the driver is assigned, the legs of the order will be in a Planned (PLN) status.
The Gantt bar color changes from blue to green to show that the trip is now planned.

-
Click the Save button to save the changes to the route.
Note: Saving generates a numeric Id number (PlannedRouteId) that is associated with the Planned Route and any leg assigned to the route.
HOS (Hours of Service) columns
You have the option view a drivers HOS availability in the Route Information grid. These columns can be added using the right-click Cell Designer menu.
-
DriveHoursRemaining
-
DutyHoursRemaining
-
CumulativeDutyHoursRemaining
-
USHoursUntilRestBreak
-
HoursIn1Day
-
HoursInRest
-
LastCycleReset
| You can also add these columns to the Resources grid using Field Chooser. |
Automatically cascade Dates/Times and add deadhead stops
If there is no driver asset assigned to a route, the system will compute the travel time between the trips on a route and update the stop dates as additional trips are added.
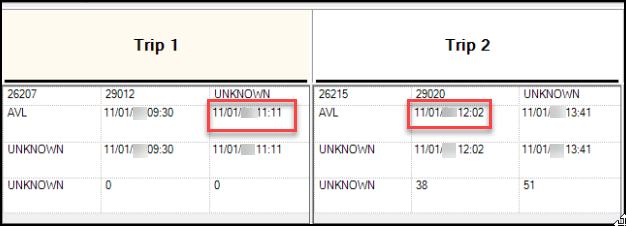
In this example, the system has determined that there are 38 miles between the final destination of Trip 1 and the start location of Trip 2.
It determined that it will take 51 minutes to travel 38 miles.
Trip 2 begins at 12:02 PM which is 51 minutes after Trip 1’s end time of 11:11 AM.
The Gantt bar automatically updates as trips are added to the route to give a visual of the time duration between the trips.

A deadhead stop is added automatically if a driver is assigned to the route. This type of stop will be added at the beginning of the trip(s) to get the driver/tractor to the next starting location.
Dispatching Planned one-time routes
When you have completed planning the route, the carrier will need an automated process to dispatch all eligible trips associated with a route or dispatch trips singularly on a route.
| A trip can be dispatched only if it is in a Planned (PLN) status and has the appropriate assets assigned to it (Driver/Tractor). |
Dispatching a single trip
To begin dispatching a single trip, follow these steps:
-
Select one trip that you want to dispatch.
-
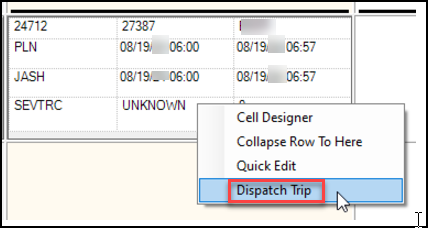
Right-click on the trip and select Dispatch Trip.
-
Select OK on the Dispatch Status message.
The trip Status is changed to Dispatched (DSP)
Note: The Status field may need to be added using Cell Designer. -
Select Save.
The Route is saved with the dispatched trip. The Trips grid shows the updated DSP status under the Dispatch Status column.
| If you access the Quick Edit window through the right-click menu, the data will be in a read-only mode when changes are made to a single trip. |
Dispatching a route
To begin dispatching a route, follow these steps:
-
Select a route that has multiple trips assigned to it.
-
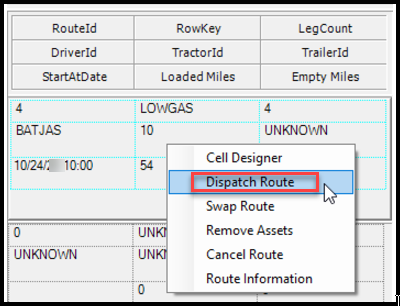
Right-click on the Route ID card and select Dispatch Route.
-
Select OK on the Dispatch Status message.
The trip Status is changed to Dispatched (DSP) -
Select Save.
The Trips grid shows the updated DSP status under the Dispatch Status column for each of the trips.
Notes:
-
Dispatching trips or routes without a tractor will result in a Dispatch Status notification message to select a tractor in order to dispatch.
-
If a trip is already dispatched and the route has both a PLN and DSP Status - Only the PLN trips will get dispatched.
The DSP trips are already dispatched. If this happens a Dispatch Status notification message will inform you.
Route Information window
The Route Information window can be used to view information for a selected route.
To review the route information overview, right-click in the Route Information grid and select the Route Information menu. A window will open to display the route information.
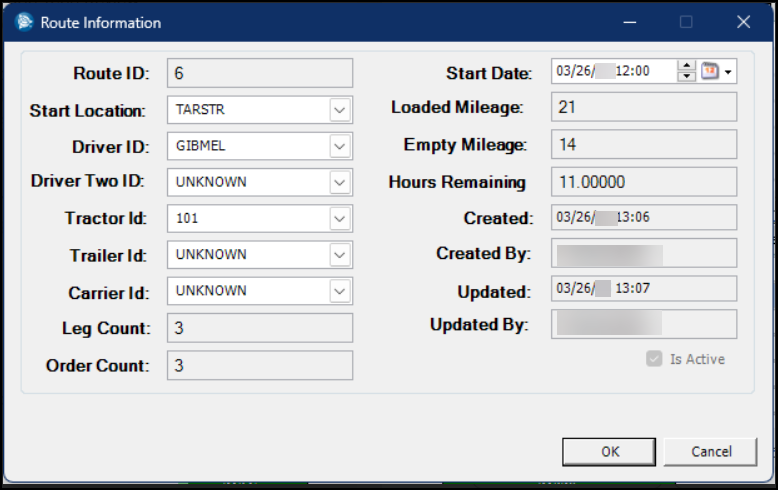
In the Route Information window you can update these fields:
-
Start Location
-
Driver ID
-
Driver Two ID
-
Tractor Id
-
Trailer Id
-
Carrier Id
-
Start Date
You can also view the Hours Remaining that a driver has for the HOS (Hours of Service).
Click the OK button to continue with any changes to the route, and update all associated legs assigned to the route.
The window will close and return to the Route Planner window.
Note: Changes must be saved from the main Route Planner window.
Canceling a one-time route
A route can be canceled if it is currently active and has a numeric Id number (PlannedRouteId) that is greater than zero (0).
To cancel a route, follow these steps:
-
Select the route to be canceled.
-
Right-click on the route.
A Cancel Route confirmation message will display. -
Select Yes to proceed canceling or No to stop canceling.
-
Select Save.
Once canceled, the trip is no longer assigned to the route, assets are removed from it (except in the STD status) and the trip will appear back in the AVL status in the Trips grid.
Batch dispatch Planned routes
Route Planner provides the option to dispatch multiple Planned routes at the same time. To use this option, follow these steps:
-
Right-click any route and select the Batch Dispatch Routes menu option.
The Batch Dispatch Routes window opens.
The data grid displays both route information and the legs associated with the route. -
Click the Select box to select one or more routes to be dispatched.
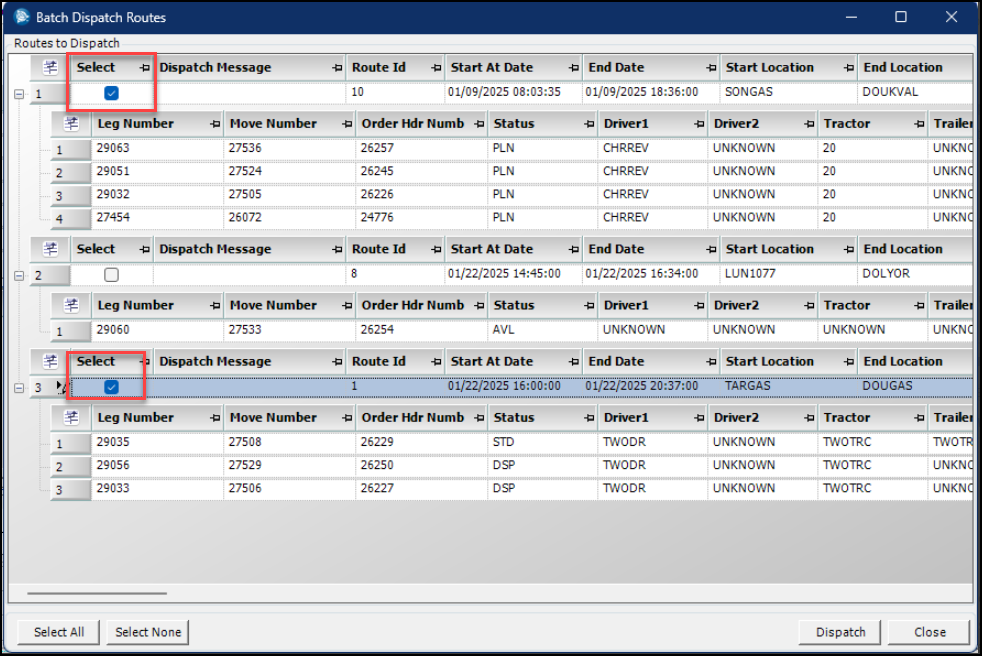
-
Click the Dispatch button to dispatch the selected routes.
Any informative messages associated with the route will display in the Dispatch Message column.
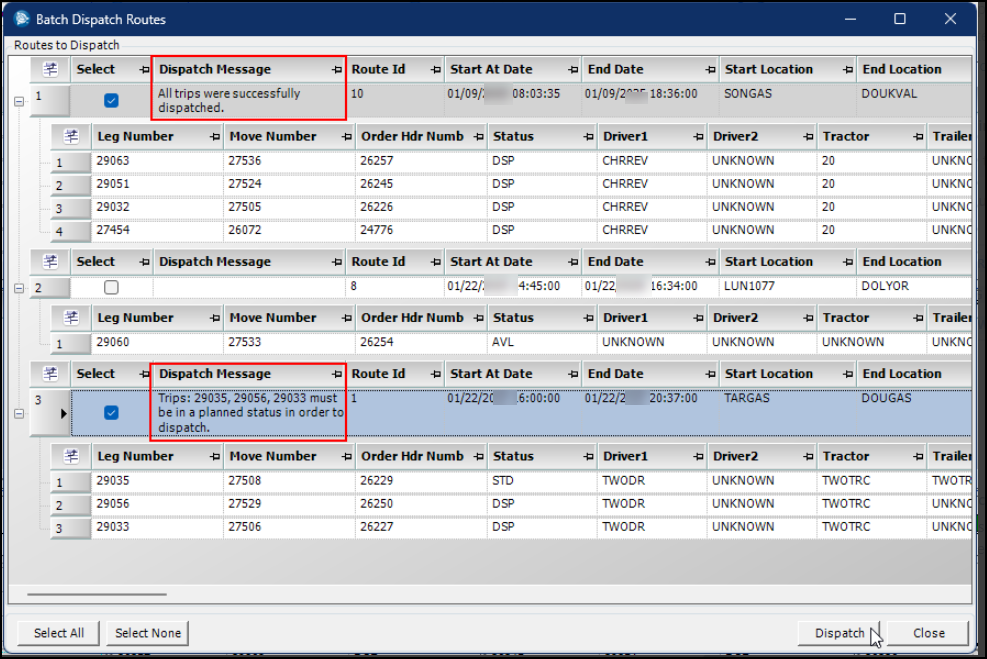
Note: The same route cannot be dispatched twice. Once dispatched the record in the data grid will turn gray in color and the Select column will no longer be editable.
-
Click the Close button on the window.
This will return you to the Route Planner form where the changes will need to be saved.
If the Route Planner is refreshed without the changes being saved, the changes will be reverted.
Driver swap one-time routes
You have the option to swap drivers on a route as needed. To use the driver swap option, follow these steps:
-
Right-click on a route and select Swap Route
The Swap Routes window opens. -
Select the "+" sign next to a driver.
The grid will expand and display the orders that are on the route for that driver. The content is read only.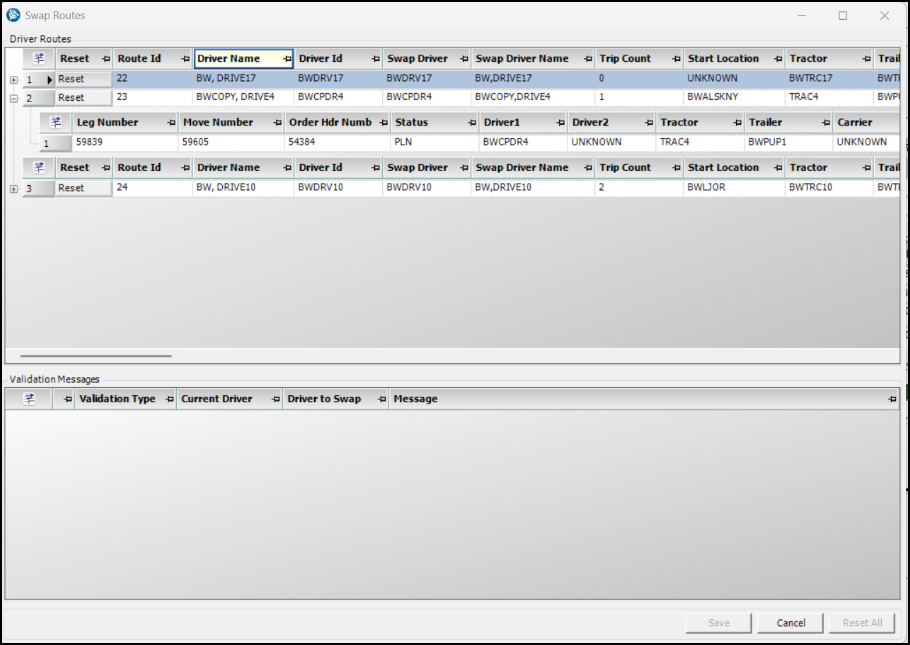
-
Select a new driver from the Swap Driver column to replace the existing driver.
The Swap Driver column will display UNKNOWN for the new driver selected.
For the route to be swapped, the route start time will be updated to the new driver’s route start time. A message will display in the windows Validation Messages grid with information on the swap.

| A driver cannot be assigned to more than one route under the Swap Driver column. |
-
Select Save.
The changes are saved, and the window will close.
The Route Planner will automatically update with the driver route(s)that were swapped.
Reset and Canceling routes
If you need to make a change during the swapping process, you can reset the changes you were making. These options are available in the Swap Routes window.
-
Use the Reset button to reset to its original state.
Note: The Reset button is only active when a swap is made. -
Use the Reset All button, if you make one or more swaps.
-
Use the Cancel button to cancel changes and to close out of the window.
