Setting up the No-Touch Processor
The No-Touch Processor automates the procedures for invoicing and settling trips in TMW Back Office. You can configure the amount of automation you want to allow.
For example, you can create an automated process for rating invoices from orders that are ready for billing and then save them in the On Hold status. You can also automate the process for taking orders all the way through printing the invoices. The automated process is configurable based on your TMW Back Office queues and view definitions.
The No-Touch Processor is a Windows Service that runs in the background on a user’s computer. There is no user interface beyond the installer itself. Additional setup is required that involves establishing INI paths, user credentials, and so on.
|
The No-Touch Processor is supported for:
|
General requirements
Before you install the No-Touch Processor, check that these requirements have been met:
-
You must have TMWSuite, TMW Operations, and TMW Back Office installed.
For installation information about those applications, see:-
Installing/upgrading TMWSuite in the Getting started with TMWSuite online help
-
-
You must be logged into the system where you want to install the No-Touch Processor, and have administrator rights for that system.
-
You must have SQL Server System Administrator rights.
The installation of the No-Touch Processor includes the manual application of a SQL script to your database. You must have a SQL Server administrator login and password to apply it.
Quick setup guide
Setup includes downloading and installing the software and then configuring it to run on your system. The specific steps are:
-
Set up restriction sets (TMW Back Office only)
Installing the No-Touch Processor
The steps to install the No-Touch Processor include:
-
Downloading the application files
-
Installing the application
-
Applying SQL to your database
Downloading the application files
This process assumes that you have already downloaded and installed the correct version of TMW Back Office.
-
In Trimble Transportation ClientCenter, go to Build Delivery > Downloads.
-
Use the Line of Business, Product, and Build lists to locate the No Touch Billing Service.
Notes:
-
You must install the version of the No-Touch Processor that is associated with the TMW Back Office version you are using.
-
When you update to a new version of TMW Back Office, you must uninstall your current version of the No-Touch Processor and then install the new version that is associated with the updated version of TMW Back Office.
-
-
Click View Details to go to the Software Delivery Files page and download the installation file.
-
When prompted to run or save the installation file, save it to your desktop or Downloads folder.
Installing the application
After you download the installation files, you can install the application on your machine. Follow these steps.
-
Open the installation .zip file you downloaded and saved.
-
Double-click the .msi file.
The Welcome to the No-Touch Processor Setup Wizard opens. -
Click Next to continue. The Select Installation Folder window opens.
-
Do one of the following:
-
To accept the installation folder, click Next.
-
To change the installation folder, click Browse.
-
In the Browse for Folder window, locate the appropriate folder.
-
Click OK.
-
-
-
Select one of the following radio buttons:
-
Everyone
If other users will be accessing the application from this computer. -
Just me
If you will be the only person accessing the application from this computer.
-
-
Click Next.
The Confirm Installation window opens. -
Click Next.
The Installing window displays momentarily. -
When the Installation Complete window opens, click Close.
After installation is complete, your install directory will have all the following:
-
The necessary .dll files to run the service
-
A SQL folder containing a copy of TMWBackOfficeDBMods.sql file
-
The TMWBackOffice_NoTouchProcessor.exe executable file.
Applying SQL to your database
To ensure that your database is correctly modified, you must apply the TMWBackOfficeDBMods.sql file to your database. This file was installed in the SQL folder in the same directory as the other No-Touch Processor files.
To apply the SQL file to your database, follow these steps.
-
In Windows Explorer, access the folder and double-click the TMWBackOfficeDBMods.SQL file.
-
Apply the SQL to your database.
Note: For instructions, consult your Microsoft SQL Server Management Studio or SQL Server Enterprise Manger documentation. If you need further assistance, contact Trimble Transportation Support. If you do not already have an account, you can create one by clicking Sign Up.
Configuring the No-Touch Processor
Configuration of the No-Touch Processor includes:
-
Editing the configuration file
-
Using QuickDesigner to add the no-touch flag in the profiles
-
Marking companies and resources for no-touch processing
-
Setting up restriction sets for no-touch invoicing
-
Setting up the Windows Service
Editing the configuration file
The TMWBackOffice_NoTouchProcessor.exe.config file is located in the folder where you installed the application files. You can set several important parameters in the <appSettings> section of this configuration file. Do not make changes in other sections of the configuration file.
The configuration file consists of keys (i.e., settings) and values, which are the options associated with those keys. For example, you use the OrdersAvailableInterval key to specify how often the service will poll the database for orders that are eligible for invoicing.
<add key="OrdersAvailableInterval" value="5000" />
This table lists the keys in the order they appear in the configuration file.
| Key | Definition | Default Value |
|---|---|---|
|
|
|
|
|
|
|
Specifies how often the service polls the database for orders that are eligible for invoicing. The value is in milliseconds (e.g., 5000 = 5 seconds). |
|
|
The earliest time during the day that the system can poll for available orders. Works with the OrdersAvailableEndTime key to specify the times when the service is active. |
|
|
The latest time during the day that the system can poll for available orders. Works with the OrdersAvailableStartTime key to specify the times when the service is active. |
|
|
If the service fails to process an order because one or more order terms of reference numbers is not set, this is the amount of time that the service waits before retrying. The value is in hh:mm:ss format. |
|
|
If the service fails to process an order because one or more order terms of reference numbers is not set, this is the amount of time that the service waits before retrying a second time. The value is in hh:mm:ss format. |
|
|
If the service fails to process an order because one or more order terms of reference numbers is not set, this is the amount of time that the service waits before retrying a third time. The value is in hh:mm:ss format. |
|
|
If the service fails to process an order because one or more order terms of reference numbers is not set, this is the amount of time that the service waits before retrying a fourth or other time. The value is in hh:mm:ss format. |
|
|
If the service fails to process an order because of these reasons:
this is the amount of time that the service waits before retrying. The value is in hh:mm:ss format. |
|
|
If the service fails to process an order because of the reasons listed for ComputeChargesOrPayFirstRetryTimespan, this is the amount of time that the service waits before retrying a second time. The value is in hh:mm:ss format. |
|
|
If the service fails to process an order because of the reasons listed for ComputeChargesOrPayFirstRetryTimespan, this is the amount of time that the service waits before retrying a third time. The value is in hh:mm:ss format. |
|
|
If the service fails to process an order because of the reasons listed for ComputeChargesOrPayFirstRetryTimespan, this is the amount of time that the service waits before retrying a fourth or other time. The value is in hh:mm:ss format. |
|
|
Specifies how often the service polls the database for On Hold invoices that are eligible to be Ready To Print. The value is in milliseconds (e.g., 5000 = 5 seconds). |
|
|
The earliest time during the day that the system can poll for invoices On Hold. Works with the InvoicesOnHoldEndTime key to specify the times when the service is active. |
|
|
The latest time during the day that the system can poll for invoices On Hold. Works with the InvoicesOnHoldStartTime key to specify the times when the service is active. |
|
|
Specifies how often the service polls the database for Ready To Print invoices and attempts to print them. The value is in milliseconds (e.g., 5000 = 5 seconds). |
|
|
The earliest time during the day that the system can poll for invoices to be printed. Works with the InvoicesReadyToPrintEndTime key to specify the times when the service is active. |
|
|
The latest time during the day that the system can poll for invoices to be printed. Works with the InvoicesReadyToPrintStartTime key to specify the times when the service is active. |
|
|
If the printing of an invoice is delayed, this represents the amount of time the system will wait before moving to the next invoice in the print queue. The system will continue performing the original print job, but do so in the background. This allows for the service queue to not be bound by the speed of the printer. The value is in an hh:mm:ss format (e.g., 00:02:00 = 2 minutes) |
|
|
Specifies how often the service polls the database for trips that are ready to settle and attempts to compute pay details for them. The value is in milliseconds (e.g., 5000 = 5 seconds). |
|
|
The earliest time during the day that the system can poll for trips that are ready to settle. Works with the TripsReadyToSettleEndTime key to specify the times when the service is active. |
|
|
The latest time during the day that the system can poll for trips that are ready to settle. Works with the TripsReadyToSettleStartTime key to specify the times when the service is active. |
|
|
If the service delays a settled trip because paperwork requirements were not met, this is the amount of time that the service waits before retrying. The value is in hh:mm:ss format. |
|
|
If the service delays a settled trip because paperwork requirements were not met, this is the amount of time that the service waits before retrying a second time. The value is in hh:mm:ss format. |
|
|
If the service delays a settled trip because paperwork requirements were not met, this is the amount of time that the service waits before retrying a third time. The value is in hh:mm:ss format. |
|
|
If the service delays a settled trip because paperwork requirements were not met, this is the amount of time that the service waits before retrying a fourth or other time. The value is in hh:mm:ss format. |
|
|
Specifies how often the service polls the database for driver HOS log data. The value is in milliseconds (e.g., 5000 = 5 seconds). |
|
|
The earliest time during the day that the system can poll for driver HOS log data. Works with the DriverHOSLogsImportEndTime key to specify the times when the service is active. |
|
|
The latest time during the day that the system can poll for driver HOS log data. Works with the DriverHOSLogsImportStartTime key to specify the times when the service is active. |
|
|
|
|
|
Specifies how often the service polls the database for trip match HOS log data. The value is in milliseconds (e.g., 5000 = 5 seconds). |
|
|
The earliest time during the day that the system can poll for trip match HOS log data. Works with the TripMatchHOSLogsImportEndTime key to specify the times when the service is active. |
|
|
The latest time during the day that the system can poll for trip match HOS log data. Works with the TripMatchHOSLogsImportStartTime key to specify the times when the service is active. |
|
|
|
|
|
Determines the number of days the service can look back for trips. For example, if this value is 10, the service looks for trips with dates that occurred within the past 10 days. |
|
|
Determines which activities the system will not consider for trip matching. |
|
|
For accurate calculating of hours worked during Premium Time, this determines where to split the duty status according to the Premium Time period. The value is in 24-hour format. Multiple values are separated by comments (for example, |
Blank; that is, no entry |
|
Maximum number of "leftover" minutes available from the end of a trip that can be applied to a concurrent trip. |
|
|
Specifies how often the service validates time details. The value is in milliseconds (e.g., 5000 = 5 seconds). |
|
|
The earliest time during the day that the system validates time details. Works with the TimeDetailValidationEndTime key to specify the times when the service is active. |
|
|
The latest time during the day that the system validates time details. Works with the TimeDetailValidationStartTime key to specify the times when the service is active. |
|
|
Number of minutes a time detail record with an Approved status can exist before it is cleaned up for reprocessing as defined by the CleanupTimeDetailsProcessInterval key. |
|
|
Number of minutes a time detail record with a Pending status can exist before it is cleaned up for reprocessing as defined by the CleanupTimeDetailsProcessInterval key. |
|
|
Number of minutes a time detail record with a NotApplicable status can exist before it is cleaned up for reprocessing as defined by the CleanupTimeDetailsProcessInterval key. |
|
|
Number of minutes a time detail record with a Locked status can exist before it is cleaned up for reprocessing as defined by the CleanupTimeDetailsProcessInterval key. |
|
|
Specifies how often the service "cleans up" records for reprocessing. The value is in milliseconds (e.g., 5000 = 5 seconds). |
|
|
The earliest time during the day that the system can perform the cleanup process. Works with the CleanupTimeDetailsProcessEndTime key to specify the times when the service is active. |
|
|
The latest time during the day that the system can perform the cleanup process. Works with the CleanupTimeDetailsProcessStartTime key to specify the times when the service is active. |
|
|
The path to the directory containing your TTS50.ini file. |
|
|
The path to the directory containing your TTSLocal.ini file |
|
|
The path to the directory containing the No Touch Processor executable |
|
|
Determines whether the SQL Server dependency is on (true) or off (false) |
|
|
Sets the minimum level of logging based on the Importance value on each log message.
|
|
Setting a path to your INI files
By default, the No-Touch Processor assumes that your TTS50.ini and TTSLocal.ini files are in the same directory as the TMWBackOffice_NoTouchProcessor.exe. If your INI files are in a different directory, you must tell the system where the files are located. You can do this in one of two ways:
-
Make entries in the TMWBackOffice_NoTouchProcessor.exe.config file. For example:
<add key="TTS50Location" value="C:\[path]\TTS50.ini" />
<add key="TTSLocalLocation" value="C:\[path]\TTSLocal.ini" /> -
Use command-line arguments
You can use the
-G, -Lcommand line arguments to specify the TTS50 and TTSLocal file paths. For more information, see Understanding how to use command line arguments for no-touch processing.
Using QuickDesigner to add the no-touch flag to the profiles
Before you can use no-touch processing, you must use QuickDesigner to add the IsNoTouchBillingEligible checkbox to the appropriate profiles. The checkbox allows you to flag specific Bill To companies and/or resources for no-touch processing.
-
For invoicing, you add the checkbox to the company profile.
-
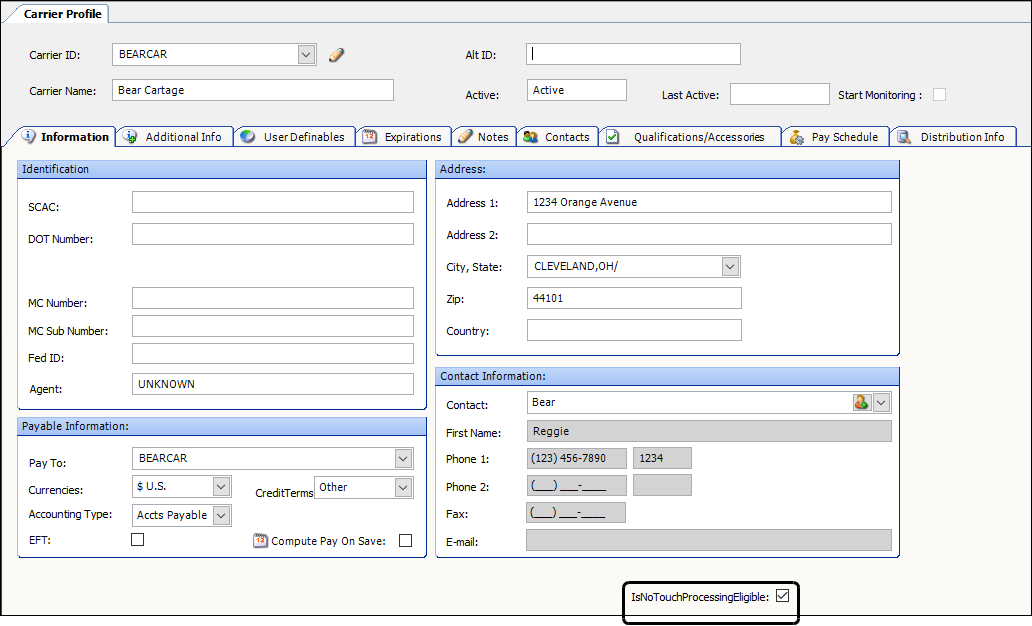
For settlements, you add the checkbox in the appropriate resource profile: driver, tractor, or carrier.
This illustration shows the checkbox in the Carrier profile.
Adding the no-touch flag to a company profile for invoicing
To use the No-Touch Processor for invoicing, you must add the no-touch flag to the company profile. To add the no-touch flag, follow these steps.
-
Open the company profile.
-
Launch QuickDesigner.
-
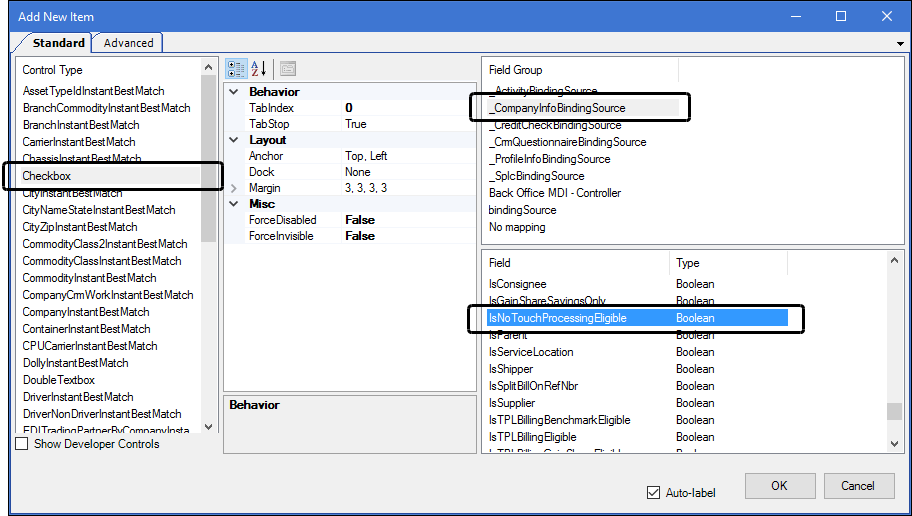
In the Add New Item window, specify the following:
-
Control: Type: Checkbox
-
Field Group: CompanyInfoBindingSource
-
Field: IsNoTouchProcessingEligible
-
Adding the no-touch flag to a resource profile for settlements
To use the No-Touch Processor for settlements, you must add the no-touch flag to the resource profile. To add the no-touch flag, follow these steps.
-
Open the profile for the type of resource: driver, tractor, or carrier.
-
Launch QuickDesigner.
-
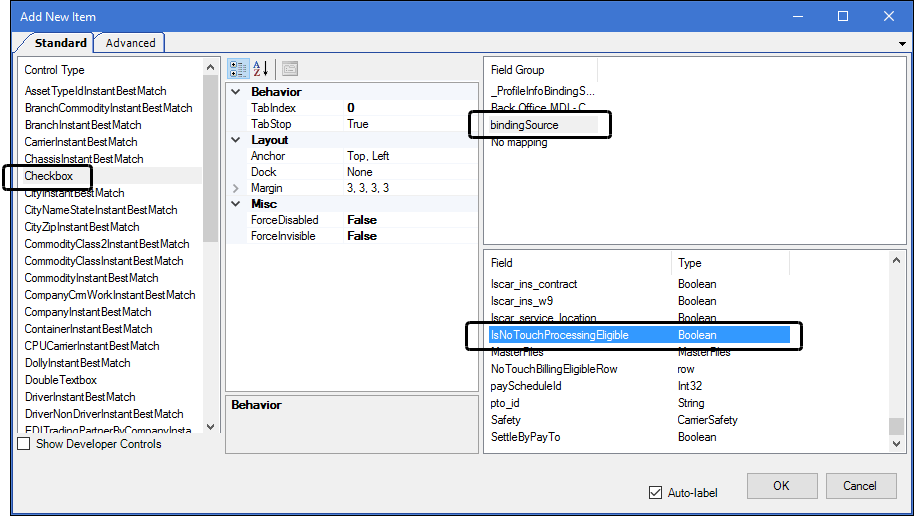
In the Add New Item window, specify the following:
-
Control: Type: Checkbox
-
Field Group: bindingSource
-
Field: IsNoTouchProcessingEligible
-
Marking companies and resources for no-touch processing
You select the IsNoTouchBillingEligible checkbox to specify that an entity is eligible for no-touch processing.
-
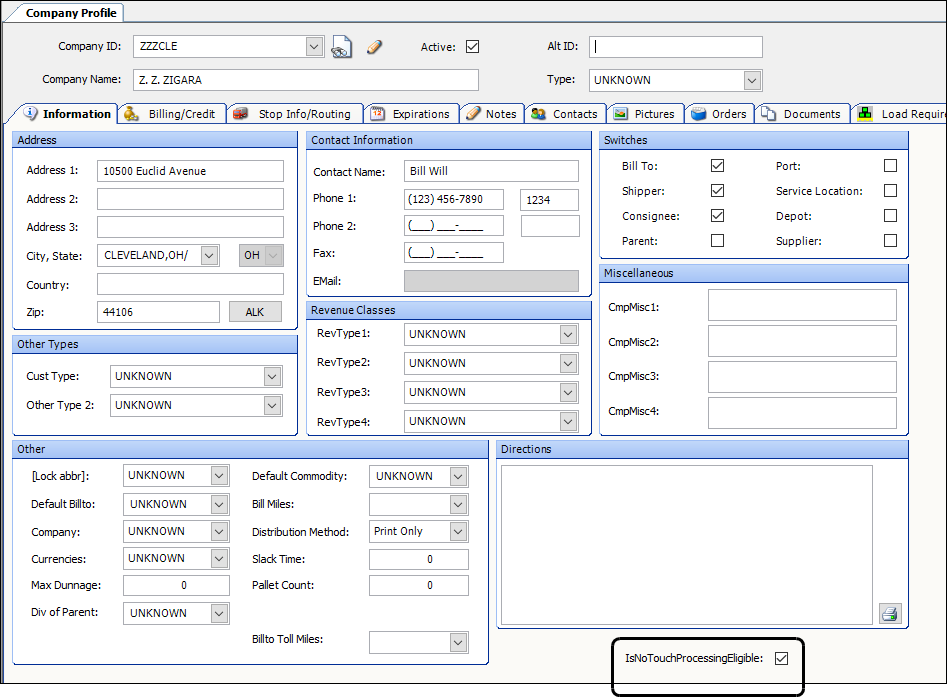
For invoicing, you select the checkbox in the Bill To company’s profile. This illustration shows the checkbox selected in a company profile.
-
For settlements, you select the checkbox in the profile of the appropriate driver, tractor, or carrier. This illustration shows the checkbox selected in a carrier profile.
Setting up restriction sets for no-touch invoicing
To use no-touch processing for invoicing, you must set up a restriction set that specifies whether a Bill To company’s invoices will be processed by the feature. You set up restriction sets in the No Touch Billing Maintenance window.
-
Go to Tools > Setup > No-Touch Processing > Billing Maintenance.
The No Touch Billing Maintenance window opens.
-
Click
 Add.
Add.
A blank row is added. -
Make entries in these fields.
* = Required
Applies To
Select the Bill To company.
Note: If you set this to UNKNOWN, the view is available for all Bill To companies.
Invoice Orders Board *
Select the board the system will use to filter Available orders to be invoiced.
Notes:
-
The default option is Orders Ready for No-Touch Billing.
-
Any board that has a Board Type of NTBSCR is displayed.
Invoices on Hold Board *
Select the board used to filter On Hold invoices to be set to Ready to Print.
Notes:
-
The default option is Invoices On Hold for No-Touch Billing.
-
Any board that has a Board Type of NTCSCR is displayed.
Print Invoices Board *
Select the board used to filter Ready To Print invoices to be printed.
Notes:
-
The default option is Invoices Ready To Print for No-Touch Billing.
-
Any board that has a Board Type of NTDSCR is displayed.
End Invoice Status
Select the invoice status at which the no-touch process will stop. Options include:
-
OnHold for Audit
-
On Hold
-
Ready To Print
-
Printed
Eligibility Date
Specify the date type used to determine if the order is eligible for processing. Options include:
-
Order Ship Date
-
Order Delivery Date
-
Order Final Date
Eligibility Lag Days
Specify if any days should be added to the eligibility date when determining if the order is eligible for processing.
Note: Used with the Eligibility Date column. It specifies a timespan (in days) that must pass after the eligibility date before an order is eligible for no-touch invoicing. For example, if Order Ship Date is the Eligibility Date, and Eligibility Lag Days is set to 5, an order with a ship date of 1/5/2025 is not eligible until 1/10/2025.
Eligibility Terms
Specify the payment term restriction for this board, if any. Options include:
-
PPD
Prepaid -
COL
Collect
Note: These terms are from the CreditTerms label.
Require Fuel Surcharge
Select this checkbox to limit the invoices processed to those that have a Fuel Surcharge invoice detail.
Eligibility Ref Types
If you want, specify a reference number type restriction that will limit the invoices processed to those with the specified reference number type(s).
Clicking the Ref #s button for any configuration record on the grid, displays a popup reference type editor. You can use the editor to specify multiple reference number type requirements. The button is highlighted in red when one or more reference number requirements are present for the given configuration record.
Notes:
-
This restriction only applies to the Invoice Orders queue.
-
When multiple reference numbers are listed, the invoice must contain all the specified reference numbers.
-
The system will look at all reference numbers tied to an order, not just the first one written directly to a given orderheader record.
This illustration shows a sample restriction set.

-
-
Click
 Save.
Save. -
Repeat Steps 2-4 for each additional Bill To company.
Understanding how to use command line arguments for no-touch processing
You must set up a command line argument that the Windows Service will use to call the TMWBackOffice_NoTouchProcessor.exe. The following table explains the commands and arguments available for use with no-touch processing.
| Parameter | Description |
|---|---|
|
Command for accessing the Service Controller’s configuration utility |
Service name |
Enter TMWNTProcessor Notes:
You can use the sc getkeyname command at the command prompt to retrieve the service name. See your Microsoft documentation for more information. |
|
Enter the path to the TMWBackOffice_NoTouchProcessor.exe file followed by the applicable command line arguments. You must enter a space between the binPath parameter and its argument. You should also use double quotes around the entire argument. Note: The |
You can add the following command line arguments after the binPath argument.
| Command line argument | Description |
|---|---|
|
Enter your TMW Back Office username. |
|
Enter your TMW Back Office password. |
|
Enter the path to the TTS50.ini file. |
|
Enter the path to the TTSlocal.ini file. |
|
Run the no-touch process for invoicing. |
|
Run the no-touch process for settlements. |
Registering the permanent command line parameters
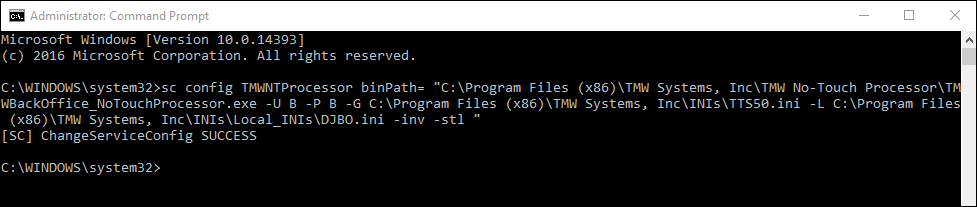
You must permanently register the command line parameters to be passed to the service upon startup. This string shows a sample command line argument for the No-Touch Processor Windows Service:
sc config < enter the service name> binPath= "<enter the path to the EXE>\TMWBackOffice_NoTouchProcessor.exe -U <enter the TMW login> -P <enter the TMW password> -G <enter the path to TTS50>\TTS50.ini -L <enter the path to TTSlocal>\TTSlocal.ini -inv -stl "
To permanently register the command line parameters, follow these steps.
-
Open the command prompt as an administrator.
-
Enter the command.
-
Press ENTER.
When it completes the command, the system displays SUCCESS message.
-
Close and reopen TMW Back Office.
|
For more information about using the SC.exe command to manage Windows Services from the command line, see the following Microsoft TechNet webpages: |
Editing the Windows Service
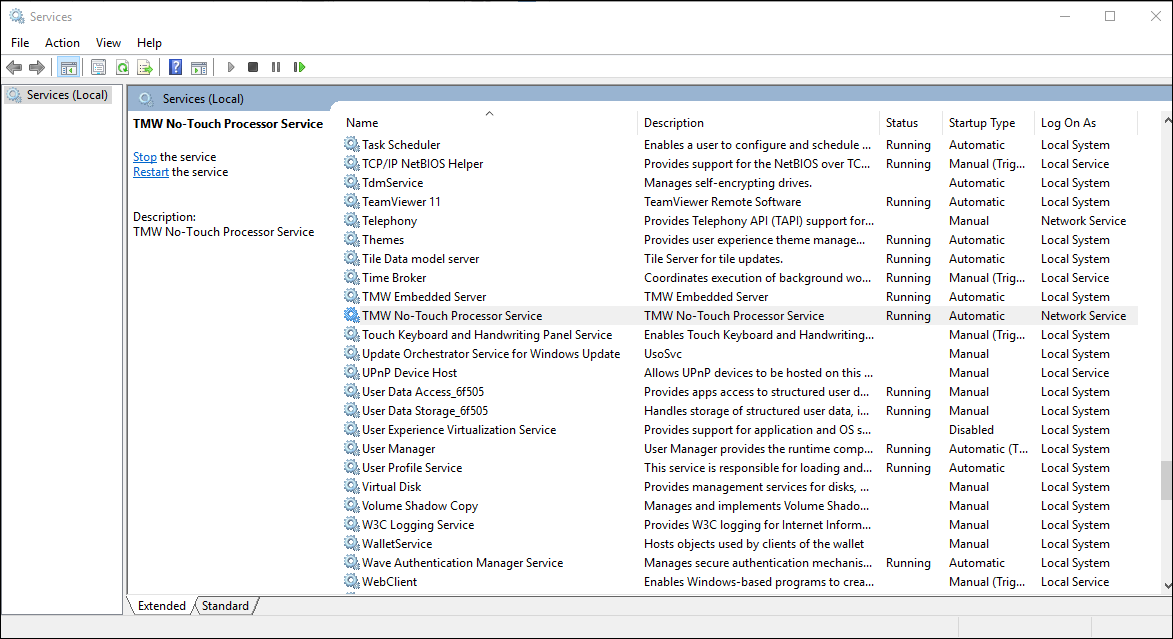
When you ran the No-Touch Processor installer, the system automatically created the Windows Service named TMW No-Touch Processor Service. Although the service was installed, you must edit it before using the feature.
The Windows service for the No-Touch Processor periodically polls the database to check whether any invoices and/or settlement records are ready for processing.
A Windows Service is an application type that runs in the system background without a user interface. In the Services window, you can edit a service’s properties, and you can start, stop, pause, resume, or disable the service.
To edit the Windows Service, follow these steps.
-
Open the Services window and navigate to the TMW No-Touch Processor Service.
Note: See your Windows documentation for information about accessing or using Windows Services.
-
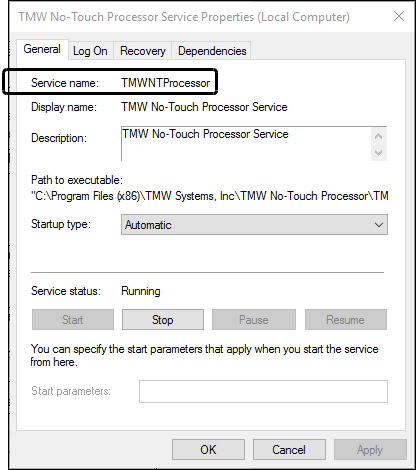
Right-click on the No-Touch Processor Service service. Then select Properties.
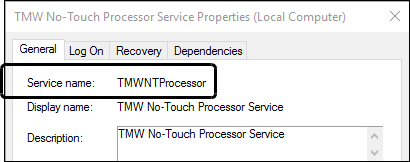
The No-Touch Processor Service Properties window opens.
Note: The service name for the No-Touch Processor is TMWNTProcessor.
-
On the Log On tab, select Local System account.
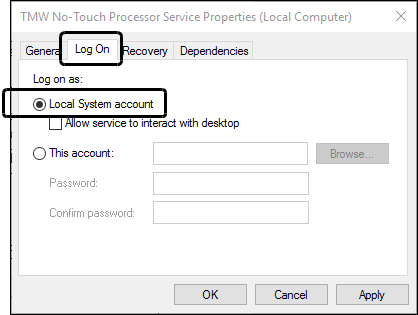
-
Click Apply.
-
Click OK.
-
Right-click on the No-Touch Processor Service service. Then select Refresh.
-
Close the Services window.
Activating the logging service
As an option, you can set up No-Touch Processor to log all of its messages to a database table named TMWSystemWideLogging.
The logged information can be useful for troubleshooting why a given order or invoice is not processing as expected.
If this setup is not performed, the no-touch service will not write any log messages.
To activate the logger, paste the following INI settings into the TTS50.ini file you will be using with the No-Touch Processor. Be sure to include the section names, such as [LOGGER].
[LOGGER]
AppenderSetupCount=1
AppenderSetup0=DBLog
ActivationRulesCount=1

[Logger/AppenderSetup-DBLog]
AppenderClassName=DatabaseLogAppender
TableName=TMWSystemWideLogging
FieldMappingsCount=13
FieldMappings0=AppID
FieldMappings1=KeyWord1
FieldMappings2=KeyWord2
FieldMappings3=Importance
FieldMappings4=TMWUser
FieldMappings5=AppVersion
FieldMappings6=MiscDataDef
FieldMappings7=MiscData1
FieldMappings8=MiscData2
FieldMappings9=MiscData3
FieldMappings10=MiscData4
FieldMappings11=LogDate
FieldMappings12=Message
FieldMappings-AppID=%[AppID]
FieldMappings-KeyWord1=%[IF KeywordCount>0 THEN ToList(Keywords).Item(0) ELSE "Unknown" ENDIF]
FieldMappings-KeyWord2=%[IF KeywordCount>1 THEN ToList(Keywords).Item(1) ELSE "Unknown" ENDIF]
FieldMappings-Importance=%[Importance]
FieldMappings-TMWUser=%[TMWUser]
FieldMappings-AppVersion=%[AppVersion]
FieldMappings-MiscDataDef=%[ "1:" & IF AdditionalData().Keys.Count >0 THEN ToList(AdditionalData().Keys).Item(0) ELSE "Unknown" ENDIF & ", 2:" & IF AdditionalData().Keys.Count >1 THEN ToList(AdditionalData().Keys).Item(1) ELSE "Unknown" ENDIF& ", 3:" & IF AdditionalData().Keys.Count >2 THEN ToList(AdditionalData().Keys).Item(2) ELSE "Unknown" ENDIF& ", 4:" & IF AdditionalData().Keys.Count >3 THEN ToList(AdditionalData().Keys).Item(3) ELSE "Unknown" ENDIF]
FieldMappings-MiscData1=%[IF AdditionalData().Values.Count >0 THEN ToList(AdditionalData().Values).Item(0) ELSE "Unknown" ENDIF]
FieldMappings-MiscData2=%[IF AdditionalData().Values.Count >1 THEN ToList(AdditionalData().Values).Item(1) ELSE "Unknown" ENDIF]
FieldMappings-MiscData3=%[IF AdditionalData().Values.Count >2 THEN ToList(AdditionalData().Values).Item(2) ELSE "Unknown" ENDIF]
FieldMappings-MiscData4=%[IF AdditionalData().Values.Count >3 THEN ToList(AdditionalData().Values).Item(3) ELSE "Unknown" ENDIF]
FieldMappings-LogDate=%[Timestamp]
FieldMappings-Message=%[message]

[LOGGER/ACTIVATIONRULES0]
MatchAppIdsCount=1
MatchAppIds0=.NB
AppenderSetupNamesCount=1
AppenderSetupNames0=DBLog
RequiredKeywordsCount=1
RequiredKeywords0=NoTouchBatchProcess
OptionalKeywordsCount=0
NeededOptionalCount=0