Recording minimum charges for a row or column
Follow these steps to flag all of the cells in a row or column as minimum flat rates:
1. Set up the rate schedule according to the requirements of your contract:
Identify the type of rate (primary, secondary, line item, or linked line item rate).
Select the charge type that identifies the rate's calculation method (e.g., mileage, weight, volume, count, or percent of revenue).
Make entries in the appropriate fields in the rate header and index.
Create your rate table by making selections in the Rows and/or Col's fields in the rate header.
Add rows and/or columns and make entries as needed for all rates, except for the minimums.
2. To add a row or column for the minimum charges, do one of the following:
Minimums that are determined by row options must be entered in the first column, directly to the right of row values. Insert a column with the heading MIN.

Minimums that are determined by column options must be placed in the first row, directly under column values. Insert a new row with the heading MIN.
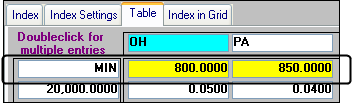
3. In each cell of the MIN row or column, right-click and select Rate As Flat from the shortcut menu and then enter the minimum flat rate.
The background of each minimum flat rate cell changes from white to yellow:

4. In the rate header area, select the  button.
button.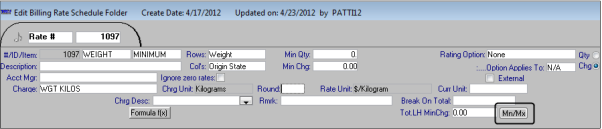
5. Your entry in the Min Rule field of the Min/Max window specifies where the system looks for minimums.
Do one of the following:
If your row selections determine which minimums apply, enter row.
If your column selections determine which minimums apply, enter col.
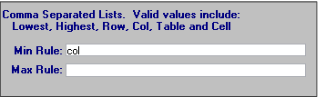
Note: The Lowest, Highest, and Table options in the Min/Max window are currently not functional. Using a comma-separated list of options is also not functional.
6. Click  again to close the window.
again to close the window.The button turns red (  ), indicating that a Min Rule has been applied to the rate.
), indicating that a Min Rule has been applied to the rate.7. Save the rate schedule.