Installing SystemsLink
These instructions represent a typical installation for all variants of SystemsLink.
Deviations from these installation instructions may result in unexpected results.
| The instructions in this guide are for use with SystemsLink versions 2016.3 and later. |
Prerequisites and requirements
You must have system administration rights on the target machine(s) to install and configure the required software.
Hardware
-
Processor: Quad core processor, 2.4 GHz or faster with 16GB RAM
-
Internal server storage: 250GB Serial ATA (SATA) drive
-
External server storage: minimum of four 146GB hard drives (using the RAID configuration, for backups)
Software
-
Microsoft Windows 2008 R2 Server or later
-
Internet Information Services (IIS) version 7 or later
-
Microsoft .NET Framework 4.7.2
-
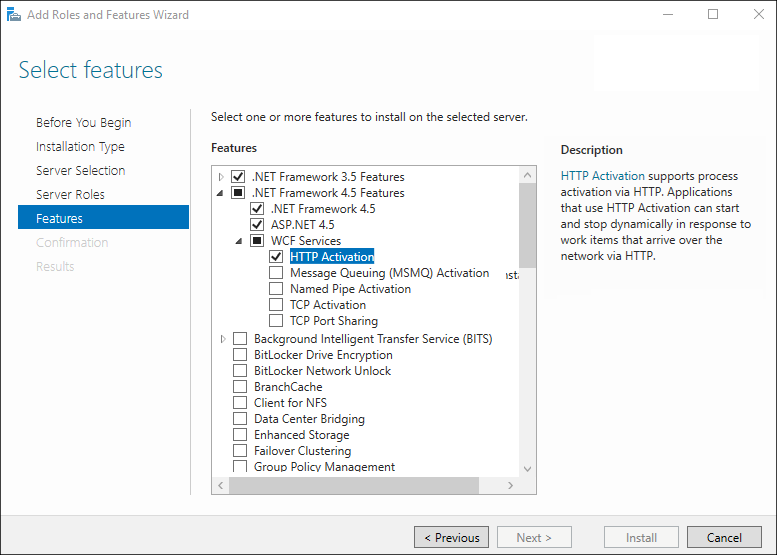
Verify the .NET Framework 4.5 WCF HTTP Activation feature is turned on:
-
Open Server Manager.
-
On the Dashboard, select Add roles and features.
The Add Roles and Features Wizard window opens. -
In the navigation pane, select Server Selection.
-
In the navigation pane, select Features.
-
Go to .NET Framework 4.5 Features > WCF Services.
-
Verify that the HTTP Activation checkbox is selected.
-
Internal server
-
SQL connectivity for the database
-
SystemsLink license
-
Mileage interface software for order-mileage calculation. For a list of supported software, contact Trimble Transportation Support.
-
TMWSuite 2016.15_07.0311 or newer, including the corresponding TMWSuite database
-
TMWSuite user account with access to the TMWSuite Dispatch application. You can set this up in TMWSuite System Administration.
-
Ttslocal.ini file pointing to the TMWSuite Dispatch server and database
-
Tts50.ini file pointing to the appropriate Ttslocal.ini file. Ensure the following settings are in the
[Misc]section:-
GlobalLogon=No -
UserWindowsAuthentication=N
-
Downloading the SystemsLink installation files
Download the SystemsLink installation files from Trimble ClientCenter.
-
Use the Line of Business, Product, and Build fields on the Downloads page to locate the TMW Web Products build that you want to download. SystemsLink is contained within the installer.
-
Select the build you want and click View Details.
The Software Delivery Files page opens. The top of the page displays notes about the selected build. -
Review the notes and select the I have reviewed the notes above provided by Trimble for this download checkbox.
The middle section of the page shows a Download link appears next to each file in the list. -
Click the Download link for the files you want.
-
Save them in an appropriate location.
| For more information about downloading files from ClientCenter, see Downloading product updates in the ClientCenter online help. |
Setup methods
These methods are valid for all variants of SystemsLink. Deviations from the given methods may result in unexpected behavior.
Multi-server setup
Trimble’s recommended setup is to install SystemsLink internal and external modules on separate servers, with the external module connected to the Internet. In this configuration, shown in the illustration below, SystemsLink can accept secured requests from authorized outside sources while remaining protected by a firewall.
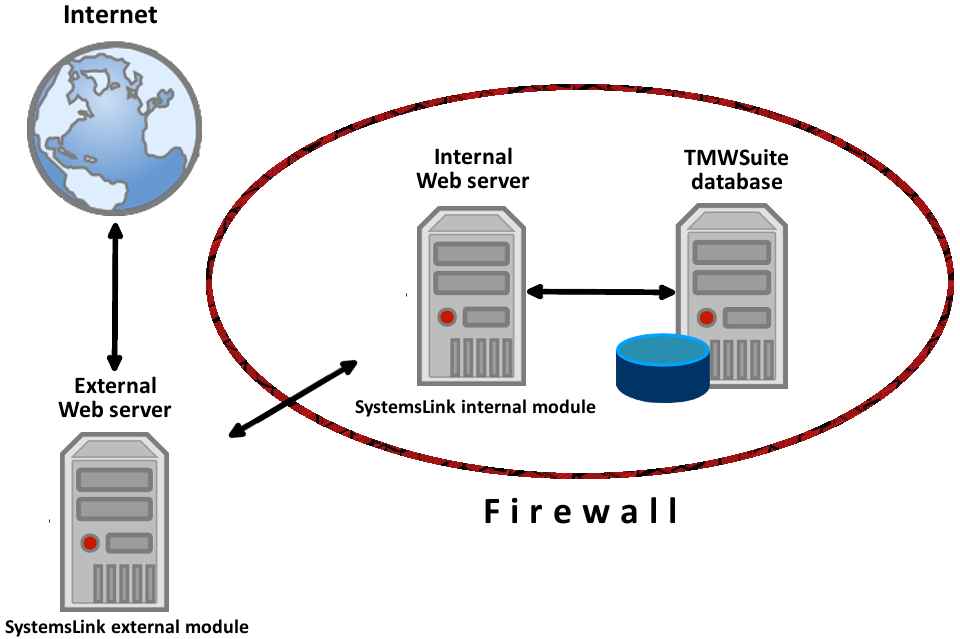
Before installing the external module in the recommended setup, ensure the external server can communicate with the internal server and the licensing server.
To perform the recommended setup, follow the instructions in these topics in this order:
Internal-module-only setup
SystemsLink does not require the external module. The illustration below shows a setup using only the internal module, allowing customer programs to communicate with SystemsLink directly.
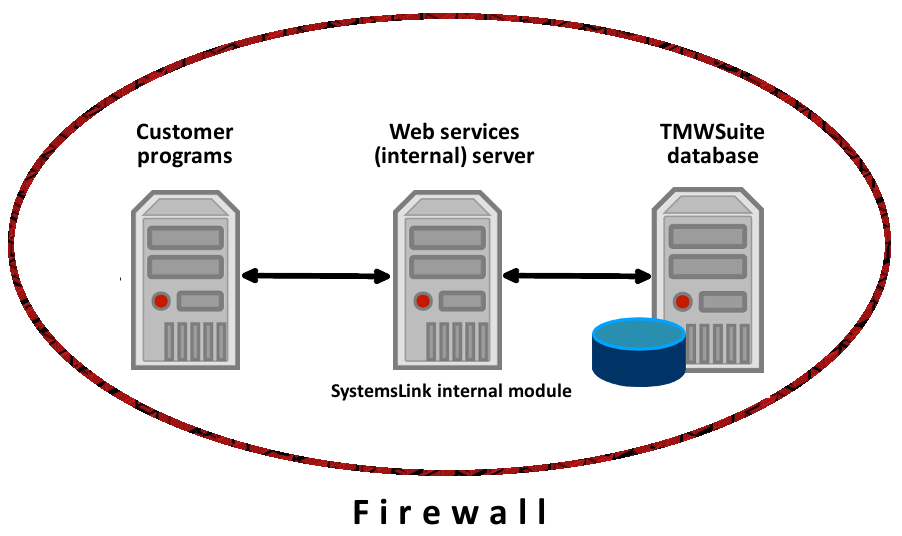
To perform the internal-module-only setup, follow the instructions in Installing the SystemsLink internal module.
Single-server setup
If necessary, you can install both the internal and external modules of SystemsLink on the same server.
For this setup, first follow the instructions in Installing the SystemsLink internal module. Then, perform the following steps.
-
Follow steps 1-3 of Modifying an existing SystemsLink installation.
-
Follow steps 5-9 of Installing the SystemsLink external module.
-
Verify that the Install Type in the Installation Review window is Modify.
-
Click Begin Installation to begin the modification process.
-
If the installation was successful, click Finish to exit.
If an error or failure occurred, check the log file. If you cannot resolve the error or failure, provide a description of the problem and a copy of the log file to Trimble Transportation Support.
Installing the SystemsLink internal module
Before you begin, review the prerequisites and requirements.
-
Extract the installer to the target machine. Repeat this step for each machine.
Note: Keep a copy of the installer in case you need to upgrade, repair, or delete SystemsLink. -
As an administrator, run the installer.
-
Click Install Trimble Transportation Products.
Note: The About Trimble Transportation Products and Resources links do not contain information relevant to installing SystemsLink. -
In the License Information window, enter:
-
Your ClientCenter credentials
-
The environment in which you are installing SystemsLink
-
-
Click Login.
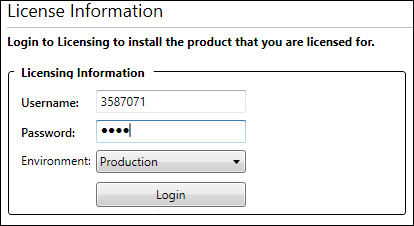
If the login fails after multiple attempts or you do not have a valid license for SystemsLink, contact Trimble Transportation Support.
-
After successfully logging in, click Next.
-
In the Installation Type window, select New Installation.
-
Set the Available Instances field value at 01 for a first time install.
-
Give a name for the instance and press TAB.
Note: You will need the instance name later in the installation process.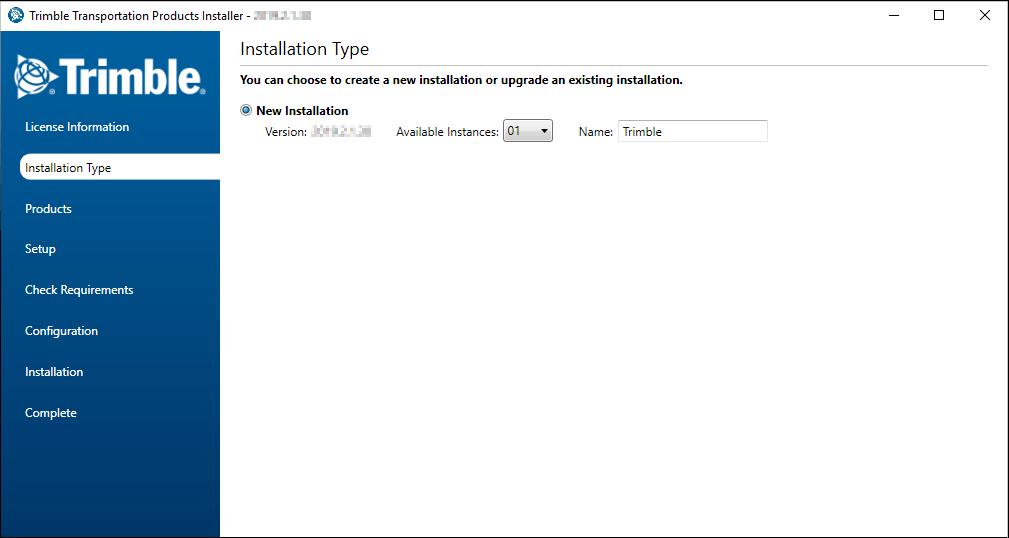
-
Click Next.
-
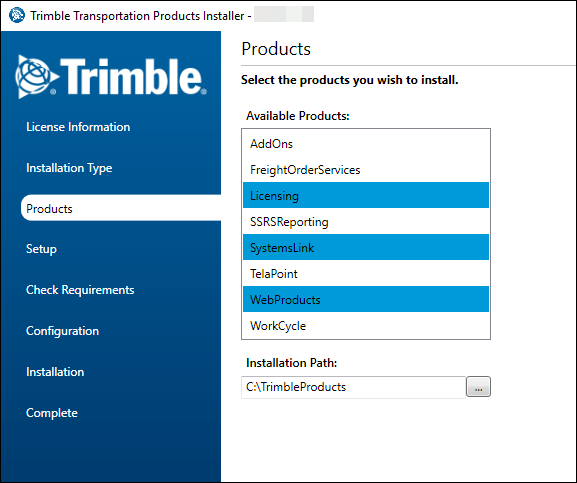
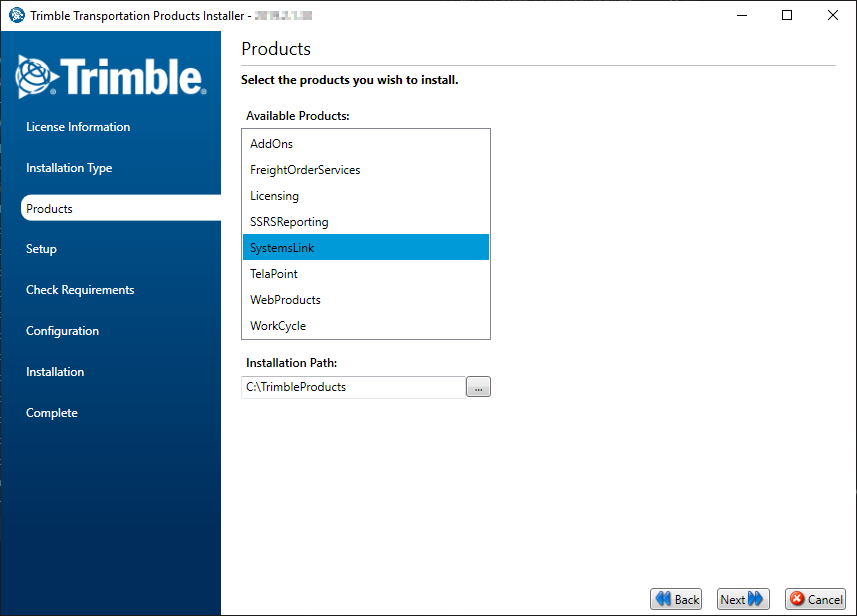
In the Products window, select the following products:
-
Licensing
-
SystemsLink
-
WebProducts
-
-
Change the installation path if needed, then click Next.
-
In the Setup window, select the following services:
-
Licensing API
-
WCF Services
-
Imaging Services
-
Web Framework WCF Services
-
-
If you do not have an existing web framework database to use, select Web Framework under the SQL Installations section. Otherwise, continue to the next step.
-
Select SystemsLink Core API.
Warning: You cannot install non-Fuel and Fuel services in the same instance. If both non-Fuel and Fuel services are selected in the Setup window, the Next button will be disabled until your selections are corrected.
-
Click Next.
-
Confirm whether requirements are met in the Requirements window.
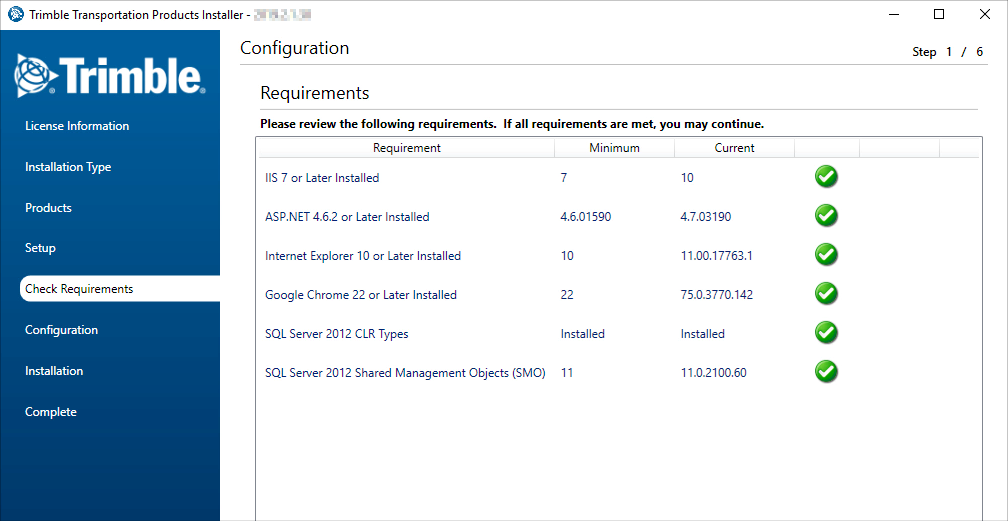
Click Next if at least one of the following is true:
-
All requirements are met
-
One or both browser requirements are not met, but all other requirements are met
Click Cancel if one or both of the following are true:
-
The IIS and/or ASP.NET requirement is not met
-
The SQL server requirement is not met and you are installing a version of SystemsLink that is earlier than 2017.3
As of version 2017.3, the minimum SQL Server requirement is 2008 R2. If your machine does not have this version installed, and you are installing version 2017.3 or higher, you will be prompted to install the SQL Server 2008 R2 CLR Types and Shared Management Objects (SMO). They are included with the installer.
-
-
In the IIS Setup window, make entries in the following fields for each service that you are installing.
Field Definition Auto Warmup Sites
For SystemsLink installation, be sure that this checkbox is cleared.
Web Site
The root-level web site in IIS Manager defaults to Default Web Site. Select the name of your web site.
Virtual Directory Name
The virtual directory receives queries and directs each query to the appropriate data source.
The default name for the services virtual directory appears in the field. If you want, enter another name for the virtual directory.
Is SSL?
First available in TMW Web Products 2018.2
Select this option if the service is using Secure Socket Layer (SSL).
Ext. Host
First available in TMW Web Products 2018.2
Select this option if the URL for the service will be called externally.
Application Pool Name
In IIS 7.0 and later, you group your web applications and services by assigning each to an application pool. Applications that call similar processes could be in the same application pool.
The default name for the application pool appears in the field. If you want, enter another name for the application pool.
-
Click Next.
-
In the SQL Setup window, specify the location and login credentials for the Web Framework database.
If you need to create the framework database, click Create New Database. Then, enter a unique database name in the text box that appears in the Database column.
Note: For the recommended multi-server setup, create the framework database on the external web application server.
-
Specify the location and login credentials for the TMW Operations database.
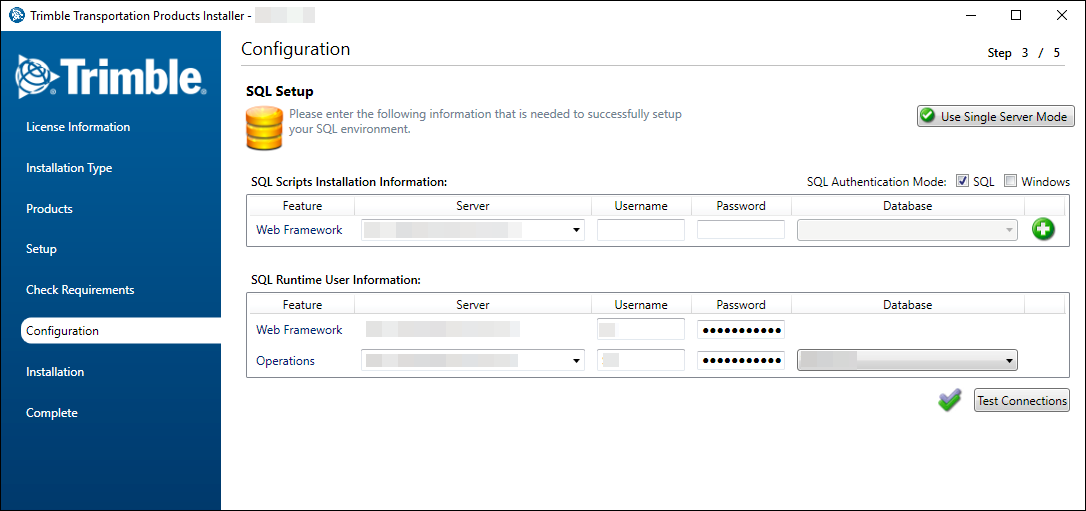
Field Definition Server
Select the server from the list. If you are installing version 2016.4 or above, you can manually enter the name of the server.
Username
Enter a user name used to connect to the server.
The user must have system administrator privileges for the server.
Password
Enter the password used to connect to the server.
Database
Select the TMWSuite database.
-
Click Test Connections. A successful test will display two checkmarks.

-
If the test was successful and all other information is correct, click Next.
-
In the TTS Setup window, enter the locations and names of the Tts50.ini and Ttslocal.ini files.
-
Enter the username and password for the TMWSuite user account with access to the TMWSuite Dispatch application as specified in Internal server, then press TAB.

-
Check for any errors, indicated by a red highlight surrounding a field, then do one of the following:
-
If there are no errors, click Next.
-
If there are errors, you must correct the information in those fields before continuing.
Once any errors are corrected, press TAB, then click Next.
-
-
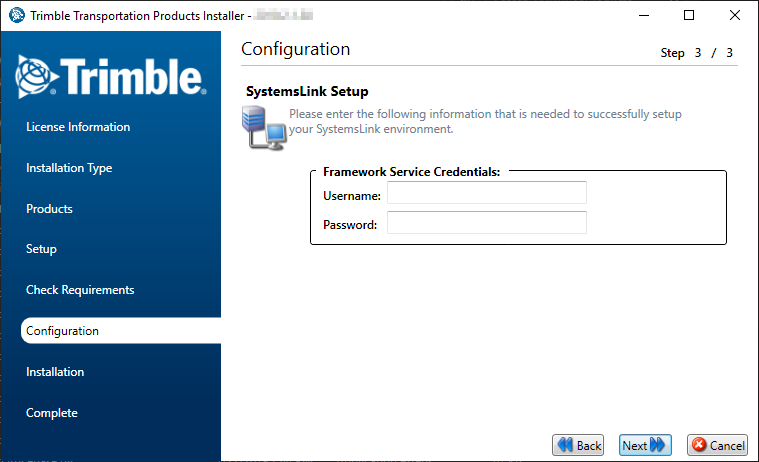
In the SystemsLink Setup window, configure settings based on their descriptions in the table below.
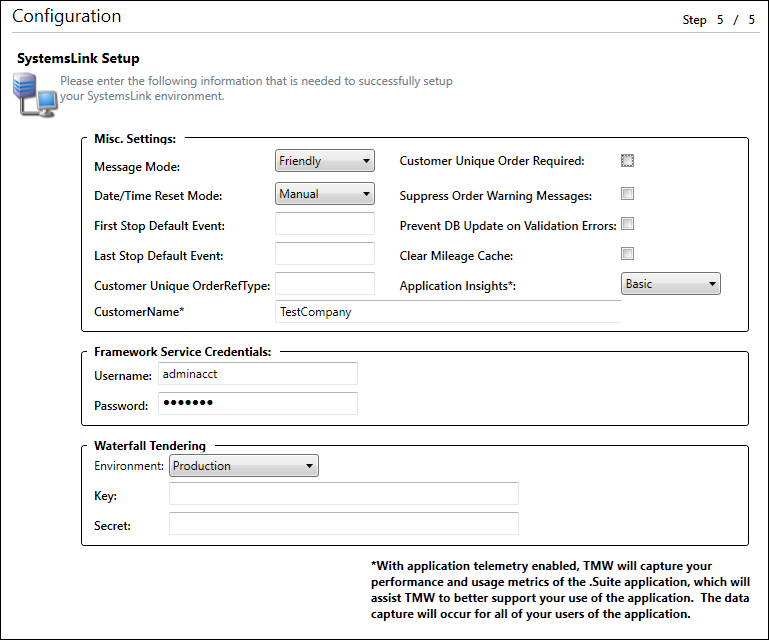
Note: This illustration and table represents some settings used by SystemsLink. Others may require configuration depending on your setup. Contact Trimble Transportation Support if you need to use or enable any of these optional settings:
-
First Stop Default Event
-
Last Stop Default Event
-
Customer Unique OrderRefType
-
Customer Unique Order Required
-
Suppress Order Warning Messages
Field Details Message Mode
The Detail option is selected by default. Select Friendly.
Date/Time Reset Mode
Specify how the system will calculate or recalculate travel times and adjust the dates/times for stops.
-
If you select Manual, the system does not update dates/times automatically.
-
To update arrival/departure times automatically using the travel times stored in the mileage database, select TMWSuite.
Prevent DB Update on Validation Errors
Select the checkbox to prevent changes in the database when a validation error occurs.
Clear Mileage Cache
Select the checkbox to delete previous mileage amounts from the system’s mileage cache.
Application Insights
Records performance and usage metrics. Valid values are:
-
Basic (default)
-
Exceptions
-
None
CustomerName
Enter a unique name to represent this instance of SystemsLink. With it, Trimble can capture data that can be used in troubleshooting.
Username
Enter the WebProducts Framework Service username.
Password
Enter the password for the WebProducts Framework Service username.
-
-
Verify that all settings have been filled out correctly, and then click Next.
-
On the Installation Review window, click Begin Installation.
-
Check the Success column to see the result of the installation. The icon indicates whether the installation is successful. If successful, click Launch to open the SystemsLink test-connection page.
Icon Definition 
The installation was not successful. Contact your Trimble Transportation Support representative. Be prepared to provide a copy the log file, which will reside on the machine’s desktop. You can view the file by clicking
 Open Log.
The installation was successful but one or more post-installation processes failed. Position your cursor over the icon to view a ToolTip describing the issue. Contact your Trimble Transportation Support representative. Be prepared to provide the information in the ToolTip as well as a copy of the log file.

The installation was successful. Click
 Launch to open the SystemsLink test-connection page. Then, click Finish to close the installer.
 -
Click Test Connection in the opened browser window containing the SystemsLink test-connection page. If the connection is successful, information appears that describes your system setup and licenses.
-
In the installer, click Finish.
Configuring and testing the SystemsLink internal installation
Applying SQL scripts to your database
Typically, when configuring your installation, the first step is to apply the appropriate SQL database modification script to your database. These scripts are located in the installation directory inside a folder named SQL_ followed by the version number of your installation. For instance, if installing SystemsLink 2021.2.1.30, the folder would be called SQL_2021_2_1_30.
If your version of SystemsLink is 2021.3.x or later:
-
Apply RunFirstToValidateSqlScriptVersions-OPS.sql to your database.
-
When the script completes, a message appears indicating your database version status.
-
If your database version is equal to or later than your SystemsLink version, you do not have to apply ETSDBMods.sql to your database. Continue to Step 4.
-
If your database version is no more than six versions older than your SystemsLink version, you must apply ETSDBMods.sql to your database. Continue to Step 3.
-
If your database version is more than six versions older than your SystemsLink version, we strongly recommend that you do not apply any other SQL scripts. Contact Trimble Support for assistance.
-
-
Apply ETSDBMods.sql to your database.
-
Apply RunLastToSetSqlScriptVersion-SL-OPS.sql to your database.
If your version of SystemsLink is 2021.2.x or earlier, apply ETSDBMods.sql to your database.
Continuing configuration and testing
After you have updated your database, continue configuring and testing your installation as indicated below.
-
Restart IIS.
Note: The TTS50.ini, TTSLocal.ini, and Web.config files are cached in memory to improve performance. After configuring your application or changing a setting, you must restart IIS to clear the cache and allow the new settings to take effect. -
To test the installation, go to the SystemsLink virtual directory in IIS and click Content View at the bottom of the window.
-
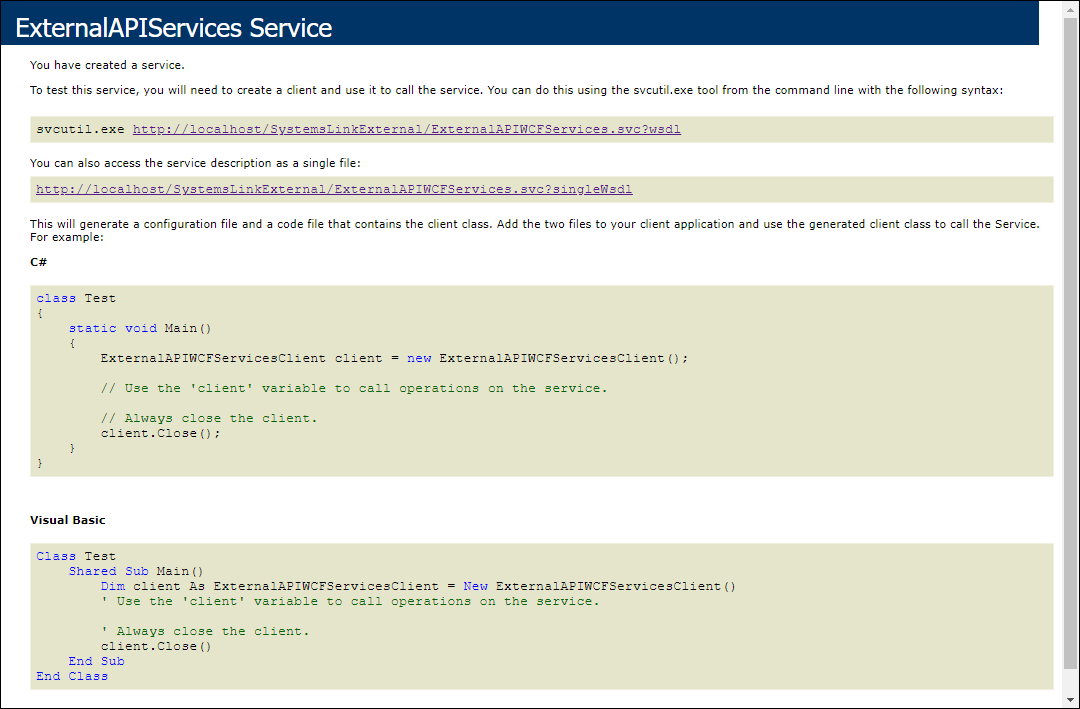
Right-click on the APIWCFServices.svc file and select Browse in the shortcut menu.
A browser page displays, verifying that you have created a service.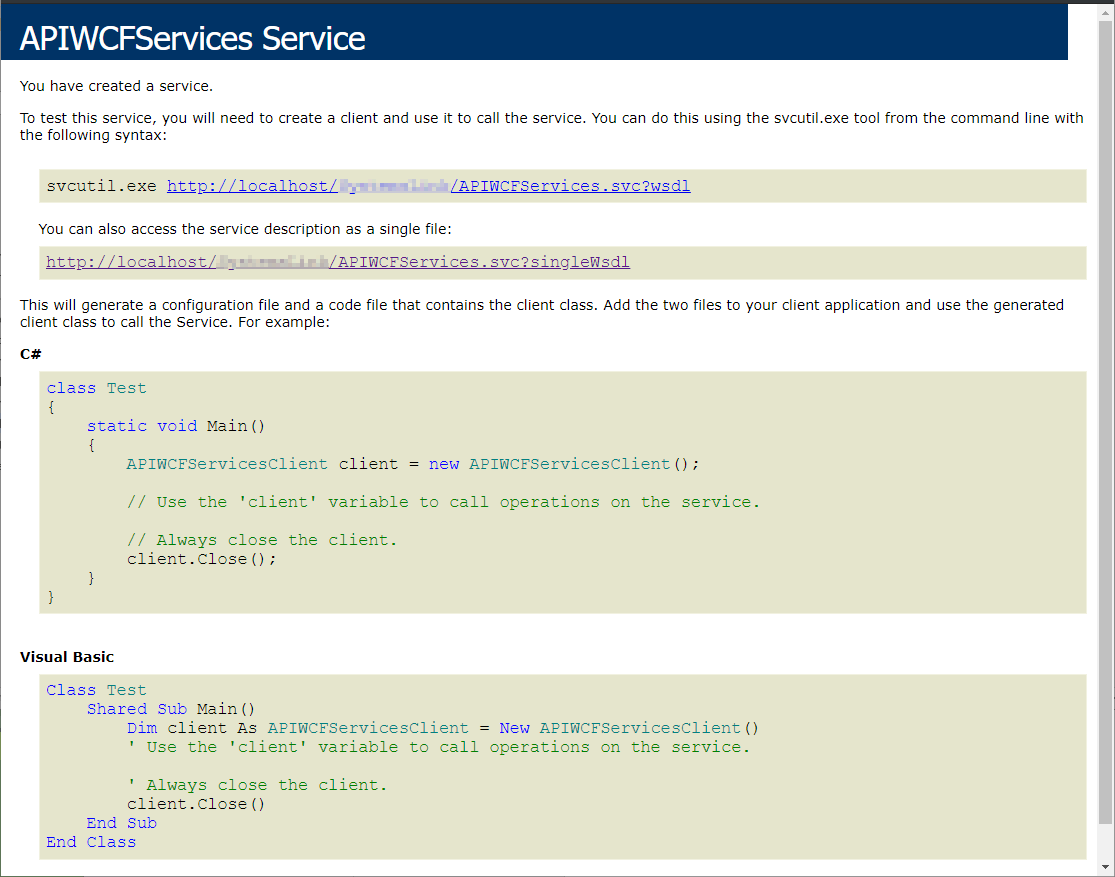
-
In IIS, go to the .TMW virtual directory.
This directory is named after the virtual directory specified for SystemsLink Core, with the addition of .TMW at the end. For example, the default name for this directory would be SystemsLink.TMW. -
Right-click on the SystemsLinkTestConnection.aspx file, select Browse in the shortcut menu, then click Test Connection in the opened browser window. If the connection is successful, information appears that describes your system setup and licenses.
Installing the SystemsLink external module
-
Extract the installer to the target machine. Repeat this step for each machine.
Note: Keep a copy of the installer in case you need to upgrade, repair, or delete SystemsLink. -
As an administrator, run the installer.
-
Click Install Trimble Transportation Products.
Note: The About Trimble Transportation Products and Resources links do not contain information relevant to installing SystemsLink. -
In the License Information window, enter:
-
Your ClientCenter credentials
-
The environment in which you are installing SystemsLink
-
-
Click Login.
If the login fails after multiple attempts or you do not have a valid license for SystemsLink, contact Trimble Transportation Support.
-
After successfully logging in, click Next.
-
In the Installation Type window, select New Installation.
-
Set the Available Instances field value at 01 for a first time install.
-
Give a name for the instance and press TAB.
Note: You will need the instance name later in the installation process. -
Click Next.
-
In the Products window, select SystemsLink.
-
Change the installation path if needed, then click Next.
-
In the Setup window, select SystemsLink APIs needed for this external instance. Available external services include:
-
SystemsLink RESTful API
-
SystemsLink Vendor API
-
SystemsLink External API
Warning: You cannot install non-Fuel and Fuel services in the same instance. If both non-Fuel and Fuel services are selected in the Setup window, the Next button will be disabled until your selections are corrected.
-
-
Click Next.
-
Confirm requirements in the Requirements window.
Click Next if at least one of the following is true:
-
All requirements are met.
-
One or both browser requirements are not met, but all other requirements are met.
Click Cancel if one or both of the following are true:
-
The IIS and/or ASP.NET requirement is not met.
-
The SQL server requirement is not met and you are installing a version of SystemsLink that is earlier than 2017.3.
As of version 2017.3, the minimum SQL Server requirement is 2008 R2. If your machine does not have this version installed, and you are installing version 2017.3 or higher, you will be prompted to install the SQL Server 2008 R2 CLR Types and Shared Management Objects (SMO). They are included with the installer.
-
-
In the IIS Setup window, make entries in the following fields for each service that you are installing.
Field Definition Auto Warmup Sites
For SystemsLink installation, be sure that this checkbox is cleared.
Web Site
The root-level web site in IIS Manager defaults to Default Web Site. Select the name of your web site.
Virtual Directory Name
The virtual directory receives queries and directs each query to the appropriate data source.
The default name for the services virtual directory appears in the field. If you want, enter another name for the virtual directory.
Is SSL?
First available in TMW Web Products 2018.2
Select this option if the service is using Secure Socket Layer (SSL).
Ext. Host
First available in TMW Web Products 2018.2
Select this option if the URL for the service will be called externally.
Application Pool Name
In IIS 7.0 and later, you group your web applications and services by assigning each to an application pool. Applications that call similar processes could be in the same application pool.
The default name for the application pool appears in the field. If you want, enter another name for the application pool.
Site URL
Enter the addresses of these services installed on the internal web server:
-
SystemsLink Core API
-
WCF Services
-
Web Framework WCF Services
The Required column indicates whether the web service is already installed in the current instance. A
 checkmark means the required service is detected, while a red cross means you must provide the URL for the service.
-
-
Click Next.
-
In the SystemsLink Setup window, enter the WebProducts Framework Service username and password.
-
Click Next.
-
On the Installation Review window, click Begin Installation.
-
Check the Success column to see the result of the installation. The icon indicates whether the installation is successful.
Icon Definition The installation was not successful. Contact your Trimble Transportation Support representative. Be prepared to provide a copy the log file, which will reside on the machine’s desktop. You can view the file by clicking
Open Log.The installation was successful but one or more post-installation processes failed. Position your cursor over the icon to view a ToolTip describing the issue. Contact your Trimble Transportation Support representative. Be prepared to provide the information in the ToolTip as well as a copy of the log file.
The installation was successful. Click Finish to close the installer.
Configuring and testing the SystemsLink external installation
SystemsLink uses credentials to verify that anyone connecting to a TMWSuite database has the correct permissions. This means that you need a username and password, and you must be able to retrieve tokens. Both are required before testing the actual connection.
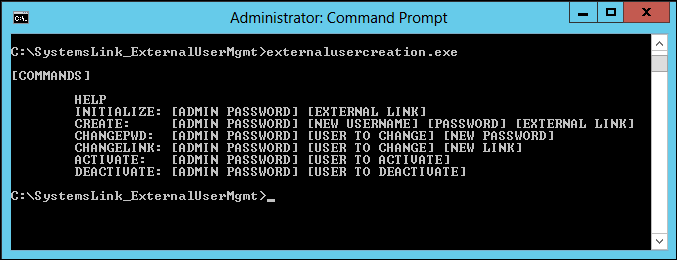
You create and manage external users using the ExternalUserCreation utility, which is packaged with the installation download available from ClientCenter.
To create administrator and test user accounts, use the ExternalUserCreation program contained in the SystemsLink_ExternalUserMgmt.zip file.
| For SystemsLink versions lower than 2019.2, the zip file containing the ExternalUserCreation program is named with the version of SystemsLink being installed. For example, in the 2019.1.0.22 release, this zip file is named SystemsLink_ExternalUserMgmt_2019.1.0.22.zip. |
Follow these steps on the internal installation server:
-
Go to the location of the SystemsLink_ExternalUserMgmt.zip file and extract the archive contents to a local or network directory.
-
In the newly created directory, open ExternalUserCreation.exe.config in a text editor.
-
Find the
appSettingssection and change the username and password to any valid TMWSuite user ID and password. -
Save and close the file.
-
In the same directory, open Ttslocal.ini and make the following edits:
-
Change the
servernamevalue to the name of the database server where your TMWSuite database resides. -
Change the
databasevalue to the name of your TMWSuite database.
-
-
Save and close Ttslocal.ini.
-
Open an administrator command prompt in the directory you created and enter:
.\ExternalUserCreation.exeIf the help prints to the screen, the application is working.
-
Create an administrator account by using the
INITIALIZEoption.
For example, to create an account with the passwordadminpasswordand the external link ofadminacctenter:.\ExternalUserCreation.exe INITIALIZE adminpassword adminacctIf successful, the message
Successfully initialized (<your external link>) for useprints to the screen. -
Create a user account by using the
CREATEoption followed by the administrator password, the user account name, the user account password, and the external xref:.\ExternalUserCreation.exe CREATE adminpassword useracct userpassword adminacctIf successful, the message
Successfully created user account <user account name>prints to the screen. -
Allow the SystemsLink external module to be accessed from the Internet.
Note: If you need to set up firewalls or ports, follow your company’s security and other procedures to allow the SystemsLink external module to be accessed from outside the company network. -
Add additional users.
After you have initialized the administrator account with the ExternalUserCreation program, you can use the same program to create and manage all external user accounts. Account information is stored in the WebSystemsLinkCredentials table in your TMWSuite database. -
To test in IIS, locate the SystemsLink virtual directory you specified previously and click Content View at the bottom of the window.
-
Right-click on ExternalAPIWCFServices.svc, then select Browse in the shortcut menu. This opens the service in a browser window.
-
Confirm the service is active in the opened browser.
Testing the SystemsLink external module with SoapUI
If you want, you can use the SoapUI API testing tool to check the SystemsLink external connection.
-
Download and install SoapUI.
-
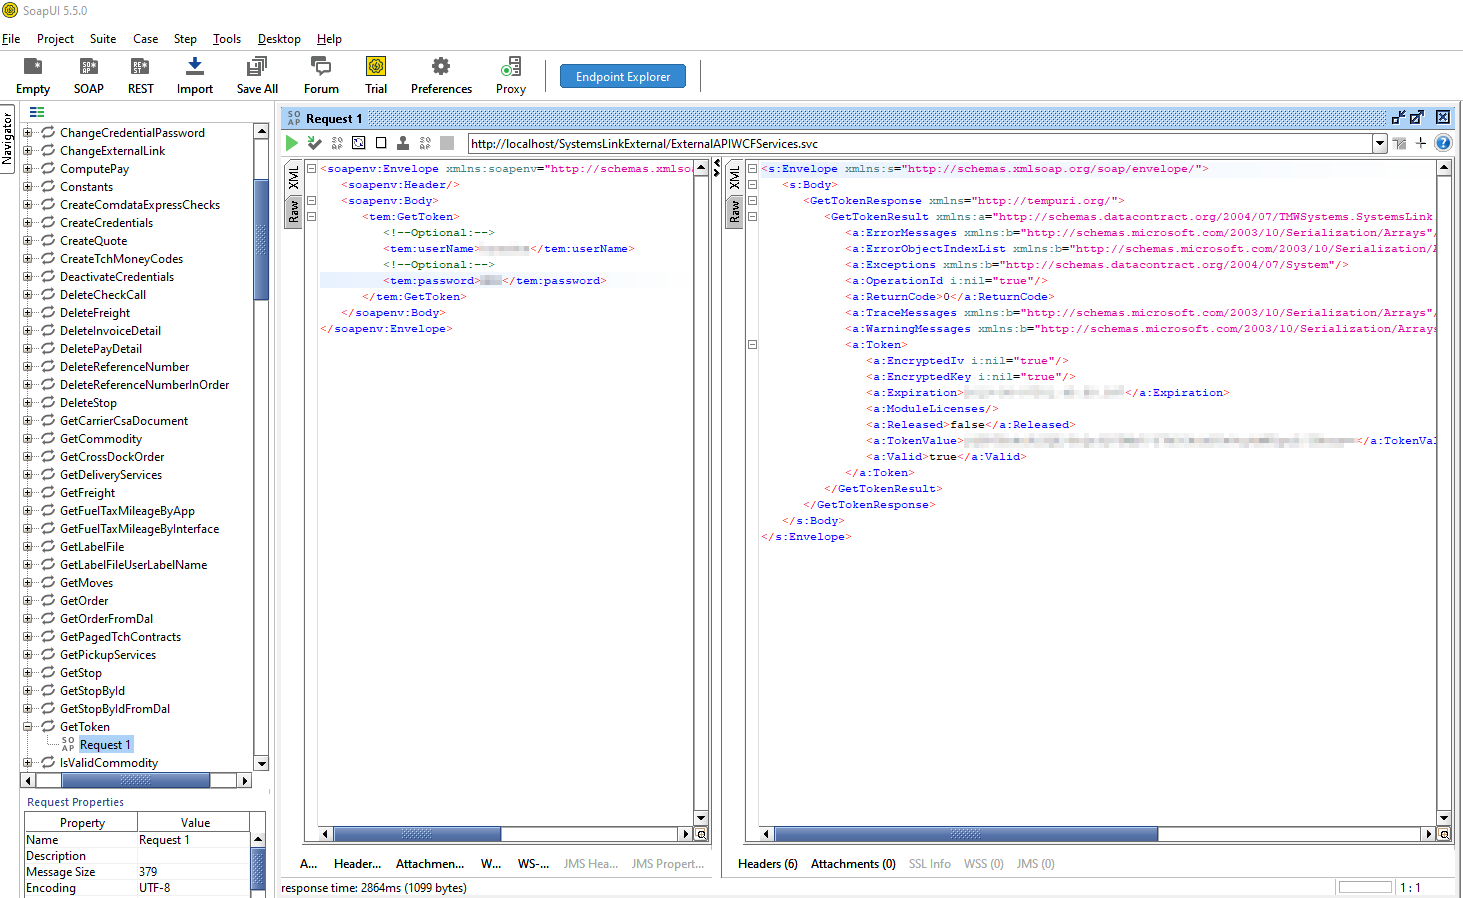
Create a new project that uses the SystemsLink external WSDL. An example of the WSDL endpoint could be:
http://[SystemsLink server name]/[namespace for External SystemsLink]/ExternalAPIWCFServices.svc?WSDLNote: The endpoint may have a different name than in the example.
-
Test the GetToken method.
-
Find the GetToken method in the Navigator sidebar and select the plus sign next to the method.
-
Click Request 1. A window opens. It contains the standard format of a GetToken request.
-
Insert the username for the SystemsLink external administrator account inside the userName tag, and the password for that account inside the password tag.
-
Click
 Run. The results display in the rightmost section of the window.
 -
Verify that the method achieved the appropriate result. A return code of 0 means that the method was successful. Any other return code means that an error occurred.
GetToken should return a token inside the TokenValue tag. Use this token for further test requests.
-
-
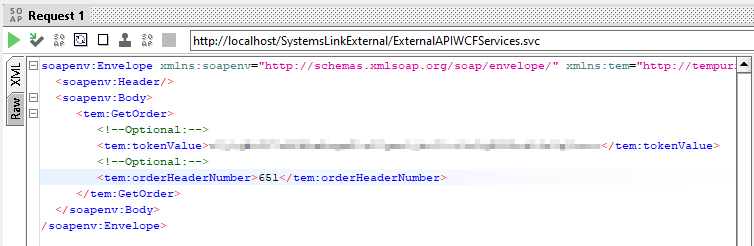
Repeat Step 3 for the following methods:
-
TestConnection
Testing this method requires the token received from the GetToken. Insert it into the tokenValue tag.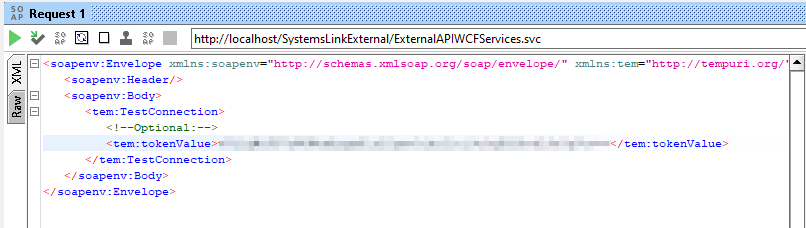
-
GetOrder
Testing this method requires the token received from the GetToken test, as well as a valid order’s header number. Put the token inside the tokenValue tag and the order header number inside the orderHeaderNumber tag.
-
Once you have called all three methods successfully, you are ready to use the API.
Adding another instance of SystemsLink
You can install multiple instances of SystemsLink on a single server. This may be useful in the following situations:
-
If your company is a hosting company with multiple customers, you may want the ability to keep different instances of SystemsLink for each of your customers. Using this setup allows your customers to use the version(s) that best suits their needs.
-
You may want to create test and production environments on the same server.
-
Follow steps 1-6 in Installing the SystemsLink internal module or Installing the SystemsLink external module. Ensure you use the installer version matching your existing instance of SystemsLink.
-
In the Installation Type window, select a new instance number in the Available Instances field.
-
In the Name field, enter a unique name, press TAB, and click Next.
-
Proceed with the installation from step 11 in either Installing the SystemsLink internal module or Installing the SystemsLink external module.
-
Modifying an existing SystemsLink installation
-
Follow steps 1-6 in either Installing the SystemsLink internal module or Installing the SystemsLink external module.
-
In the Installation Type window, select Existing Installation.
-
If your instance can be modified with this installer, an Add/Remove button appears in the Add/Remove Features column. To add and/or remove features to this instance, click the button.
-
In the Products window, select any products to add and clear any products you want to remove. Already-installed applications you wish to keep should stay selected. Once finished, click Next.
-
In the Setup window, select the services to install, then click Next.
-
Confirm requirements in the Check Requirements window.
Click Next if at least one of the following is true:-
All requirements are met.
-
One or both browser requirements are not met, but all other requirements are met.
Click Cancel if one or both of the following are true:
-
The IIS and/or ASP.NET requirement is not met.
-
The SQL server requirement is not met and you are installing a version of SystemsLink that is earlier than 2017.3.
As of version 2017.3, the minimum SQL Server requirement is 2008 R2. If your machine does not have this version installed, and you are installing version 2017.3 or higher, you will be prompted to install the SQL Server 2008 R2 CLR Types and Shared Management Objects (SMO). They are included with the installer.
-
-
In the Modifications Review window, confirm the features that you want to add or remove, then click Next.
-
In the IIS Settings window, enter the required information for any added features, then click Next.
Not all fields will be editable. If only removing features, there may be no editable fields. -
In the SQL Setup window, enter your database information and click Next.
Not all fields will be editable. If only removing features, there may be no editable fields. -
In the TTS Setup window, ensure the locations and names of the Tts50.ini and Ttslocal.ini files are correct as well as the user account information. Any errors are indicated by a red highlight surrounding the field.
-
Do one of the following:
-
If there are no errors in the TTS Setup window, click Next.
-
If there are errors, you must correct the information in those fields before continuing. Once the errors are corrected, press TAB, then click Next.
-
-
In the SystemsLink setup window, make any needed changes, then click Next.
-
Check that the Install Type in the Installation Review window is Modify, then click Begin Installation to begin the modification process.
-
Do one of the following:
-
If the installation was successful, click Finish to exit.
-
If an error or failure occurred, check the log file. If the error or failure cannot be resolved, provide a description of the problem and a copy of the log file to Support.
-
Upgrading an existing SystemsLink instance
-
Back up your TMWSuite databases.
-
Follow steps 1-6 in Installing the SystemsLink internal module or Installing the SystemsLink external module.
-
In the Installation Type window, select Existing Installation.
-
Select the Upgrade checkbox for the instance, then click Next.
-
Check that the Install Type in the Installation Review window is Upgrade.
-
Click Begin Installation.
-
If the installation was successful, click Finish.
If an error or failure occurred, check the log file. If the error or failure cannot be resolved, provide a description of the problem and a copy of the log file to Support. -
Apply the setting values in your old web.config files to the new web.config files.
Uninstalling a SystemsLink instance
-
Follow steps 1-6 in Installing the SystemsLink internal module or Installing the SystemsLink external module.
-
In the Installation Type window, select Existing Installation.
-
Select the Uninstall checkbox for the instance, and then click Next.
-
In the Installation Review window, confirm that the Install Type column value is Uninstall.
-
Click Begin Installation.
-
In the Installation Complete window, check the Success column to see the result of the uninstallation. The icon indicates whether the uninstallation is successful.
Icon Definition The uninstallation was not successful. Contact your Trimble Transportation Support representative. Be prepared to provide a copy the log file, which will reside on the machine’s desktop. You can view the file by clicking
Open Log.The uninstallation was successful but one or more post-uninstallation processes failed. Position your cursor over the icon to view a ToolTip describing the issue. Contact your Trimble Transportation Support representative. Be prepared to provide the information in the ToolTip as well as a copy of the log file.
The uninstallation was successful. Click Finish to close the installer.