Company expirations
Company expirations are key activities and out-of-service dates for such things as account review and company shut-downs. Each expiration has an effective date, i.e., the date that it becomes active. Some expirations are for a specific date. Others, such as an expiration for a seasonal shut-down, may span a date range. You set up expirations based on the way your company does business.
There are two expiration priority levels:
-
Priority 1 (often abbreviated as P1)
Critical expirations are assigned a priority of 1. Their completion is required. If a company has a Priority 1 expiration that has not been marked as completed, the system will not allow use of that company on an order on, or after, the expiration’s effective date.
Note: A Priority 1 expiration is defined as Required in the ExpPriority label in the label file.
-
Priority 2 (often abbreviated as P2)
Expirations that are not critical are assigned a priority of 2. Due to their secondary nature, such expirations are categorized as Priority 2 expirations.
Note: A Priority 2 expiration is defined as Key Date in the ExpPriority label in the label file.
The system will check for company expirations in these places:
-
Order Entry Folder
-
Dispatch Trip Folder
-
Quick Trip window in Dispatch
-
Copy Order window in both Order Entry and Dispatch
-
Fuel Dispatch
Note: For details on how company expirations are entered and used in Fuel Dispatch, see Expirations tab in the Fuel Dispatch online help.
| Company expirations are not operational anywhere else in the system. Company expirations will be ignored for orders created using Order Scheduler, LoadTender/Smart Link, eStat, EDI, or any other feature not listed above. |
By default, the system will:
-
Check every time you save an order that has an Available, Planned, or Dispatched status.
Note: The General Info Table setting
UseCompanyExpirationsallows you to modify the order statuses the system uses when checking for company expirations or to turn off the checking altogether. For more information, see Specifying how the system is to handle company expirations. -
Check only on billable stops.
-
Not check on secondary events.
|
The information in this topic is limited to expirations as they relate to companies. For additional expiration-related functionality, see:
|
Understanding the PM/Expirations window
The PM/Expirations window is used to add, modify, and delete expirations for a company. It is accessed in File Maintenance.
The window is shown here with data for a company expiration:
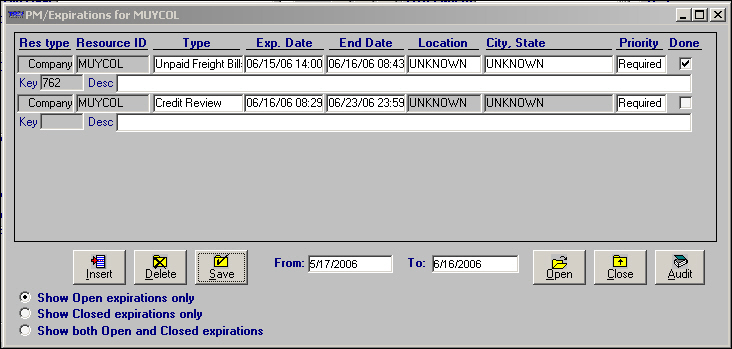
The window has two sections: the Expirations grid and the Show Expirations area.
Expiration grid
The Expirations grid is located in the top portion of the window. Expirations are listed here based on the date they go into effect (Exp Date). The expiration that has the earliest Exp Date will display at the top of the list. Only three expirations can be shown at one time. If more exist, use the scroll bar on the right to view them.
Show Expirations section
This section allows you to select the kind of expirations the system will display.

Use these radio buttons:
-
Show Open Expirations only (default)
Displays expirations that are not marked as Done. -
Show Closed Expirations only
Displays expirations that were marked as Done within a specific date range. -
Show both Open and Closed expirations
Displays open expirations and those that were marked as Done within a specific date range.
Preliminary setup
The preliminary setup for using company expirations involves:
-
Specifying the order statuses you want included in expiration checking.
-
Setting effective dates for P1 and P2 warning indicators for company expirations.
-
Defining company expirations in the CmpExp label.
Defining company expirations
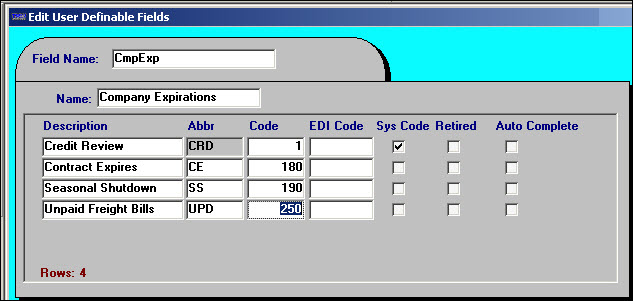
Company expirations are defined in the label file in the System Administration application. There is one system code expiration (Credit Review) in the CmpExp label. If your company has other situations that identify an expiration situation, you can add them.The CmpExp label is shown here with sample data:
For detailed information on adding labels, see Using the label file to customize fields in the TMWSuite System Administration online help.
| Unlike expirations for resources, company expirations are not identified as dispatch or non-dispatch. The codes assigned to the options you add will not determine whether the expirations are functional. |
Specifying how the system is to handle company expirations
Although the system checks for company expirations by default, you have the option to disable the checking. Additionally, if you want the system to check for expirations but would like to have it check for orders having statuses other than or in addition to Available, Planned, or Dispatched, you can specify the statuses you want to use.
Both of these options are controlled by the UseCompanyExpirations General Info Table setting.
Setting effective dates for P1 and P2 warning indicators for company expirations
For Priority 1 and Priority 2 expirations, P1 and P2 indicators turn yellow a user-defined number of days before the expiration beginning date.These indicators are found in the following locations:
-
In Order Entry, P1 and P2 indicators are shown for the shipper, consignee, and Bill To in the header section of the Order Entry Folder.
-
In the Dispatch Trip Folder, P1 and P2 indicators are shown in the Stop Detail grid. Additionally, the indicators are shown for the Bill To company in the Order Header Information window.
-
In the Dispatch Quick Trip window, P1 and P2 indicators are shown for the Bill To company in the Order Header Information window.
Note: Although the indicators show only for the Bill To in the Quick Trip window, the system will display an appropriate Company Expiration message when you save if any other company on the order has an active expiration.
Company expiration effective dates are determined by the INI setting.
| No other expiration-related INI settings are supported for company expirations. |
Recording an expiration for a company
Company expirations are recorded in the File Maintenance application, using the PM/Expirations window. To record an expiration for a company, follow these steps:
-
In File Maintenance, open the profile of the company for which you are recording an expiration in the Company File Maintenance window.
-
With the profile of the company for which you are recording an expiration displayed in the Company File Maintenance window, do one of the following:
-
Click the Expirations
 icon in the sheet toolbar.
 -
Go to Edit > Expirations.
-
-
The PM/Expirations window is displayed. Note that the window title includes the system ID for the selected company.
Make entries in the following fields:
Res type
Defaults to Company. Leave as is.
Resource ID
Defaults to the system ID of the company displayed in the Company File Maintenance window at the time you accessed the PM/Expirations window. Leave as is.
Type
Select the appropriate expiration type from the drop-down list that is displayed when you click in this field.
Note: The options are set up in the CmpExp label, accessed in System Administration.
Exp Date
Do one of the following:
-
If the expiration occurs on a specific date, enter that date here.
-
If the expiration involves a date range, enter the beginning date here.
End Date
Enter the date when the expiration is expected to be completed.
Location
Defaults to UNKNOWN. Leave as is.
City, State
Defaults to UNKNOWN. Leave as is.
Priority
To rank the importance of the expiration, select the appropriate priority code. The option selected determines whether the expiration will prevent a company from being used on an order. The default options are:
-
Required
The expiration will prevent the saving of an order with this company listed as the Bill To or as the location for a billable stop. -
Key Date
The expiration will not prevent the saving of an order with this company listed as the Bill To or as the location for a billable stop.
Done
Do not make an entry here. This checkbox is used to mark the expiration as completed.
Recurrence
If you want an expiration to renew automatically, select an appropriate recurrence from the drop-down list. Your selection determines which calendar period the system uses to schedule recurring expirations.
For example, when you complete an expiration with a May 10 expiration date and a Monthly recurrence, the system automatically adds a new expiration with a June 10 expiration date.
System Code Recurrence field options include:
-
One Time
Expiration does not renew -
Monthly
Expiration renews in one month -
Quarterly
Expiration renews in three months -
Semiannual
Expiration renews in six months -
Yearly
Expiration renews in one year -
Biennial
Expiration renews in two years
For more information, see Completing an expiration to renew automatically.
Notes:
-
Renewal occurs upon completion of the current expiration.
-
Enter One Time or leave the field set to Unknown if you do not want the expiration to renew automatically.
Key
System-assigned expiration ID.
Desc
If desired, enter a free-form message of up to 95 characters.
-
-
Repeat Steps 2 and 3 for each additional expiration to be recorded.
-
Click the Save button to save your entries.
-
Click the Close button to exit the PM/Expirations window.
Completing an expiration to renew automatically
Automatic renewal is a time saving feature to use for recurring events such as routine credit reviews. For example, you can set up a credit review expiration to renew automatically on a semiannual basis. When you complete the expiration, the system adds a new expiration and schedules the expiration date to six months later.
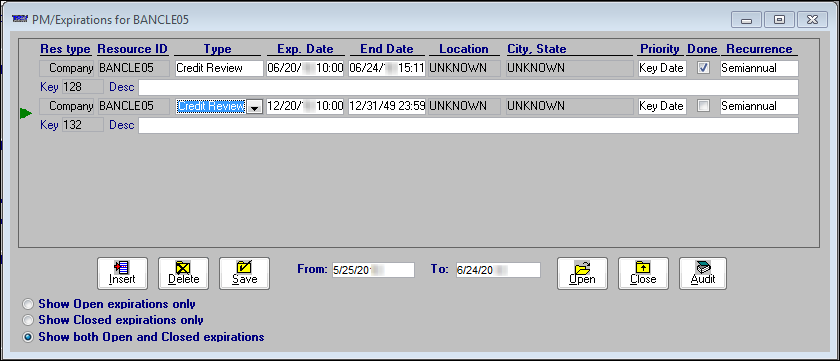
This illustration shows the completion and renewal of a credit review expiration that renews on a semiannual basis. When we completed the expiration dated 06/20, the system created the new expiration with an expiration date of 12/20.
Setting up expirations to recur
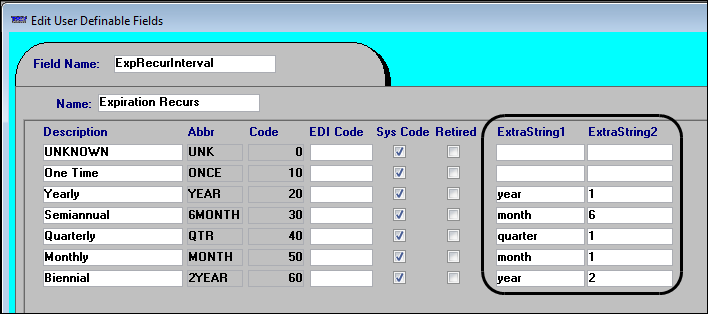
The system uses the label file ExtraString1 and ExtraString2 values to determine expiration dates for recurring expirations. For example, when you complete an expiration with a Semiannual recurrence, the system schedules the new expiration date to six months later.
In this illustration, the Semiannual values are month and 6. Based on these values, the system schedules expiration dates to occur six months apart.
Renewing an expiration
Some expirations such as contract renewals require completion on a continual basis. You can set an expiration to recur automatically. When you complete a recurring expiration, the system adds a new expiration based on a renewal term that you specify.
To automatically renew an expiration, follow these steps:
-
With the PM/Expirations window open, select the Done checkbox for the expiration you want to complete.
-
Choose an entry in the Recurrence drop-down list.
Notes:
-
You can populate this field prior to completing the expiration for example when you Insert an expiration.
-
The selection you make in this field determines the calendar period the system uses to schedule new expiration dates.
-
-
Click the Save button to complete and renew the expiration.
A message window opens.
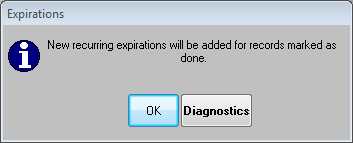
-
Click OK to renew the expiration.
The system adds a new expiration and schedules the expiration date based on the:
-
Recurrence field entry
-
Exp. Date field entry for the completed expiration
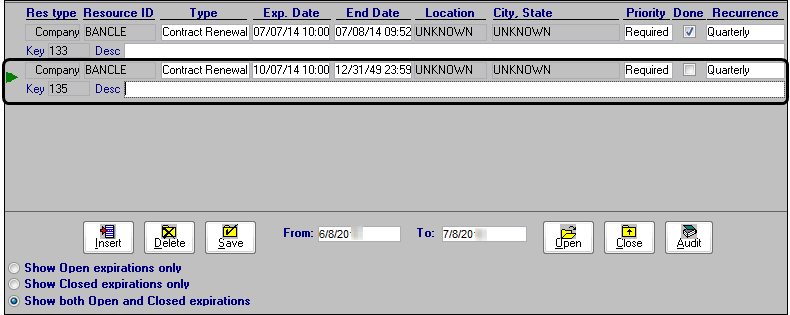
For example, in this illustration, the system:
-
Renewed the expiration on a quarterly basis to three months in the future, 10
-
Scheduled the expiration date to the same day as the completed expiration, 07

-
-
To view the completed and new expirations in the PM/Expirations window, do the following:
-
Select the Show both Open and Closed expirations radio button in the lower-left of the window.
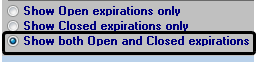
-
Click the Open button in the lower-right of the window.
This illustration shows the completed 07/07 expiration with a quarterly recurrence. When completed, the system set the new expiration date to 10/07, three months later.
-
Viewing company expirations outside of File Maintenance
Company expirations are displayed in Order Entry, the Dispatch Trip Folder, and the Dispatch application’s Quick Trip window.
Usually abbreviated as P1 and P2, these indicators change color based on expiration status:
| P1 and P2 indicator color | Meaning |
|---|---|
Green |
Currently, no expirations are in effect for the company. |
Yellow |
An expiration for the company is due to go into effect shortly. |
Red |
An expiration is in effect for the company. |
The indicator type (P1 or P2) and color (green, yellow, red) reflect the expiration with the greatest severity. Priority 1 (Required) expirations always take precedence over Priority 2 (Key Date) expirations. As a result, the indicator shown for a company is determined as follows:
| Indicator | Meaning |
|---|---|
Red P1 |
At least one Priority 1 expiration is in effect for the company. |
Yellow P1 |
No Priority 1 expirations are in effect, but at least one Priority 1 expiration is imminent. |
Red P2 |
No Priority 1 expirations are in effect or imminent. However, at least one Priority 2 expiration is in effect. |
Yellow P2 |
No Priority 1 or Priority 2 expirations are in effect, but at least one Priority 2 expiration is imminent. |
Green P1 |
No Priority 1 or Priority 2 expirations are in effect or imminent. |
| The system determines what color the indicator should be based on your entry for the INI setting. For more information, see Setting effective dates for P1 and P2 warning indicators for company expirations. |