Automatically generate a route using Route Assistant
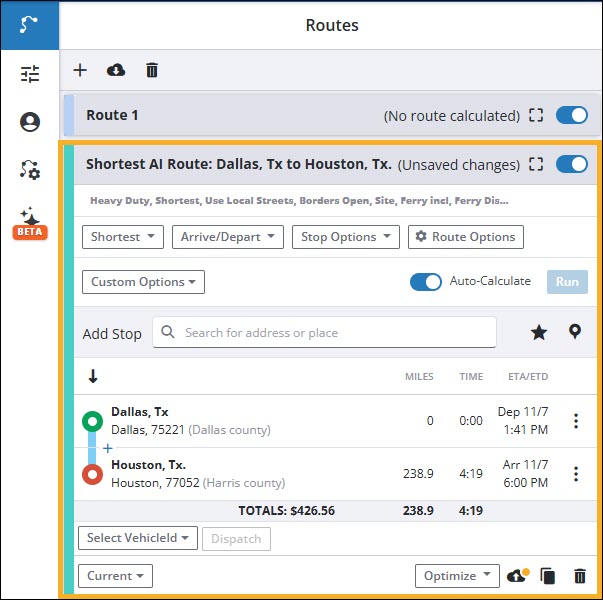
PC*Miler’s Route Assistant lets you generate a route in seconds by entering all of your route details as a prompt. Select a single button, and Route Assistant uses artificial intelligence (AI) to identify your origin, destination, an optional intermediate stop, and route options such as toll roads and routing type. PC*Miler then generates the route, displays it on the map, and adds it to your list of routes in the Route window.
You can view route reports, edit the route, or perform any other functions as you would for routes created directly in the Route window.
Route Assistant overview
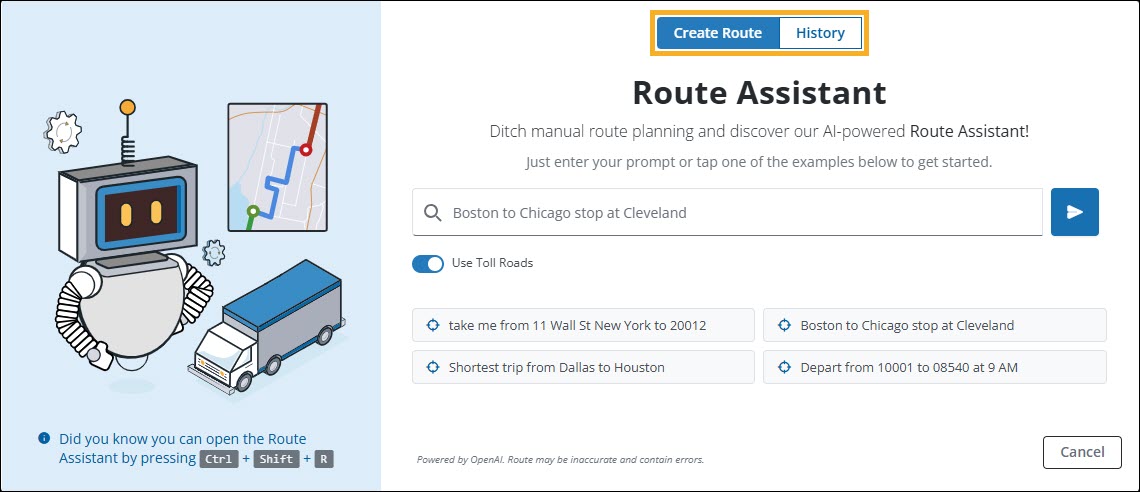
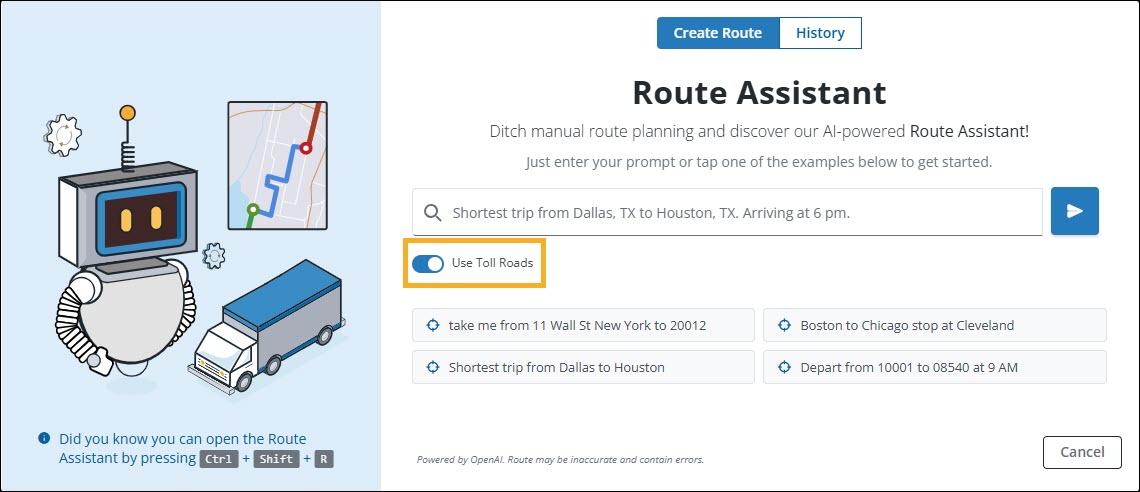
Route Assistant streamlines route creation with two tabs:
-
Create Route - Enter your prompt and select
 Send to generate a route.
 -
History - Access previously generated routes.
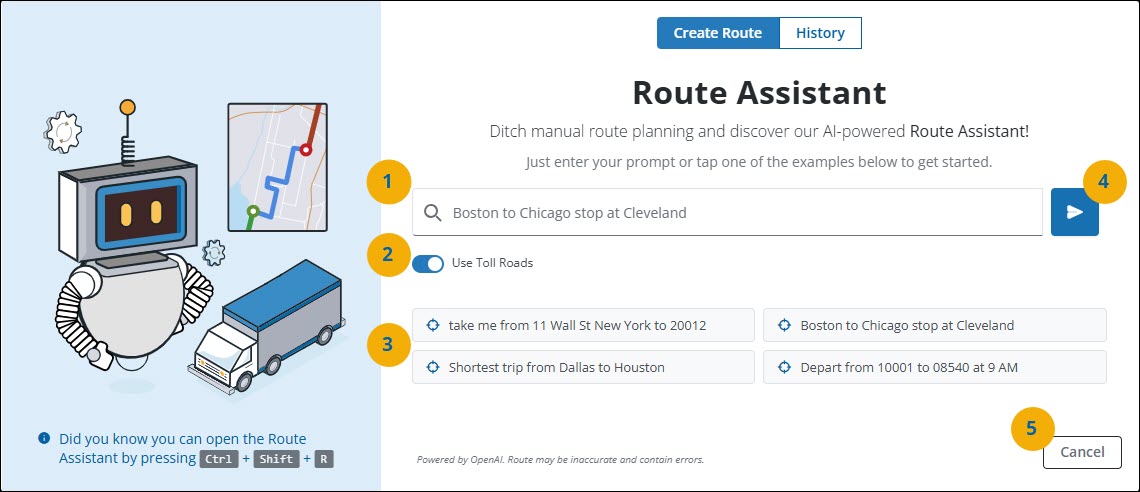
Create Route tab
-
Prompt field - Enter your location details and route options as a prompt in the text field. Route Assistant uses your input to generate an associated route.
-
Use Toll Roads - Select the Use Toll Roads toggle if you want Route Assistant to include toll roads when generating your route. If the toggle is blue, toll roads are turned on.
-
Suggested prompts - Suggested prompts are provided to help you get started with Route Assistant. Select an example and the prompt will appear in the prompt field. You can then edit the prompt in the text field to suit your needs.
-
Send - Select
Send to let Route Assistant automatically generate a route using your input details. The generated route appears in your route list within the Route window. -
Cancel - Select Cancel to close the Route Assistant window at any time.
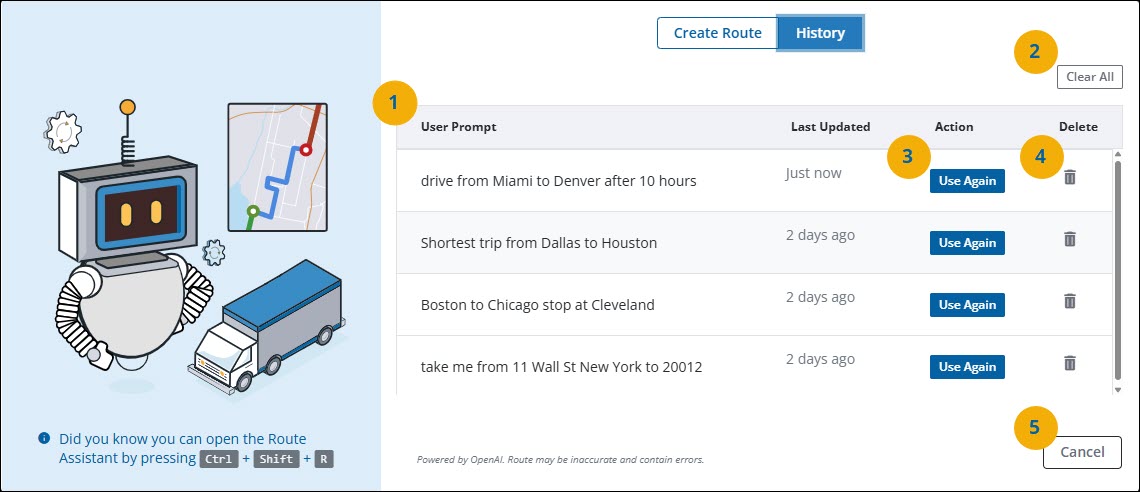
History tab
-
History - Your previously created routes are listed in most recent order.
-
Clear All - Select Clear All to delete your entire Route Assistant search history.
-
Use Again - Select Use Again to recreate the selected route.
-
Trash Bin - Select the
 Trash Bin to delete the selected route from your search history.
 -
Cancel - Select Cancel to close the Route Assistant window at any time.
Create a route using Route Assistant
-
To access Route Assistant, select the icon from the side bar or press CTRL + SHIFT + R.

The Route Assistant popup window opens and the Create Route tab is displayed. -
Enter your prompt in the text field including origin, destination, intermediate stops, and any route options such as route type (shortest or fastest), departure time, and arrival time.
For the best results, we suggest using specific descriptors and prompts when entering your route details. View our best practices listed in the next section to ensure you are formatting your inputs correctly.
|
Route Assistant uses the Heavy Duty Semitrailer (48’ x 96”) vehicle routing profile by default when generating a route. Any route options that are added to your prompt will take priority over the default settings. If no route options are stated in your prompt, Route Assistant will generate the most practical route based on the default settings of the Heavy Duty Semitrailer (48’ x 96”) routing profile. It does not apply the options or profile you have selected in the Route window. |
-
Once you have entered all your required route details, select
Send. Route Assistant automatically generates a route based on your prompt and adds it to your list of routes in the Route window.
|
Route Assistant is currently in Beta. Errors in how your prompt is processed by Route Assistant should occasionally be expected. We strongly advise that you always review the generated route to check for accuracy and make any corrections where needed. |
-
Depending on how many details you entered in Route Assistant, or how you formatted your prompt, you may need to refine the generated route further to meet your specific needs. You can edit a generated route just like any other. This includes editing stops, changing your vehicle routing profile, or editing route options.
Get the most out of Route Assistant
Route Assistant uses AI to determine the details of your route including origin, destination, intermediate stops, and route options. That’s why Route Assistant works best when you provide it with specifically formatted prompts.
Location prompts
| During the Beta phase, Route Assistant is limited to processing a maximum of three stops per route (origin and destination (required), and one optional intermediate stop). |
-
When entering locations, always provide as much location detail as possible. Route Assistant will not ask you to select a location if multiple options exist. Thus, providing sufficient location detail reduces the risk of needing to edit your stops from the Route window afterwards.
For example, “London to Buffalo” could result in multiple different routes (London Ontario, London Kentucky, London Ohio). Instead, using “London, ON N6G 3M6 to Buffalo, NY 14211” provides a more specific route.
-
When creating a basic origin-destination style route, use “to” as your descriptor between the origin and destination. Route Assistant easily recognizes this syntax and will process your locations as the starting and ending destinations of your route.
For example, a two stop route should look like:
-
Princeton to Hightstown
-
1234 Ocean View Drive Santa Monica, CA 90405 to 9876 Redwood Avenue San Francisco, CA 94116
-
34.0522, -118.2437 to 40.7128, -74.0060
-
-
If you are creating a route with multiple stops, enter your origin, intermediate stop, and destination using "to" as your descriptor.
For example, a three stop route should look like:
-
Boston, MA to Cleveland, OH to Chicago, IL
-
10001 to 30033 to 08540
-
1234 Ocean View Drive, Santa Monica, CA 90405 to 2500 Main Street, Santa Monica, CA 90405 to 9876 Redwood Avenue, San Francisco, CA 94116
-
34.0522, -118.2437 to 40.7128, -74.0060 to 39.7401, -104.9406
-
| Route Assistant supports all the same location formats you are familiar with using in PC*Miler Web. |
Route options
Route Assistant lets you customize your route by adding route options to your input string. Currently supported route options include:
-
Tolls - Toll roads do not have to be specified in your input string. The Use Toll Roads toggle below the prompt field controls whether toll roads are allowed in the generated route. When the toggle is blue, toll roads are allowed. Any toll-related instructions in your prompt will be overridden by the toggle setting.
-
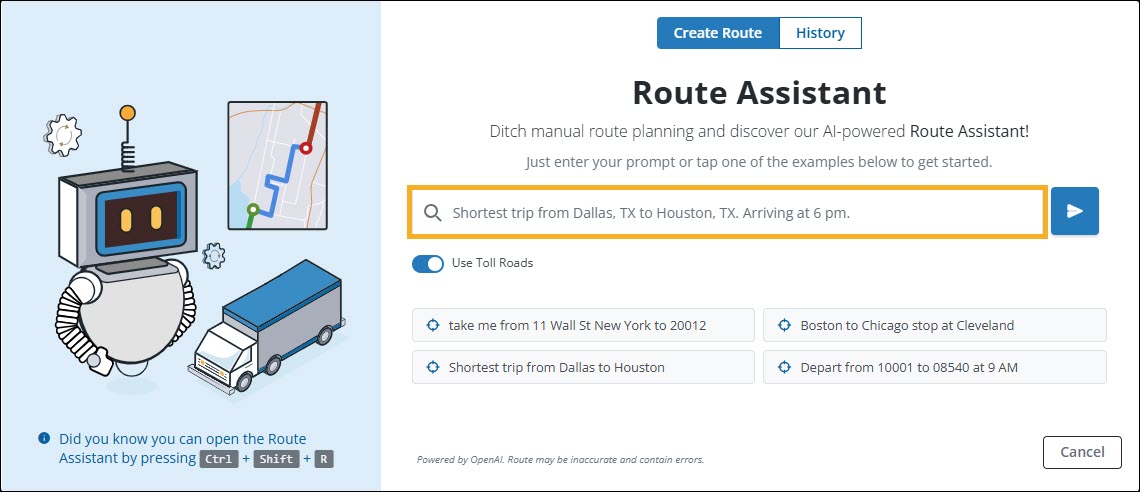
Route Type - Adding “shortest route” or “fastest route” to your prompt will change the generated route accordingly. If no route type is stated, Route Assistant will generate the most practical route.
For example: “Shortest route from Boston, MA to Chicago, IL”.
-
Departure Time - Adding “depart now” or “depart at” to your prompt will generate a route that accounts for traffic and time of day. If no departure time is stated, Route Assistant will not account for traffic or time of day when generating your route.
For example: “Create a route departing at 6:00 pm from Boston, MA to Chicago, IL”.
-
Arrival Time - When you add “arrive at” to your prompt, Route Assistant will generate a route with a suggested departure time. The suggested departure time accounts for traffic and time of day to ensure your arrival time is met. If no arrival time is stated, Route Assistant will generate the most practical route, not accounting for a set arrival time.
For example: “Create a route from Buffalo, NY to Toronto, ON, arriving at 10:30 am tomorrow”.
Route option prompts
-
When specifying options such as route type or departure time, add your statement to the beginning of your input string.
For example:
-
Find me the fastest route from Boston, MA to Chicago, IL
-
Depart now from Buffalo, NY to Miami, FL
-
-
When specifying arrival time, add your statement to the end of your input string.
For example: “Create a route from Austin, TX to Dallas, TX, arriving at 8:00 pm tonight”.