Editing event codes
Event codes identify the activity that occurs at a stop. You can use the Event Code Maintenance window to edit event codes.
| By default, all users can edit event codes. You can limit who has the ability to change event codes by removing the Tools > Tools Maintenance > Event Code Maintenance menu command for those users. For details, see Customizing menus. |
Creating new event codes
In TMW Operations, you have the ability to create custom event codes. Custom event codes function the same way as default system event codes.
| It is recommended that you contact Trimble Support before creating new event codes. |
To create new event codes, follow these steps:
-
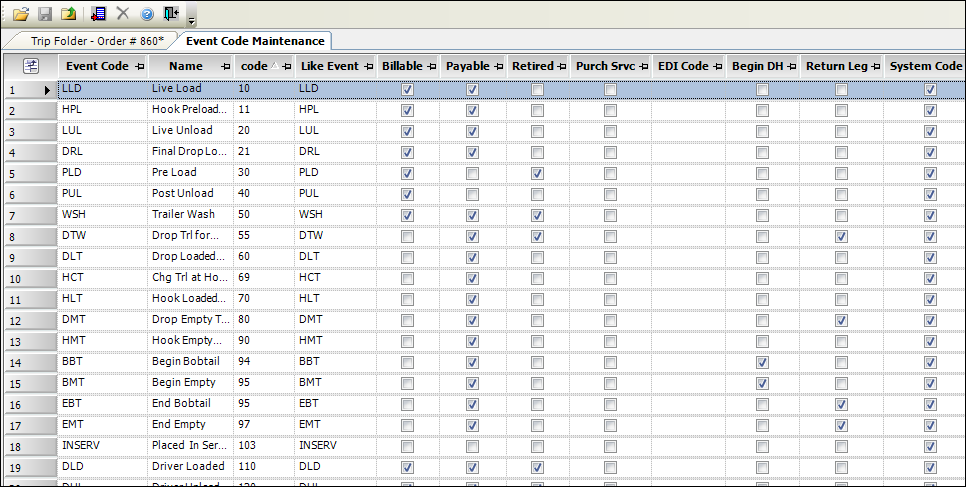
Go to Tools > Tools Maintenance > Event Code Maintenance.
The Event Code Maintenance window opens. -
Select the event code row on which you want to base the new event code.
-
Click
 Add.
Add.
A new row appears at the bottom of the Event Code Maintenance grid.Note: The new row automatically fills in the Like Event Code, Billable, and Payable fields based on the selected event code.

-
Make the appropriate entries to the following fields:
Field Description Event Code
Enter the event code abbreviation.
Note: You can enter up to 6 characters for the abbreviation.
Name
Enter the event code name.
Note: You can enter up to 25 characters for the name.
Like Event Code
Displays all system event codes. Select the code on which the new code will be based.
Billable
Select the checkbox if the event is billable.
Payable
Select the checkbox if the event is payable.
Code
Enter a sequential number. This number determines the sort order in the Event drop-down list.
Notes:
-
If this column is not displayed, use the Field Chooser to add it. For details, see Adding and hiding columns.
-
When you add a new event code, the system automatically assigns a zero in the Code field. To edit the Code field, you need to change the column security to full access. For details, see Changing the column’s status to full access.
-
-
To retain your changes, press TAB or click in another field, and click
 Save.
Save.Note: You must close and reopen TMW Operations for the new event code to be available in the Event drop-down list.
Changing the event code name
You can rename existing event codes to match your company’s language.
| You cannot change the abbreviation in the Event Code field for an existing event. |
To change the event code’s name, follow these steps:
-
Go to Tools > Tools Maintenance > Event Code Maintenance.
The Event Code Maintenance window opens. -
Select the event code you want to rename.
-
Enter the new name in the Name field.
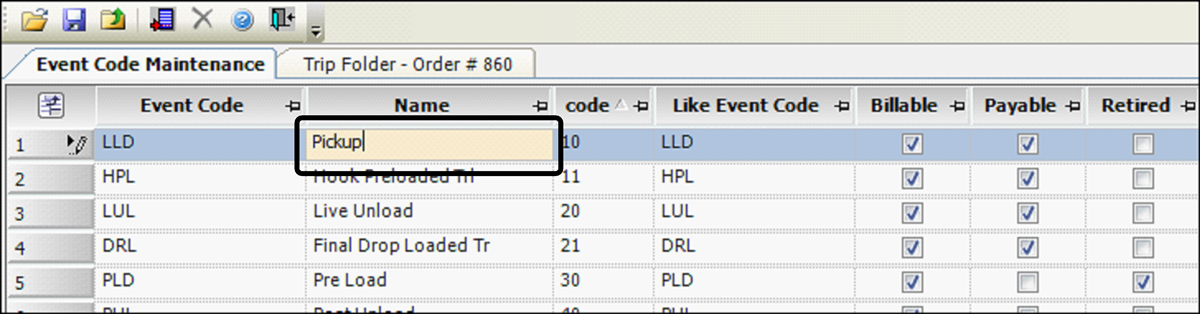
Note: You can enter up to 25 characters for the event code name.
-
To retain your changes, press TAB or click in another field, and click
Save.Note: You must close and reopen TMW Operations for the new event code to be available.
Retiring or deleting an event code
If you have event codes that become obsolete, you can retire or delete them.
-
Retiring an event code does not remove it from the Event Code Maintenance window.
-
Deleting an event code makes it unavailable in the system.
| Deleting or retiring system event codes may cause system performance issues or cause TMW Operations to stop responding. Contact Trimble Support before attempting to retire or delete event codes. Retiring an event code should be safer than deleting it. |
These changes will take effect the next time you create a new order. This will not remove the code from existing trips.
Retiring an event code
To retire an event code, follow these steps:
-
Go to Tools > Tools Maintenance > Event Code Maintenance.
The Event Code Maintenance window opens. -
Select the event code you want to retire.
-
Select the Retired checkbox.

Note: If you want to return an event code to the Event drop-down list, clear the Retired checkbox.
-
To retain your changes, press TAB or click in another field, and click
Save.
Deleting an event code
To delete an event code, follow these steps:
-
Go to Tools > Tools Maintenance > Event Code Maintenance.
The Event Code Maintenance window opens. -
Select the event code you want to delete.

-
Click
 Delete Item.
Warning: The system automatically saves after you delete an event code. No warning message is displayed.
Event Code dwell time
First available in TMW Operations V.2024.3
Dwell time is the total amount of time that a driver is at a facility. It includes time spent loading and unloading, as well as any slack or detention time.
You can use the Event Code Maintenance window to specify a default dwell time. The system takes into consideration the default dwell time at the event code.
Adding a dwell time event code
Using the Event Code Maintenance window, default dwell times can be established per individual event code.
To add an event code for dwell time, follow these steps:
-
Go to Tools > Tools Maintenance > Event Code Maintenance. The Event Code Maintenance window opens.
-
Add the DefaultDwellTime column to the data grid using Field Chooser.
![]()
-
Enter the desired dwell time value for the event.
Note: Valid values include whole positive integers.
![]()
When a stop is added or altered with an event code which has a default dwell time established, the system will set the stop duration (time between the arrival and departure) accordingly. If you change a stop’s event type, this will also update the duration based on the default value, if populated.
-
Add the StopDuration column to the Stops grid using the Field Chooser.
This allows you to see the duration of the stop.
![]()
Stop time settings
If there is no default dwell time established for an event code, the system will use the existing rules for setting stop times. These rules include the following TTS50 INI settings:
[Operations]DefaultLoadTime=30 (for loaded stops)
[Operations]DefaultStopTime=15 (for empty stops)
|
The Trip Planner follows specific Fuel Dispatch default time rules. Additional settings exist in the [FuelDispatch] section of the TTS50 file which can impact default dwell times. |
An example below shows a LUL that has no specific default dwell time. The [Operations]DefaultLoadTime INI setting is used to set the duration of the stop to 30 minutes.
![]()
This logic will apply to most areas of the application where stops can be added or altered (e.g. Order Entry, Trip Folder, Trip Planner).
However, not all functions in the system which add stops to a movement use the same time logic which calculates the dwell time for a stop (e.g. Split Trip > Park and Hook function simply puts a minute between arrival and departure).