Detention Billing
Detention occurs when a driver is made to wait by the shipper or consignee before they can pick up or drop off freight. These delays can negatively affect the carrier’s operational schedule and the resources needed to complete later freight movements.
You can use the Detention Billing program to produce reports and freight bills for clients who have detention records against them. This allows your business to pass detention costs onto the responsible parties. Detention Billing uses detention rate sheets to determine the costs that will be passed along. These are set up on the Detention tab in the Rates Maintenance program.
In Detention Billing you can:
Carriers who want to use Detention Billing should consider the following:
-
Detention Billing requires data on driver or equipment activity. This usually requires a Mobile Communications integration. However, if accurate dates and times are entered into TruckMate manually, you can still calculate detention.
-
Detention Billing requires a real-time method to create and send warnings to the bill-to party, shipper, or consignee. This is best done via the Scheduler Detention Service (with a Dawg integration) in TruckMate Service Host.
| The Detention Billing program requires the #28000 and #28001 license keys. |
Access Detention Billing
| From this location | Go to |
|---|---|
TruckMate Menu and TruckMate Task List |
Billing > Detention Billing |
Windows Start Menu |
TruckMate > Detention Billing |
Windows Explorer |
C:\Program Files (x86) > TruckMate > DetentionBill.exe |
Menu and toolbar options
| Option | Description |
|---|---|
|
Shows a preview of the records included by your filters.
In this window you can:
|
|
Select
|
|
Creates freight bills for the filtered detention records. |
|
Opens the Audit Detention Events window. |
Options (Tools menu) |
Open Log File Opens Detention Billing’s log file, "DetentionBillLog.txt." This file is created when freight bills are created. |
Clear Log Files Erases any stored Detention Billing log files. |
|
Remember User Setting Saves your current filter settings. Your current filters will be automatically applied the next time you open Detention Billing. |
|
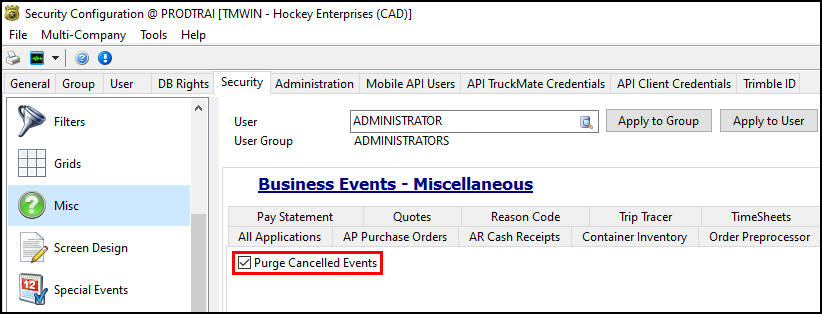
Purge Cancelled Events Purges Cancelled detention events. This option is not available by default. It is only available if:
You can select |


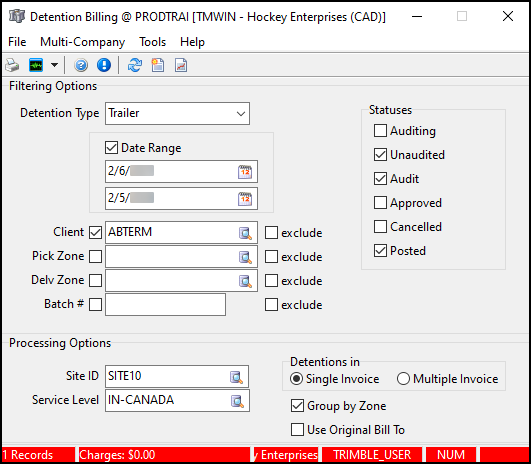
Filtering Options
Use the Filtering Options to find specific detention records.
| Option | Description |
|---|---|
Detention Type |
You can select either Trailer or Driver as a detention type. You must have a rate sheet configured for each detention type that you want to use. |
Date Range |
Select the Date Range checkbox and then select |
Client |
Select the Client checkbox to enable filtering by Client. Select Select a client code to filter for detention records involving that client. If you select a client and then select the exclude checkbox, you will filter for all clients except the currently selected one. |
Pick Zone |
Select the Pick Zone checkbox to enable filtering by Pickup Zone. Select Select a zone code to filter for detention records within that zone. If you select a zone code and then select the exclude checkbox, you will filter for all zones except the currently selected one. |
Delv Zone |
Select the Delv Zone checkbox to enable filtering by Delivery Zone. Select Select a zone code to filter for detention records within that zone. If you select a zone code and then select the exclude checkbox, you will filter for all zones except the currently selected one. |
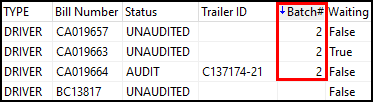
Batch # |
Select the Batch # checkbox to enable filtering by batch number. If you enter a batch number, detention invoices will only be created for that batch. If you enter a batch number and then select the exclude checkbox, you will filter for all batches except for the batch you entered. |
Statuses |
Select the checkbox next to a status to only include records that are in that status. You can select multiple statuses. |

Processing Options
Use the Processing Options to choose how detention reports and invoices are formatted.
| Option | Description |
|---|---|
Site ID |
Select |
Service Level |
Select |
Detentions In |
|
Group By Zone |
Select Group by Zone to group records with the same zone codes together on invoices. This option is only available for Trailer type detention bills. |
Use Original Bill To |
If this option is selected, newly created bills will use the original bills' Bill To code as their Bill To code. This option is only available for Trailer detention bills. |
Audit Detention Events
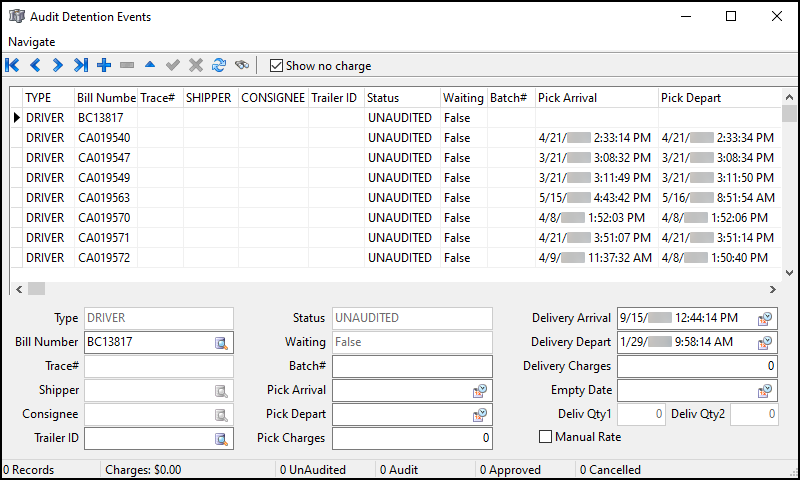
Select  Audit on the toolbar or in the Tools menu to open the Audit Detention Events window.
In this window you can:
-
View the detention records that match your current filters.
Create a detention event
-
In the Audit Detention Events window, select
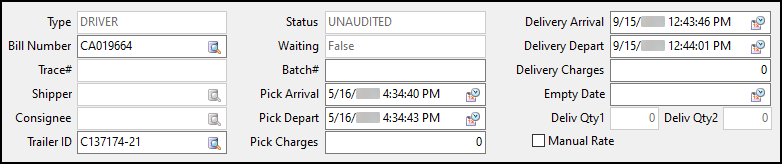
 Insert. A blank detention record form appears below the grid.
Note: the Type field cannot be edited in this window. The type defaults to the Detention Type set in the Filtering Options.
-
Do one of the following:
-
Manually enter a freight bill number in the Bill Number field.
-
Select a freight bill:
-
Select
 search in the Bill Number field. The Select Freight Bill Number window opens.
 -
Filter for and select a freight bill number from the list.
-
Select OK. The Select Freight Bill Number window closes. The bill you selected appears in the Bill Number field.
-
-
-
Enter or
search for a trailer in the Trailer ID field. -
Enter any other values you want to include in the optional fields.
-
After you have finished entering details, select
 Post.
Post.
Change a detention record’s status
You can change a detention record’s status from the Audit Detention Events grid.
There are some restrictions on the statuses you can set:
-
Records in an Unaudited status can be updated to Audit or Cancelled without any restrictions. They can also be set to Approved if an Empty Date value is set.
-
Records in an Audit status can be updated to Cancelled without any restrictions. These records can also be set to Unaudited, but any changes may be overwritten by automatic updates. These records can also be set to Approved if an Empty Date value is set.
-
Records in a Cancelled status can be set to Audit without any restrictions. These records can also be set to Unaudited, but any changes may be overwritten by automatic updates.
-
Records in an Approved status cannot be set to Cancelled. These records can be set to Audit or Unaudited, but any changes may be overwritten by automatic updates.
Follow these steps to change a record’s status:
-
Select one or more records on the grid.
-
Right-click in the grid. The shortcut menu opens.
-
Select one of the status options. The options are:
-
Unaudited
-
Audit
-
Approved
-
Cancelled
The records update to the selected status. A warning message opens if any of the records cannot be updated.
-
Edit a record
You can edit records that are in an Audit or Unaudited status.
Records in a Posted status can be edited if the app config Security.exe > Detention Billing: Posted Edits Security is set to True and the user has the Allow Posted Edits security setting enabled.
-
Select a record on the grid. Its details populate the fields below the grid.
-
Change the value in any of the editable fields.
-
The Trace#, Shipper, and Consignee fields autopopulate based on the Bill Number.
-
The Status field is updated using the Status option.
-
-
Select
Post.
Assign a batch number
You can select Assign Batch to group records together with a batch number.
-
Select more than one record.
-
Right-click in the grid. The shortcut menu opens.
-
Select Assign Batch. A system-generated batch number is assigned to all of the selected records that do not already have a batch number.
Export records
You can export records on the grid to a .txt or .csv file.
-
Select one or more records.
-
Right-click in the grid. The shortcut menu opens.
-
Select either Export to file > As CSV or Export to file > As Text. File Explorer opens.
-
Select a file destination and then select Save.
-
If you selected Export to file > As Text, the records are saved as a .txt file in a fixed-width column format.
-
If you selected Export to file > As CSV, the records are saved as a .csv file with commas to indicate a new column.
In either format, text values are enclosed in double quotation marks and numeric values are enclosed in quotes. Decimals are explicit.
-
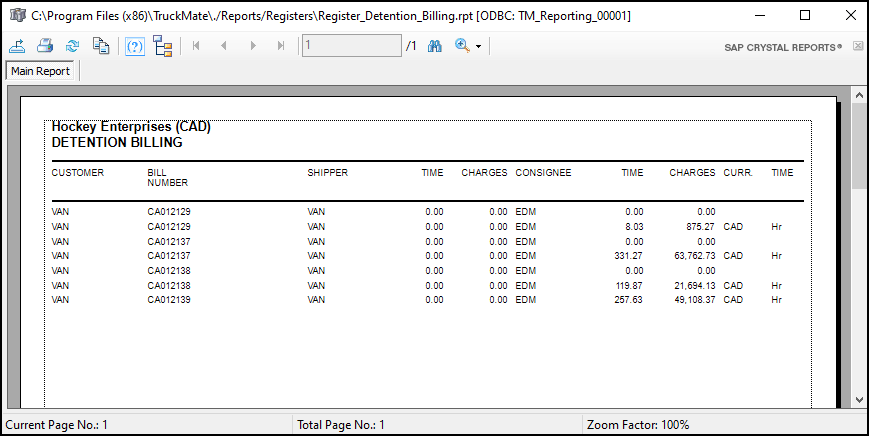
Create freight bills
You can create freight bills from detention records.
-
Filter for the detention records that you want to use to create bills.
-
Select File > Preview Posting. A preview of the records included by your filters opens.
-
Select
 Close. The report preview window closes.
 -
Select
 Create Freight Bills. The freight bills are created and a confirmation window opens.
 -
Select OK.