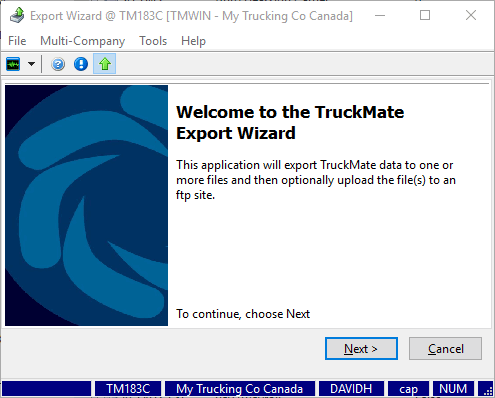
Export Wizard
The Export Wizard program can be used for various exports, including fuel taxes and accounting data. It can be used to export data for:
| Each of these export types requires a specific TruckMate license. |
The wizard may show different windows depending on the export type. Some of the possible windows are:
-
Sub-Types
If a type exports multiple files, you may choose to not export them all. -
Filters
You may not want to export all transactions. You will be prompted for a date-range, month, and so on. -
File directory
The location where you want to write the files.
Once the export files have been generated, in Export Wizard you can:
-
See a summary of which files have been generated.
-
See how many records are in each file.
-
Open or view the files.
You may close the wizard once the files have been generated (if your goal is to just create the files), or you can continue and FTP the files to a website.
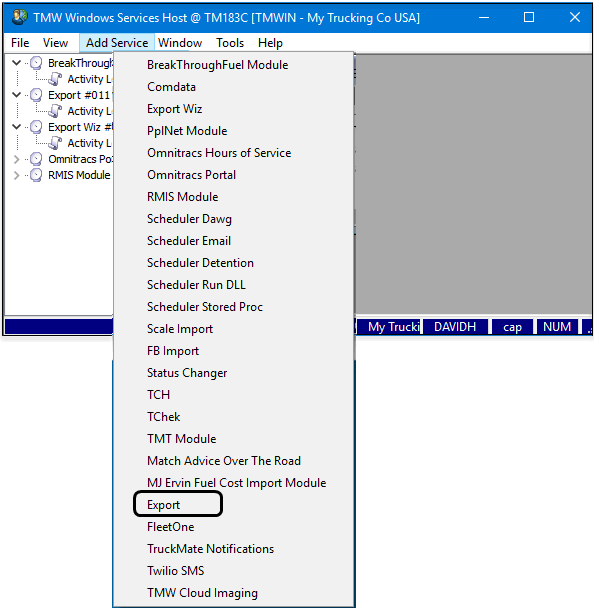
To access Export Wizard:
| From this location | Go to |
|---|---|
TruckMate Menu and TruckMate Task List |
Imports & Exports > Export Wizard |
Windows Start Menu |
TruckMate > Export Wizard |
Windows Explorer |
C:\Program Files (x86) > TruckMate > ExportWiz.exe |
Set up Export Wizard
Requirements
Each export type requires a specific TruckMate License.
| TruckMate License Number | Export Type |
|---|---|
29001 |
Inter-Tax |
29002 |
T-Chek |
29003 |
PC*Miler |
29004 |
Great Plains Accounting |
29005 |
IDSC |
29007 |
Optimum Solutions Export |
29008 |
TCG LTL/Traffic Costing Info (SMC3) |
29009 |
MacroPoint |
Set up Application Configurator for Export Wizard
In Application Configurator, the options for Export Wizard are located under Configuration Options > EXPORTWIZ.EXE.
| Option | Description |
|---|---|
Allow FTP Settings Change |
|
Allow Path Change |
|
Billing Register Export – Group ID:Type ID |
Sets the Export Group & Type being used to export TruckMate A/R to the system of record. This value identifies the EXPORT_LOG_DETAIL entries to examine when calculating the credit a client has used up. If an order has gone through Billing Register, but has not been exported yet, it will be included. |
Default FTP Location |
Enter a default FTP file location on the FTP Server. |
Default FTP Server |
Enter a default FTP Server address. This is usually in the form of "ftp://hostsitename.com" or "ftp://198.161.0.1". |
Default Path |
Enter a default path that will contain the files needed for importing. |
Link DrvPay to Trip |
|
TCG LTL/Traffic Costing Info: LoadPlan Export per Service Level |
Determines which service levels to use for export. Valid values are:
|
TCG LTL/Traffic Costing Info: Use Primary Route |
Determines behavior when exporting LoadPlan options data to SMC3. Valid values are:
|
Use Global Configurations |
|
Create an export file directory
Export Wizard creates export files. These files are stored to a directory location. Create this file folder before running Export Wizard. There are no requirements for a specific name or location.
Customized TruckMate code
If you already use TruckMate Export to create integration files, and some of the export file creation routines have been customized, you will need to contact Trimble Transportation Support to upgrade to the latest TruckMate version. A custom "stub" will need to be created to allow the latest version of TruckMate to use your customized code.
Automatically selected export types
Each export option has been assigned startup codes (such as -g1, -g2, -g3). This allows the software to start Export Wizard with an export type already selected. For example, the following menu options are already set up and available within the TruckMate Task menu. The "-g#" has been set to the startup command line parameter for the executable name:
| Option | Description |
|---|---|
Export to Inter-Tax |
-g1 |
Export to T-Chek |
-g2 |
Export to PCMILER Fuel Tax |
-g3 |
For example, this is what \ExportWiz" -g3 for Export to PCMILER Fuel Tax looks like in the Task Menu:
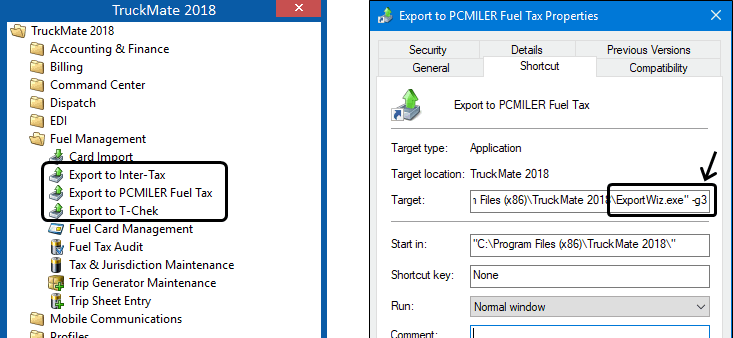
Because the startup code numbers match to the export type IDs, you can create your own Microsoft Windows shortcuts to start Export Wizard with other export types selected. For example, \ExportWiz" -g8 would start with TCG/LTL/Traffic Costing Info already selected as the export type.
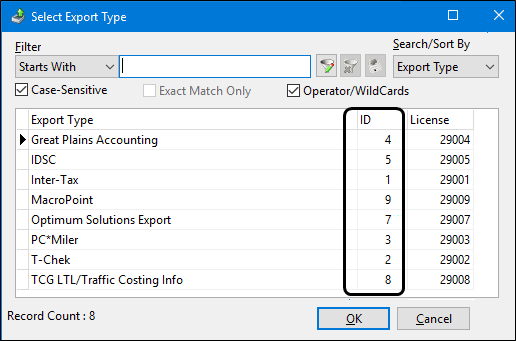
If you run the basic Utilities > Export Wizard from the TruckMate Task menu, no ID number is supplied as a default. You will be prompted for the Export Type.
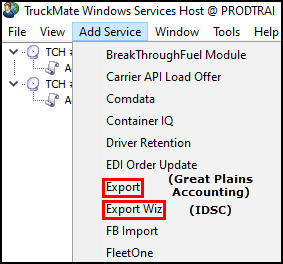
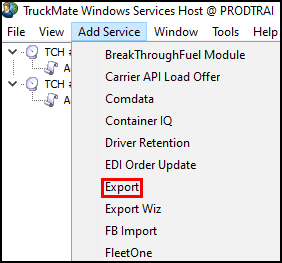
Run Export Wizard as a service
Some of the Export Wizard export types can be run as a Windows service using TruckMate Service Host.
For example, the IDSC fuel tax export type can be added and configured as a service called Export Wiz. The Great Plains Accounting export type can be added and configured as a service called Export.
Export Wizard process
The basic steps for using Export Wizard are:
-
Select an export type.
-
Select the export sub-types.
-
Set the date range filter.
-
Set the file directory location.
-
Create the export files.
-
Review the export log.
-
For FTP uploads:
-
Select the export files to upload.
-
Select and configure the FTP site.
-
Review the FTP log.
-
Select an export type
-
Select Next.
-
Select
 . The Select Export Type window opens.
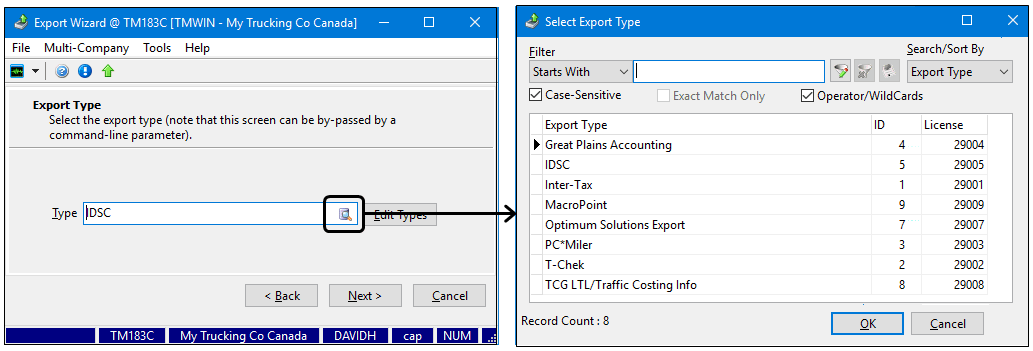
-
Search for and select an export type from the list, then select OK. The Select Export Type window closes.
-
If you want to restrict which export types are available in the list, select Edit Types.
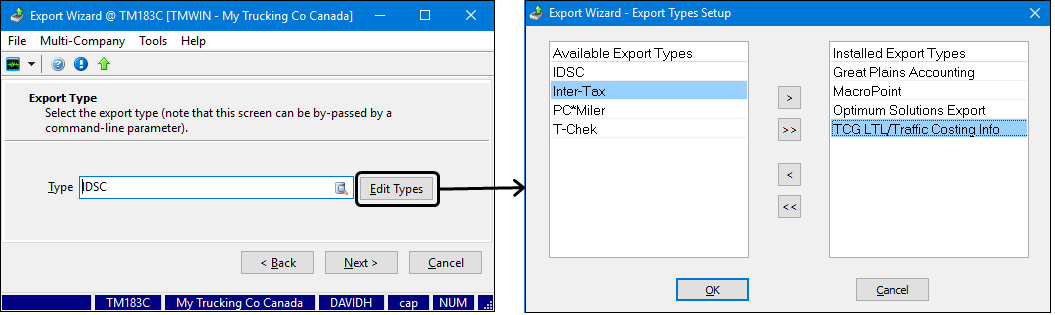
Note: An additional Export Type XML is also available, but it requires custom code. If your company is interested in XML format exports, contact Support.
Each export type requires a separate license key. If you do not have the required license keys, a warning window opens. Contact Support to get the proper license keys.
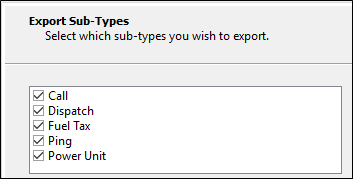
Select the export sub-types
Most export types have their own set of sub-types.
-
Do one of the following:
-
Select Check All or Uncheck All to quickly select or clear the sub-types.
-
Select the sub-type checkboxes individually.
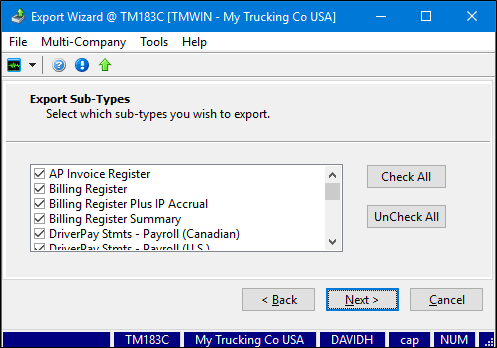
Note: Some export types do not require the selection of sub-types. For example, the IDSC export type has no sub-types, so it only requires a date range to be defined. The Optimum Solutions Export type requires you to select a payroll batch number.
-
Set a date range
Enter values in the From and To date fields to set a date range for your export files. Select the  calendar to select the month, year, and date.
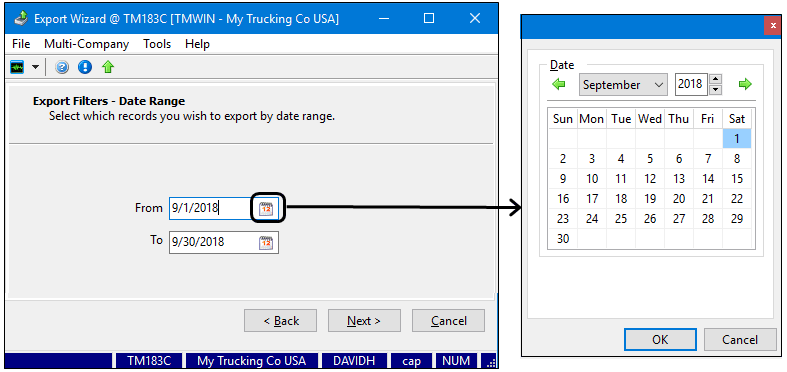
| Some export types (such as Macropoint and Optimum Solutions Export) do not require a date range. |
Set the export file directory location
-
Select the
 ellipses to set the location of the file directory to create and store the generated export files.
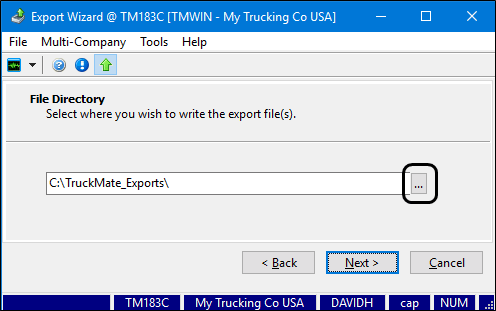
-
Some export types (such as Optimum Solutions Export and T-Chek) have a Include Column Headings checkbox. Select this checkbox to include the columns as header text at the beginning of the export files.
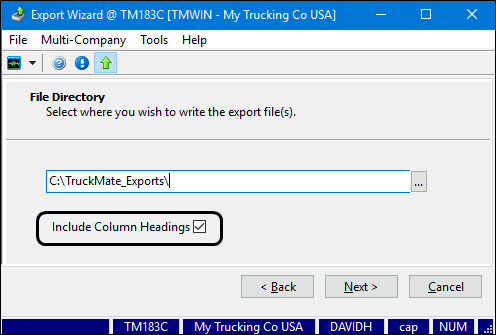
-
Select Next. An "Exporting… please wait until done (when buttons are re-enabled)" message appears. The bottom buttons are unavailable until the export process is complete.
Create the export files
It may take a few minutes to process the data.
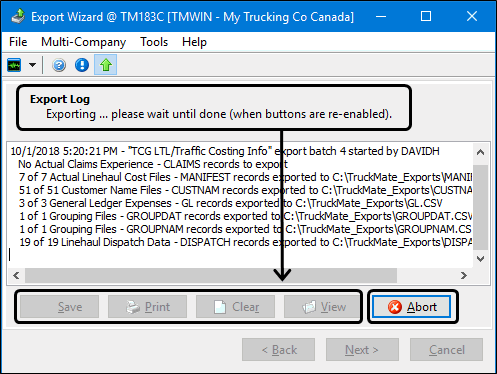
If the process is taking too long and you want to cancel it, select Abort. If you select Abort, you will not be able to proceed with the FTP portion of the process. To continue the export, select Back and regenerate the export files.
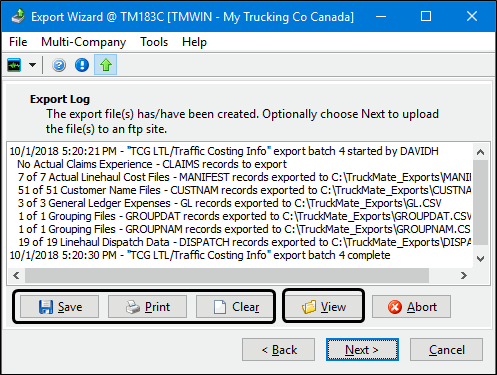
Once the export files have all been created, the buttons will be enabled and the export log file will be updated.
Go to the file directory where the files were created if you want to see the resulting set of .CSV export files. The folder will contain a variety of different file types depending on the export type.
Warning: If a file of the same name already exists in the folder selected to store the export files, it will be overridden without warning.
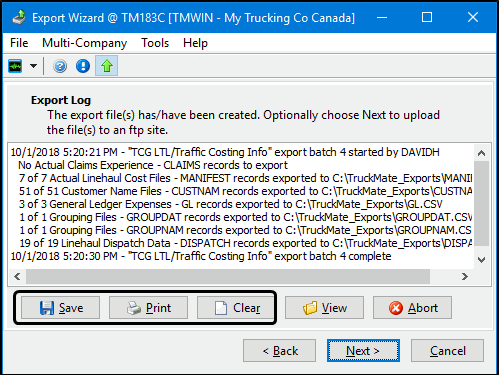
Review the export log
Select View to select any of the export files in the export folder and review them for accuracy.
The Save, Print, and Clear buttons are all associated with the export log text file. They are used to save and display the results of the export process.
| Option | Description |
|---|---|
Save |
Saves the details of the creation log displayed in this window as a text file in the file directory. |
Prints the creation log text to the default printer setup for this workstation. |
|
Clear |
Clears the creation log text. |
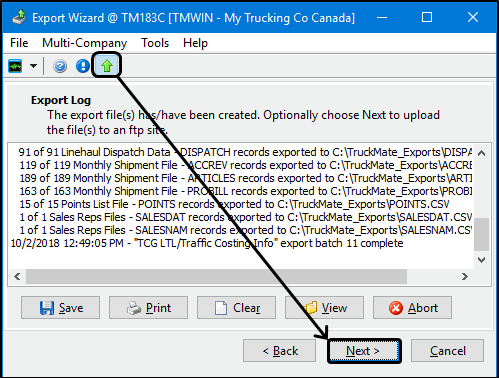
If you are not sending the files to an FTP site, clear  Use FTP to Send Exported Files and select Next to complete the process.
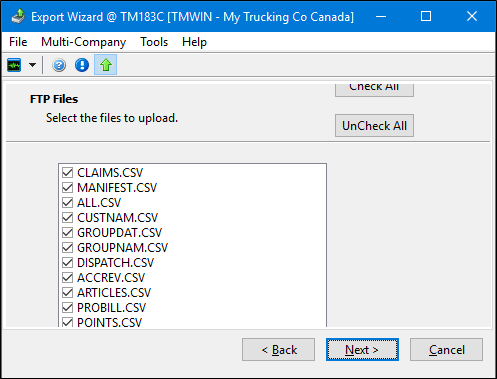
FTP: Select the export files to upload
To send the files to an FTP site:
-
Select
Use FTP to Send Exported Files and select Next. -
Select the files to upload and select Next.
FTP: Configure the FTP site
Once you have selected which files to upload, the FTP Site window opens.
-
Enter the FTP site connection information.
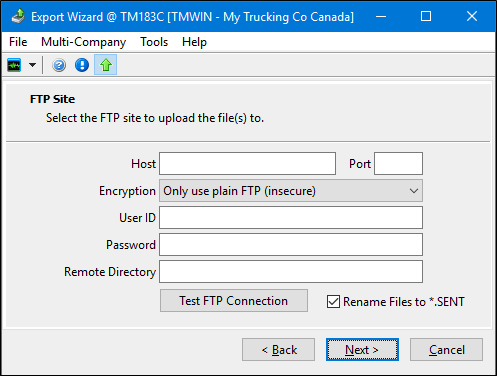
Field Description Host
Enter the FTP site’s host address. This is usually in the format "ftp://hostsitename.com" or "ftp://123.45.6.7".
Port
Enter the FTP site’s port number, if required.
Encryption
Select the FTP site’s encryption mention from the dropdown menu.
User ID
Enter the user ID you use to access this FTP Site.
Password
Enter the password associated with the user ID that you use to access this FTP site.
Remote Directory
Enter the directory of the host site to set where you would like to store your files. This location will be supplied to you by the FTP administrator.
Rename Files to *.SENT
Select this checkbox to rename all of your text files (currently with the file extension ".txt") to files bearing the extension ".sent". This tells your FTP site administrator that these files were uploaded through Export Wizard. If you would like your files to remain as they are on your local system ("Dispatch14.txt" for example), clear this option.
-
Select Test FTP Connection to verify the connection is working.
-
Select Next to transmit the files to the FTP site.
FTP: Review the FTP log
Once the files have been sent to the FTP site, the FTP Log window opens and displays a summary of which files were sent. An error message opens if there were problems.
-
Review the FTP log to verify that the files were successfully submitted.
-
If there were any problems, use the information displayed in the log file to determine how to fix the issue.
-
Select Back, fix the issue, and try again.
-
Use the Save, Print, and Clear options as needed. These options are all associated with the FTP log text file.
Option Description Save
Saves the details of the FTP log displayed in this window as a text file in the file directory.
Print
Prints the FTP log text to the default printer setup for this workstation.
Clear
Clears the FTP log text.
-
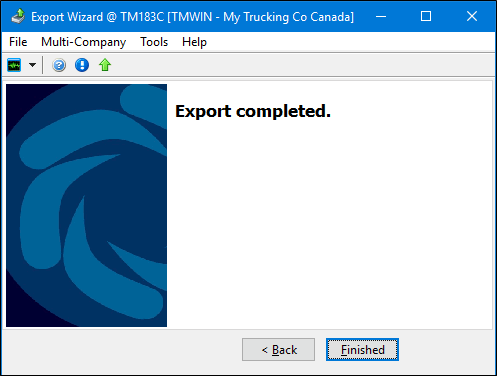
Select Finished. The "Export completed" message appears.
-
Select Finished to end the process.
Great Plains Accounting (GP)
This integration requires TruckMate license key # 29004.
Sub-types include:
Microsoft Dynamics GP (formerly known as Great Plains) is Microsoft’s general-purpose, enterprise-wide accounting software system. It is one of the largest, most flexible, and popular accounting packages on the market.
TruckMate has its own fully integrated Accounts Payable and Accounts Receivable modules. However, since some businesses run some divisions with TMWSuite and others with TruckMate, there is a partial integration to GP in TruckMate.
The interface between GP and TruckMate is a one-way process: export from TruckMate and import into GP. For the GP side, clients will be provided with template .IMD files (import definitions) for the files exported by TruckMate. The default template file is called "TruckMateIM.imd". It will be placed into the default TruckMate installation folder (C:\Program Files (x86)\TruckMate\) following installation. The files exported by TruckMate will be imported through GP’s Integration Manager. For the TruckMate side, Export Wizard exports two types of data: reference lists and registers (transactional data).
Run the GP Export as a service
The Great Plains Accounting export type can be added and configured as a Windows service called Export in TruckMate Service Host. For more details about configuring this service, see TruckMate Service Host.
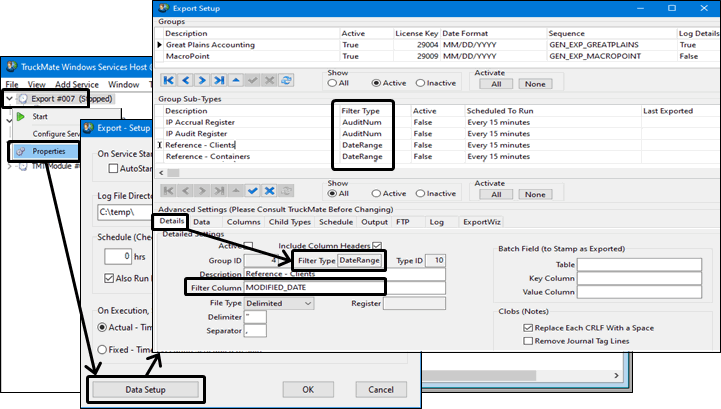
The Filter Type value tells you the type of data you need from the Filter Column field on the Details tab. For example, if the filter type is AuditNum, you will need the column from the source table that identifies the batch # used to post it to the General Ledger. Other filter types include None and DateRange. In the Export Setup window, this value appears on the Group Sub-Type grid and the Advanced Settings > Details tab.
-
In TruckMate Service Host, right-click the export service. The shortcut menu opens.
-
Select Properties. The Export – Setup / Properties window opens.
-
Select Data Setup. The Export Setup window opens.
In this window you can define export groups, their sub-types, and the options related to the data to be exported.
Re-export (Great Plains Accounting only)
When exporting the Microsoft’s Great Plains Accounting system, you have three options to choose from in the Re-Export window:
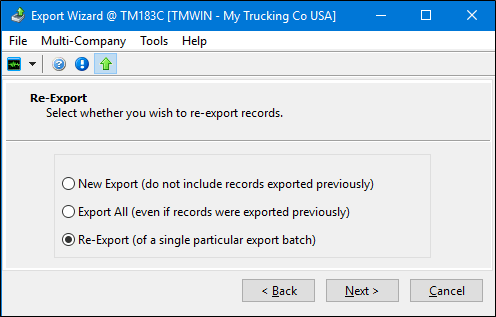
| Option | Description |
|---|---|
New Export |
Will not include previously exported records in the current export. Dropdown boxes for Audit Number or Pay Report Run will only show those that have never been exported. |
Export All |
Exports all records (including previously exported records). All batch numbers will be available in the dropdown boxes. |
Re-Export |
Re-exports only the records included in a previous export batch. Dropdown boxes for Audit Number or Pay Report Run will only show those that have been previously exported. |
Reference
-
File types include: clients, vendors, employees (CAN and US), power units, trailers, containers, equip, and GL (general ledger) account codes.
-
Clients, vendors, employees, and GL account codes are used to support register data.
-
Power units, trailers, containers, and equip are intended to allow quick fixed asset setup in GP.
-
Files contain minimal info (code, name or description, address, and so on).
-
GP import will either do an update or an insert.
-
You do not have to export the entire table every time. Export Wizard will prompt you with a date range to filter reference tables by MODIFIED_DATE. You can set the start date to something like 1/1/1900 to do a complete table export, or you can use a recent date to only export new/updated records.
-
You can choose to add new reference codes into GP manually.
-
You can export any combination of types (0 to 9) in a single step or export (along with 0 to 5 registers).
Registers
Select the audit number from the various register programs throughout TruckMate that you want to export to the Great Plains accounting system. Export Wizard supports exporting the data from the TruckMate Billing Register program and AP Invoice Register program into the Microsoft GP accounting system.
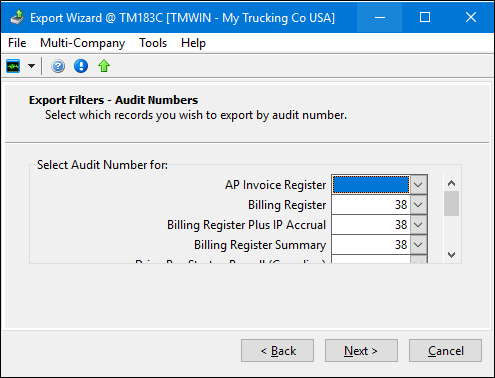
-
You will be prompted for audit number (BR or IP) or report run (DP).
-
File types include: Billing (BR), Interliner Payable (IP), Accounts Payable (AP) and Driver Pay (DP), and settlement statements (vendor type, Canadian payroll type, and U.S. payroll type).
-
You can export any combination of types (0 to 6) in a single step or export (along with 0 to 9 reference exports).
-
You can only select one "batch" number (audit or report run) per type (per export). For example, if you want to export 2 billing register batches (audit numbers), you must run the export twice.
A log table keeps track of when exports were run and which types and batch numbers were selected.
Billing Register export
For the Billing Register export you will need to:
-
Complete and approve Freight Bills in the Customer Service program.
-
Run the Billing Register program (BILLBR.EXE).
-
Run the Export Wizard program for the given Billing Register audit number.
IP Accrual Register export
For the IP Accrual Register export you will need to:
-
Complete and approve freight bills in the Customer Service program.
-
Run the IP Accrual Register program (IPACCRUALREG.EXE).
-
Run the Export Wizard program for the given IP Accrual audit number.
Billing Register Plus IP Accrual export
This type of export combines the Billing Register export and the IP Accrual Register export into one export type. Instead of exporting the Billing Register and the IP Accrual Register in two separate exports, you can combine the two into one export.
Before you use this option:
-
Set the application configuration option CSERV.EXE - Auto Approve IP on FB Approval to True. This guarantees that the attached IP records get approved when the freight bill is approved.
-
Make sure users do not "unapprove" and edit an IP record attached to a freight bill that has been approved and exported to GP. No changes are allowed on an approved IP, but a user may unapprove and then change an IP.
-
Make sure users do not add any IP record to a freight bill that has been approved and exported to GP.
To complete the Billing Register Plus IP Accrual:
-
Complete and approve Freight Bills in the Customer Service program.
-
Run the Billing Register program.
-
Run the IP Accrual Register program.
-
Run Export Wizard for the given Billing Register audit number.
| If you run both the Billing Register Plus IP Accrual export and the IP Accrual Register export on the same freight bills, they will get double posted in GP. You should consistently use either the combined Billing Register Plus IP Accrual export or the two separate exports, Billing Register and IP Accrual Register. You should not switch back and forth. You can hide the exports you do not want to use in Export Wizard to prevent users from accidentally running the wrong one. This is done via SQL: set column EXPORT_TYPE.ACTIVE to False. |
Interline Payables Register export
-
Run the IP Accrual Register on Freight Bills with Interliners attached.
-
Audit the IP records using the Interline Payables Audit program (IPIIPM.EXE).
-
Run the Interline Payables Audit Register (IPIIPR.EXE).
-
Run Export Wizard for the given IP audit number.
Driver Payables Register Export
-
Do one or more of the following:
-
Create contracts and rules for trip/freight bill-based pay (and dispatch freight bills) in the Driver Pay Contracts program.
-
Use the Fuel Card Data Import program to create fuel deductions.
-
Create manual pay/deduction entries in the Driver Pay Audit program.
-
-
Run the Driver Pay Register program (PAYREG.EXE) and Driver Deduction Register program (DEDREG.EXE). You may have to run these programs many times.
-
Run the Driver Statements program (PAYSTMT.EXE).
-
Run the Export Wizard program for the given statement run (by report run number).
The amounts will be summarized (totaled) by either GL account (for vendor type driver pay) or pay/ded code (for payroll type driver pay). Pay/ded descriptions will not come over into GP.
When you write a check in GP, you will have to include the settlement statement printed from TruckMate to show the detailed breakdown.
For payroll type driver pay, payroll deductions (income taxes, etc. as opposed to "regular" driver deductions) will be calculated in GP.
Files
-
A separate file is generated for each different type of export (up 14 files total).
-
For any given type, the same name is used every time (such as BR.csv).
Because of this, no sequential number or timestamp is used in the name. This means you need to import into GP before exporting the next audit number from TruckMate. Because you do not have to select or change the filename each time, importing into GP is easier.
-
All files are in comma-delimited format so they can be viewed in either a text editor or Excel.
-
All rows within a given file have an identical format. Because of this, header/totals info may be repeated on multiple lines.
For example: "BR.csv" has a row for every debit and credit in the BILLGL table. For every row, the bill-to client, bill number, invoice total, and so on will all be the same.
Limitations
-
If your business uses GP, it is assumed that TruckMate is only being used for operational purposes (for example, Customer Service, Multi Mode Dispatch, and so on).
-
If your business requires the use of GP, it is assumed that you need R&M software and are using TruckMateT. This means that there is no export for: R&M, general payroll (as opposed to payroll type driver pay), GJ, general AP (as opposed to IP or vendor-based driver pay), AR adjustments, cash receipts, checks, fixed assets, and so on. It is expected that you will enter data for these modules directly into GP (or TruckMateT).
-
Although COD and Supplier registers are part of operations, these are little-used by TruckMate clients and (thus far) have not been implemented.
-
Since the data flow is one-way, TruckMate does not have access to current AR balances. Because of this, checking to see if a client is near or over their credit limit must be done in GP, not TruckMate.
-
Exports have not been written for one-time setup/conversion from TruckMate Accounting to GP (AR and AP balance forwards, GL balance history, and so on).
-
Driver pay settlement statements for drivers of type D=driver/direct-pay (as opposed to V=vendor or P=payroll) are not exported.
-
Driver pay and deduction codes are limited to six characters in GP, and no import facility is available. Because of this, if a longer code is created in TruckMate, it will get truncated to six on export (in payroll type DP export).
-
Auto-generated pay rows in TruckMate are not assigned a pay code. This is required in GP, so hard-coded values are used on export of payroll type DP:
-
AMIFSC = Paid by Mileage Fuel Surcharge
-
AMIGAL = Paid by Miles Per Gallon
-
AMI = Paid by Mileage
-
APKDR = Paid by Pickups/Drops
-
APRCNT = Paid by Percentage of Gross
-
APKACC = Pickup Acc Charge
-
ADRACC = Delivery Acc Charge
-
AFLMI = Flat pay based on mileage
-
AJOBQ = Paid by Job Quote
-
AMIN = Paid by Minimum
-
ASC = Paid by Surcharge
-
AUNITS = Paid by Units
-
AFL*TR = Paid by Flat Trip
-
AMINTR = Paid by Min Trip
-
AIM = Paid by InGate/OutGate
-
AFLPT = Paid by Point to Point Flat Rate
-
AVOID = Voided check reversal
-
-
In TruckMate, you may create a pay or deduction record without filling in the code. Blank/missing codes are set to hard-coded, catch-all codes on export of payroll type DP:
-
ATAXP = taxable driver pay
-
ANTAXP = non-taxable driver pay
-
ATAXD = taxable deductions
-
ANTAXD = non-taxable deductions
The automatic pay-types you use, the four catch-all codes, and any pay/deduction codes created manually in TruckMate must all be created manually in GP. The easiest way to avoid name collisions is to never create a manual code starting with letter "A".
-
-
When creating manual pay and deduction codes, you should avoid using any of the above codes (unless you want your manual pay amounts to be lumped in with auto-pay amounts for payroll type exports).
-
In the GL accounts export, the "type" is resolved to 1 of 48 standard types in GP. These are almost the same as the 50 or so types available in TruckMate.
-
In employee export, SINs/SSNs will get truncated to nine digits.
-
When DP is exported, status codes are not modified. Because of this, in Driver Pay Audit you cannot distinguish which items have been "settled"/exported. Because you will not be creating the checks in TruckMate, the items will never go into a "paid" status.
-
We currently only support export of "regular" driver pay (as opposed to the little-used TruckMate feature whereby DP can be recorded in the BILLGL table).
IDSC
IDSC (Integrated Decision Support Corporation) fuel tax data requires TruckMate license key # 29005.
No sub-types need to be selected when exporting IDSC fuel tax data.
Use Export Wizard to manually export data from the FT_FUEL table (which has either been imported via Fuel Card Data Import or manually added via Fuel Tax Trip) to the IDSC Expert Fuel module. Exporting manually in this case means that you will be prompted for date range values to perform the export. Make sure that:
-
No records are exported twice
-
No records are missed (not exported)
Alternatively, you can do the export automatically using the TruckMate Service Host program. The service will auto-export records and stamp them so they are not re-exported.
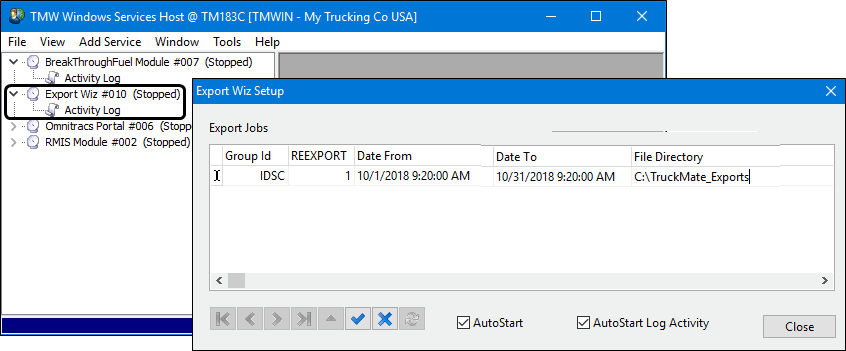
| The IDSC export type will create a file called "Fuelact.dat" (in a directory you specify) that lists fuel purchases (rows from the FT_FUEL table) for the date range you specify for later import into the IDSC Expert Fuel program. |
MacroPoint
Requires TruckMate license key # 29009
No sub-types or date range values need to be selected when exporting MacroPoint data.
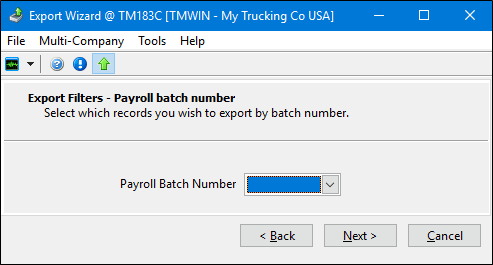
Optimum Solutions
Requires TruckMate license key # 29007
The export type does not include sub-types or require a date range. Only a payroll batch number needs to be selected.
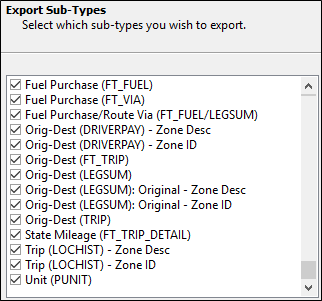
PC*Miler
Requires TruckMate license key # 29003.
Sub-types include:
When using Export Wizard to export to PC*Miler Fuel Tax, not all import types are required. Although you can export the files from TruckMate all at once and in any order, the order of import into PC*Miler Fuel Tax is important. You may also decide not to import certain fields into PC*Miler Fuel Tax. Most fields are optional.
To exclude a field, do not assign a "column" and "length" to the field in the Import Layout Setup window (Tools > Import > Advanced Settings in PC*Miler Fuel Tax). For example, you may decide not to import TruckMate fuel tax trip numbers in Fuel Purchases (*.fp). This forces PC*Miler Fuel Tax to determine the trip number by matching to a previously imported trip by date/unit.
Power Units (PUNIT - *.unt) should be imported first. Otherwise, you may get an error in PC*Miler Fuel Tax when importing fuel purchases or trips for a non-existent unit. If your active Power Unit list is fairly static, then it only needs to be exported/imported periodically (after changes in TruckMate). If your Power Unit list is very static, you may decide to maintain it manually in PC*Miler Fuel Tax and never need to export or import.
Fuel Purchases (FT_FUEL - *.fp) should always be exported and should always be imported last (especially if you decide to not import the trip number).
For Trips, choose one of these options:
-
If you are using the Fuel Tax program in TruckMate to regularly create and audit fuel tax trips from dispatch trips, then it is recommended that you export Origin-Dest (FT_TRIP) and State Mileage (FT_TRIP_DETAIL). In this case, you should import FT_TRIP before FT_TRIP_DETAIL, and you should include TripID when setting up *.fp.
-
If you were using the 6.1 or 7.0 Fuel Tax Export program (FTEXPORT.EXE), then choose between:
-
Origin-Dest (LEGSUM): Original
-
Trip (LOCHIST)
-
Origin-Dest (DRIVERPAY)
-
Origin-Dest (LEGSUM)
This is similar to the original, but it has more fields (see table below).
-
All four of these choices create a PC*Miler Fuel Tax trip for every TruckMate dispatch leg. The trip number will be of the form "X.Y" or "XSY", where "X" is the TruckMate dispatch trip number and "Y" is the TruckMate leg number. They all take longer to import into PC*Miler Fuel Tax. For trips, it needs to generate the mileage breakdown by jurisdiction as it imports. For fuel purchases, it needs to determine the trip number as it imports
With any of these four options, do not include TripID when setting up *.fp. A TruckMate fuel tax trip number will not match up to a TruckMate dispatch trip number/leg sequence.
The complete list of available fields in the setup of the import file layouts in PC*Miler Fuel Tax (Tools > Import > Advanced Settings) is as follows:
| TruckMate data | PC*Miler Fuel Tax field name | Starting column | Length |
|---|---|---|---|
Unit (PUNIT)- *.unt |
ID |
1 |
10 |
LicenseNumber |
12 |
14 |
|
VehicleID |
27 |
18 |
|
ModelYear |
46 |
4 |
|
AxleCount |
51 |
4 |
|
FuelType |
56 |
2 |
|
CGWeight |
59 |
10 |
|
GWeight |
70 |
10 |
|
UWeight |
81 |
10 |
|
FleetID |
92 |
10 |
|
FleetDate |
103 |
8 |
|
Fuel Purchase (FT_FUEL)- *.fp |
UnitID |
1 |
10 |
Vendor |
12 |
10 |
|
City/Zip |
23 |
30 |
|
Jurisdiction |
54 |
2 |
|
Date |
57 |
9 |
|
Time |
67 |
5 |
|
Volume |
73 |
8 |
|
Cost |
82 |
10 |
|
Invoice# |
93 |
16 |
|
VolumeUnits |
110 |
1 |
|
TripID |
112 |
10 |
|
Taxable |
123 |
5 |
|
TaxPaid |
129 |
5 |
|
Bulk |
135 |
10 |
|
Orig-Dest (FT_TRIP)- *.ods |
Origin |
1 |
40 |
Destination |
42 |
40 |
|
UnitID |
83 |
10 |
|
TripID |
94 |
10 |
|
Start Date |
105 |
8 |
|
End Date |
114 |
8 |
|
Start Time |
123 |
5 |
|
End Time |
129 |
5 |
|
State Mileage (FT_TRIP_DETAIL)- *.mil |
TripID |
1 |
10 |
UnitID |
11 |
10 |
|
Permit# |
22 |
10 |
|
PermitCost |
33 |
10 |
|
Jurisdiction |
44 |
10 |
|
Date |
55 |
8 |
|
Time |
64 |
5 |
|
Highways |
70 |
254 |
|
Loaded |
325 |
1 |
|
Toll |
327 |
10 |
|
NonToll |
338 |
10 |
|
Taxable |
349 |
1 |
|
Orig-Dest (LEGSUM): Original- *.ods , Trip (LOCHIST)- *.trp, Orig-Dest (DRIVERPAY)- *.ods |
UnitID |
3 |
10 |
TripID |
13 |
12 |
|
End Date |
25 |
15 |
|
Origin |
40 |
30 |
|
Destination |
70 |
30 |
|
Orig-Dest (LEGSUM)- *.ods |
TripID |
1 |
10 |
UnitID |
12 |
10 |
|
Origin |
23 |
30 |
|
Destination |
54 |
30 |
|
Start Date |
85 |
8 |
|
End Date |
94 |
8 |
|
Start Time |
103 |
5 |
|
End Time |
109 |
5 |
SMC3 (TCG) LTL/Traffic Costing Info
Requires TruckMate license key # 29008.
Sub-types include:
Transportation Costing Group (TCG) is now Cost Intelligence System, a product of SMC3. SMC3 provides transportation-costing software to Less Than Truckload (LTL) and Truckload (TL) transportation companies.
TruckMate integrates with two of the SMC3 products: LTL/CIS and Traffic/CIS. The integration exports specific TruckMate information into external files. These files are used by these SMC3 software applications.
| Product | Description |
|---|---|
LTL/CIS |
LTL Cost Information System (CIS) is a comprehensive model customized for individual motor carriers providing LTL/TL service via a terminal network. CIS combines carrier traffic and financial information with carrier and/or industry performance standards to develop the cost of individual shipments. The system processes freight bills or user-built shipment description files to provide accurate, specific cost information for pricing, traffic analysis, profitability analysis, and operations/productivity analysis. |
Traffic/CIS |
An extension of either LTL/CIS or TL/CIS, this system routinely costs all traffic in each accounting period by interfacing with both cost and customer profiles. A cost-based data warehouse is produced as well as standard monthly reports for account and freight terminal profitability. Users can also custom design reports to be run on any period or combination of periods in the cost-based database. The cost-based database can be used for analysis of virtually any traffic breakdown to enable users to "zero-in" on both profitable and unprofitable traffic segments. What-If scenarios can be applied to re-cost traffic segments in order to enhance decision-making and shipper negotiations capabilities. The system can also be interfaced with onboard computers and/or bar code readers to allocate costs based on the actual circumstances of each shipment’s movement. |
Disclaimer: Confirm specific features with your vendor. Trimble does not make any representations about the capabilities of third-party products.
| This solution works with Export Wizard. It is not integrated with TruckMate Service Host. |
All export files for the SMC3 TCG LTL/Traffic Costing Info integration are created as CSV files. Previously, some of the files were created as DAT or TXT files. If you are using the latest TruckMate versions and patch versions (e.g. TM 2018.3+) containing this change where the export files will all be created as CSV files, you will need to contact SMC3 and let them know. SMC3 will need to set a switch via a flag embedded in the SMC3 software for each file and send you a modified version of the SMC3 software to enable the TruckMate / SMC3 integration to use the CSV files.
Users should avoid saving an export file opened in Excel to CSV if any of the fields start with "0". For example, if the GL Account code is all numeric and starts with "0", saving from Excel will drop the leading "0".
If TruckMate is set to allow postings to prior GL periods, the export will not send those postings if the prior period has already been exported to SMC3 unless the prior period can be re-exported.
If you were already using this integration but customized some of the export file creation routines, you will need to contact Support to upgrade to the latest TruckMate version. A custom "stub" will need to be created to allow the latest version of TruckMate to use your customized code.
SMC3 cost model setup checklist
To ensure the SMC3 LTL and Traffic cost information systems have enough information for analysis and reporting purposes, the data requirements are set up in two phases:
-
Create a working cost model.
-
Set up the costed traffic information.
The following tables describe the typical checklist for the SMC3 setup. They identify which elements are supplied by data files coming from TruckMate Export Wizard. The items marked as MANUAL require you to provide the data manually. Consult the SMC3 implementation documentation for more information.
PHASE 1 - Create a working cost meodl (LTL/CIS)
| Description | File name | Notes | |
|---|---|---|---|
A |
General ledger expense data |
- |
|
B |
Traffic statistics |
- |
P&D hours and Dock hours are not supported in TruckMate |
C |
Points list |
- |
|
D |
Terminal codes and locations |
MANUAL |
Provide SMC3 a list of all terminals (freight terminals, interline carrier’s terminals, cartage agent). Include the zone code used to identify each in TruckMate. |
E |
Terminal features |
MANUAL |
For each company terminal, provide SMC3 with the number of doors and "Y" if forklift only. |
F |
Linehaul dispatch data |
- |
|
G |
Cartage rates |
MANUAL |
Provide SMC3 with rates, terms of payment, and means by which freight is provided for any terminal or geographic area not served by company drivers and/or using a local cartage agent to pick up and deliver freight. |
H |
Load Plan |
- |
|
I |
Extra Costs |
MANUAL |
Provide SMC3 a list of any additional costs of various accessorial charges. |
J |
Purchased linehaul |
MANUAL |
Provide SMC3 a list of vendor charges for any linehaul legs served specifically or exclusively by purchased transportation (as opposed to casual use for overflow) if DISPATCH.DAT is:
|
PHASE 2 - Cost freight on an ongoing basis (Traffic/CIS)
| Description | Filename | Notes | |
|---|---|---|---|
A |
Monthly shipments |
- |
|
B |
Actual P&D trips |
- |
|
C |
Customer names |
- |
|
D |
Grouping for national accounts |
- |
|
E |
Sales reps customers |
- |
|
F |
Interline profile data |
MANUAL |
Provide SMC3 a list of major partner carriers. Indicate for each how the freight is usually interchanged. |
G |
Manifest file for actual linehaul costing |
- |
|
H |
Revenue corrections and adjustments |
- |
PAYBACKS.DAT is not applicable to TruckMate. TruckMate will include interfaced (posted to AR) credits and rebills in PROBILL.CSV, ARTICLES.CSV, and ACCREV.CSV. |
I |
Actual claims experience |
- |
|
J |
Density by commodity |
MANUAL |
Provide SMC3 a list of density data by commodity code as well as by customer if available. |
K |
Handling units detail |
MANUAL |
HANDLING.DAT is not applicable to TruckMate. TruckMate will include density in PROBILL.CSV. |
Dock handling time |
- |
Export sub-types and export file descriptions
When using Export Wizard to generate export files for LTL/Traffic Costing Info purposes, there are several sub-type options. Each export sub-type is associated with a specific export file.
| The file names are fixed as recommended by SMC3. If a file of the same name exists in the folder selected to store the export files, it will be overridden without warning. |
Cost Information
Actual Linehaul Cost (MANIFEST.CSV)
This file serves as a link between the DISPATCH.DAT and PROBILL.DAT records for freight bills on an interlined linehaul leg. The file will store the Manifest Number and the Freight Bill Number fields to establish the link. Cancelled freight bills and freight bills that have not been posted (NA) will be excluded from the file. The information in the file will be for transactions that took place within the specified date range.
Actual P&D Trips (ALL.CSV)
This file includes one record for each shipment picked up or delivered on each P&D trip. TruckMate exports all freight bills on pickup and delivery trips that changed trip status within the selected date range. Records appear in stop# sequence by ascending trip number. These fields are included:
-
Date
-
Terminal Code
-
Driver ID
-
Manifest Number
-
Leave Terminal Time
-
Arrive First Stop Time
-
Leave Last Stop Time
-
Return Terminal Time
-
Pickup or Delivery
-
Probill Number
-
Pieces
-
Weight
-
Arrive Stop Time
-
Depart Stop Time
Dock Handling Time (ADOCK.CSV)
This file contains data for each approved, original bill in the billing cycle that contains barcode items, such as probill number and terminal. The handling minutes value is set to 0.
General Ledger Expense (GL.CSV)
This file includes GL transactions on account types beginning with the letter "P". Examples include Sales (PR001-PR003), Cost (PG001-PG005), and Expense (PE001-PE017). This file only includes transactions that fall within the specified date range.
These fields are included:
-
G/L Account Number
-
Expense Amount
-
G/L Account Description
Linehaul Dispatch/Actual Cost (DISPATCH.CSV)
This file contains costing information for leg-based interlined linehaul trips. It shows dispatch information, including source and destination terminals and the sum of distances of all freight bills on a leg that fall within the selected date range. The file includes settlement amounts (Interline Payable’s Base + Extra Charges without fuel) accumulated for all applicable freight bills. The Settlement Code/Purchase Type is fixed as "O" (optional). The file also includes a calculation of all fuel surcharges (if purchased) accumulated for all applicable freight bills. Cancelled freight bills and freight bills that have not been posted (NA) will be excluded from the file.
The files should include all the dispatches, manifests, and local trips pulled for a time frame starting two weeks before the selected period (for probill file) and two weeks after (or up to the current date). You can also choose to only include completed trips.
These fields are included:
-
Dispatch Number
-
Dispatch Date & Time
-
Truck ID for Tolls
-
Origin Terminal
-
Destination Terminal
-
Miles
-
Settlement Code
-
Settlement Amount
-
Fuel Surcharge
-
Trailer # 1 Manifest Number
-
Total Weight
-
Number of Shipments
Load Plan (LOADPLAN.CSV)
The load plan tells the system the primary operating legs used when going to and from your freight terminals. It provides the intermediate/via terminals. It also indicates, if available, whether shipments are re-handled at each. TruckMate will export as a comma-separated file named LOADPLAN.CSV. The file will contain the load plan as defined on the Load Plan tab in Service Level Maintenance.
| Intermediate terminals must be freight terminals only. They cannot be "meet and turn" relay points. |
Customer Information
Customer Index (CUSTNAM.CSV)
This file includes all active customers. No date filter is applied to this file.
These fields are included:
-
Customer Name
-
ID Field (for example, City/State)
-
Customer Code
Customer Index Grouping (GROUPDAT.CSV)
This file contains all active customers that are assigned to groups. If a customer is not assigned to customer group, it will not be listed in this file.
These fields are included:
-
Grouping Code
-
Customer Code
Customer Index Grouping (GROUPNAM.CSV)
This file contains a list of distinct customer groups. Distinct group numbers assigned to active customers will be listed in this file.
These fields are included:
-
Group Name
-
ID Field (for example, City/State)
-
Group Code
Revenue Details
Source Shipment Data File (PROBILL.CSV)
This file contains details about freight bills with billing dates that fall within the selected date range.
-
The PROBILL file and the related detail files (ACCREV and ARTICLES) should be all shipments for whatever date range and date stamp that best fits your accounting period. It should only include shipments that moved in the period, with the revenue as accurate as it is known to be at the time the user makes the request. It can include corrections if you are not sending PAYBACKS.
-
If your accounting recognizes revenue at pickup, then include freight bills based on pickup date. If your accounting recognizes revenue at delivery, then include the freight bills based on delivery date. If your accounting uses an invoice or other date, discuss with SMC3 to determine which date is more appropriate.
-
A shipment is only pulled into one period.
TruckMate includes these fields:
-
Pickup Date
-
Delivery Date
-
Probill Number
-
Shipper
-
Consignee
-
Bill-to
-
Rate-To
-
Origin Terminal
-
Pickup Unit or Manifest Number
-
Destination Number
-
Delivery Unit or Manifest Number
-
Origin Zip Code / Postal Code
-
Destination Zip Code / Postal Code
-
Actual Weight
-
Billed Weight
-
Pieces
-
Pallets
-
Packaging Code
-
Density
-
Type of Rate
-
Net Revenue
-
Discount
-
Accessorial Revenue
-
Fuel Surcharge
-
Intermediate Terminal 1-6
-
Dock Code - Origin
-
Dock Code - Intermediates
-
Dock Code - Destination
-
Tariff & Number
-
Prepaid = 1 / Collect = 2
-
Originating Carrier
-
Terminating Carrier
-
Interline Carrier Share
-
Service Days
Supplemental Articles (ARTICLES.CSV)
Articles are represented as Items in freight bill detail lines in TruckMate. This is an optional file, but including it improves cost accuracy and subsequent freight re-rating for shipments made on multiple-class items. The commodity code field can be further linked to density information.
The PROBILL.DAT record Packaging Code and Shipping Units takes precedence over the article detail (such as all articles on one pallet). The shipment record should contain zeros if the shipment has articles with mixed packaging (both loose pieces and pallets).
This file contains information about items on all freight bills that have an actual billing date that falls within the selected date range.
TruckMate includes these fields:
-
Probill Number
-
Actual Weight of the Article
-
Shipping Units
-
Packaging
-
Density
-
Actual Classification
-
Rated Classification
-
Commodity Code
-
Description
Supplemental Accessorial Revenue (ACCREV.CSV)
This file contains information about all accessorial charges (except fuel surcharges) assigned to all freight bills with billing dates that fall within the selected date range. All fuel surcharge accessorial records (Accessorial Code = FSC in Codes Maintenance) are excluded from this file.
TruckMate populates these fields:
-
Probill Number
-
Accessorial Charge
-
Accessorial Code
Miscellaneous
Actual Loss & Damage by Customer (CLAIMS.CSV)
This file contains information for claims that are both settled (approved) and closed/posted (processed into AR or AP module). Cancelled freight bills and freight bills that have not been posted (NA) are excluded from the file. The information in the file will be grouped according to the freight bill’s Rate To Code and whether the transaction is inbound or outbound.
The file contains:
-
Customer Code
-
Cumulative Revenue
-
Cumulative Claims Paid
-
Application (S = Shipper, C= Consignee, Bill To)
Points List (POINTS.CSV)
This file includes address details (zip code/postal code) of zones that are defined as terminal zones.
TruckMate includes these fields:
-
Zip / Postal Code
-
Terminal Code
-
City Name
-
SCAC Code
(Only included if a primary partner is defined as both the Advance and Beyond carrier for the Zone Code and the SCAC code is defined for the carrier.) -
State / Province
|
SMC3 uses zip/postal codes, not zone codes. Because of this, you have to assign a zip/postal code to each zone code that needs to be exported. This applies even if the zone code is the same as the zip/postal code. POINTS.CSV exports the Zip/Postal Code field, not the Zone Code. Contact SMC3 if some service points are conditional. For example, if zip code 12345 is served by terminal "X" if coming from the east, but is served by terminal "Y" if coming from the west. |