Trip Schedules
Trip schedules are trip templates that you can use to generate commonly-used trips. You can use the Trip Schedules window to create and edit trip schedules.
To access Trip Schedules in Multi Mode Dispatch, go to Tools > Edit Trip Schedules.
Create a trip schedule
-
Select
 Insert.
 -
Select values for these fields to set the trip parameters:
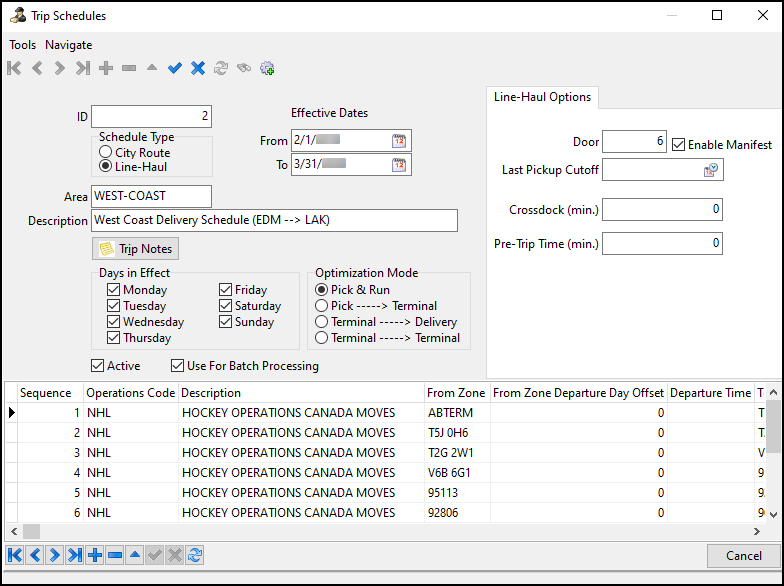
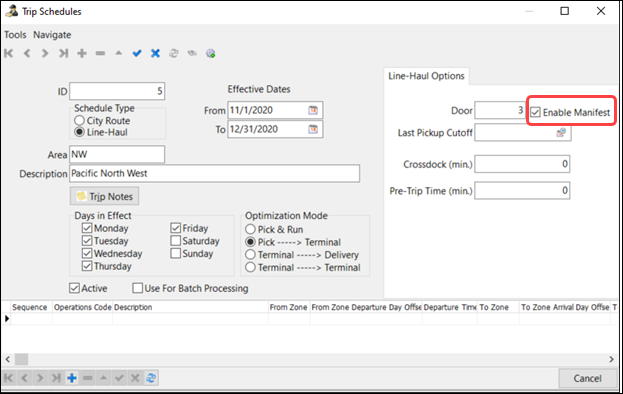
Field Definition ID
The trip ID is automatically created.
Schedule Type
Specifies if the trip schedule is a pickup and delivery route (City Route) or a Line-Haul route.
Area/Description
Enter a name for the trip schedule in the Area field that matches the location the trips service. Enter a short text description in the Description field.
To avoid mistakes, Trimble recommends that you view the terminal that you are scheduling. You can go to Tools > Change Current Terminal change your terminal view.
Trip Notes
Enter any notes about the trip schedule.
Effective Dates - From/To
Sets the effective period of the schedule.
Days in Effect
Sets the days of the week that the trip schedule is available when you generate trips.
Optimization Mode
Sets the optimization mode for the trip schedule. The optimization modes are:
-
Pick & Run: A trip designed for several local pickups.
-
Pick → Terminal: A trip to pick up freight and then move it to a specific terminal.
-
Terminal → Delivery: A trip that delivers freight to its destination zone from the terminal.
-
Terminal → Terminal: A trip that moves freight between two terminals.
Active
Sets the trip schedule to an Active status. This makes it available for generating trips.
Use for Batch Processing
Sets the trip schedule to run by the automated batch creation procedure.
If checked, this schedule will be part of a batch process to create the freight bills and trips and then match the freight bills to the trips. This is done by setting up an automated batch in DAWG.
-
-
Enter values in the City Route Options or Line Haul Options fields.
These fields vary depending on if the schedule type is City Route or Line-Haul.
-
City Route options
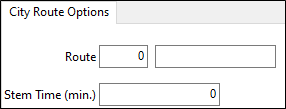
Field Definition Route
Select this field to open the Select City Dispatch Route window. You can then choose a default route for this trip schedule from the list of options.
You can create and edit routes for specific terminals in the P&D Routes tab in Terminal Maintenance.
Stem Time (min.)
The time in minutes from the terminal to the route.
-
Line-Haul options
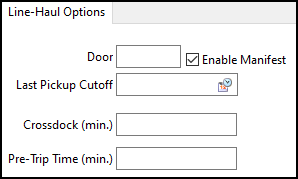
Field Definition Door
Sets the door where the trip will park.
Last Pickup Cutoff
Sets the latest load pickup cutoff time for this trip.
Crossdock (min.)
Enter an estimate of the minimum amount of time expected to be spent on crossdock operations.
Pre-Trip Time (min)
Enter an estimate of the minimum amount of time expected to be spent on pre-trip activities.
Enable Manifest
You can use the Enable Manifest checkbox to use trip schedules with any start zone without loading at a door.
-
If Enable Manifest is selected and the Door field contains a number, the trip is parked immediately at the door chosen (if available) on the trip schedule.
-
If Enable Manifest is selected and the Door field is empty, the trip appears on the Trips tab. It must be loaded at a door before it can be activated.
-
If Enable Manifest is selected and the app config Schedule Generated Trip tab is set to Planning, the trip appears on the Planning tab. It must be loaded at a door before it can be activated.
-
If Enable Manifest is not selected, the Door field is set to 0 and cannot be changed. The trip can be activated immediately after being created.
-
-
-
When you have finished making changes, select
 Post to save your changes.
Trip Schedules grid
You can create the trip legs and pre-assign resources to each leg.

When assigning a driver, TruckMate checks a driver’s defined terminal zone against the schedule’s terminal zone to determine driver eligibility. This does not apply to linehaul-based schedules. You can assign any driver to a linehaul schedule regardless of their defined terminal zone.
-
Select
 Insert below the Trip Schedules grid. A trip leg with a Sequence value of 1 appears on the grid. The From Zone defaults to your current terminal.
 -
Enter details relevant to the leg in each column.
-
Double-click in the Preassigned Driver field. The Select Driver ID window opens.
-
Find and select a driver.
-
Select OK. The Select Driver ID window closes and the driver is preassigned to the leg.
-
Repeat these steps for each resource you want to assign to the leg.
-
When you have finished entering leg details, select
Post Edit. -
Repeat Steps 1-7 for each leg you want to add to the trip schedule.
Create trips from a schedule
After you have created a trip schedule, you can use it to create trips.
-
Select the
 binoculars. The Select Schedule window opens with a list of previously created schedules.
 -
Select a schedule and then select OK. The Select Schedule window closes.
-
Select the
 gear. The Trip Schedule window opens.
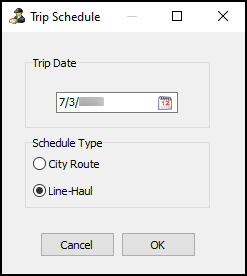
-
Select the
 calendar. A calendar selection window opens.
 -
Select a date and then select OK. The calendar selection window closes.
-
Select a schedule type.
-
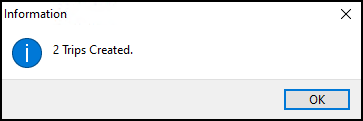
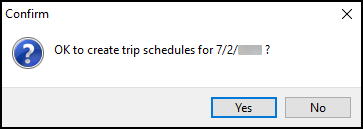
Select OK. The Trip Schedule window closes and a confirmation window opens.
-
Select Yes. Trips are created based on the trip schedule, date, and schedule type.