Create custom places
With ContentTools, you can create, name, and manage your own custom locations on the map. These custom places can define an individual business location, such as a rest stop, an office, or a distribution center, as well as key points within that location—perhaps a dry dock, cold dock, trailer parking, etc. You can also organize these locations in categories so you can easily find and update them.
In ContentTools, locations are called Places and their categories are called Place Sets. A Place must be part of a Place Set.
There are two types of Places in ContentTools:
-
Custom Places, which users can create and edit.
-
Verified Places in the Trimble MAPS database for tens of thousands of commercial locations across North America that serve the transportation industry, including distribution centers, intermodal terminals, manufacturing plants, truck stops, and more. These can be searched, viewed on the map, and used in routing planning and mobile navigation. Verified Places cannot be edited, but you can add your own custom Place ID, contact information, operating hours, and comments.
Each Place can include some or all of the following attributes: latitude, longitude, name, name of its Place Set, Place ID, street address, city, state, ZIP/postal code, phone number, website, operating hours, and comments. Before you can create a Custom Place, you must first create a Place Set where it can be stored. A Place Set can be imported or newly created using the steps below.
Create a Place Set
-
Activate the Place Sets panel by selecting Manage Places on the top menu ribbon.

-
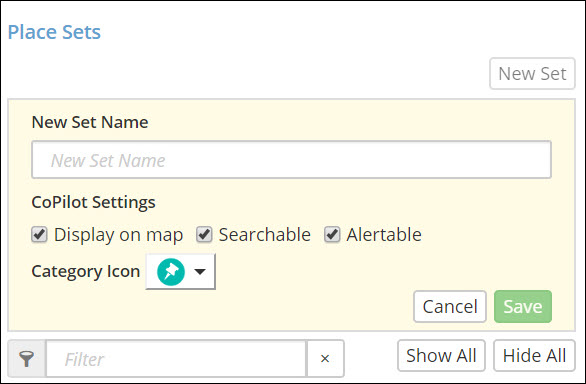
Select New Set in the Place Sets panel. Enter the New Set Name.
-
CoPilot Settings: When a new set is created, three settings are offered. By default, all three settings are checked.
-
Display on Map
When checked, displays all the Places within the set on the map in CoPilot. -
Searchable
When checked, all the Places can be searched in CoPilot. -
Alertable
When checked, CoPilot will show a "Point of Interest" notification when it is near the Place. The driver can then add the Place as a stop on their route.
-
-
Choose a Category Icon for how you would like Places in this Place Set to be displayed on the Map. The icon you select for the Place Set will be displayed on the map to identify Places, instead of the pin.
-
Select Save to finish.
View Place Sets
The Place Sets panel contains the list of Place Sets created in your Content Tools account.
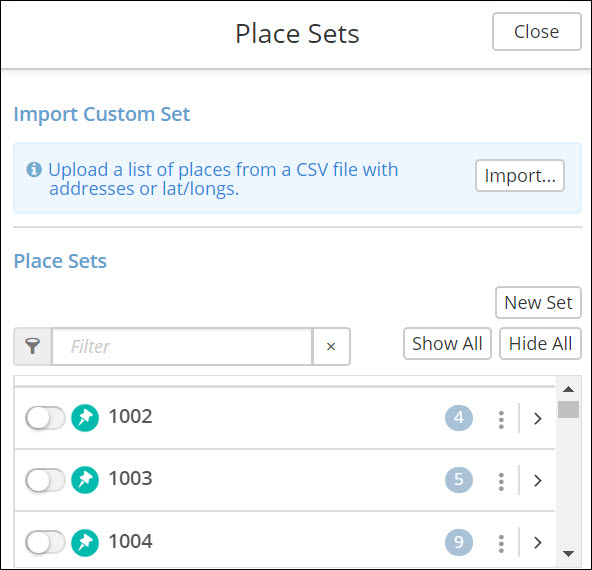
Place Set Panel Features
-
Select Show All or Hide All to display or remove Place Sets from the map.
-
Select
 to navigate to the list of custom places.
 -
Select the
 toggle button to view the places on the map.
 -
Select
 to delete a set or edit the set name and settings.
 -
Search for a Place Set or Places using the filter option. To search for a set, start typing the name.

-
Select
 to cluster places close to each other.
 -
To see the details of a Place within a particular set, select
 .
.
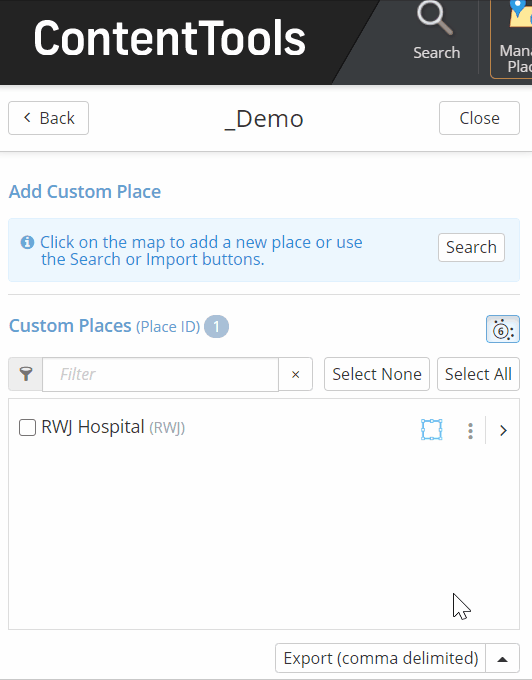
Add a custom place
You can create custom places with the following steps:
-
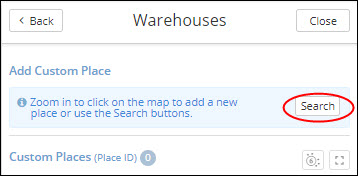
Click on Manage Places at the top menu ribbon and select a Place Set in the Place Sets panel on the left.
-
In the Place Sets panel, click Search under Add Custom Place to search for a location. Or, you can click on the exact location on the map where you want to add a New Place. (Single click, as double-clicking causes the map to zoom in.)
|
Typically, a driver is most interested in routing to the truck entrance. It’s often best to locate your Place at that entrance on the map. You can also add entrances and exits using the Sites feature. |
-
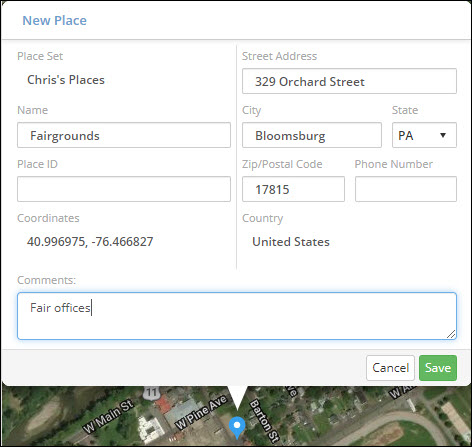
When you choose a location, the New Place window will pop up, and the icon you chose for that Place Set will appear on the map.
-
Add any details you’d like to include about the custom place, including Name, Phone Number, and additional comments about the location (250 character limit). The Place ID field can be used to create a unique identifier for that location, including special characters. (For example, you can use an existing Customer Code, Location ID, Store ID, etc.)
-
Click Save to add the new custom place to the current Place Set.
|
You can also search for a location using the Search button on the top menu ribbon. However, you cannot add a place using this option. It is used only for searching and viewing the location on the map. To add the location once you’ve found it on the map, go back to Step 1 in this section. |
Additional Place Details
After adding a Place in the map screen, you can return to the Place’s Details page and add two additional pieces of information:
-
A website URL
-
Operating Hours
To add these details, select the pencil icon, enter the information, and select Save.
|
For best performance, place sets should be limited to no more than 10,000 places. |
Import a Place Set
Place Sets can also be imported via a .csv or .txt file.
-
Activate the Place Sets panel by selecting Manage Places on the top menu ribbon.
-
In the Place Sets panel, select Import…

-
Select Choose File… to upload the file or drag and drop your file into …or drop file here. Under the Field Separator drop-down, select the way in which the Places in your file are separated (Comma, Tab, or Pipe). Select Continue.
-
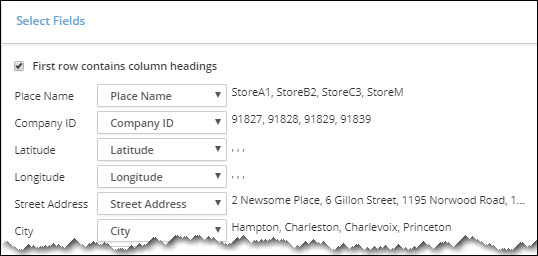
A Select Fields window will open and show the content of the imported file. In this window, you can match the data fields in your imported file with the fields in Content Tools. If you need to change a data field, select the drop-down menu and make a new selection.
-
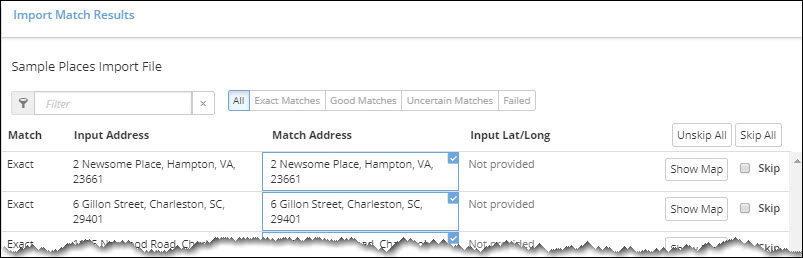
If the data alignment is correct, click on Continue to bring up the Import Match Results window. In this window, you will see how your locations have been matched or "geocoded" to locations in our map database.
-
Check Skip next to any Places you do not want to import. You can also select Show Map to display a Place. Select Continue when you are finished.
-
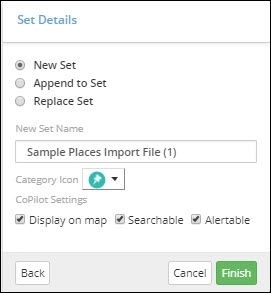
A Set Details dialog will open, giving you three options:
-
New Set
Creates a new Place Set. Enter the name of the new set in the New Set Name box. -
Replace Set
Replaces an existing Place Set. Click on the Replace Set button and choose an existing set from the drop-down. -
Append to Set
Adds places to an existing Place Set. Click on the Append Set button and choose an existing set from the drop-down.
-
-
In Set Details, you can also choose a Category Icon to identify the types of Places you have imported on the map.
-
When a new set is created, three settings are offered under CoPilot Settings. By default, all three settings are checked
-
Display on Map
When checked, displays all the Places within the set on the map in CoPilot. -
Searchable
When checked, all the Places can be searched in CoPilot. -
Alertable
When checked, an alert notification is shown in CoPilot upon approaching a Place.
-
-
Select Finish to import all of the data.
How to Use Places
After you have saved your new Places, a few extra steps may be necessary to use them in routing.
-
If you are using PC*MILER Web or the Trimble MAPS development platform, your newly created Places will be available immediately for use in routing.
-
For PC*MILER desktop users, under the Tools tab, select the Sync Content button before using your new Places.
-
For CoPilot users, Places must be assigned to specific vehicle groups in Account Manager for use in routing. CoPilot devices in that group are updated with the new Places the next time CoPilot is launched on the device or at a time based on the sync interval set within the device’s configuration profile in Account Manager.