Uploading SSRS reports
If your company creates their own SSRS reports, you can upload them to your Report Server. When you upload SSRS reports to your server, you allow others to run them or embed them into other applications
You can embed uploaded SSRS report files into TMWSuite, and TMW Operations. You can also use them with Dashboard Builder.
Uploading an SSRS report file
| The instructions documented are for SQL Server 2016. Your steps may be different if you are using a different version of SQL Server. |
To upload an SSRS report:
-
In an internet browser, go to your Report Server’s homepage.
Notes:-
By default, the SSRS report server’s homepage URL is https://<servername>/Reports. If your company changed this location, browse to the correct URL.
-
Trimble recommends creating a new folder on your homepage to store custom SSRS reports. This ensures you do not lose reports when you update the Report Library.
-
-
If needed, click the
 Add icon and then select Folder.
The Create a new folder in <Folder Location> window opens. -
In the Name field, enter a name for the folder.
-
Click Create.
The new folder is displayed on the page. -
Click on the folder to which you want to upload the report.
-
Click
 Upload File.
The Open window opens. -
Browse to the SSRS report file (.RDL) that you want to upload.
You can upload the following file types:-
Report files (.rdl)
-
Model files (.smdl)
-
Shared dataset files (.rsd)
-
Report part files (.rsc)
-
-
Select the file and click Open.
The uploaded file is displayed on the page.
Note: If you are uploading a file that already exists, click Overwrite.
Setting the data source
| The instructions documented are for SQL Server 2016. Your steps may be different if you are using a different version of SQL Server. |
By default, uploaded reports are not linked to a data source. Before you use the report, you must associate it with a data source.
To set the data source for a report:
-
In an internet browser, go to your Report Server’s homepage.
-
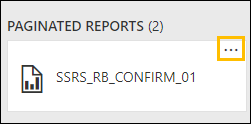
Browse to the report you need to link to a data source.
-
Click the ellipsis button.
-
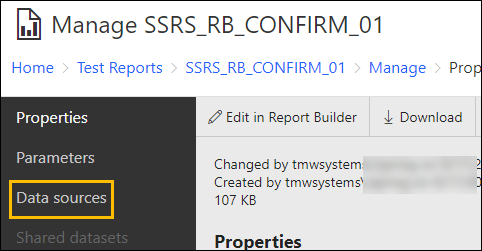
Select Manage.
The Manage Report page opens. -
Select Data Sources.
An error message under the A Shared data source radio button is displayed. It states, "We can no longer find this data source. If it was moved, choose it from its new location."
-
Do one of the following:
-
Select a shared data source
-
Select the A shared data source radio button.
-
Click
 Browse.
The Data source window opens. -
Navigate to the data source folder.
-
Select the data source you want to use for this report.
-
-
Select a custom data source
-
Select the A custom data source radio button.
-
In the Type field, select the type of data source.
-
In the Connection string field, enter the required connection string information.
-
In the Credentials section, select the type of connection.
-
Verify the connection by clicking Test Connection.
-
-
-
Click Save.