Recording/viewing a carrier’s expirations and qualifications
Recording/viewing a carrier’s expirations
TMWSuite allows you to schedule key activities for your resources, as well as dates and reasons they will be unavailable for service in the future. Key activities and out-of-service reasons are custom-defined by your company in the label file within System Administration. Within TMWSuite, notices regarding key activities and out-of-service dates are referred to as expirations.
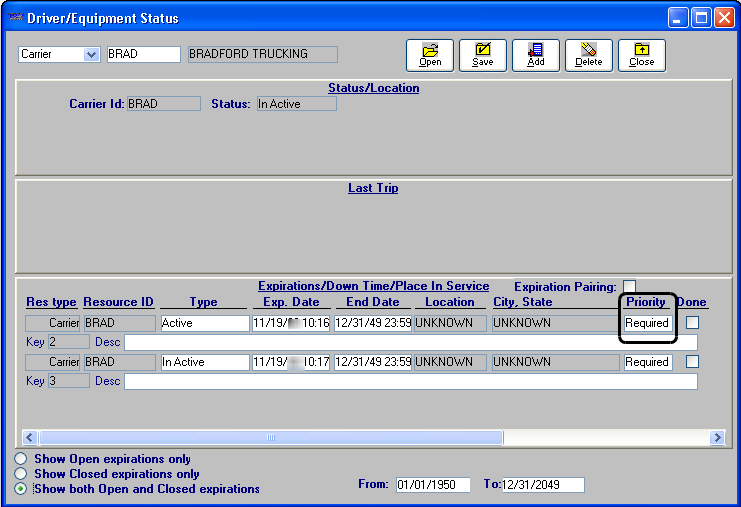
Expirations are added, modified, and deleted in the Driver/Equipment Status window, which is accessed in File Maintenance and Dispatch. Any expiration record can be entered or updated in the File Maintenance application. Some records may also be entered or updated in the Dispatch application. Data entered in one application will appear in the other.
|
To access the Driver/Equipment Status window, do one of the following:
-
Select Edit > Expirations.
-
Click
 Expirations in the sheet toolbar.
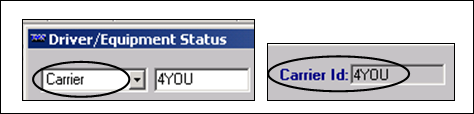
| If you select the Expirations command with a carrier’s profile opened, the <resource’s> expirations will automatically display. If you select the command with no carrier profile opened, the system will default to Carrier as the resource type. However, you must enter the ID in the second of the two fields in the upper left corner of the Driver/Equipment Status window. |
When you enter an expiration record, you must specify its priority. There are two priority levels:
-
Priority 1
Critical expirations are assigned a priority of 1. Their completion is required. If a resource has a Priority 1 expiration that has not been marked as completed, the system will not allow dispatch of that resource on, or after, the expiration’s effective date.
-
Priority 2
Expirations that are not critical are assigned a priority of 2. Due to their secondary nature, such expirations are categorized as Priority 2 expirations.
| User-defined priority values for expirations are set up in System Administration using the ExpPriority label in the label file. The code assigned to a priority value determines the priority’s effect on the system. A code of 1 signifies a Priority 1 value. A code of 2 or greater signifies a Priority 2 value. |
Although some priority values may be custom-defined by your company, two system codes exist in the ExpPriority label:
-
Required
The label option Required has a code of 1, which means it has a Priority 1 value. When an expiration is categorized as Required, dispatch of a resource with that expiration will not be allowed on, or after, the expiration’s effective date until the expiration is marked as completed. -
Key Date
The label option Key Date has a code of 9. Since the code is greater than 2, this means it has a Priority 2 value. Key Date can be used for an expiration that represents a significant date. Key Date expirations will never prevent resources from being dispatched.
Your system administrator can provide a list of your company’s Priority 1 and Priority 2 values.
Selecting the status of expirations you want to view
In the lower left of the Driver/Equipment Status window, these radio buttons are used to specify the status of the expirations you want to see:
-
Show Open Expirations only
Displays expirations that are not marked as Done. -
Show Closed Expirations only
Displays expirations that were marked as Done within a specific date range. -
Show both Open and Closed expirations
Displays both open expirations and those that were marked as Done within a specific date range.
For example, follow these steps to display only expirations for a carrier that were marked Done:
-
Select the Show Closed Expirations only radio button.
-
The From and To fields displayed in the lower right corner of the window are used to record the range of completion dates for the expirations to be listed.
-
Enter the beginning date in the From field.
-
Enter the ending date in the To field.
-
-
Click Open. The system automatically displays all expirations that have been marked as Done and that have completion dates falling within the specified date range.

Note: Two expirations can be seen at one time. If more than two expirations are listed, the system displays a scroll bar to the right. Use the scroll bar to view additional expirations.
-
After completing your review of the expirations, you can clear them from the window by deselecting the Show Closed expiration only checkbox.
Adding an expiration
-
With the carrier’s profile opened, click Add. A new expiration line is displayed. The system automatically transfers the type of lookup you initiated to the Res type field. The system also transfers the appropriate ID to the Carrier Id Resource ID field.
-
Make entries in these fields.
Type
Select the appropriate expiration type from the drop-down list that is displayed when you click in this field.
Note: The options are set up in the <*resource-specific Exp*> label, accessed in System Administration.
Exp Date
Do one of the following:
-
If the expiration occurs on a specific date, enter that date.
-
If the expiration involves a date range, enter the beginning date.
End Date
Enter the date when the expiration is expected to be completed.
Location
If the resource is to go to a particular location to have the expiration satisfied, enter the company code for that site.
City/State
The system will populate this field automatically, based on your entry in the Location field. (note that it doesn’t say whether you can enter a value manually
Priority
To rank the importance of the expiration, select the appropriate priority code.
Expiration Pairing
This field is used to activate the expiration link between a driver and a tractor. It is not applicable for a carrier profile.
Done
Do not make an entry here. This checkbox is used to mark the expiration as complete.
-
-
Repeat Steps 1-2 for each additional expiration to be recorded.
-
Click Save to save your entries.
-
Click Close to exit the Driver/Equipment Status window.
Deleting an expiration
If an expiration has been recorded in error, you can delete it from the system.
-
Position the cursor in any field for the expiration to be removed.
-
Click Delete.
-
The system asks if you are sure you want to continue with the deletion. Do one of the following.
-
Click Yes to complete the deletion.
-
Click No to cancel the deletion.
-
-
If you selected Yes, click Save. The system permanently deletes the expiration
-
Click Close to exit the Driver/Equipment Status window.
Marking an expiration as complete
When an expiration has been satisfied, you must use the Driver/Equipment Status window to record its completion. Until you do so, the system assumes that it is still unfinished. Once a Priority 1 expiration has reached its effective date, the system will not allow dispatch of the resource.
To mark an expiration as done, follow these steps:
-
If needed, change the date shown in the Completion Date field.
-
Select the Done checkbox.
-
Click Save.
Note: If you have the Show Open expirations only radio button selected, the expiration record is no longer displayed in the window. The expiration is still displayed if you have the Show both Open and Closed expirations radio button selected.
Once the expiration is marked as done, the system will not check future trip dates and times against its effective date(s).
Activating the Expiration Audit report feature
TMWSuite allows you to track all changes that were made to a resource’s expirations in both the File Maintenance and Dispatch applications.
The feature is activated by the ExpirationAudit General Info Table setting.
When the feature is turned on, the Audit button is added to the Driver/Equipment Status window.

To view/print a report of the activity pertaining to all closed and opened expirations recorded for a resource, click Audit. The Expiration Activities window is displayed. The resource type and ID are included in the window’s title.
The activity is shown in chronological order, with the latest change as the first line. Information is displayed in these columns:
Date |
The date/time the expiration was created, updated, completed, or deleted. |
Key |
The unique, system-generated identifier assigned to the expiration by the system. Note: This column corresponds to the Key field in the Driver/Equipment Status window. |
User |
The user ID of the person who recorded the expiration or made changes to it. |
Type |
The type of expiration, as recorded in the Driver/Equipment Status window. |
Action |
The type of change made, e.g., created, updated, deleted, or completed. |
Update Notes |
Detailed information about the change(s) made. You can use the scroll bar at the bottom of the window to view the entire Update Note column. |
If desired, you can print the audit report. Clicking Print sends the report directly to your default printer.
Recording/viewing a carrier’s qualifications
When a carrier is assigned to a order that has load requirements, those requirements can pertain to:
-
Driver qualifications
Driver qualifications are defined using the DrvAcc label, accessed in System Administration. -
Tractor accessories
Tractor accessories are defined using the TrcAcc label, accessed in System Administration. -
Trailer accessories
Trailer qualifications are defined using the TrlAcc label, accessed in System Administration. -
Carrier qualifications
Carrier qualifications pertain to the carrier as an entity. They are defined using the CarQual label, accessed in System Administration.
When you are setting up profiles for board carriers, you record the driver qualifications and tractor/trailer accessories in the individual driver/tractor/trailer profiles of the assets associated with the carrier.
When you are setting up profiles for non-board carriers, no individual drivers/tractors/ or trailers are identified as being associated with the carrier. Therefore, the Carrier File Maintenance window allows you to record driver qualifications and tractor/trailer accessories for the carrier’s assets as a whole, rather than individual assets.
| TMW recommends that you do not record this information in the profiles of board carriers. Instead, record information for board carriers' resources in the individual profiles of their drivers, tractors, and trailers. For a board carrier, any driver qualifications recorded via the Carrier File Maintenance window will be ignored during the dispatch process. Instead, the system will compare qualifications recorded in the profiles of the driver, tractor, and trailer. |
Carrier qualifications pertain to the carrier as an entity, whether it is a board or a non-board carrier.
-
With the profile of the carrier opened, do one of the following:
-
Select Edit > Carrier Qualifications.
-
Click
 Carrier Qualifications in the sheet toolbar.
-
-
The Carrier Qualifications for Carrier window opens. Notice that the window title includes the carrier’s system ID.
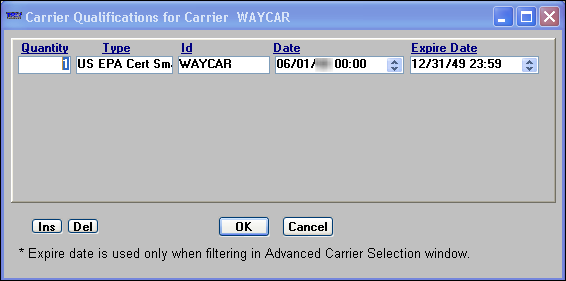
Click Ins to add a row to the window.
-
Make entries in the following fields:
Quantity
Enter the quantity available for the carrier qualification.
Type
Select the qualification type. The types are defined in the System Administration application using the CarQual label.
Id
Defaults to the ID of the opened carrier profile. This field is read-only.
Date
Enter the date the qualification is to go into effect.
Expire Date
Enter the date the qualification is to end.
Note: The default is the system apocalypse date of 12/31/2049.
-
When you are done, click OK.
-
The system displays a confirmation message. Click Yes to save your entries and close the Carrier Qualifications for Carrier window.