Custom Defined Fields
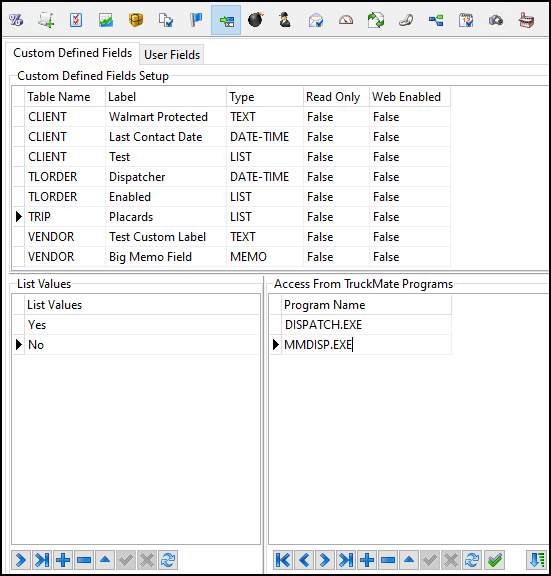
You can use the Custom Defined Fields tab in Codes Maintenance to create fields specific to your company’s needs.
Set up a custom defined field

The Custom Defined Fields Setup pane is where you choose the structure of a custom defined field.
-
Do one of the following:
-
To edit an existing table:
-
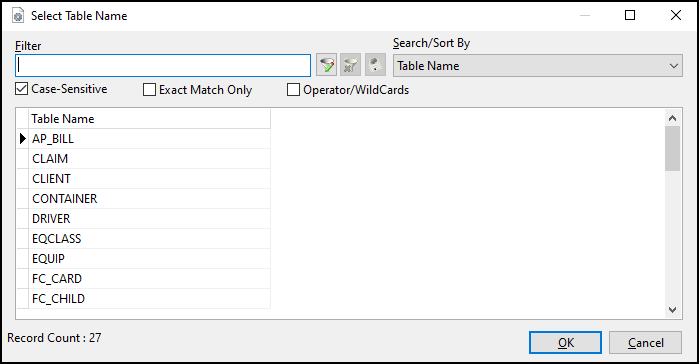
Double-click a table in the Table Name column. The Select Table Name window opens.
-
-
To create a new table:
-
Above the grid, select
 Insert. A blank record appears in the grid.
 -
Double-click the blank record. The Select Table Name window opens.
-
-
-
Select a table and then select OK. The Select Table Name window closes.
The table you select limits the programs that you can add to this field in the Access From TruckMate Programs pane.
Note: Not all TruckMate tables are available as Custom Defined fields.
-
Select the Label field and enter a label for the field.
The label is the name the field will have on the Custom Defined tab of the programs you specify.
-
Double-click in the Type field. A dropdown menu option appears.
-
Select the dropdown menu and choose a field type:
Field type Description LIST
Fields function as dropdown menus. You specify the menu options in the List Values pane.
TEXT
Fields allow for freeform text entry.
DOUBLE
Fields used for precise decimal numbers (FLOAT values that are greater than or equal to 22 characters in length) or very large integers. Large numbers are formatted using normal scientific notation conventions. For example, "1000000000000000" becomes "1E15".
DATE-TIME
Fields are used to record pickup and delivery dates and times. Double-click these fields to open a calendar menu where you can select a date. The date and a timestamp are stored in the database.
DATE-ONLY
Fields are used to record pickup and delivery dates, similarly to DATE-TIME fields. The only difference is DATE-ONLY fields do not record a timestamp.
MEMO
Fields that allow for lengthy strings of text (for example, several thousand characters).
-
Double-click in the Read Only column. A dropdown menu appears.
-
Select the dropdown menu and select either True or False.
If you select True, users cannot update the field. It can only be viewed.
-
Double-click in the Web Enabled field. A dropdown menu appears.
-
Select the dropdown menu and select either True or False.
If set to True, the selected field appears in TM4Web.
-
Select
 Post Edit to save your changes.
Enter list values
If you selected List as a field type, you choose which values appear in the list.
-
Below the List Values pane, select
Insert Record. A blank record appears. -
Select the record and enter a value.
-
Select
Post Edit. -
Repeat Steps 1-3 for each value you want to add to the list.
Access From TruckMate Programs
The Access From TruckMate Programs pane shows all of the TruckMate programs that can use the selected custom defined field.
You can select  Auto-Add All to add all the possible programs that can access the field at once.
To add a single program to the list:
-
Select
Insert Record. A blank record appears. -
Double-click the blank record. The Select Program Name window opens.
-
Select a program and then select OK. The Select Program Name window closes.
-
Select
Post Edit. -
Repeat Steps 1-3 for each program you want to add to the list.
Set order of appearance
If a program has more than one custom defined field, you can choose the order that the fields appear in the program.
-
Select
 Set order of appearance. The Set Custom Def’s Order window opens.
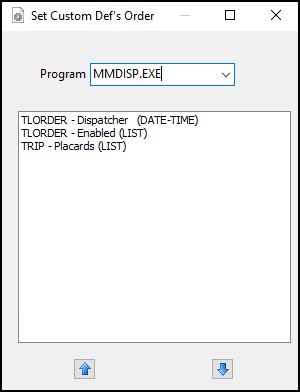
-
Select the Program dropdown list. A list of programs with more than one custom defined field opens.
-
Select a program. A list of custom defined fields that the program can access opens.
-
Select a field from the list.
-
Select

 Move to move the field up or down one place in the list.
 -
When you have finished making changes, select
 Close.