Load Optimizer
Use Load Optimizer to create, organize, and edit trip legs based on their freight bills and the trip type.
Load Optimizer has three panes:
Open Load Optimizer
-
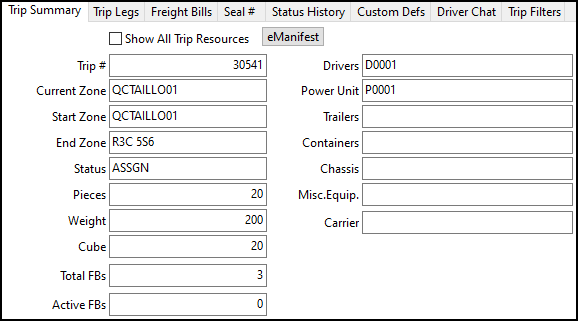
In Multi Mode Dispatch, select a trip. The Trip Summary tab opens.
-
Select either Trip Legs or Freight Bills.
-
Right-click a trip or leg. The shortcut menu opens.
-
Select Optimize Trip. The Load Optimizer window opens.
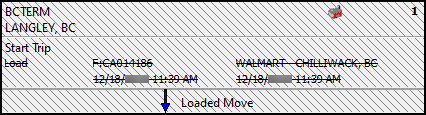
Trip legs
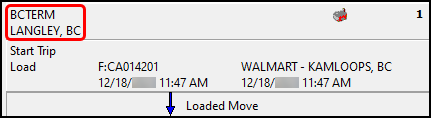
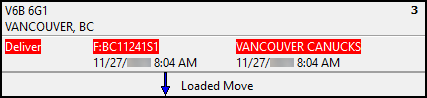
The trip legs pane shows the trip’s legs and assigned freight bills.
A strikethrough indicates that a freight bill has been picked up or delivered on that stop. Completed trip legs are shown with diagonal strikeouts over the legs. A  building icon indicates that the stop is at a terminal zone.
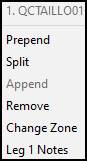
On this pane, you can:
Prepend a leg
Use Prepend to add a leg to the start of the trip.
-
Right-click the zone of the first leg.
The shortcut menu opens.
-
Select Prepend. The Supply Zone window opens.
-
Do one of the following:
-
Manually enter a zone code.
-
Select
 search to look up a zone code.
 -
Select
 Look up using Client Profile to select a client’s zone.
The zone you enter will be the origin for the new leg.
-
-
Select OK. A new leg is created at the beginning of the trip.
Split a leg
Use Split to create a new leg above an existing leg.
-
Right-click the zone of the leg you want to split. The shortcut menu opens.
-
Select Split. The Supply Zone window opens.
-
Do one of the following:
-
Manually enter a zone code.
-
Select
search to look up a zone code. -
Select
Look up using Client Profile to select a client’s zone.The zone you enter will be the origin for the new leg.
-
-
Select OK. A new leg is created above the leg you selected.
Append a leg
Use Append to add a leg to the end of the trip.
-
Right-click the zone of the last leg on the trip. The shortcut menu opens.
-
Select Append. The Supply Zone window opens.
-
Do one of the following:
-
Manually enter a zone code.
-
Select
search to look up a zone code. -
Select
Look up using Client Profile to select a client’s zone.The zone you enter will be the final destination of the trip.
-
-
Select OK. A new leg is created at the end of the trip.
Remove a leg
Use Remove to delete a leg. This option is only available if no freight bill picks or drops have been assigned to the leg.
-
Right-click the zone of a leg that has no assigned freight bill picks or drops. The shortcut menu opens.
-
Select Remove. The leg is removed from the trip.
Change a leg’s zone
Use Change Zone to change a leg’s zone.
-
Right-click a leg’s zone. The shortcut menu opens.
-
Select Change Zone. The Supply Zone window opens.
-
Do one of the following:
-
Manually enter a zone code.
-
Select
search to look up a zone code. -
Select
Look up using Client Profile to select a client’s zone.
-
-
Select OK. The leg’s zone changes to the zone you selected.
Add notes to a leg
You can add notes to legs.
-
Right-click a leg’s zone. The shortcut menu opens.
-
Select Leg Notes. A notes window opens.
-
Enter notes about the leg.
-
Select
 Post Edit. The note is saved.
 -
Select
 Close. The notes window closes.
Move a leg
You can move legs to reorder them. If two legs have the same zone, you can move one leg on to the other to combine them. Freight bills that are being picked or dropped on the leg will move with the leg.
-
Select and hold a leg’s zone.
-
Drag the leg above, below, or onto another leg.
Move a freight bill
You can move freight bills between legs. You cannot move the delivery portion of a freight bill ahead of that bill’s pickup.
-
Select and hold a freight bill’s number.
-
Move the freight bill to a leg’s zone.
If you move a delivery bill to a leg that occurs before its pickup, the bill’s information displays in red.
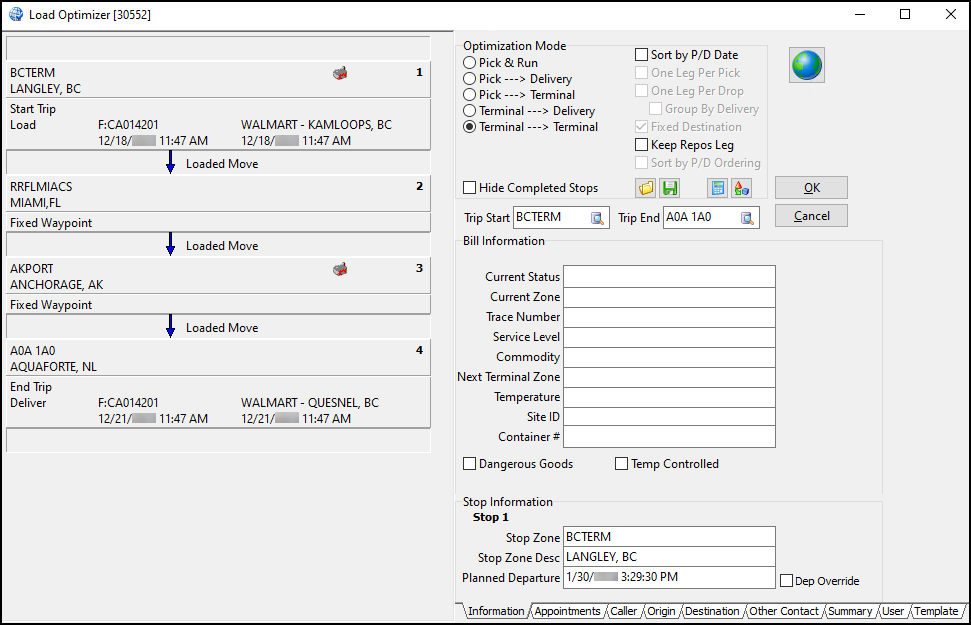
Optimization Mode
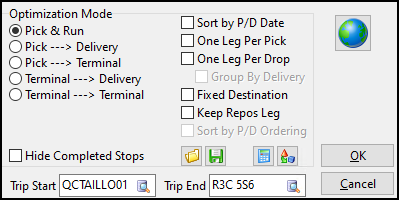
On the Optimization Mode pane, you can:
-
Define optimization modes and optimization rules to semi-automate the optimization process.
-
Use automated optimization to have Mileage Server compare the distance between leg zones and create the most efficient trip.
Change the trip Start or Trip End zone
You can change the Trip Start or Trip End zone.
The Trip Start zone represents the first leg of the trip. It defaults to the Current Zone of the first freight bill assigned to the trip.
The Trip End zone represents the last leg of the trip. It defaults to the End Zone of the last freight bill assigned to the trip.
-
Do one of the following:
-
Select the Trip Start or Trip End field and manually enter a zone code.
-
Select
search next to the Trip Start or Trip End field to look up a zone code.
-
-
Select OK. If you changed the Trip Start zone, a leg is added to the beginning of the trip. If you changed the Trip End zone, a leg is added to the end of the trip.
|
If you use the Terminal → Delivery or Terminal → Terminal optimization mode, when you select If you use the Pick → Terminal or the Terminal → Terminal optimization mode, when you select |
Optimization modes
There are five different optimization modes.
You can set a default optimization mode. In the Security application, go to Business Events > Misc > Multi Mode/Dispatch > Default Optimization Mode. You can set it to either of these options:
-
Pick & Run
This is the default setting. -
Pick → Delivery
When this is selected, all trips are created as Pick → Delivery trips by default.
Pick & Run
This mode creates legs for all freight bill pickups and deliveries based on the Current Zone and End Zone of each freight bill.
If more than one freight bill has the same Current Zone or End Zone, they will be grouped on the same leg unless the One Leg Per Pick or Drop Optimization optimization rules have been selected.
Pick → Delivery
The Pick → Delivery mode is for trips where drivers pick up freight, take it to a drop or delivery point, and then repeat this process.
If you add waypoints to this kind of trip, they are retained as the trip advances. This optimization mode does not remove waypoints from your planned trips.
When a new freight bill is added to a Pick → Delivery trip, the system automatically optimizes the trip by creating two new stops for the bill being added. The first stop will be the bill’s Current Zone. The second stop will be the bill’s End Zone. These two stops are automatically placed at the end of the trip.
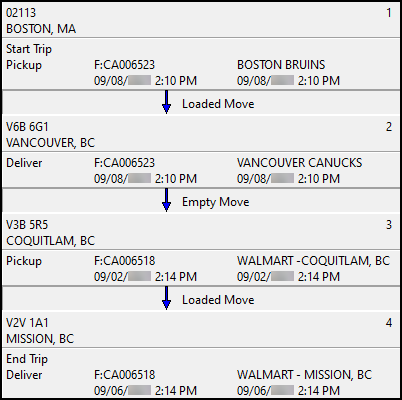
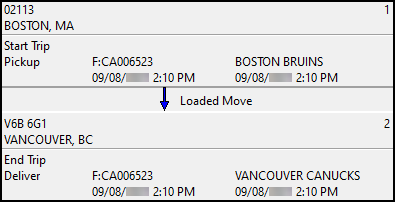
For example, here is a trip going from Boston, MA to Vancouver, BC:
If you add a freight bill going from Coquitlam, BC to Mission, BC to the trip, it looks like this:
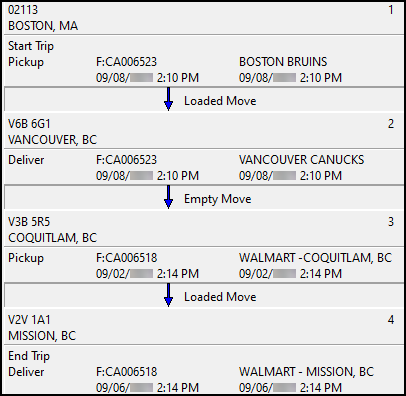
After adding the new freight bill, the trip now has this structure:
-
Leg 1 is a loaded move from the pickup/current zone of the first freight bill (CA006523) to its delivery zone.
-
Leg 2 is an empty move from the consignee of the first bill to the pickup/current zone of the second freight bill (CA006518).
-
Leg 3 is a loaded move from the pickup/current zone of the second freight bill (CA006518) to its delivery zone.
As more bills are added to the trip, the trip will alternate between loaded moves (the actual pick and delivery movements) and empty moves (going from the previous delivery to the new start location):
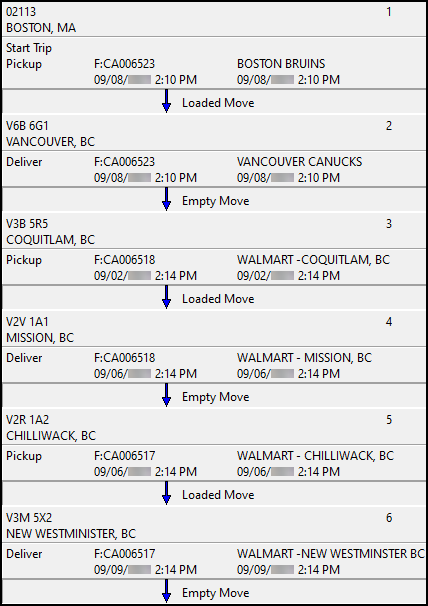
Because this trip structure can grow long, you may want to select Hide Completed Stops. This makes it so only ACTIVE or PENDING legs appear on the trip. All FINISHED stops and legs will be hidden.
Pick → Terminal
If you use this mode, the Trip End zone must be a terminal zone.
When you select  Calculate Legs, the system creates legs for each freight bill pickup, starting with the zone in the Trip Start field. The trip’s last leg will end at the terminal zone specified in the Trip End field.
Terminal → Delivery
If you use this mode, the Trip Start zone must be a terminal zone.
When you select Calculate Legs, the system creates legs for each freight bill delivery, starting with the zone specified in the Trip Start field. The trip’s final leg will end at the zone specified in the Trip End field.
Normally this mode is only used for freight bills whose current zone is the same as the zone specified in the Trip Start field. For example, you could use this mode for freight bills that have been assigned a Docked status and are therefore currently at a terminal.
Terminal → Terminal
If you use this mode, the Trip Start zone and Trip End zone must be terminal zones.
When you select Calculate Legs, the system creates legs for the terminal zones specified in the Trip Start and Trip End fields. It will assign the pickup of each freight bill to the Trip Start leg and the delivery of each freight bill to the Trip End leg.
Optimization Rules
You can use optimization rules to further customize how trip legs will be optimized.
-
Sort by P/D Date
Select this option to sort the trip legs by their pick and drop dates. If the bill has not yet been picked up, it will sort by the Pick Up By date/time. If the bill has been picked up, it will sort by Deliver By date/time. This allows you to bypass mileage calculations altogether when optimizing trips. -
One Leg Per Pick
Select this option to have each leg have only one pick bill when you calculate legs. This may result in duplicate stops/legs for the same zone if there is more than one pick or delivery at the same location. -
One Leg Per Drop
Select this option to have each leg have only one drop bill when you calculate legs. This may result in duplicate stops/legs for the same zone if there is more than one pick or delivery at the same location. -
Fixed Destination
Select this option lock the trip’s End Zone in place. A trip with a fixed destination will not have its End Zone optimized to a different zone when you select Calculate Legs. -
Keep Repos Leg
Select this option to make sure that empty resource repositioning legs are not removed when you select Calculate Legs. You may want to retain these legs for driver pay calculations.
Calculate Legs
After you have selected your optimization mode and rules, select Calculate Legs to calculate the trip legs.
The results are displayed on the trip legs pane for review.
Calculate Legs creates legs for each freight bill pickup and delivery, but does not try to logically order the legs beyond creating the pickup legs before the drop legs. You can use the Optimize option to have the system determine the logical order of legs, or you can manually order the legs on the trip legs pane.
Save a route
You can store the sequence of legs that is currently configured on the trip leg pane.
-
Configure the route on the trip leg pane.
-
Select
 Save Route. The Save Route window opens.
 -
Enter a description in the Title field.
-
Select Save. The Save Route window closes.
Delete a route
You can delete any of your saved routes.
-
Select
Save Route. The Save Route window opens. -
Select an existing route.
-
Select Delete. A confirmation window opens.
-
Select OK. The route is deleted.
Replace a route
You can replace a saved route with a different route.
-
Configure the route on the trip leg pane.
-
Select
Save Route. The list of saved routes opens. -
Select a route.
-
Select Replace. Your current trip structure overrides the previous route.
Load a route
You can load a route that you have previously saved.
-
Select
 Load Route. A list of your saved routes opens.
 -
Select a route.
-
Select Load. The route is copied to the trip leg pane.
If existing pickup and delivery legs on the trip leg pane match legs stored in the route, the freight bill pickups and deliveries will be copied to the legs. If pickups and deliveries exist for zones not included in the route, they will be included in the new trip structure.
Optimize
Select  Optimize to calculate the trip configuration and optimize the trip. The results are displayed on the trip legs pane for review.
A trip can be optimized at any time. For example, after legs on a trip have been completed, you may assign more freight bills to the trip. You can then re-optimize any pickups or deliveries that have not been completed.
If you try to optimize a trip with a zone code that does not exist or is set to PENDING, a window opens informing you that this must be fixed before the trip can be properly optimized. The process will not be stopped, but if you ignore this warning, an exception is logged to the EXCEPTION_LOG table.
| Optimize does not take into account that pickups must occur before deliveries. After you select this option, check the results on the trip legs pane and make manual changes as needed. |

Bill Information
The Bill Information pane has nine tabs that show freight bill information:
-
Information
-
Appointments
-
Caller
-
Origin
-
Destination
-
Other Contact
-
Summary
-
User
-
Template
Select a freight bill on the trip legs pane to see its details in these tabs.
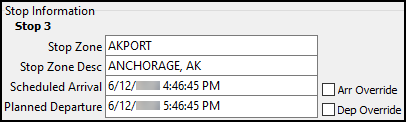
Scheduled arrival and planned departure times
When you select a stop, you can see its scheduled arrival and planned departure times.
The information that appears differs depending on the stop:
-
On the first stop, only the Planned Departure date/time displays. The Scheduled Arrival date/time does not display because there is no "arrival" for the first stop.
-
On the last stop, only the Scheduled Arrival date/time displays. The Planned Departure date/time does not display because there is no "departure" for the last stop.
-
All other stops display both Planned Departure and Scheduled Arrival dates/times.
The Scheduled Arrival displayed is the same date/time as the Planned Departure from the previous stop.
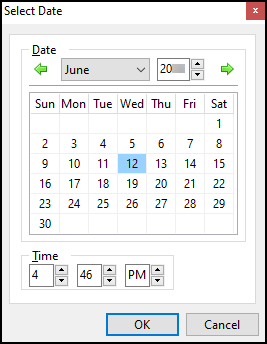
If you have the Planned Departure/Scheduled Arrival Dates security permission enabled, you can double-click in these fields to open a calendar where you can select a date and time.
Any Planned Departure date you enter must obey the Planned Departure Default Time app config’s setting.
TruckMate recalculates dates/times if you:
-
Add a stop.
-
Move stops.
-
Remove a stop.
-
Re-optimize a trip.
TruckMate retains any dates/times that were manually set within Load Optimizer.