Recording/viewing a driver’s expirations
TMWSuite allows you to schedule key activities for your resources, as well as dates and reasons they will be unavailable for service in the future. Key activities and out-of-service reasons are custom-defined by your company in the label file within System Administration. Within TMWSuite, notices regarding key activities and out-of-service dates are referred to as expirations.
For a driver, expirations might include the renewal of their driver’s license, sick time, training time, and vacation.
Expirations are added, modified, and deleted in the Driver/Equipment Status window, which is accessed in File Maintenance and Dispatch. Any expiration record can be entered or updated in the File Maintenance application. Some records may also be entered or updated in the Dispatch application. Data entered in one application will appear in the other.
|
To access the Driver/Equipment Status window, do one of the following:
-
Select Edit > Expirations.
-
Click
 Expirations in the sheet toolbar.
| If you select the Expirations command with a driver’s profile opened, the <resource’s> expirations will automatically display. If you select the command with no driver profile opened, the system will default to Driver as the resource type. However, you must enter the ID in the second of the two fields in the upper left corner of the Driver/Equipment Status window. |
When you enter an expiration record, you must specify its priority. There are two priority levels:
-
Priority 1
Critical expirations are assigned a priority of 1. Their completion is required. If a resource has a Priority 1 expiration that has not been marked as completed, the system will not allow dispatch of that resource on, or after, the expiration’s effective date.
-
Priority 2
Expirations that are not critical are assigned a priority of 2. If a Priority 2 expiration is not completed by its effective date, the system will display a warning when you assign the resource to a trip occurring on or after that date. However, dispatch is allowed.
| User-defined priority values for expirations are set up in System Administration using the ExpPriority label in the label file. The code assigned to a priority value determines the priority’s effect on the system. A code of 1 signifies a Priority 1 value. A code of 2 or greater signifies a Priority 2 value. |
Although some priority values may be custom-defined by your company, two system codes exist in the ExpPriority label:
-
Required
The label option Required has a code of 1, which means it has a Priority 1 value. When an expiration is categorized as Required, dispatch of a resource with that expiration will not be allowed on, or after, the expiration’s effective date until the expiration is marked as completed. -
Key Date
The label option Key Date has a code of 9. Since the code is greater than 2, this means it has a Priority 2 value. Key Date can be used for an expiration that represents a significant date. Key Date expirations will never prevent resources from being dispatched.
Your system administrator can provide a list of your company’s Priority 1 and Priority 2 values.
Selecting the status of expirations you want to view
In the lower left of the Driver/Equipment Status window, these radio buttons are used to specify the status of the expirations you want to see:
-
Show Open Expirations only
Displays expirations that are not marked as Done. -
Show Closed Expirations only
Displays expirations that were marked as Done within a specific date range. -
Show both Open and Closed expirations
Displays both open expirations and those that were marked as Done within a specific date range.
For example, follow these steps to display only expirations for a driver that were marked Done:
-
Select the Show Closed Expirations only radio button.
-
The From and To fields displayed in the lower right corner of the window are used to record the range of completion dates for the expirations to be listed.
-
Enter the beginning date in the From field.
-
Enter the ending date in the To field.
-
-
Click Open. The system automatically displays all expirations that have been marked as Done and that have completion dates falling within the specified date range.
Note: Up to three expirations can be seen at one time. If more than three expirations are recorded, the system displays a scroll bar to the right. Use the scroll bar to view additional expirations.
-
After completing your review of the expirations, you can clear them from the window by deselecting the Show Closed expiration only checkbox.
Adding an expiration
-
With the driver’s profile opened, click Add. A new expiration line is displayed. The system automatically transfers the type of lookup you initiated to the Res type field. The system also transfers the appropriate ID to the Resource ID field.

-
Make entries in these fields.
Type
Select the appropriate expiration type from the drop-down list that is displayed when you click in this field.
Note: The options are set up in the <*resource-specific Exp*> label, accessed in System Administration.
Exp Date
Do one of the following:
-
If the expiration occurs on a specific date, enter that date.
-
If the expiration involves a date range, enter the beginning date.
End Date
Enter the date when the expiration is expected to be completed.
Location
If the resource is to go to a particular location to have the expiration satisfied, enter the company code for that site.
City/State
If you made an entry in the Location field, the system will populate this field automatically. If no entry was made in the Location field, you can manually enter a city/state.
Priority
To rank the importance of the expiration, select the appropriate priority code.
Expiration Pairing
This field is used to activate the expiration link between a tractor and a driver. For details, see Expiration pairing for tractors and drivers.
Description
Enter free-form text about the expiration. << confirm this isn’t in the other ones
Done
Do not make an entry here. This checkbox is used to mark the expiration as complete.
-
-
Repeat Steps 1-2 for each additional expiration to be recorded.
-
Click Save to save your entries.
-
Click Close to exit the Driver/Equipment Status window.
Expiration pairing for tractors and drivers
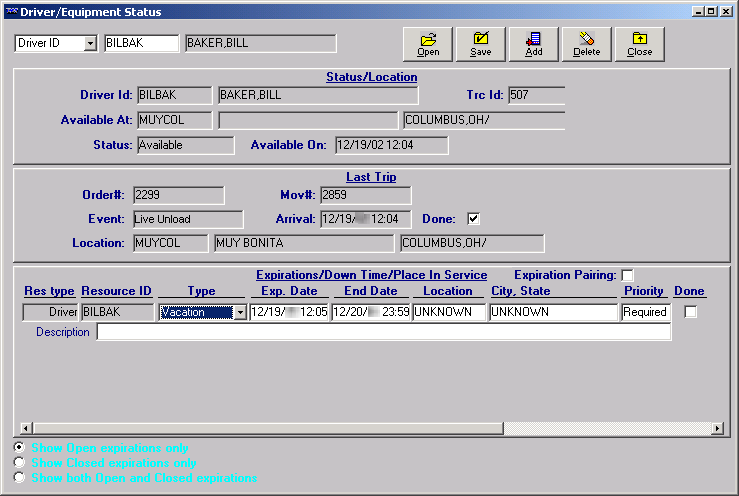
The Expiration Pairing feature serves as a crosscheck of availability for a driver and tractor that have been linked in their individual resource profiles. In the example shown here, the driver, Bill Baker, is associated with the specific tractor having an ID of 507.
The Expiration Pairing feature is useful if a driver usually uses the same tractor. In such a situation, the tractor is not in use whenever the driver is not available to work. For example, expiration pairing can be used to send the tractor home with the driver.
With Expiration Pairing turned on, when you add an expiration, the system displays two new lines: one for the driver, and one for the tractor.
By default, the expiration pairing feature is not active. If your company wishes to have this feature turned on whenever you access the status window, you can use the [Misc]ExpirationPairing=Yes setting in the TTS50.ini file.
|
To add expirations using Expiration Pairing, follow these steps:
-
If the Expiration Pairing checkbox is not selected, click in it turn on the functionality.
-
Click Add.
-
For the Tractor expiration line:
-
Select the Type of expiration.
-
Enter the Exp. Date.
-
Enter the End Date, if applicable.
-
Enter the Location, if applicable.
-
Set the Priority.
-
Enter a Description, if needed.
-
-
Repeat Step 3 in the Driver expiration line.
-
Click Save.
-
Click Close to exit the Driver/Equipment Status window.
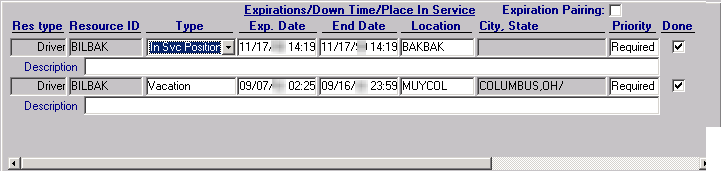
Note: You can verify that the system has added the expiration to both the driver and the tractor by looking up the expirations recorded for the tractor associated with the driver.
Deleting an expiration
If an expiration has been recorded in error, you can delete it from the system.
-
Position the cursor in any field for the expiration to be removed.
-
Click Delete.
-
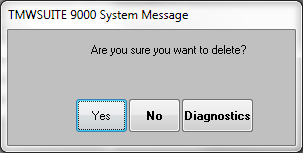
The system asks if you are sure you want to continue with the deletion. Do one of the following.
-
Click Yes to complete the deletion.
-
Click No to cancel the deletion.
-
-
If you selected Yes, click Save. The system permanently deletes the expiration
-
Click Close to exit the Driver/Equipment Status window.
Marking an expiration as complete
When an expiration has been satisfied, you must record its completion. Until you mark the expiration as Done, it is still in effect.
| Once a Priority 1 expiration has reached its effective date, the system will not allow the resource to be dispatched. |
Expirations can be completed manually in the Driver/Equipment Status window, or you can configure the system to automatically complete expirations of a particular type.
Completing expirations manually
For manual completion, follow these steps:
-
With the Driver/Equipment Status window open, select the resource type from the drop-down list in the top left of the window.
-
Enter the resource ID in the second field.
-
Click Open. All open expirations are displayed.
-
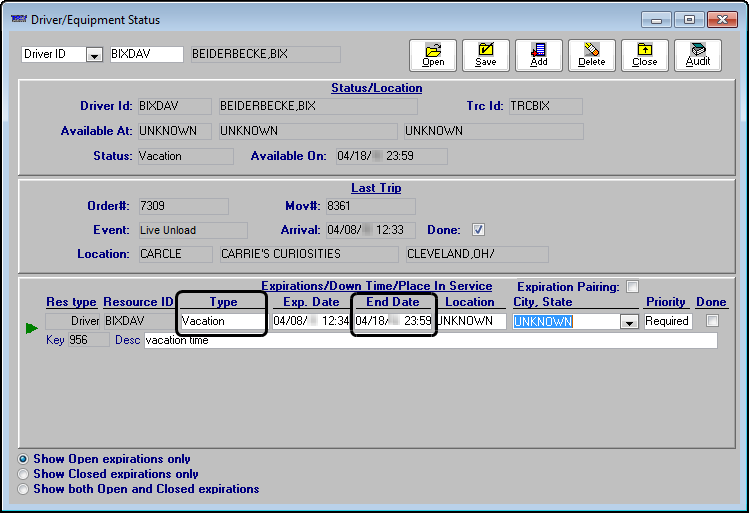
If needed, change the date shown in the End Date field.
Warning: If you complete an expiration before its End Date, you must manually change the date. The system does not update the date/time in the End Date field when you select the Done checkbox. Therefore, the system will consider the resource as unavailable until the date recorded in the End Date field, even though the expiration has been marked as completed.
-
Select the Done checkbox.
-
Click Save.
Notes:
-
If you have the Show Open expirations only radio button selected, the expiration record is no longer displayed in the window. The expiration is still displayed if you have the Show both Open and Closed expirations radio button selected.
-
Once the expiration is marked as Done, the system will not check future trip dates and times against its effective date(s).
-
-
Click Close to exit the Driver/Equipment Status window.
Completing an expiration automatically
Completing expirations automatically
Automatic completion is a convenient feature for any routine type of expiration that does not require user intervention. For example, because you usually know the duration of a driver vacation in advance, you typically enter a specific end date when setting up a vacation expiration. If you set up the system to complete vacation expirations automatically, the driver will become available for dispatch as soon as the vacation’s end time passes.
|
Setting up expiration types to complete automatically
You can set up any expiration, for any resource type, to be set to Done automatically. You do so by selecting its Auto Complete checkbox in the label file.
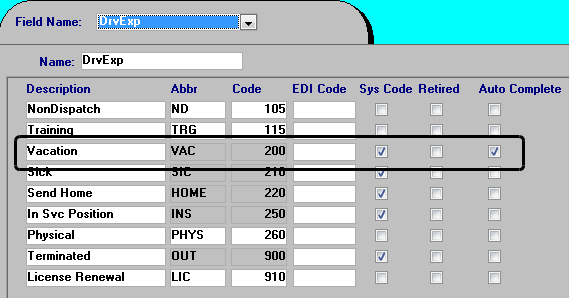
When the end date passes for an expiration type that has its checkbox selected, the auto_complete_expirations_sp stored procedure must execute in your TMWSuite database before the expiration will be marked complete.
You can schedule this stored procedure to execute on a regular basis in SQL Server Enterprise Manager. For more information, see Setting up the recurring job to complete expirations.
Follow these steps to mark an expiration type to complete automatically.
-
In System Administration, select Edit >Label File.
The Edit User Definable Fields window is displayed. -
Click in the Field Name field, and from the drop-down list select the desired label (CarExp, DrvExp, TrcExp, or TrlExp).
-
Identify the first label entry for an expiration type that you want to be completed automatically, and select its Auto Complete checkbox.
-
Save your changes.
-
Repeat Steps 2 and 4 for each expiration type that will be completed automatically.
Setting up the recurring job to complete expirations
To have expirations completed automatically, you must set up a recurring job for the auto_complete_expirations_sp stored procedure. This stored procedure must execute after the expiration’s end date passes for that expiration to complete automatically.
Use Microsoft SQL Server Management Studio or SQL Server Enterprise Manager to set up a job to run the stored procedure routinely. When creating the job:
-
Record a name for the step. The step name cannot be left blank.
-
Select Transact-SQL Script (T-SQL) as the Type.
-
Enter
exec auto_complete_expirations_spin the Command field.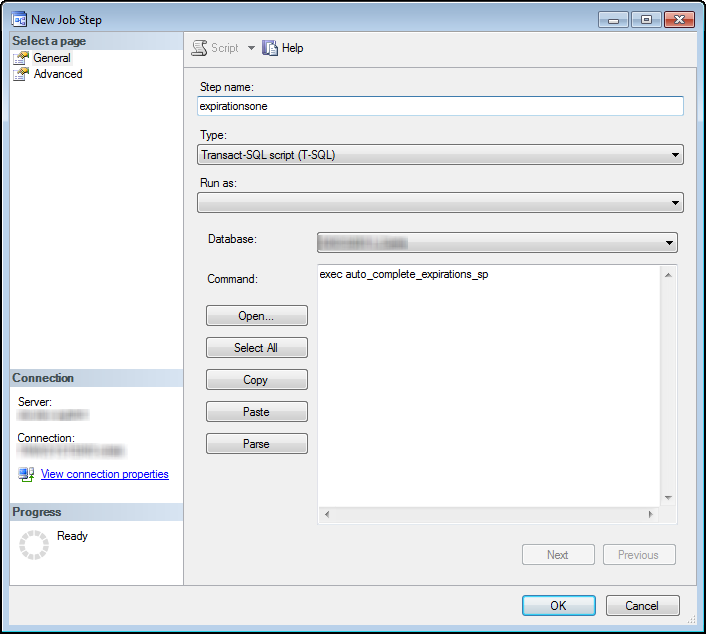
-
Set up the job schedule using
auto_complete_expirationsas the New Job Schedule Name, and have the job run every day.
| Refer to your SQL Server Management Studio or SQL Server Enterprise Manager help system for instructions on creating a recurring job. If you need assistance, contact your Trimble Transportation Support representative. |
Completing an expiration to renew automatically
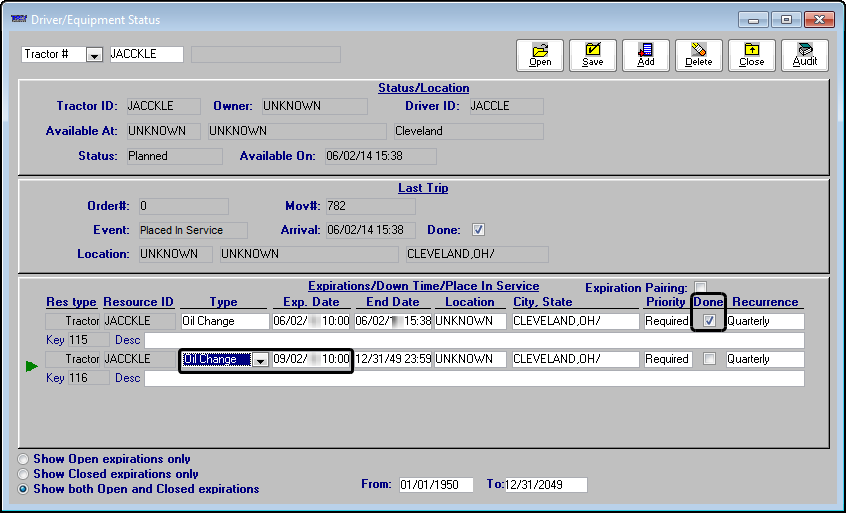
Automatic renewal is a time-saving feature to use for recurring events such as routine tractor maintenance. For example, you can set up an oil change expiration to renew automatically on a quarterly basis. When you complete the expiration, the system adds a new expiration and schedules the expiration date to three months later.
This illustration shows the completion and renewal of an oil change expiration that renews quarterly. When we completed the expiration dated 06/02, the system created the new expiration with an expiration date of 09/02.
Setting up expirations to recur
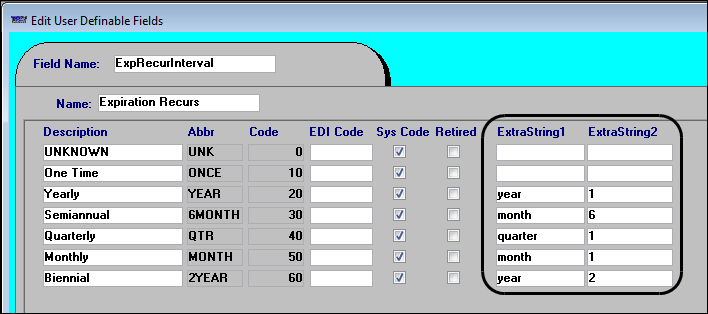
The system uses the label file ExtraString1 and ExtraString2 values to determine expiration dates for recurring expirations. For example, when you complete an expiration with a Semiannual recurrence, the system schedules the new expiration date to six months later.
In this illustration, the Semiannual values are month and 6. Based on these values, the system schedules expiration dates to occur six months apart.
Renewing an expiration
Some expirations such as routine equipment maintenance require completion on a continual basis. You can set up these types of expirations to recur automatically. When you complete a recurring expiration, the system adds a new expiration based on a renewal term that you specify.
To automatically renew an expiration, follow these steps:
-
Complete an expiration.
-
Choose an entry in the Recurrence drop-down list.
Notes:
-
You can populate this field prior to completing the expiration for example when you Add an expiration.
-
The selection you make in this field determines the calendar period the system uses to schedule new expiration dates.
-
-
Click the Save button to complete the expiration.
The Expirations window opens.
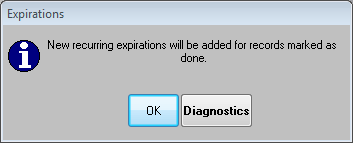
-
Click OK to renew the expiration.
The system adds a new expiration and schedules the expiration date based on the Recurrence field entry and the Exp. Date field entry for the completed expiration.
For example, in this illustration, the system:
-
Renewed the expiration on a quarterly basis to three months in the future, 09
-
Scheduled the expiration date to the same day as the completed expiration, 02

-
-
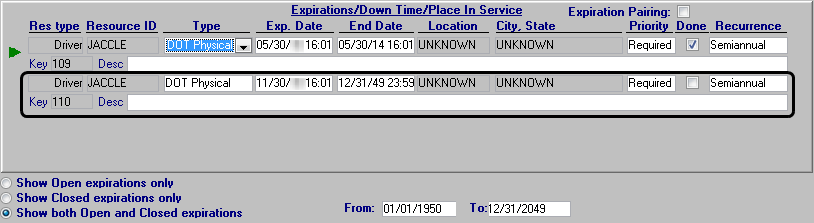
To view the completed and new expirations in the Driver/Equipment Status window, do the following:
-
Select the Show both Open and Closed expirations radio button in the lower-left of the window.

-
Click the Open button in the upper-right of the window.
This illustration shows the completed 5/30 expiration with a Semiannual recurrence. When completed, the system set the new expiration date to 11/30, six months later.
-
Activating the Expiration Audit report feature
TMWSuite allows you to track all changes that were made to a resource’s expirations in both the File Maintenance and Dispatch applications.
The feature is activated by the ExpirationAudit General Info Table setting.
When the feature is turned on, the Audit button is added to the Driver/Equipment Status window.

To view/print a report of the activity pertaining to all closed and opened expirations recorded for a resource, click Audit. The Expiration Activities window is displayed. The resource type and ID are included in the window’s title.
The activity is shown in chronological order, with the latest change as the first line. Information is displayed in these columns:
Date |
The date/time the expiration was created, updated, completed, or deleted. |
Key |
The unique, system-generated identifier assigned to the expiration by the system. Note: This column corresponds to the Key field in the Driver/Equipment Status window. |
User |
The user ID of the person who recorded the expiration or made changes to it. |
Type |
The type of expiration, as recorded in the Driver/Equipment Status window. |
Action |
The type of change made, e.g., created, updated, deleted, or completed. |
Update Notes |
Detailed information about the change(s) made. You can use the scroll bar at the bottom of the window to view the entire Update Note column. |
If desired, you can print the audit report. Clicking Print sends the report directly to your default printer.
Generating user-defined driver expiration forms
Trimble’s Integrated Reporting feature provides a means of merging driver expiration information from your TMWSuite database with forms based on Microsoft SQL Server Reporting Services (SSRS) reports. The system is set up to allow menu access to two different forms. Although you can create your forms from scratch, these two formats are available as SSRS templates and can be requested from your TMW Support representative:
-
A driver license renewal letter
This sample is a reminder letter to the driver that their driver’s license is due for renewal.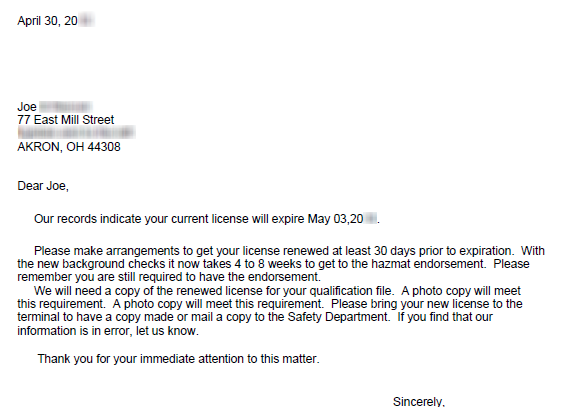 Click image to enlarge
 -
Driver cards
The template layout consists of six small cards and space for two additional cards. The cards provide information about a driver license, Hazmat certification, and medical examiner’s certification. However, you can modify the template’s content and use different expiration types.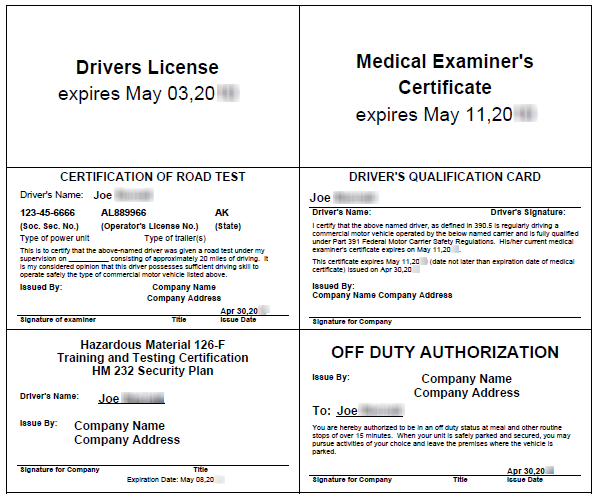 Click image to enlarge
| If your staff has extensive reporting experience and an understanding of the TMWSuite database structure, your company can design its own formats. Alternatively, if you do not have the necessary resources, you may contact your Trimble Transportation Support representative to request that a report be designed for you. |
Expirations are recorded in the Driver/Equipment Status window, which can be accessed in File Maintenance and Dispatch.
Prerequisites
When creating driver expiration forms using SQL Server Reporting Services, be aware that user logins cannot contain slashes, for example, TMW\user1. When driver expiration forms based on SQL Server Reporting Services are printed, the print function stores temporary files with a slash preceding the user login. A slash in the login to separate the domain from the user ID will conflict with the print function.
To use SQL Server Reporting Services, you must have:
-
SQL Server
-
SQL Server Reporting Services
-
IIS
-
Business Intelligence Development Studio
Required for editing. -
TMWSuite
-
The TMWSuite Add-ins feature
You can install Add-ins when you use the TMWSuite Installer to update to a new release of TMWSuite. You must activate the feature by using the[TmwSuiteAddins]EnableInterface=Ysetting in your TTS50. -
The Integrated Reporting license
The license is available at no charge and can be obtained from your TMWSuite Support representative. -
A PDF viewer
The form is displayed in a PDF viewer when it is rendered in SQL Reporting Services.
After developing a form that meets your company’s needs, deploy it to your reporting server.
For assistance with prerequisite setup, contact Trimble Transportation Support.
Adding your form to TMWSuite
To add the deployed forms to TMWSuite, do the following:
-
In System Administration, go to Edit > Integrated Report Setup > Original Integrated Report Setup.
-
Use System Administration’s Integrated Report Setup window to add the form to TMWSuite.
Sample report setup for ID 7: License Expiration Letter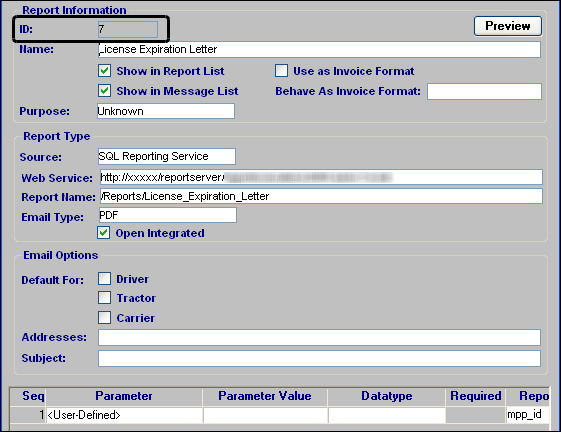
When setting up the driver expiration form, you must:
-
Specify the source as SQL Reporting Services.
-
Indicate the full web site address.
-
Enter the report location and name.
-
Select an Email Type of PDF.
-
For previewing the form, identify the
mpp_idreport parameter as the data retrieval argument for the report.
-
-
Click Save.
The system automatically assigns a numeric ID to the report. -
Make a note of the report’s ID number so you can enter it into the General Info Table settings, which are described in the next section.
| For more information about Integrated Reporting, see Integrated Reporting in the TMWSuite Optional Modules online help. |
Setting up your system to use the driver expiration forms
After the SSRS form is added to TMWSuite, you must configure the DriverRenewalLetter and CardPrintExpirations General Info Table settings.
Printing a driver expiration form
Use this procedure to print one of the driver expiration forms, based on SQL Server Reporting Services reports. The Driver Cards and the Renewal Letter forms are generated in PDF format.
-
In File Maintenance, retrieve the driver record.
-
With the driver’s record displayed, select one of the following:
-
File > Print > Driver Cards
-
File > Print > Renewal Letter
-
The form is sent to your default printer.
If no report form ID has been identified in the CardPrintExpirations or DriverRenewalLetter General Info Table settings, a message is displayed. It states: "No report has been configured for driver cards."