Work with independent PM schedules
An independent PM schedule is a list of maintenance that can be performed on a unit independently of each other. The maintenance list typically includes various types of inspections, such as Department of Transportation (DOT) inspections or state inspections.

This illustration shows an example of an independent PM schedule.
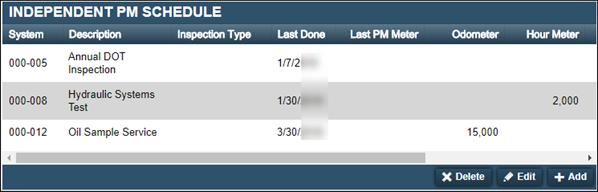
Before you can set up an independent PM schedule, PM Component Codes must be present. If they are not present, you must add them before you set up the schedule. On the unit, you must verify that the meter types are listed in that unit’s Meter Information section. If they are not listed, you must add them before you set up the schedule.
Set up an independent schedule
-
Select the PM tab and then select the Schedules sub-tab. The page refreshes and displays the Independent PM Schedule section.
-
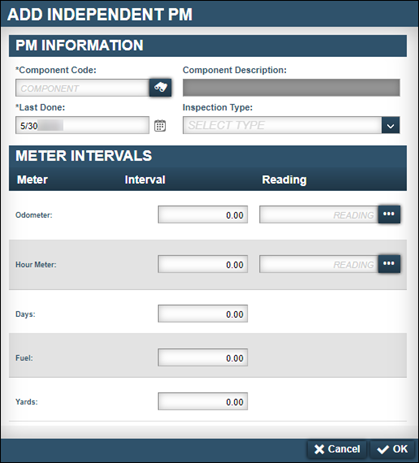
Click Add. The Add Independent PM window opens and displays the PM Information and Meter Intervals sections.
-
Enter the preventive maintenance component code in the Component Code field and press ENTER. The system updates the Component Description field.
-
In the Last Done field, change the date to the last date the service was performed.
Note: If the service has never been performed, leave the default value. For new units, the Last Done field default value is the date the unit was created. This is because the Last Done field cannot be blank.
-
Select the type of inspection in the Inspection Type field. You can have only one inspection type per PM. If you select STANDARD as the inspection type for a PM, you cannot use that inspection type on other PM schedules.
-
In the Meter Intervals section, identify the meter types you want to track.
-
Make an entry in the appropriate Interval fields.
-
Enter values in the Reading fields as needed. If you are not tracking a meter type, you do not have to enter a value. However, one advantage of tracking multiple meter intervals is that you receive notifications earlier. For example, if you enter an odometer reading, an interval in hours, and an interval in days the first one met triggers the notification.
-
-
When you are finished making entries, click OK. The window closes and the dependent schedule is displayed in the Independent PM Schedule section.
-
Repeat Steps 1-8 to create additional levels.
Set up an independent PM schedule with a fixed date
To comply with mandates such as the Clean Truck Check (HD I/M), you need to set up an independent PM schedule with a fixed compliance deadline and frequency in TMT.
Independent PMs let you define specific maintenance tasks for individual units. When you set a Fixed PM Compliance Deadline, the program tracks when the PM is due based on a set date, rather than solely on usage or last completion date.
-
Select the PM tab and then select the Schedules sub-tab. The page refreshes and displays the Independent PM Schedule section.
-
In the bottom-right corner of the Independent PM Schedule section, select Add. The Add Independent PM window opens and displays the PM Information and Meter Intervals sections.
-
In the Component Code field, enter the code for the Clean Truck HD/IM or use the
 Search icon to find it. The component code should have been assigned during the Clean Truck Check (HD I/M) set up.
Once you enter the component code, the program completes the Component Description for you automatically.
-
Enter a Fixed PM Compliance Deadline or select one using the
 Calendar icon. This is the specific date by which the PM must be completed.
Note: If your setup doesn’t have the
Enable PM Fixed DateApplication Option set to YES, you will not see the Fixed PM Compliance Deadline or Fixed PM Frequency fields. -
Select a value from the Fixed PM Frequency dropdown list. For example, if the inspection needs to be done every six months, you would select Semi-annually.
You can ignore the Meter Interval section, as those fields don’t apply to a fixed date PM schedule.
-
Select OK to save your changes. The Add Independent PM window closes, and your new PM schedule appears in the Independent PM Schedule section.
How TMT calculates PM due dates with fixed date scheduling
When you have a Fixed PM Compliance Deadline, the program looks back from that deadline to determine when the next PM becomes due, considering the set due percentage. This makes sure that the PM is scheduled within the required window for completion.
Example: Semi-Annual Inspection Calculation
Let’s say you have the following settings:
-
Inspection Type: Semi-Annual Inspection (Twice Yearly)
-
Interval: 6 Months
-
Fixed PM Compliance Deadline: 07/30/2025
-
Due Percent: 50%
Here’s how the system calculates the due date:
-
Look Back from Compliance Deadline: The program looks back six months from the Fixed PM Compliance Deadline (07/30/2025). This date is 01/30/2025.
-
Calculate Due Percentage Forward: From 01/30/2025, the program calculates when the PM would become 50% due. In this example, the PM would become due at 50% on 04/30/2025.
This calculated date of 4/30/2025 falls within a 90-day window before the 7/30/2025 compliance deadline, allowing sufficient time for completion.
How Fixed Compliance Deadlines Update After PM Completion
When you complete a PM that has a Fixed Compliance Deadline, the program automatically adjusts the next compliance deadline based on the set interval. This makes sure that your PM schedule remains continually accurate.
Example: Updating After PM Completion
Let’s consider this scenario:
-
Fixed Compliance Deadline: 07/30/2025
-
PM Completed: 07/07/2025 on a Repair Order (RO) in TMT
-
Interval: Six months
Here’s how the system updates the dates:
-
You completed the PM on 7/7/2025.
-
The program automatically updates the Fixed Compliance Deadline value to the next six-month interval. In this case, the program sets the new Fixed Compliance Deadline to 01/30/2026, six months after the original Fixed Compliance Deadline of 07/30/2025.
Edit independent interval levels
-
Select the PM tab and then select the Schedules sub-tab. The page refreshes and displays the Independent PM Schedule section.
-
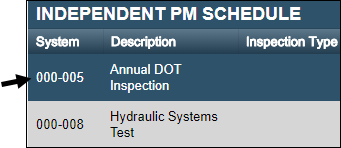
Select the interval level that you want to edit.
-
Click Edit. The Edit Independent PM window opens.

-
Make changes as needed.
-
Click OK. Your changes are displayed in the Independent PM Schedule section.
Remove independent interval levels
-
Select the PM tab and then select the Schedules sub-tab. The page refreshes and displays the Independent PM Schedule section.
-
Select the interval level that you want to remove.
-
Click Delete. The Delete PM system message window opens. It asks, "Are you sure you want to delete PM PM Description?"
-
Click Delete PM. The interval level is removed from the Independent PM Schedule section.