Examples of workflow applications
The following interactive exercises demonstrate workflow concepts that can be modified, or used to create larger workflows.
Example 1: Creating a workflow to send an email
The Email User activity enables a workflow to send a user an e-mail message. Typically, the message notifies a user that an activity within the workflow has run, or it sends information the workflow has accessed or generated. A main advantage of Email User is that a user does not need to repetitively evaluate a situation or manually send the e-mail message.
Overview
The following workflow example tests to determine whether a specific file exists, and sends an e-mail message if the file is detected. The workflow consists of the following activities:
-
File Exists
The File Exists activity checks for the presence of a user-specified file. Normally, the activity checks once, and outputs Yes or No. In this workflow, each of these outputs is routed to a different activity. -
Wait
The Wait activity receives the No output of the File Exists activity. It provides a user-specified delay, in minutes, after which processing returns to the File Exists activity. In this way, the workflow can periodically test for the presence of the file. -
Email User
The Email User activity receives the Yes output of File Exists. Therefore, it sends a message if the file is detected.
|
Setting up the workflow
To create the example, follow these steps:
| This example tests for a file named "test.txt" located in the root of the C:\ drive. In a real-world situation, you can use any folder or file on your computer. Simply modify steps in Defining activity options to point to the desired drive, folder, and file name. |
-
Open Workcycle.
-
In the Activities panel, expand the IO list.
-
Click and drag the File Exists activity onto the canvas.
Note: The Start and Stop activities automatically appear once you drag an activity onto the canvas.
-
To clean up the Canvas, right-click anywhere in the canvas and select Auto Arrange. You can repeat this step later, as needed.
-
In the Activities panel, expand the Core list. Click and drag the Wait activity onto the canvas and place it on the No arrow of the File Exists activity.
-
In the Activities panel, click and drag the Email User activity onto the canvas, and place it on the Yes arrow, between the File Exists activity and End.
-
Click on the tip of the Wait output arrow and drag it to the File Exists activity.
-
Right-click anywhere in the canvas and select Auto Arrange.
The sequence of your workflow activities should resemble this example (activity positions can vary, but the connections should be the same):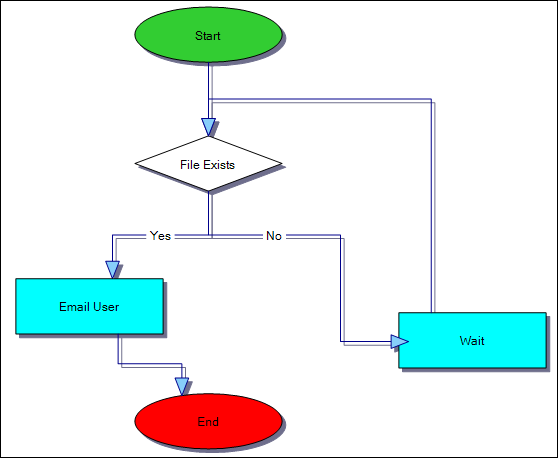
-
Click File > Save to save your workflow.
Defining activity options
All of the activities needed for this workflow are in place. You must now set up options for each activity:
-
Click the File Exists activity.
-
In the Options panel, click in the Value field.
The Open file window opens. -
Browse to C:\.
-
In the Open file window’s File Name field, enter "test.txt".
Note: If the desired file exists, you can select the file to complete the File Name field. If the file does not exist, enter the file name in the field.
-
In the Open file window, click Open.
-
Select the Wait activity.
-
In the Options panel, click in the Value field and enter 1 (a one-minute wait).
-
Select the Email User activity and enter the following in the Options panel.
-
In the Mesg row, set the field type to Text. In the Value field, enter "Test file exists in C:\".
-
In the Subj row, set the field type to Text. In the Value field, enter "File Exists".
-
In the to_email row, set the field type to Text. In the Value field, enter your e-mail address.
Note: The foAttachment options are not used for this example.
-
-
Click File > Save to save your workflow.
Testing the workflow
The following procedure demonstrates how the workflow template tests for a file and e-mails a user if/when the file exists.
-
In the root of the C:\drive, create the file "test.txt" if needed.
-
In the WorkCycle Designer, select Test > Run.
The Run Workflow window opens. -
No start value is required. Click OK.
-
The functionality deprecated message appears. Click OK.
-
The Interactive Run window opens. Click Next, wait a second or two, and repeat. The window will update the status of the workflow. If all global and local options have been set up correctly, the window should report "----- Workflow ended -----," and you should receive an e-mail.
-
Go to C:\ and rename "test.txt" to "_test.txt,"
-
In the WorkCycle Designer, select Test > Run Unattended.
The Run Workflow window opens. -
No start value is required. Click OK.
-
The functionality deprecated message appears. Click OK and the message disappears. The workflow begins checking repetitively for the existence of "test.txt" (now named "_test.txt"). No email is sent.
-
Go to C:\ and rename "_test.txt" back to "test.txt." The Log_Form window should report that the workflow has ended, and you should receive an email.
Example 2: Creating a workflow to retrieve a file from an FTP site
The FTP Fetch activity is used to retrieve a file from an FTP site. This activity is particularly useful in EDI applications to automate the retrieval of files from a Value-Added Network (VAN). You can combine the concepts of this example with the previous example to create a more complex workflow.
| This example assumes that you have login credentials to an FTP site. |
Overview
The following workflow example demonstrates how to retrieve a file from an FTP site and then place that file in a directory of your choice.
The workflow consists of one activity: FTP Fetch. The FTP Fetch activity pulls a user-specified file off of an FTP site and places it in a user-specified local or network folder.
Setting up the workflow
To create the example, follow these steps:
-
Open WorkCycle.
-
In the Activities panel, expand the FTP list.
-
Click and drag the FTP Fetch activity onto the canvas.
Note: The Start and Stop activities automatically appear once you drag an activity onto the canvas.

-
To clean up the Canvas, right-click anywhere in the canvas and select Auto Arrange.
-
Click File > Save to save your workflow.
Defining activity options
All of the activities needed for this workflow are in place. You must now set up options:
-
Select the FTP Fetch activity.
-
In the Options panel bUse Binary row, the field type is automatically set to Text and cannot be changed. Click in the Value field:
-
If the file you want to retrieve can be opened as a text file (.txt), then click No.
-
If the file you want to retrieve cannot be opened as a text file, then click Yes.
-
-
In the Options panel fsFile row:
-
Set the field type to Text and click the Value field.
The Save as window opens. -
Browse to the location where you want to the file to be saved, and enter a name for the file in the File name field.
-
Click Save.
-
In the FTP Host row, set the field type to Text, click the Value field, and enter the address of the FTP site from which to retrieve the file.
Note: You must enter the full path to the file on the FTP site, including the folder, any subfolders, the filename, and its extension. -
In the sPassword row, click the Value field and enter your FTP password.
-
In the UID row, click the Value field and enter your FTP username.
-
Click File > Save to save your workflow.
Testing the workflow
Follow this procedure to test the workflow:
-
Select Test > Run.
The Run Workflow window opens. -
No start value is required. Click OK.
-
The functionality deprecated message appears. Click OK.
-
The Interactive Run window opens. Click Next, wait a second or two, and repeat. The window will update the status of the workflow. Continue clicking Next until the window reports "----- Workflow ended -----".
-
Check the local directory you identified in the fsFile field for the file.
Example 3: Creating a workflow using a SQL query
Using the SQL Query Builder, you can incorporate SQL queries into your workflows. This enables you to use WorkCycle to interact dynamically with a database.
Overview
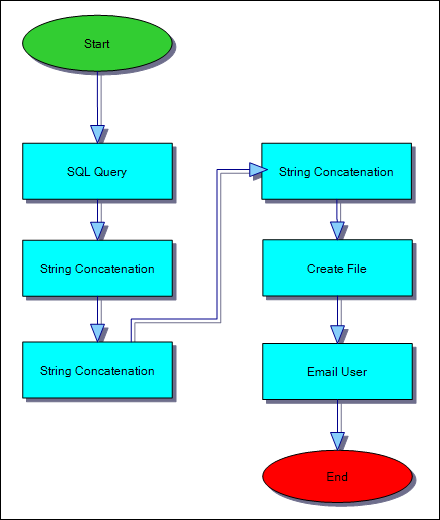
The following workflow example demonstrates how to create a SQL query-based activity, and to incorporate the activity into a workflow. In this example, a SQL query pulls information from the TMWSuite database. The workflow inserts the information into a file and e-mails the file to a user.
The workflow consists of the following activities:
-
SQL Query
The SQL query activity performs the action specified by a SQL script you enter in the Query Builder window. This script is described below in Setting up the workflow. -
String Concatenation
The String Concatenation activity combines two strings into a single string. This example uses three String Concatenation activities to sequentially combine multiple strings. -
Create File
The Create File activity creates a text file based on static or dynamic content. In this example, the content will be provided dynamically. The text file will contain the concatenated string. -
Email User
The Email User activity sends a message when the text file exists.
Creating the SQL-based activity
To create the SQL-based activity, follow these steps:
-
Open WorkCycle.
-
Select Options > Query Builder.
-
Make the following selections and entries in the QueryBuilder window:
Queries
From the Queries drop-down list, select <ADD NEW>
Name
Enter a descriptive name for the query; for example, SQL Query.
Note: The name you enter in this field will appear in the Activities list.
Query Type
From the Query Type drop-down list, choose Select Query.
Cache Query on Clientside
Clear the check box.
Query
Write a simple query to select the following:
-
Count the number of orders for a particular Bill to company. Name this column # Orders.
-
Sum the billable miles for these orders. Name this column Loaded Miles.
Here is a sample of the query:
select
  count(o.ord_hdrnumber) as [# Orders],
  sum(o.ord_totalmiles) as [Loaded Miles]
from orderheader as o
join stops as s on s.ord_hdrnumber = o.ord_hdrnumber
where s.stp_loadstatus = 'LD' and o.ord_billto = 'ALLCOL'
Parameter
Leave blank.
Parameter type
Leave blank.
-
-
Close the QueryBuilder window.
The SQL Query activity group will be added to the activity list if it did not exist already. The new activity will be added to the group.
Setting up the workflow
To create this example, follow these steps:
-
Open WorkCycle.
-
In the Activities panel, expand the SQL Query list.
Your query should be present in the list. -
Click and drag your SQL activity onto the canvas.
Note: The Start and Stop activities automatically appear once you drag an activity onto the canvas. -
In the Activities panel, expand the Core list.
-
Click the String Concatenation activity and drag it onto the output of the SQL query activity.
-
Right-click in the Canvas area and select Auto Arrange to clean up the workflow.
-
In the Activities panel Core list, click and drag another String Concatenation activity onto the Canvas and place it on the output of the first String Concatenation activity.
-
Right-click in the Canvas area and select Auto Arrange to clean up the workflow.
-
In the Activities panel Core list, click and drag another String Concatenation activity onto the Canvas and place it on the output of the second String Concatenation activity.
-
Clean up the workflow as needed.
-
In the Activities panel IO list, click and drag the Create File activity onto the canvas and place it on the output of the last String Concatenation activity.
-
Click and drag the Email User activity onto the canvas and place it on the output of the Create File activity.
-
Right-click in the canvas and select Auto Arrange. The sequence of your workflow should resemble this example (activity positions can vary, but the connections should be the same):
-
Click File > Save to save your workflow.
Defining activity options
All the activities needed for this workflow have been added. Activity option parameters will now be defined.
-
Select the first String Concatenation activity in the sequence and make the following entries:
-
In the String1 row, set the field type to Text. Click in the Value field and enter "Total Number of Orders: "
Note: Make sure you include a space after the semi-colon.
-
In the String2 row, set the field type to Field. Click in the Value field. The column names that you identified in your query appear in the Available Fields window. Select the option named # Orders.
-
In the Output Field, enter "str_Orders".
-
-
Select the second String Concatenation activity in the sequence and make the following entries:
-
In the String1 row, set the field type to Text. Click in the Value field and enter " Total billable miles: "
Note: Make sure you include a few spaces at the beginning of the string, and a single space after the semi-colon.
-
In the String2 row, set the field type to Field. Click in the Value field. As with the previous activity, the columns that you identified in your query appear in the Available Fields window. Select the option named # Loaded Miles.
-
In the Output Field, enter "str_loadedMiles".
-
-
Select the third String Concatenation activity in the sequence and make the following entries:
-
In the String1 row, set the field type to Field. Click in the Value field and double-click the name for the first String Concatenation activity. (You entered str_Orders in the Output Field, so that option should be available in the Available Fields window.)
-
In the String2 row, set the field type to Field. Click in the Value field and double-click the name for the second String Concatenation activity. (You entered str_loadedMiles in the Output Field, so that option should be available in the Available Fields window).
-
In the Output Field, enter "Orders and billable miles".
-
-
Select the Create File activity. Set the field type to Field. Click in the Value field and select the name for the third String Concatenation activity. (You entered "Orders and billable miles" in the Output Field, so that option should appear in the Available Fields window.)
-
Select the Email User activity and make the following selections:
-
In the foAttachment1 row, set the field type to Field. Click in the Value field and select the name for the Create File activity.
-
In the Mesg row, set the field type to Text. Click in the Value field and enter text to appear in the body of the e-mail.
-
In the Subj row, set the field type to Text. Click in the Value field and enter text to appear in the Subject line of the e-mail.
-
In the to_email row, set the field type to Text. Click in the Value field and enter the recipient’s e-mail address (for testing purposes, enter your own e-mail address).
-
-
Select File > Save to save your workflow.
Testing the workflow
Follow these steps to test the workflow:
-
Select Test > Run.
The Run Workflow window opens. -
No start value is required. Click OK.
-
The functionality deprecated message appears. Click OK.
-
The Interactive Run window opens. Click Next, wait a second or two, and repeat. The window will update with the status of the workflow. Continue clicking Next until the window reports "----- Workflow ended -----".
-
Check your e-mail inbox for an e-mail message from the workflow. If the message is received, check for the following:
-
Does the subject line match what you entered in the Subj row of the Email User activity?
-
Does the content of the e-mail match what you entered in the Mesg row of the Email User activity?
-
Is there an attachment?
-
If yes, open the attachment. Does it contain both strings?
-
Do the strings have corresponding number values?
-
-