Working with the Workflow Designer
The following sections describe several basic operations needed to create, modify, and test workflow templates. The same concepts are used for working with all types and sizes of templates.
Running the Workflow Designer for the first time
The first time after installation the Workflow designer is run, the Managing Connections window opens. Connection database information must be entered in this window before the Designer can be used.
| Normally, this step will already have been performed at the time WorkCycle was installed. |
Setting an activity’s global options
Some activities require the setting of global options before the activity functions properly in a workflow. A global option applies to all WorkCycle users and affects all instances of an activity, whether in the same workflow template or in different templates.
The TMWSuite system administrator sets up global options as part of the WorkCycle installation. Users can familiarize themselves with global options in the Workflow Designer Manage Activities window by selecting Options > Manage Activities.
The following activities contain global options:
-
Email User
-
Email with Template
-
HTML Email with Template
-
Run Command
|
Understanding the difference between a workflow and a workflow template
In describing WorkCycle, this chapter uses the terms workflow and workflow template. The terms are similar, but there is a distinction:
-
A workflow template is a blueprint or master copy that describes the activities comprising a workflow, their arrangement, and their various parameters. Workflow templates are created using the Workflow Designer.
-
A workflow is an instance of a workflow template that has been launched by the Workflow service. A workflow instance runs only once. If a workflow needs to run multiple times, the Workflow service runs additional instances as needed.
Creating a basic workflow template
WorkCycle activities are named and grouped in the Activities panel according to their functions:
A basic workflow template can be created by dragging an activity from this panel to the Canvas area. WorkCycle creates the template by combining the activity with existing Start and End activities:
-
The Start activity receives a "start" value (if used) from the Workflow service when the workflow is launched, and passes the value to the next activity in the workflow.
-
The End activity updates the database tables with a workflow’s status and ending time when the workflow finishes running.
| Start and End are system-managed activities, without required parameters or global options. They are added to workflows automatically when an activity is dragged to the Canvas. |
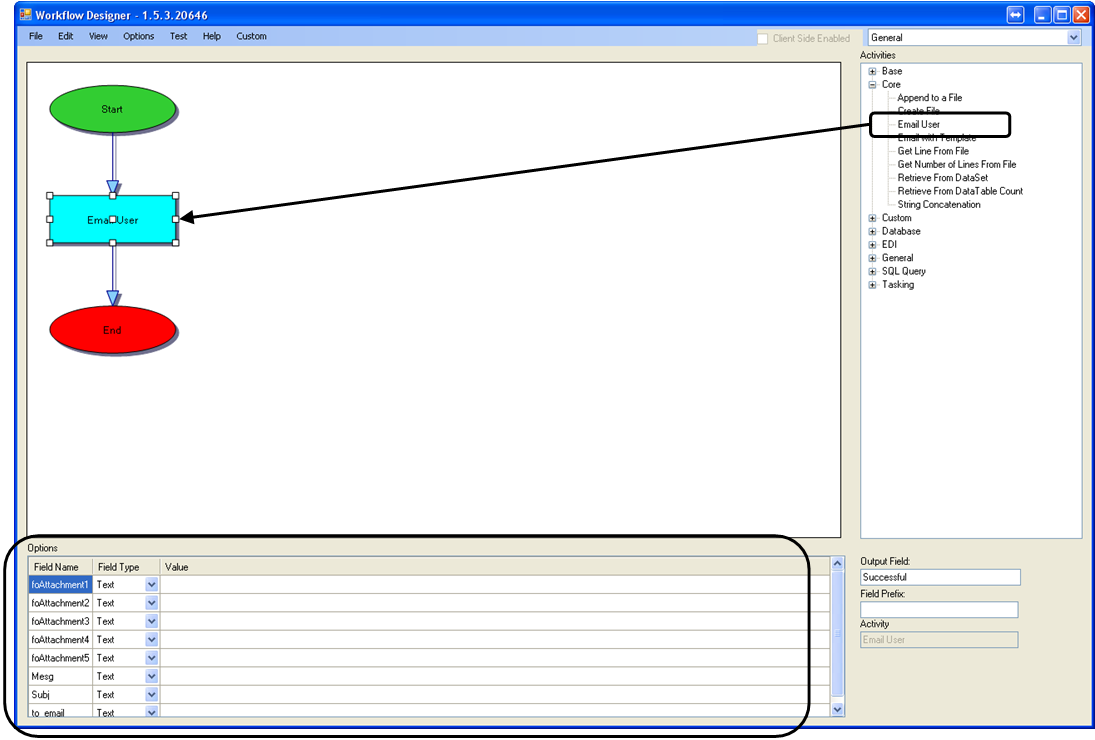
Setting required parameters
When you click an activity in the Canvas area, the Options panel may display several editable fields, as shown in this example for the Email User activity. These options are called required parameters.
In actual use, some of these parameters can be left blank. For example, the to_email, Mesg, and Subj parameters would be required in order to send an email. foAttachment parameters are applicable only if attachments are to be sent.
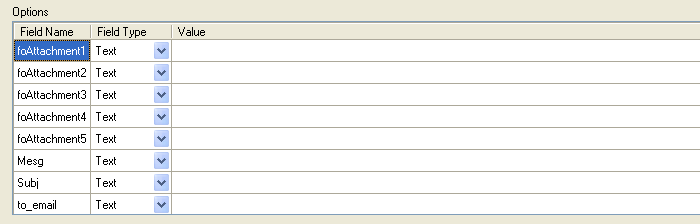
| Field | Definition |
|---|---|
Field Name |
The name of the option. Field names cannot be edited. |
Field Type |
A drop-down list that provides options of Field and Text. Make a selection, and then complete the corresponding Value field |
Value |
|
| Required parameters can be set differently each time the activity is used, whether in the same workflow template or in different templates. |
Moving and resizing an activity
You might need to relocate an activity to make room for adding other activities, or you might wish to change an activity’s proportions or overall size for emphasis. When you click an activity, anchor points appear along the border and in the center of the activity:
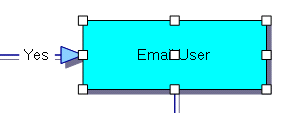
-
To move the activity, click and drag the anchor point at the center of the activity.
-
To resize the activity, click and drag a corner anchor point.
-
To change the activity’s size, click and drag an anchor point along in the middle of a vertical or horizontal edge of the activity.
Optimizing a workflow diagram
The zoom and redraw functions can be used to improve the appearance of a workflow diagram. You can perform this function any time you want to clean up a diagram. Refreshing can be particularly useful after you add or move an activity.
-
To have the system redraw a workflow diagram, select View > Refresh Layout. If the diagram extends out of the Design area, follow up by selecting View > Zoom > Zoom to fit.
-
To change the magnification of a workflow diagram, select View > Zoom > Zoom In or View > Zoom > Zoom Out. You can also use CTRL++ to zoom in, or CTRL+- to zoom out.
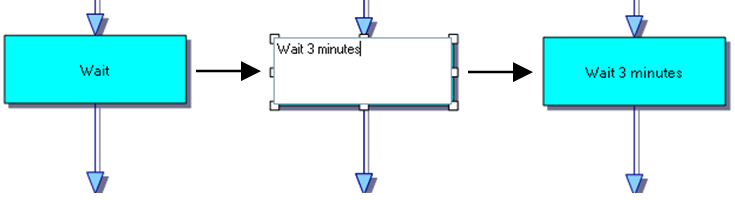
Making a workflow self-documenting
You can improve the readability of a workflow by renaming activities to provide details about their functions in the workflow. For example, a workflow might contain several Wait activities, each providing a different delay. You can rename each activity to show this delay by double clicking the activity, and then editing the activity name. To set the new name, click on the Designer canvas.
Adding an activity to a workflow template
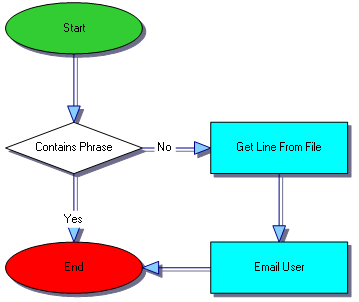
Multiple activities are usually combined in a workflow template to provide more complex logic. For example, this workflow checks for the existence of a file, and sends an e-mail to one recipient, regardless of the output of the File Exists activity.
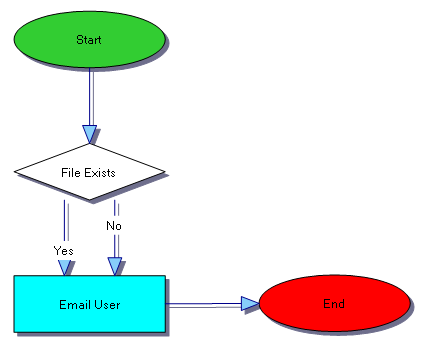
You can make the workflow e-mail different individuals according to the file’s availability, by dragging and dropping a second Email User activity over the File Exists activity’s No node:
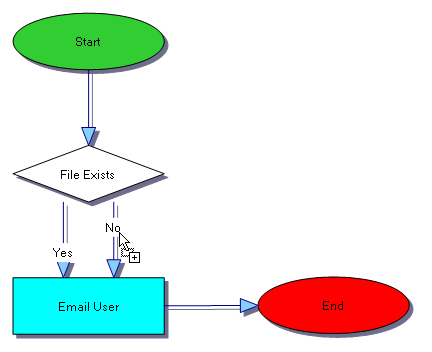
To place the activity, release the mouse. The workflow diagram then resembles this illustration.
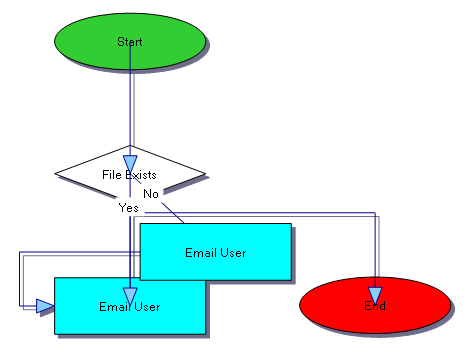
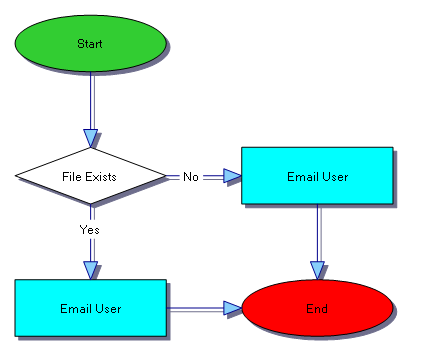
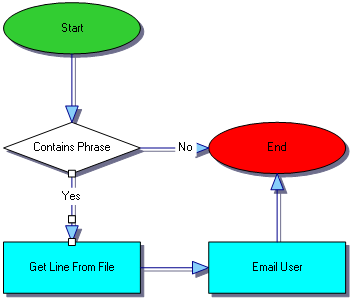
To clean up the diagram, select View > Refresh Layout. The diagram is redrawn.
Managing an activity’s output
The arrow(s) pointing out of an activity represent its output. When you first create a workflow template, arrows are drawn automatically between the Start activity, the named activity, and the End activity. As you develop a workflow, you might need to rearrange outputs from one activity to another.
In this example, the outputs of the Contains Phrase activity were inadvertently switched. We’d like to redirect these outputs so that an email is sent if a particular line exists in a file.
To make this change, click and hold the arrowhead of the No output, and drag it to the edge of the End activity. Likewise, drag the arrowhead of the Yes output to the Get Line from File activity. The workflow assumes this form:
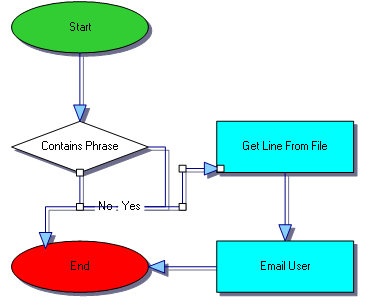
Select View > Refresh Layout. When you release the mouse, the diagram is redrawn.
Deleting an activity from a workflow
As you create or modify a workflow, you might need to delete an activity. To do so:
-
Click the activity
-
Press DELETE.
-
Select View > Refresh Layout to clean up the workflow diagram.
Loading new activities
New groups of activities can be added to WorkCycle. Typically, these activities will be packaged in a dynamic link library (.dll) file, which you must copy to the Plugins subfolder in the WorkCycle program folder. Follow these steps:
-
In the Windows Control Panel, go to Administrative Tools > Services.
-
Stop the Workflow service.
-
Copy the supplied .dll file to the Plugins subfolder.
-
In the Workflow Designer, select Options > Refresh Plugins.
-
Restart the Workflow service.
A new Activities group should now exist in the Workflow Designer.
Working in multiple databases
If your installation of WorkCycle was set up to access multiple databases, you can change the database being used with WorkCycle.
Checking the current database connection
The following steps will show you how many database connections have been set up for your installation of WorkCycle, as well as the current connection.
-
In the Workflow Designer, go to File > Connection.
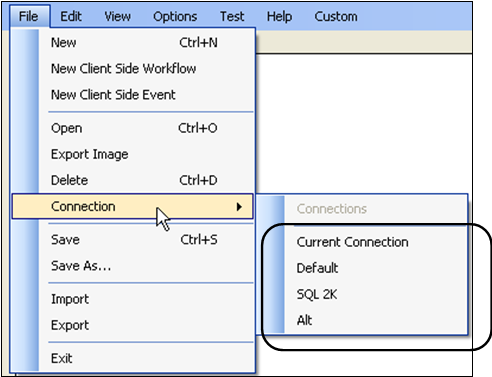
The connection name of each database accessible to WorkCycle is listed below the Current Connection subcommand.
Note: The Connections subcommand, if present, is reserved for future use.
-
If only one connection name appears beneath the Current Connection subcommand, WorkCycle is set up to access only one database. You can skip the rest of this section.
-
If more than one connection name appears beneath the Current Connection subcommand, WorkCycle is set up to access multiple databases.
-
-
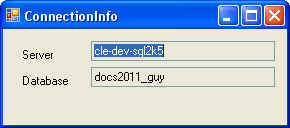
To view the current database connection, select Connection > Current Connection. The ConnectionInfo window displays the server and database name.
To select a different database connection, continue with Changing the database connection.
Changing the database connection
-
To change the database connection, follow these steps.
-
In the Workflow Designer, go to File > Connection.
-
In the submenu, select the desired new database connection name.
-
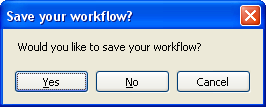
WorkCycle asks whether you want to save your workflow. Click the appropriate response, or Cancel to abort the change.
-
Check that WorkCycle is now connected to the new database by selecting Connection > Current Connection.