Using the Call On Demand Order Entry window
To actualize stops on a driver’s planned trip with the Call On Demand Order Entry window, follow these steps.
-
Access the Call On Demand Order Entry window.
-
Directly from Fuel Dispatch
-
Go to Application > Call On Demand Order Entry.
-
Retrieve the order.
-
-
From within the Card Planner or Planning Worksheet
-
Go to Application > Card Planner or Application > Planning Worksheet.
-
If you are in the Planning Worksheet, select the resource assigned to the trip to the Resource pane.
-
On the Assignment Plan pane, double-click on the trip.
Based on how your system is set up, the Call On Demand Order Entry window opens as a movable window or as it would if you selected Application > Call On Demand Order Entry.
-
-
-
If you want, locate the Arrival Date field for the first stop in the Stops detail section of the window, and then enter the time the driver arrived at the stop location.
-
Locate and select the A checkbox for the first stop. Repeat this step for subsequent stops.

If the selected trip is the first in the driver’s schedule, the first stop event will be the Begin Empty that moves the driver from the At Home Location where he/she starts the workday.
Notes:
-
You can automatically complete all stops by just selecting the checkbox for the last stop.
-
If the truck has an integrated cargo area, the system will allow you to actualize stops without a trailer assignment.
-
-
Click
 Save.
Save. -
When finished, click
 Close in the window toolbar.
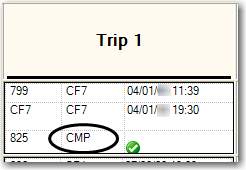
If you accessed the window from the Card Planner or Planning Worksheet, the trip’s status is updated in the Assignment Plan pane to reflect your changes.
In this Card Planner example, the trip’s status is shown as CMP.
In this Planning Worksheet example, the trip’s status icon indicates the driver has arrived at a pickup location.
