Temporarily modifying an order (trips)-based view
When you are scheduling and tracking trips in the Planning Worksheet, the data grid that displays the trips is the results of dispatch views.
These dispatch views determine which columns from the database will be included. They can also restrict the number of records that are displayed by including filters or restrictions.
In the Planning Worksheet, you select the views from the Trips field.
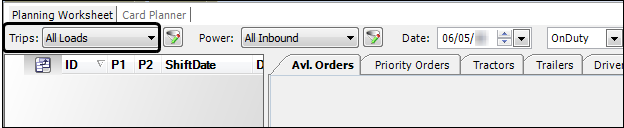
The default in the Trips field is All Loads.
To modify the view, follow these steps.
-
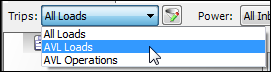
In the Trips field, select a view.
-
Click
 Filter.
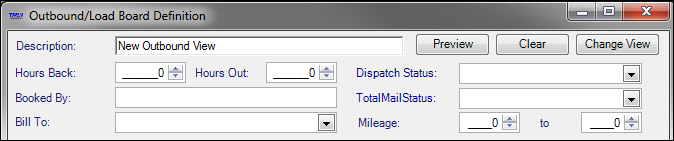
The Outbound/Load Board Definition window opens.Note: If the selected view already contains restrictions, those will be visible in the Outbound/Load Board Definition window.
-
In the Outbound/Load Board Definition window header, modify fields as needed.
-
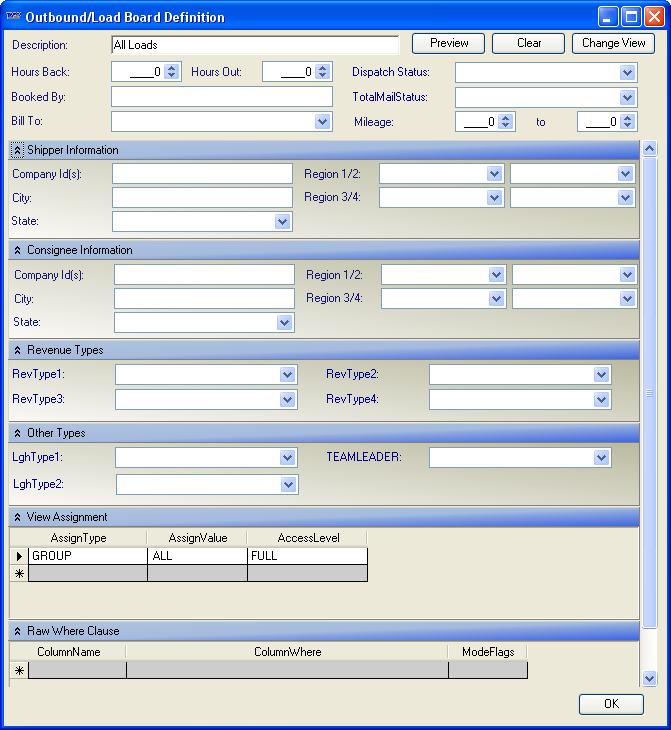
In the body of the Board Definition window, set restrictions as needed.
These restrictions are organized in sections.
-
Each restriction section is marked by a blue title bar.
-
If a section already contains restriction settings, the section expands automatically, and the number of set restrictions appears in parentheses after the section title.
-
To open a section for editing, click the
 Expand icon next to the section title.
 -
To close a section, click the
 Collapse icon next to the section title.
-
-
If you want to preview the effect of a view on a trip grid, do the following:
-
Click Preview.
-
View the grid.
-
To close the Preview window, click OK.
Note: The View Assignment and the Raw Where Clause sections do not apply to this procedure.
-
-
To accept the modified restriction set, click OK in the Board Definition window.
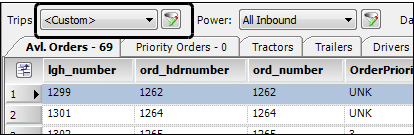
The view is now available in the Trips drop-down list as <Custom>. -
To apply the revised view, click Refresh.
The modified view is available temporarily as <Custom>, until you exit the planning board or select another view.
Temporarily modifying a power (resource)-based view
When you are scheduling and tracking trips in a dispatch planning board, such as the Planning Worksheet, the data grid that display the power (resources) are the results of dispatch views.
These dispatch views determine which columns from the database will be included. They can also restrict the number of records that are displayed by including filters or restrictions.
In the Planning Worksheet and Card Planner, you select the views from the Power field.
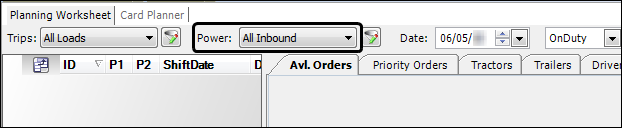

The default in the Power field is All Inbound.
To modify the view, follow these steps.
-
In the Power drop-down list, select a view.

-
Click
Filter.
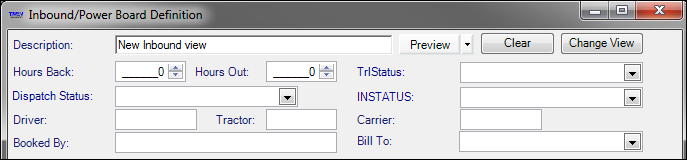
The Inbound/Power Board Definition window opens.Note: If the selected view already contains restrictions, those will be visible in the Inbound/Power Board Definition window.
-
In the Inbound/Power Board Definition window header, modify fields as needed.
-
In the body of the Board Definition window, set restrictions as needed.
These restrictions are organized in sections.
-
Each restriction section is marked by a blue title bar.
-
If a section already contains restriction settings, the section expands automatically, and the number of set restrictions appears in parentheses after the section title.
-
To open a section for editing,click the
Expand icon next to the section title. -
To close a section, click the
Collapse icon next to the section title.

Note: The View Assignment and the Raw Where Clause sections do not apply to this procedure.
-
-
If you want to preview the effect of a view on a trip grid, do the following:
-
Click Preview.
-
View the grid.
-
To close the Preview window, click OK.
-
-
To accept the modified restriction set, click OK in the Board Definition window.
The view is now available in the Power drop-down list as <Custom>. -
To apply the revised view, click Refresh.
The modified view is available temporarily, as <Custom>, until you exit the planning board or select another view.
Resetting a temporarily modified dispatch view
When you applied temporary restrictions to a dispatch view, the view field displays <Custom>.
If you want to return to the original restriction settings, or change the current restriction settings, you can do either of the following:
-
Select another view.
-
From the drop-down list, select one of the available views.
-
Click Refresh.
Note: The previous <Custom> view cannot be retrieved again.
-
-
Change the restrictions of the current <Custom> view.
-
Click
Filter. -
If you want to remove all restrictions currently set on the view, click Clear.
Note: If the view from which you started contained restrictions, they will also be removed.
-
If you want, change the restrictions according to your needs.
-
Click OK.
-
Click Refresh.
-
Outbound/Load Board Definition field definitions
Header
Definitions are listed in alphabetical order.
Bill To |
TMWSuite identification code assigned to the company that is to be billed for shipment of fuel To select multiple Bill To companies, hold CTRL down while selecting each company. |
Booked By |
ID of the user who created the order |
Description |
The user-assigned name for the view. |
Dispatch Status |
The statuses identify the current phase of the order’s life cycle.
|
Hours Back |
Used as a restriction when defining order-based views. This field sets the beginning time frame for which trips are to be listed. It determines how far in the past the system will go back to search for available orders. The system subtracts the number of hours entered here from the current time. Only orders scheduled to start on or after the resulting date/time are listed. For example, suppose it is currently 10:00 AM on 1/15. If 48 is entered in this field, the system will list orders that were scheduled to start on or after 10:00 AM on 1/13. Note: A zero (0) in this field indicates that the list is not to be restricted according to trips' past start dates/times. |
Hours Out |
Used as a restriction when defining order-based views. This field sets the ending time frame for which orders are to be listed. It determines how far in the future the system will search for available orders. The system adds the number of hours entered here to the current time. Only orders scheduled to start on or before the resulting date/time are listed. For example, suppose it is currently 8:00 AM on 1/17. If 48 is entered in this field, the system will list orders that are scheduled to start on or before 8:00 AM on 1/19. Note: A zero (0) in this field indicates that the list is not to be restricted according to trip segments' future start dates/times. |
Mileage (from/to) |
Distance from one location to another. Mileage can be measured from:
|
TotalMailStatus |
Restricts the view to include orders having the selected TotalMail status. Note: Options are defined in the TotalMailStatus label, accessed in the System Administration application. All options are system codes and must not be changed. Do not add options, as they will not be recognized by TotalMail. |
Restrictions
City |
City where the company or stop is located. |
Company ID |
TMWSuite identification code assigned to a company. |
LghType1-2 |
Categories to which trip segments are assigned for dispatch planning or pay purposes. Note: The abbreviation Lgh stands for legheader, which is another term for trip segment. |
Region 1/2 |
User-defined region categories for geographic locations. Note: The names for these regions are determined by your company, as are the subgroups defined for them. Regions and their subdivisions are established in the System Administration module. |
RevType1-4 |
Revenue classifications to which a record is associated. Revenue classifications frequently are recorded for orders. Notes:
|
State |
State where the company or stop is located. |
TEAMLEADER |
Identifies the team leader to which the resource is assigned. Note: Options are user-defined in the TeamLeader label, accessed in the System Administration application. |
Inbound/Power Board Definition field definitions
Header
Bill To |
TMWSuite identification code assigned to the company that is to be billed for shipment of the fuel. To select multiple Bill To companies, hold CTRL down while selecting each company. |
Booked By |
ID of the user who created the order. |
Carrier |
ID of a third party company that hauls loads. |
Description |
The user-assigned name for the view. |
Dispatch Status |
The statuses identify the current phase of the order’s life cycle.
|
Driver |
TMWSuite identification code for the driver. |
Hours Back |
Used as a restriction when defining order-based views. This field sets the beginning time frame for which trips are to be listed. It determines how far in the past the system will go back to search for available orders. The system subtracts the number of hours entered here from the current time. Only orders scheduled to start on or after the resulting date/time are listed. For example, suppose it is currently 10:00 AM on 1/15. If 48 is entered in this field, the system will list orders that were scheduled to start on or after 10:00 AM on 1/13. Note: A zero (0) in this field indicates that the list is not to be restricted according to trips' past start dates/times. |
Hours Out |
Used as a restriction when defining order-based views. This field sets the ending time frame for which orders are to be listed. It determines how far in the future the system will search for available orders. The system adds the number of hours entered here to the current time. Only orders scheduled to start on or before the resulting date/time are listed. For example, suppose it is currently 8:00 AM on 1/17. If 48 is entered in this field, the system will list orders that are scheduled to start on or before 8:00 AM on 1/19. Note: A zero (0) in this field indicates that the list is not to be restricted according to trip segments' future start dates/times. |
INSTATUS |
Status of the tractor’s next trip. Statuses are:
|
Tractor |
ID assigned to the tractor |
TrlStatus |
Statuses that identify the trailer’s current activity level. Trip-related statuses are:
Statuses also may be used to identify expirations. A number of statuses come pre-loaded with the system; they are called system codes. Others are user-defined in the TrlStatus label, accessed in System Administration. Commonly used expiration-related statuses are:
|
Restrictions
CarType1-4 |
User-defined carrier categories to which the carrier is assigned. Note: The field name and options are user-defined in the CarType1-4 labels, accessed in the System Administration application |
City |
City where the company or stop is located. |
COMPANY |
Commonly used to identify a subsidiary within your organization. The exact meaning is dependent on the type of record.
Note: The field name and options for this field are set up by your company in the Company label, accessed in the System Administration application. |
Company ID |
TMWSuite identification code assigned to a company. |
DIVISION |
Commonly used to identify the segment of your organization with which the resource is associated. Note: The field name and options for this field are set up by your company in the Division label, accessed in the System Administration application. |
DOMICILE |
Resource’s home location. Note: The options for this field are set up by your company in the Domicile label, accessed in the System Administration application. The field name itself is hard-coded and cannot be changed. |
DrvType1-4 |
Driver classifications to which the driver has been assigned. Note: The name and options for these fields are user-defined in the DrvType1 - 4 labels, accessed in the System Administration application. Assignment of drivers to driver classifications allows you to track the revenue collected for trips assigned to those drivers. In some cases, such classifications may also govern the pay rates used to determine driver settlements. |
Fleet |
Fleet to which the resource is assigned. Note: The Fleet options are user-defined in the Fleet label, accessed in the System Administration application. |
LghType1,2 |
Categories to which trip segments are assigned for dispatch planning or pay purposes. Note: The abbreviation Lgh stands for legheader, which is another term for trip segment. |
Region 1/2 |
User-defined region categories for geographic locations. Note: The names for these regions are determined by your company, as are the subgroups defined for them. Regions and their subdivisions are established in the System Administration module. |
RevType1-4 |
Revenue classifications to which a record is associated. Revenue classifications frequently are recorded for orders. Notes:
|
State |
State where the company or stop is located. |
TEAMLEADER |
Identifies the team leader to which the resource is assigned. Note: Options are user-defined in the TeamLeader label, accessed in the System Administration application. |
TERMINAL |
Terminal location with which the resource is associated. Note: Options are user-defined in the Terminal label, accessed in the System Administration application. |
TrcType1-4 |
User-defined tractor categories to which the tractor is assigned. Note: The field name and options are user-defined in the TrcType1 - 4 labels, accessed in the System Administration application. |
TrlType1-4 |
User-defined trailer categories to which the trailer is assigned. Note: The field name and options are user-defined in the TrcType1 - 4 labels, accessed in the System Administration application. |