Installing TMW Operations
To install TMW Operations correctly, you must:
Before you open the application, you must:
-
Place your TTS50.ini and TTSLocal.ini files in the TMW Operations directory.
-
Verify the TMW Operations license is applied to your database.
| This topic provides information for versions 2023.x and above. For assistance with earlier versions, contact Trimble Transportation Support. |
General requirements
Before you begin installing TMW Operations, check that these requirements are met for the version you are installing.
TMW Back Office
If you are using TMW Back Office, your version of TMW Operations must be the same as your version of TMW Back Office.
Microsoft® .NET Framework 4.6.2 or later (full package, not client)
The framework must be installed on the TMW Operations server, client, and administrator systems before you install TMW Operations. If it is not present, the system displays an advisory message during the installation. Install the framework before running the application.
Microsoft SQL Server
Versions 2025.3 and later
-
Minimum SQL Server version required: 2016
-
Certified SQL Server versions: 2016 through 2022
Versions 2023.5 through 2025.2
-
Minimum SQL Server version required: 2014
-
Certified SQL Server versions: 2014 through 2022
Login and rights
You must be logged into the system where you want to install TMW Operations and have administrator rights for that system.
Like most applications, TMW Operations can be installed locally on a user’s system. It is also possible to install TMW Operations on a network drive. To do so, you must be logged into the system where the drive is physically located and have administrator rights for that system.
The installation of TMW Operations includes the manual application of a SQL script to the TMWSuite database. You must have a SQL Server administrator login and password to apply it.
TMW Operations hardware requirements
This section lists hardware requirements and recommendations for TMW Operations.
Server F1-F2: Terminal Server or Citrix
The actual quantity of concurrent users at peak workload and desire for redundancy is what determines the quantity and size of the Terminal or Citrix servers deployed. Both Remote Desktop Services (RDS) and Citrix virtualize well and require no specific change to the resources. For full desktop or VDI environments take extra care to ensure that the resources listed below are available in addition to the ancillary applications required to support the users' applications.
Memory guidelines
A conservative rule of thumb is to reserve 750MB of memory for each active session on either RDS or Citrix when using RemoteApp or published applications. Reserve the lesser of 4GB or 10% of the total memory for the operating system, and then provide additional memory for other ancillary applications as required by the software vendor. This assumes each user runs only one copy of the software.
| Total RAM on Server | 16 GB | 32 GB | 64 GB |
|---|---|---|---|
Reserved for OS |
4 GB |
4 GB |
6 GB |
Reserved for ancillary |
Consult vendors' requirements |
||
Available RAM |
12 GB |
28 GB |
60 GB |
MB Each |
750 MB |
750 MB |
750 MB |
Total User Capacity |
16 Users |
38 Users |
81 Users |
Processor guidelines
A study of existing customers' utilization shows that for systems with moderately heavy usage, (being conservative) it is reasonable to expect five to seven users per core. Emphasis should be placed on purchasing processors with high single thread performance to provide an acceptable user experience. Generally, this means current-generation processors running at least 2.6GHz for Intel and 3.2GHz for AMD.
| Cores | 1 | 2 | 4 | 8 | 16 |
|---|---|---|---|---|---|
Users |
5 |
11 |
24 |
52 |
112 |
Note: Power saving settings should be disabled and hyperthreading enabled in the BIOS to avoid significant performance impacts. When virtualizing, take care to prevent excessive oversubscription, a relatively safe target is 1.5 vCPU for each physical core (do not count hyperthreading).
Network card guidelines
A single 1 GbE network card is sufficient for most deployments, but 10GbE is recommended for virtualized systems or any environment expected to scale to larger sizes. Network card teaming is advisable for any hardware supporting more than 30 users to provide redundancy and additional bandwidth. Avoid teaming within the OS of a virtual machine. Care must be taken to ensure that all switches between the RDS/Citrix server and the SQL Server support the full bandwidth of the link without saturation.
Proximity guidelines
RDS and Citrix servers must be located in the same Data Center as the SQL Server and round trip latency should remain below 1ms latency. They must also be on the same subnet with a local and responsive domain controller. Round trip times between the client workstation and RDS or Citrix servers should be consistently less than 75ms. Lower the better for performance however up to 150ms can be used with notable delays in responsiveness.
User quantity guidelines
Full desktops will require considerably more resources to support a typical office user with an email client, browser, etc. Consult the other software providers' resources and the appropriate VDI guidelines for suggested resources necessary to support the entire workload at peak capacity and add the resources listed above.
Scenario: 30 Users
In this scenario, there are only 30 users in a company using RDS, Citrix RemoteApp, or published applications. This would require only one server to host the environment, but two are recommended for redundancy.
| Example 1 (without redundancy) 30 Users/1 Server | Example 2 (with redundancy) 30 Users/2 Servers | |
|---|---|---|
Operating System |
Windows 2012 R2 Standard |
|
CPU |
6 cores |
4 cores |
RAM |
26 GB |
24 GB |
Hard Disk Size |
150 GB+ |
150 GB+ |
Network Card |
1 GbE |
|
Server G: Windows Services (Agents) Server #1
This server runs Windows Services, which are used to communicate with devices and customers outside of the company firewall. It is required only for those with Mobile Communications units or Electronic Data Transfer agreements.
| Number of Users | 1-50 | 51-100 | 101-150 | 150+ |
|---|---|---|---|---|
Operating System |
Windows Server 2008, 2008 R2, 2012, 2012 R2 Note: Windows Server 2016 is not supported. |
For custom configuration specifications, contact a TMW Optimization representative. |
||
CPU |
4 cores |
6 cores |
8 cores |
|
RAM |
12 GB |
24 GB |
48 GB |
|
Hard Disk Size |
350 GB |
500 GB |
750 GB |
|
Downloading the application files
Download the TMW Operations installation files from the Build Delivery section of the Trimble ClientCenter. The .msi file that you download will contain all the folders, application files, and SQL files necessary to install and set up both the TMW Operations and CRM Right applications.
In ClientCenter, use the Line of Business, Product, and Build lists to select the TMW Operations build that you want to download. The download name for the build is TMW Operations Front Office.
Click View Details to go to the Software Delivery Files page and download the installation file.
When prompted to run or save the installation file, save it to your desktop or Downloads folder.
For more information about downloading files from ClientCenter, see Build delivery in the ClientCenter online help.
Installing or upgrading the application
After you download the installation files, you can begin installing or upgrading the application on your machine.
| If you are upgrading TMW Operations and want to create an archive of the existing version, copy the folder containing that version’s executable files, then download the new version to the default location. If you download the new version to the default location without making a copy of the original version, the new files will overwrite the existing files. |
To install TMW Operations on your computer, follow these steps:
-
Locate the installation .zip file you downloaded and saved on your desktop or Downloads folder.
-
Double-click the .msi file contained in the .zip file.
The Welcome to the TMW Operations Setup Wizard window opens. -
Click Next.
The Select Installation Folder window opens. -
Do one of the following:
-
To accept the default installation folder, click Next.
-
To change the installation folder, click Browse.
-
In the Browse for Folder window, locate the appropriate folder.
-
Click OK.
-
-
-
To specify who will have access to the application, select the appropriate radio button:
-
Everyone
If other users will be accessing the application from this computer. -
Just me
If you will be the only person accessing the application from this computer.
-
-
Click Next.
The installation confirmation window opens. -
Click Next.
-
When the Installation Complete window opens, click Close.
-
You can open the application from the Windows Start Menu.
Applying SQL to your database
TMW Operations requires that certain fields exist in your TMWSuite database. To ensure that your database is properly modified, you must apply one or more SQL files to your database. These files are provided as part of the installation package.
When you ran the TMWOperationsInstall.msi, all necessary SQL files were saved to your system.
To apply the required SQL, follow these steps:
-
Use Windows Explorer to access the SQL files.
By default, the SQL files are located at
C:\Program Files (x86)\TMW Systems, Inc\TMW Operations\SQL.If you installed to a different folder location, look for the SQL folder there.
-
Double-click the appropriate SQL file to open it in Microsoft SQL Server.
The only SQL file that is required to run TMW Operations is TMWOperationsDBMods.SQL. You must apply this SQL file to your database.
The other files are used with specific Trimble Transportation applications that work with TMW Operations. For more information, contact Trimble Transportation Sales or Trimble Transportation Support.
Granting users access to TMW Operations
Before a user can log on to an application, you must grant them access to it in the System Administration application. You can do this on a user-by-user basis, or for multiple users, using the Applications section of the User Maintenance screen. For TMW Operations, you must select TMW Operations from the list of applications.
For detailed instructions on assigning rights to users, see Granting access to TMWSuite applications in the TMWSuite System Administration online help.
|
If a user tries to log on to an application without the proper authority, the system will display the message: "Sorry, You are not registered for this application." The system will not allow a user to log in to an application until the user is registered for that application. The system administrator must grant authority in the user’s profile in the System Administration application. |
Verifying the license is applied to your database
Special licensing is required to run TMW Operations. The licensing is contained in a SQL script that is applied to your TMWSuite database using SQL Server Enterprise Manager’s SQL Query Analyzer or SQL Server Management Studio.
| For instructions on applying the SQL to your database, refer to your Microsoft SQL Server Management Studio or SQL Server Enterprise Manager documentation. If you need further assistance, contact Trimble Transportation Support. |
To verify that the licensing has been properly applied to your database, follow these steps:
-
From any TMWSuite application, select Help > About.
-
Click the More button located at the bottom of the window.
-
The system displays a second About window containing licensing information. The licensing window provides a table containing three columns:
-
Option Name
Lists the applications and features available in TMWSuite. -
Option Value
Signifies whether the application/feature is active. -
Option Expiration
Lists the date that the subscription to a feature will expire.
Scroll through the list to find the TMW Operations license:
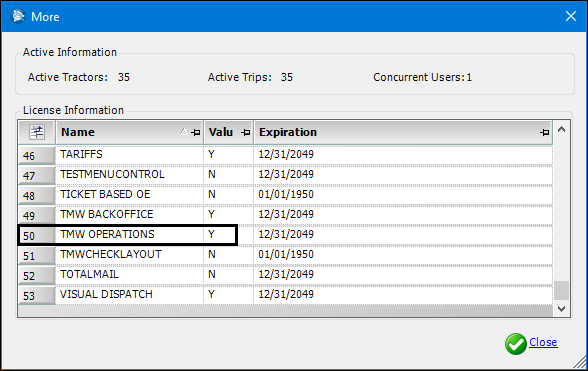
Notes:
-
The list is alphabetical.
-
If the required license is not listed, or if the Value field displays N, contact Support.
-
Uninstalling TMW Operations
To uninstall TMW Operations, run the same .msi file that you used to install the current version. The file will detect the installed version and provide an option for removing the software.
|
To uninstall TMW Operations:
-
Locate the .msi file and double-click it.
The Welcome to the TMW Operations Setup Wizard opens. -
Select the Remove TMW Operations radio button, then click Finish.
The Removing TMW Operations window opens, and the progress indicator bar cycles.Note: The progress indicator may go through multiple cycles before the removal is completed.
-
When the Installation Complete window opens, click Close.