Basic data entry instructions
TMWSuite is designed to minimize the amount of typing you must do to record information. The following subsections provide you with data entry shortcuts and simple rules.
Making an entry in a date/time field
In TMWSuite, a date/time field consists of ten digits. The first six are for the date; the remaining four are for the time (mmddyyhhmm).
Entering a date
When you enter a date, you must use this format:
-
The first two digits identify the month.
-
The second two digits identify the day.
-
The last two digits identify the year.
For example, to enter June 3, 2003, you would type 060303. The system automatically separates each pair of digits with a slash (/), so the date displays as 06/03/03.
To save on keystrokes, you can use any of these key combinations if they are applicable.
| Keys | Result |
|---|---|
CTRL+0 |
Displays current system date (today) |
CTRL+<⇒ |
Displays the current system date and time. Note: This hotkey is operational only if your TTS50 includes the |
CTRL+1 |
Tomorrow (today + 1) |
CTRL+2 |
Day after tomorrow (today + 2) |
CTRL+3 to CTRL+9 |
x days from today (today + 3, today + 4, etc.) |
SHIFT+CTRL+0 |
Yesterday |
SHIFT+CTRL+1 |
Day before yesterday (yesterday - 1) |
Entering the time
When you enter the time, you must do so in 24-hour format (hhmm). For example, to enter 6:15 AM, you would type 0615. To enter 6:15 PM, you would type 1815.
Switching between the date and time
To move from the date to the time within a date/time field, press CTRL+RIGHT ARROW. To move from the time to the date, press CTRL+LEFT ARROW.
Default dates and times
When you initiate the creation of a new record in TMWSuite, the system often displays default dates and times in date/time fields. The following defaults are used most often:
-
01/01/50 00:00
This date (January 1, 1950) is used to represent the earliest date allowed in TMWSuite. It is also known as the "genesis" date.
-
12/31/49 12:49
This date (December 31, 2049) is used to represent the latest date allowed in TMWSuite. It is also known as the "apocalypse" date.
Often, these default dates and times display in fields where a date range is expected. For online searches and reports, if you do not override the defaults, the system will list all applicable records from 01/01/1950 to 12/31/2049.
Using the instant best match data entry feature
Many TMWSuite screens have data entry fields which allow you to identify a:
-
Company
-
Driver
-
Tractor
-
Trailer
-
Carrier
-
Commodity
-
City and state/province
In a company, driver, tractor, trailer, carrier, or commodity field, you must enter the ID code assigned to the specific entity. Names rather than codes are used to identify city and state/province combinations. As you begin to type an ID or name, note that the system tries to match your entry with the IDs or names on file. It automatically displays an ID or name that begins with the letter or combination of letters you have typed. This automatic search for the proper code or name is what is known as TMWSuite’s instant best match feature.
For example, suppose you want to identify Richmond, Indiana as the location for one of your customers. As you begin to type, TMWSuite will check the characters you enter with all city names within its city file that begin with the letter 'R'. It automatically displays the first city name on file that begins with the letter or combination of letters you enter. Each time you type a character, TMWSuite continues to search its city file to locate a match. In most cases, you will not need to type an entire city name and state/province abbreviation. When TMWSuite displays the entry you want, exit the field.
There may be times when you are not sure that the code or name that you have entered is correct. This is especially true with codes since many of them may start with the same characters. To see other codes or names that begin with the character(s) you have typed, click on the down arrow that displays at the right of the field. If other codes/names begin with the character(s) you have entered, they display in a drop-down list. This illustration shows an example of how such a list looks for a field which requires entry of a company ID:
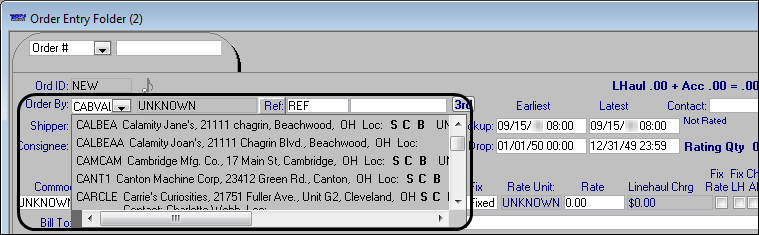
If all selections cannot be shown at one time in the list, a scrollbar displays on the right. To scroll additional selections into view, click on the scrollbar, or use the DOWN ARROW or UP ARROW key. To replace the current entry in a field with one of the other selections shown in the drop-down list, select the desired option.
|
Making selections from drop-down lists
For many fields within TMWSuite, only certain pre-defined values are valid. For such fields, TMWSuite displays drop-down lists of acceptable entries. This illustration shows an example of a field for which a drop-down list is provided:
When you position the cursor in a field that provides a drop-down list, a scroll bar displays at the right of the field. Click on it to see a list of valid entries. Highlight the desired selection.
To scroll through a drop-down list, do one of the following:
-
Click in the scrollbar shown at the right of the list.
-
Use the DOWN ARROW and UP ARROW keys.
If you know the first character of the selection you want, type that character to have the system jump to the first entry that begins with that character. If the first entry is not the one you want, continue to type the character until the system highlights the desired selection.
| Selections in most drop-down lists are based on entries in TMWSuite’s label file, which is part of the System Administration application. Many of these entries are user-defined (i.e., established by your company so that data elements can be identified by terms with which users are already familiar). An abbreviation is assigned to each label entry. In most cases, a drop-down selection is preceded by its abbreviation; selections are listed in alphanumeric order according to abbreviation. |