Installing or upgrading your TMWSuite applications and database
This topic guides you through the installation or upgrade of:
-
TMWSuite client application files
-
TMWSuite database on the SQL server
-
TMW Add-Ins Interface files, which allow you to run Microsoft® .NET Framework features from within TMWSuite
It reflects the latest version of TMWSuite as of 2024-10-24.
Warnings
Installation directory
As of version 2020.4, you must install TMWSuite files into a new directory. Some files from earlier versions are not compatible with newer versions. If you need assistance, contact Trimble Transportation Support.
Social Security number encryption
As of version 2020.2, Social Security numbers you enter in the driver profile are encrypted in the database by default.
Having encrypted Social Security numbers could interfere with third-party applications accessing the data. This happens because the data is encrypted when transferred. The third-party application does not have the ability to decrypt it.
You can set up the system so that the Social Security numbers you enter in the driver profile are not encrypted in the database.
To do so, set the DataEncryption General Info Table setting’s String1 field to N.
|
The Data Conversion Administration Utility allows you to encrypt/decrypt a group of Social Security numbers in your database. Contact your Professional Services representative to obtain the DataConversionAdministrationUtilityInstall.msi. Access and usage of the Data Conversion Administration Utility should be provided only to a system administrator. That utility provides access to highly sensitive data and should be used in the explicit instance of needing to encrypt or decrypt the driver profile. |
SMTP e-mail port
As of version 2019.2, the setup for the SMTP e-mail feature has changed.
You can now set these options in the SmtpEmailer General Info Table setting:
-
String1 = Identify your SMTP server
-
String3 = Identify your SMTP server username
-
String4 = Identify your SMTP server Password
-
Int1 = 587
-
Int2 = 465
This allows you to configure your system to use Secure Sockets Layer (SSL) for SMTP email.
| As of version 2019.4, you can disable SSL for your SMTP email feature. |
Invoice output configurations
As of version 2019.1, there is a new procedure for setting up and assigning invoice output configurations for print and EDI.
In previous versions, you set up output configurations in the EDI 210 field or in the Advanced EDI Output Settings window in the company’s File Maintenance profile.
Now, those two locations are no longer available. Set up invoice output configurations in the Billing Output Configuration Folder. To access this window, go to Edit > Company Billing Output.
You can also assign invoice output configurations from either of these locations:
-
Billing Output Configuration Folder
-
The Distribution Method window in the company profile
Note: To access this window, you must use Screen Designer to add the Invoice Output Method button to the company profile.
The new upgrade script automatically imports all the invoice output configurations you previously set up. You should not need to do any additional setup for your existing configurations. However, as with any major upgrade, we recommend that you verify the results after running the upgrade script.
PC*Miler warnings
Incompatibility with later PC*Miler|Mapping products
TMWSuite’s mapping feature works with PC*Miler|Mapping software to plot routes and symbols on a map.
To use these features in TMWSuite, you must use PC*Miler|Mapping version 31 or earlier.
Starting with PC*Miler version 32, ALK supports only ALK Maps for mapping. ALK Maps is a web-based, JavaScript API. TMWSuite does not support ALK Maps.
If you are using TMW.Suite Enterprise (TMW Operations, TMW Back Office, etc.) or another .NET product, you can use ALK Maps.
|
General requirements
Before you begin installing TMWSuite, check that these requirements are met:
-
Internet Information Services (IIS) for Microsoft® Windows Server®
IIS Microsoft Windows Server 2008 R2 or later -
Microsoft® SQL Server®
Microsoft SQL Server 2014, SQL Server 2016, SQL Server 2017, SQL Server 2019, and SQL Server 2022 are supported. Trimble Transportation recommends using the latest service pack of whichever version you use.
-
.NET Framework 4.6.2 or later
-
Microsoft Visual C++ 2010 x 86 Redistributables
-
32-bit SQL Native Client Drivers
Version 10, 11, or MS OLE DB must match the drivers to your SQL version. -
You must be logged into the system where you want to install TMWSuite and have administrator rights for that system.
Like most applications, TMWSuite can be installed locally on a user’s system. It is also possible to install TMWSuite on a network drive. To do so, you must be logged into the system where the drive is physically located, and have administrator rights for that system.
Overview of the TMWSuite installation program
You use the TMWSuiteInstaller.exe to install TMWSuite-specific client and server files, as well as any third-party files that TMWSuite requires. It also installs the TMW Add-Ins files, which are required for application features that were coded in Microsoft .NET instead of PowerBuilder. You can use the installer file if you:
-
Are installing/upgrading TMWSuite for the first time. This ensures that you have all third-party prerequisite files.
-
Have previously upgraded TMWSuite, and want to use the Installer again to install all files at the same time.
-
Want to use TMW’s .NET features (such as the .NET version of the TMWSuite scroll windows) and have never installed the Add-Ins files. For details on Add-Ins, see A note about TMW’s Add-Ins interface.
When you run the TMWSuiteInstaller.exe to install TMWSuite, you can specify whether you want to install some or all of these items:
-
Install Client (Application Files Only)
-
Install TMWSuite Add-Ins
-
Server Installation (Database Upgrade)
| To run the installer, your local Windows account must have Administrator privileges on your computer. |
A note about the TMWSuite Add-Ins interface
Although most of the functionality within core TMWSuite applications has been coded with the PowerBuilder development tool, we have developed an Add-Ins interface, which enables TMWSuite’s PowerBuilder code to call .NET Framework components. Examples of .NET features include:
-
Scroll windows
-
Interface to the Cisco® Click to Call feature
-
Some Integrated Reporting features
Installation of the free Add-Ins interface is required to run .NET features from PowerBuilder applications. Add-Ins can be installed with TMWSuite, or as a separate installation. In either case, you must also apply SQL updates to your database. See Enable the TMWSuite Add-Ins interface.
| To install the Add-Ins interface separately from the TMWSuite application and database files, contact Trimble Transportation Support to alert them that you need the latest version of the Add-Ins MSI file. |
Prepare for the upgrade
Before beginning the upgrade:
-
Instruct all users to exit all applications.
Note: Because the database is locked during the upgrade process, users cannot use the system for the duration of the upgrade.
-
Back up your TMWSuite database.
-
If you are installing an Add-Ins upgrade, uninstall your current version first.
-
Download the TMWSuiteInstaller.exe from the Build Delivery Downloads page on the Trimble Client Center.
|
If you will be running the TMWSuite Installer executable on the target system remotely via Terminal Services/Remote Desktop, you must connect with either the "/admin" or "/console" switch, as appropriate for your operating system version. This allows the TMWSuite Installer executable to leverage the Chained MSI files within Windows Installer 4.0.
Chained MSI files require that the user session be Session 0 (or Session 1 under Windows Server 2008) for the parent process that will be spawning each chained MSI. This affects only installations using Windows Terminal Services/Remote Desktop, or perhaps other software that provides virtualized sessions such as Citrix Metaframe (untested). If you connect via Virtual Network Computing (VNC), you will get the proper Session on the remote machine’s console and have no issues.
Command-Line Connection examples:
-
For Windows XP, SP1, SP2 or Windows Server 2003 (any SP), use the /console switch: mstsc /v:<servername> /console
-
For Windows XP SP3 or Windows Server 2008/2008 R2 (any SP), use the /admin switch: mstsc /v:<servername> /admin
-
For more information on Microsoft Terminal Server Client, use the mstsc /? command.
Install or upgrade the TMWSuite application and database
TMWSuite requires third-party files that are installed only when you use the TMWSuiteInstaller.exe. Third-party files must be installed only once. However, over time, those files may require updates. In addition, as TMWSuite’s feature set grows, more third party files may be needed.
To ensure that you have all needed files, the instructions in this document describe how to perform a full or partial installation using the TMWSuiteInstaller.exe.
|
Beginning steps
Follow these steps to begin the installation process:
-
Close all open applications.
-
Locate the installation .ZIP file you downloaded and saved to your desktop or Downloads folder.
-
Open the .ZIP file and double-click the .MSI file.
Note: If features added since the last upgrade require additional third-party files, the exe will tell you this, and will add them for you.
The Trimble banner appears as the InstallShield Wizard starts.
-
In the Installing/Upgrading TMWSuite window, click Next.
Run the TMWSuite Installer executable
Follow these steps to use the TMWSuiteInstaller.exe to do the installation or upgrade:
-
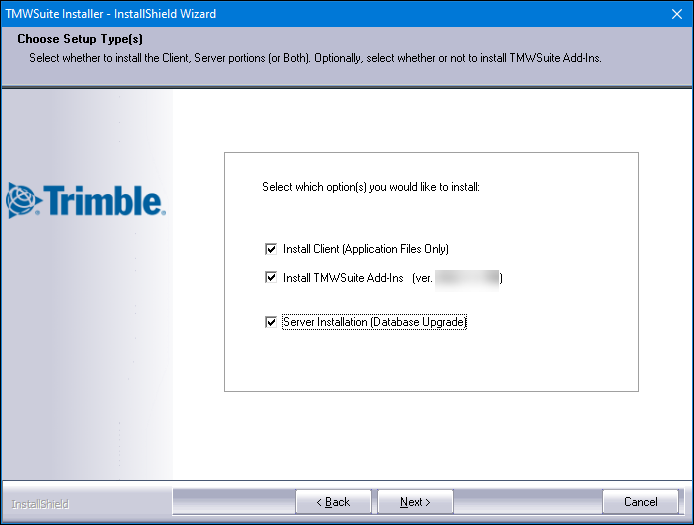
In the Choose Setup Type(s) window, select one or more of these options:
-
Install Client (Application Files Only)
Updates all TMWSuite program files for the workstation (desktop)Note: When installing these Client files, a MasterUpgrade.sql file is installed also. You can use this file to manually upgrade your database. However, you do not need to manually upgrade your database if you use the TMWSuiteInstaller to upgrade your database.
If you do want to update your database manually, use Microsoft® SQL Server® to apply the MasterUpgrade.sql file to your database.
-
Install TMWSuite Add-Ins
Required for features created using .NET development tools. You do not have to install the Add-Ins interface; however, we strongly suggest that you do so. This ensures that you have the components needed to run .NET features. -
Server Installation (Database Upgrade)
Updates the TMWSuite database on the SQL server
-
-
Click Next.
-
To begin the installation, click Install.
The Setup Status window opens.The progress bar updates you on the status of the install procedure. The installation process continues with the Preparing to install message.
The options you choose in Step 1 determine what is installed and which windows display during the install process. The following sections explain what to expect when all the install options are selected.
Install client files
The following steps take you through the installation process for the client (application) files.
-
In the Welcome to the InstallShield Wizard for TMWSuite Client Installer window,
click Next. -
When installing TMWSuite and TMWSuite Dispatch, you can accept the default destination folder(s) or you can browse to a different folder.
Note: Starting in version 2020.4, you must install the TMWSuite files into a new directory. Some files from earlier versions are not compatible with V.2020.4 and greater. If you need assistance, please work with your support team.
Do one of the following:
-
To accept the default destination folders, click Next.
-
To change the destination folder(s), do the following:
-
Click the appropriate Change button.
-
In the Change Current Destination Folder window, browse to the appropriate folder or click
 to create a new folder.
Note: When you change the TMWSuite destination folder (C:\TMWSuite), the system creates the Dispatch destination folder as a subfolder (C:\TMWSuite\Dispatch).
-
Click OK.
-
In the Destination Folder window, click Next.
-
-
-
In the Ready to Install the Program window, click Install.
In the Installing TMWSuite Client Installer window, a status bar indicates the progress of the installation.
-
In the InstallShield Wizard Completed window for the TMWSuite Client Installer, click Finish.
|
Install TMWSuite Add-Ins
If you chose to install the TMWSuite Add-Ins, the Welcome to the TMWSuite AddIns Setup Wizard window opens.
-
To install the TMWSuite AddIns, click Next.
Note: If you decide not to install the TMWSuite Add-Ins, click Cancel.
-
The Select Installation Folder window opens.
Do one of the following:
-
Click Next to accept the default installation location.
-
Click Browse to navigate to the folder where you want to install the files.
-
-
To specify who will have access to the application, select the appropriate radio button:
-
Everyone
If other users will be accessing the application from this computer. -
Just me
If you will be the only person accessing the applications from this computer.
-
-
If you want, you can view the amount of disk space available on your system’s drive(s). Also listed is the required amount of disk needed to install the additional applications.
-
Click Disk Cost.
-
Click OK.
-
-
Do one of the following:
-
To accept the installation folder, click Next.
-
To change the installation folder, click Browse.
-
In the Browse for Folder window, locate the appropriate folder.
-
Click OK.
-
Click Next.
-
-
-
In the Confirm Installation window, click Next.
In the Installing TMWSuite AddIns window, a status bar indicates the progress of the installer.
-
In the Installation Complete window, click Close.
If you chose the Server Installation (Database Upgrade) check box, then the Preparing to install… message is displayed. For more information, see Updating the TMWSuite database.
The Setup Status window remains open. Do not click Cancel. It will take a few minutes before the next window opens, and you can continue the installation process.
|
If the installation does not complete successfully, you may receive successive error messages, ending with this one:
If this happens, contact Trimble Transportation Support for assistance. |

Update the TMWSuite database
The following steps take you through the update process for the TMWSuite database.
-
In the Welcome to the InstallShield Wizard for TMWSuite Server Installer window, click Next.
The Database Server window opens.
-
In the Database server that you are installing to field, do one of the following:
-
Enter the server name manually
-
Select the server name from the drop-down list and click OK.
The Database Server window redisplays.
Note: If the server is not in the list, click Browse to locate and select the appropriate server. The more databases there are on the selected server, the longer this part of the installation will take.
-
-
In the Login ID field, enter the SQL Server system administrator’s login.
Note: The Login ID defaults to sa.
-
In the Password field, enter the password.
Warning: To help prevent unauthorized use of your system, the use of a blank password is strongly discouraged.
-
In the Name of database catalog field, enter or select the database catalog from the drop-down list.
Note: If the database is not in the list, click Browse to locate and select the appropriate database.
-
Click Next.
A SQL Backup warning message is shown. If you don’t have a current backup of your database, you should stop the install and preform the back up now. -
To continue with the install, select both checkboxes in the SQL Backup window.
-
Click Next.
-
In the Ready to Install the Program window, click Install.
-
In the Installing TMWSuite Server Installer window, a status bar indicates the progress of the installer.
-
In the InstallShield Wizard Completed window for the TMWSuite Server Installer, click Finish.
-
Close the installer window.
|
If the installation does not complete successfully, you may receive successive error messages, ending with this one:
If this happens, contact Trimble Transportation Support for assistance. |
Enable the TMWSuite Add-Ins interface
If you have installed the TMWSuite Add-Ins interface, you must perform these steps to enable it.
Activate the Add-Ins version of scroll windows
TMWSuite has two types of scroll windows: the original version that was coded in PowerBuilder, and a newer version coded with the Microsoft .NET Framework. Use of the .NET features requires the installation of TMWSuite’s Add-Ins interface. Therefore, the new version of the scroll windows frequently is called the Add-Ins version. After you install the interface, you use the [TmwSuiteAddins]EnableScrolls INI setting to activate them.
Apply SQL if you installed or upgraded the Add-Ins
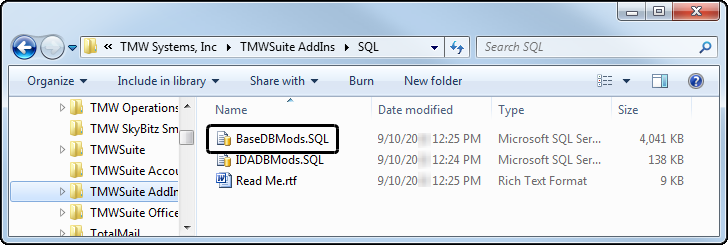
Whether you installed the Add-Ins using the Installer exe or the Add-Ins MSI, you must apply the necessary SQL updates to your database. You can find the SQL file in the TMWSuite AddIns folder on your installation drive.
The default location is C:\Program Files (x86)\TMW Systems, Inc\TMWSuite AddIns\SQL, as seen in this illustration. The file name is BaseDBMods.SQL.
| You can install the Add-Ins at a later date, by running the latest version of the Add-Ins MSI file. Contact Trimble Transportation Support to alert them that you need the latest version of the Add-Ins MSI file. |