Adding a nested view to a scroll view
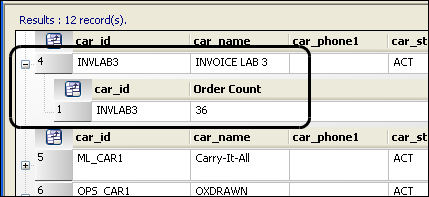
A nested view is a view within a view. The primary view provides you with the "top layer" of data for a record. A nested view then takes that record and provides more detail. By default, only data for the primary view is shown, but you can expand each line of data for a record to see the information retrieved for the nested view. In this sample, the order count for each carrier was added as a nested view.
In Microsoft SQL Server Management Studio
-
Connect to the database.
-
Create the query for the view.
Notes:
-
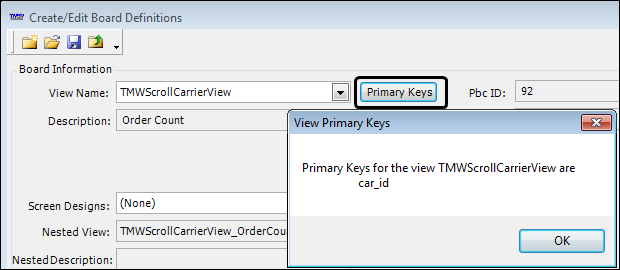
The nested view must contain the primary key of the primary view table.
-
The primary key of the nested view cannot be aliased. For example, use
SELECT car_id, notSELECT car_id as 'Carrier ID'.On the Board Definition window of the primary view, click Primary Keys. A window opens to display the key column names.
This sample joins the carrier (primary) table with the orderheader (nested) table to display the order count for each carrier.

-
-
Allow others to use the view.

| The view is not yet nested. However, it is now available in the application and can be nested to any view that uses the same primary key. |
In TMW Operations
| If TMW Operations was opened before you created the new SQL view, you must close and reopen TMW Operations to see the new view in the Create/Edit Board Definitions window. |
-
Select File > Board Setup.
-
From the Board Type drop-down list, select the type of view for which you created the new SQL view.
-
From the user groups grid, select All Users.
-
Create a new view.
-
Click New.
-
The Board Definition window opens.
-
Select the SQL View Name.
-
Enter a Description for the view.
-
When finished, save the changes.
-
On the Create/Edit Board Definitions window, click OK.
-
On the Board Definition window, click OK.
-
On the Board Setup window, click Save.
-
-
-
Add the nested view you just created in SQL.
-
On the Board Setup window, select the primary view you just created.
-
Click Edit.
-
Click Change View.
The Create/Edit Board Definitions window opens. -
Click Change Nested View.
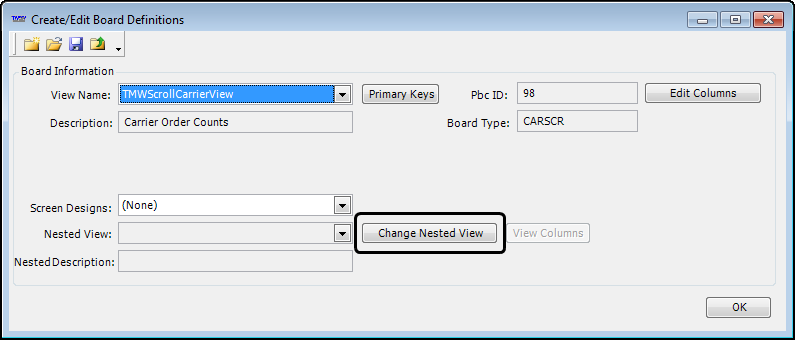
The Nested View field becomes editable, and the button label changes.

-
Select the SQL view to nest.
-
Click Commit Nested View.
-
When finished, save the changes.
-
On the Create/Edit Board Definitions window, click OK.
-
On the Board Definition window, click OK.
-
On the Board Setup window, click Save, and then OK.
-
-
The board is automatically assigned to all users. If you want, restrict access to the view.