Creating a commodity forecast
Commodity forecasts provide the information the system needs to determine when a store needs product, and how much product should be delivered on individual orders.
For each store, you create a commodity forecast for each commodity you want to monitor.
A commodity forecast includes the tank information you recorded in the Company Tank Setup window’s Tanks tab, the estimated weekly sales volume for the commodity, and the number of weeks' worth of readings on which the forecast is based.
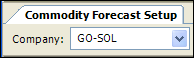
You set up a store’s information in the Commodity Forecast Setup window.
In this illustration, the Model tab is displayed.

A |
Use the Company field to select the store for which you are setting up commodity forecasts. When a store is retrieved, its name, address, and phone number are displayed. Note: If a note or an alert has been recorded for the store, the Note indicator background color changes from gray |
B |
The Tank grid displays information for each tank, as it was entered on the Tanks tab in the Company Tank Setup window. |
C |
Displays basic forecast information for the selected tank |
D |
The Time Segment grid displays daily sales by time segment. |
E |
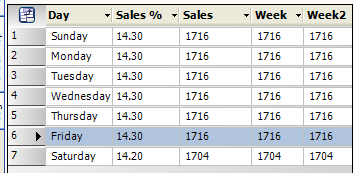
The Weekly Sales by Day grid displays the percentage of the weekly sales sold per day. |


| Commodity forecasts are not required for stores having an Inventory Service Mode of Audit Only or for secondary products that a forecasted store may carry. In such cases, requests for product delivery would be submitted by the store and the orders created in the Call On Demand Order Entry module in the Fuel Dispatch application. |
Importing the store’s tank information
If you want, you can enter the information for each tank at a store manually. However, to ensure that the information is consistent with the entries made when the tank was set up on the Tanks tab, you can import the tank setup.
| For details on entering tank information manually, see Setting up the store’s tanks. |
-
Go to Maintenance > Commodity Forecast Setup.
The Commodity Forecast Setup window opens. -
In the Company field at the top left of the window, enter the store’s ID.
-
Tab out of the field or click
 Open.
Open. -
Click
 Fill Forecast Data.
The Tank grid displays a row for each store tank. Fields shared with the Company Tank Setup window’s Tanks tab are populated.
-
Click
 Save, and then complete the forecast setup by:
Specifying how the system determines whether a reading is reasonable
In addition to a tank’s commodity forecast setup, one of the key pieces of information the Forecaster uses to correctly predict deliveries is the tank’s daily tank reading. Tank readings must accurately reflect the store’s previous day’s sales of the product.
To determine whether a daily tank reading is reasonable, you must identify the Tank Audit Rule that applies to the tank. The Tank Audit Rule helps the system evaluate whether a tank reading is reasonable or questionable. Two system code rules are available. However, your company may have defined its own rules. For more information, see Defining Tank Audit Rules.
By default, the TankAuditRule field is set to the 50% Sales/10% Tank system code option.

In each row displayed in the Tank grid, select the appropriate Tank Audit Rule option for the tank.
Click ![]() Save, and then complete the forecast setup by:
Save, and then complete the forecast setup by:
Recording product sales information
To predict when a store will need product, the Forecaster requires baseline sales quantities for each store product. To provide this baseline, you must:
-
Record how many units of the product are sold each week.
You make your entry in the Tanks grid. -
Identify the percentage of the weekly sales that is sold on the individual days of the week.
You make your entries in the Weekly Sales by Day grid, found at the bottom left of the Model tab.
By default, the system calculates the percentage of the weekly sales that will be sold in a day by dividing 100 by 7, and attributing 14.30% of the sales to each day, Monday through Friday. It attributes the remaining 14.20% to Saturday. You can adjust the percentage for a given day as needed. However, the entries in the Sales % column for all days must equal 100%.
-
With the store displayed in the Commodity Forecast Setup window, select the row for the first tank for which you are creating a commodity forecast.
-
In the grid’s Weekly Sales field, enter the number of units of product the store typically sells in a week.
Note: Alternatively, you can enter the number of gallons sold each day in the Weekly Sales by Day grid’s Sales column. The system will put the total weekly sales amount in the Weekly Sales field.

-
In the Sales % field, located in the Weekly Sales by Day grid, enter the percentage of the weekly sales attributable to each day.
Note: The sum of all your entries must equal 100%.
This illustration shows default entries in the Weekly Sales by Day grid.
Defining the time segments used to forecast a commodity
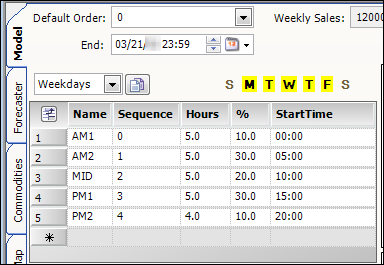
To predict when a store will need product, the Forecaster must know how much product is sold each day. For each day, it must know the sales at certain times of day, and within those times, how much is sold in an hour. To provide this information, you make entries in the Time Segments grid, located on the Commodity Forecast Setup window’s Model tab.
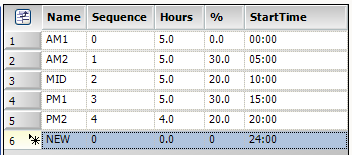
The Time Segments grid defines weekday sales.
You determine how granular you want the sales data to be. You can use the same figures for every day of the week, or you can have different figures for each day. Alternatively, you can specify different figures for weekends (Saturday and Sunday) than you specify for weekdays (Monday through Friday).
By default, each day is broken into five segments:
-
AM1
-
AM2
-
MID
-
PM1
-
PM2
For each segment, you specify a start time. The length of the segment is from its start time to the start time of the next segment. Time entries are made in the hh:mm format.
Once you have defined the hours that make up a segment, you identify the percentage of the day’s sales for each segment. You can adjust the percentage for a given segment as needed. However, the entries in the % column for all periods must equal 100%.
Things to remember when defining the time segments:
-
The first segment of the day starts at midnight, recorded as 00:00.
-
The segments as a whole must cover all 24 hours of a day.
-
The segments must be listed in chronological order.
-
With the store displayed in the Commodity Forecast Setup window, in the Tank grid, select the row for the first tank for which you are creating a commodity forecast.
-
In the Days drop-down list, select the day definition for which you are setting up time segments.
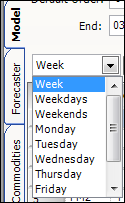
Week
Time segments will apply to every day of the week
Weekdays
Time segments will apply to Monday through Friday. Additional segments must be defined for the Saturday and Sunday.
Weekends
Time segments will apply to Saturday and Sunday. Additional segments must be defined for the remaining days of the week.
Monday
Time segments will apply only to Monday. Additional segments must be defined for the remaining days of the week.
Tuesday
Time segments will apply only to Tuesday. Additional segments must be defined for the remaining days of the week.
Wednesday
Time segments will apply only to Wednesday. Additional segments must be defined for the remaining days of the week.
Thursday
Time segments will apply only to Thursday. Additional segments must be defined for the remaining days of the week.
Friday
Time segments will apply only to Friday. Additional segments must be defined for the remaining days of the week.
Saturday
Time segments will apply only to Saturday. Additional segments must be defined for the remaining days of the week.
Sunday
Time segments will apply only to Sunday. Additional segments must be defined for the remaining days of the week.
Notes:
-
The day of the week indicators are highlighted based on your selection, as shown in this example.

-
If a store is closed on a particular day of the week, do not record a time segment for it.
-
-
In the StartTime column for a segment, enter the time at which each segment is to begin. For example, if the store is open 24 hours a day, the start time for the AM1 period would be 0:00.
Notes:
-
The times must always equal 24 hours. If a store is closed for certain hours, enter 0 in the % field when performing Step 4.
-
The system will adjust the entry in the Hours field according to your entry.
-
-
In the % field for a segment, enter the percentage of the daily sales volume that is sold during that period.
If you need to, you can add more segments.
-
Click on the row with the * in the Name field. A new row is added.
-
Enter an identifier for the segment in the name field.
-
Enter the appropriate Sequence number for the new segment, and adjust existing sequence numbers as needed.
-
Make entries in the StartTime and % fields as described above.
-
Save your entries.
-
-
Repeat Steps 2 - 4 for each day definition you selected.
-
Click
Save. -
Repeat Steps 1 - 6 for each tank, and then complete the forecast setup by:
Managing duplicate critical orders
First available in Inventory Services: 17.60
When a tank is in critical need of product, the Forecaster may create a new order or move up the runout date/time and arrival date on an existing forecasted order to prevent a runout.
If a Planned, Started, or Dispatched order is in a Locked status, the Forecaster is unable to change the retain/runout or arrival/depart dates on that locked order. In this case, the Forecaster finds the next forecasted order and sets its retain/runout and arrival/depart dates earlier to move it ahead of the locked order. When unaware of the locked order, a dispatcher could plan the next forecasted order and possibly cause a retain.
By default, the system uses the [InventoryService]PreventDuplicateLoadOnCritical=Y setting in your TTS50 to prevent the Forecaster from moving a second load earlier than a previously Planned, Dispatched, Started, and Locked load.
If you do not want to use the default setting, you must change it manually. You can use the [FuelDispatch]ScheduledLoadCheck=Y setting in your TTS50 to have the system issue a validation message when you plan duplicate loads in the Card Planner or Planning Worksheet.
Identifying a weighted average mode for a tank
When you recorded a product’s sales information, you specified the number of weeks' worth of sales data the system will use as a basis for projections. To make the projections more accurate, you can identify how the Forecaster will weigh the average sales for those weeks.
| The weighted average options will scale to any number of weeks. The weights are not dependent on the number of weeks, just how quickly the data decays based on the selected weighting method. |
-
With the store displayed in the Commodity Forecast Setup window, select the row for the first tank for which you are creating a commodity forecast in the Tank grid.
-
In the ForecastSalesUpdateRule field, select the option you want to use for this tank.

The options are depicted graphically:
Flat
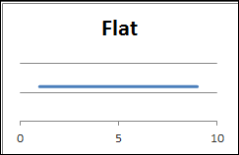
All weights are the same. This is the same as taking the average without weighting.
Standard
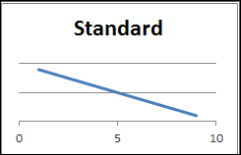
Weights are decreased in a uniform fashion (X-1, X-2, X-3…).
For example, if you have set the Weeks Included field value to 9, the weights applied would be 9,8,7,6,5,4,3,2,1, essentially making the most recent week of sales have a 90% weight, the second most recent week have an 80%, and so on.
Half-Life

Each week is 50% more important than the next (X/2, (X/2)/2, (X/2)/(X/2)/2, etc.).
This will effectively take more of the first half of your timeframe as more important than the last half. For example, if you have set the Weeks Included field value to 9, the weights would be 9, 4.5, 2.25, etc.
Base 10
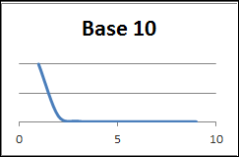
Each week is 10 times more important than the next (next (X/10, (X/10)/10, (X/10)/(X/10)/10, etc.).
This will heavily weight the most recent week by a large margin. For example, you have set the Weeks Included field value to 9, the weights would be 9, .9, .09, .009, etc.
-
Click
Save. -
Repeat Steps 1 - 3 for each tank, and then complete the forecast setup by:
Recording the store information that applies to all orders
Before the Forecaster can generate orders for a store, it must have information required on the order. You enter this information on the Commodity Forecast Setup window’s Forecast tab.
This illustration shows the Commodity Forecast Setup window with the Forecaster tab displayed.
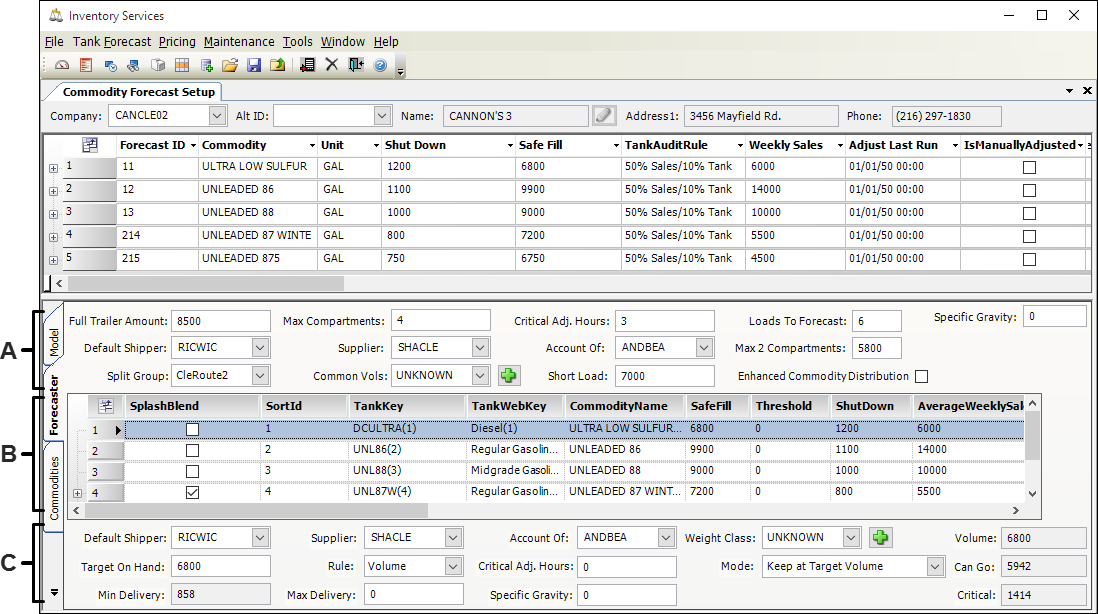
A |
The top of the tab contains fields that are relevant to all orders for the store. The Forecaster uses this information when generating orders. |
B |
The Tank grid displays each tank at the selected store. |
C |
The bottom of the tab contains fields that are relevant to orders for the tank selected in the tab’s Tank grid. The Forecaster uses this information when generating orders for that tank. For more information, see Recording order information for each store product. |
-
With the store displayed in the Commodity Forecast Setup window, select the Forecaster tab.
-
Make entries in the following fields located at the top of the tab.
Required field: *
Maximum number of units that can be contained on the trailer delivering the product. The default is 8500.
Physical location (terminal/rack) where product for this store is loaded onto the trailer
Notes:
-
Company profiles and relationships are established in the Fuel Dispatch applications. For more information, refer to the Fuel Dispatch help system.
-
If you do not specify a default shipper for all of the store’s orders, you must specify one for each commodity the store handles.
-
Fuel Dispatch uses the Default Shipper field value to populate the Shipper field on the Tanks and Freight tabs when creating an order in Call on Demand Order Entry.
Split Group
Displays the list of available split groups
Notes:
-
Split groups are set up in the System Administration application. For details on setting up this field, see the Fuel Dispatch help system.
-
Fuel Dispatch uses the Split Group field to sort forecasted orders in the Card Planner and the Planning Worksheet.
Maximum number of commodities that can be put in the trailer. The default value is 4.
Note: Starting with V.2020.4 SP1, the Forecaster no longer uses this field. It has been removed.Entity that gets the product to the shipper for pickup
Notes:
-
Company profiles and relationships are established in the Fuel Dispatch applications. For more information, refer to the Fuel Dispatch help system.
-
If you do not specify a default shipper for all of the store’s orders, you must specify one for each commodity the store handles.
-
Fuel Dispatch uses the default Supplier field value to populate the corresponding field on the Tanks and Freight tabs when creating an order in Call on Demand Order Entry.
Obsolete as of Inventory Services: 2018.3
Number of units to deliver when more than one product is delivered. Select the appropriate option from the drop-down list.
Note: Options are defined in the Modify Forecaster Common Volumes window, accessed by clicking the Add button next to the field. For more information, see Defining common volumes.
Default Trailer
First available in Inventory Services: 2018.3
ID of the trailer assigned to this store. The Forecaster uses the Trailer Compartment sizes when forecasting for the site. To use this setup, trailer profiles must include compartment records. Otherwise, the system displays an error message. See Setting up trailer compartments.
Note: The Default Trailer field exists on both the Order Forecast Review and Commodity Forecast Setup windows.
Number of hours of sales before the tank reaches its shutdown level. The default value is 3.
Entity that pays for the product
Notes:
-
Company profiles and relationships are established in the Fuel Dispatch applications. For more information, refer to the Fuel Dispatch help system.
-
Fuel Dispatch uses the default Account of field value to populate the corresponding field on the Tanks and Freight tabs when creating an order in Call on Demand Order Entry.
The Forecaster will try to create orders for full trailer loads. Some times a tank cannot wait for a full trailer load before it reaches the critical replenishment stage. Your entry in this field serves as a flag to dispatchers reviewing orders that the order will need to be consolidated. A typical entry is half the trailer capacity, rounded to the nearest thousand. The default value is 7000.
Number of orders the Forecaster is to generate for the tank at one time. The default value is 6.
Default value is 5800.
Note: Starting with V.2020.4 SP1, the Forecaster no longer uses this field. It has been removed.If the store has multiple secondary products, you can select this checkbox to have the Forecaster trigger the store’s orders based on the lead product. When it is:
-
Selected
When you select this checkbox, the Forecaster does not create orders triggered by secondary product levels. Instead, it creates lead product orders earlier rather than when the product level is critical. This allows orders to include secondary products instead of sending a full trailer of the lead product.Note: If a secondary product drops to a critical status, it will still trigger a load. The checkbox is ignored.
-
Cleared
The Forecaster will trigger orders based strictly on commodity levels. It ignores whether the commodity is a lead or a secondary product.
Notes:
-
Lead products are most often set up to use the Keep at Target Volume Mode option. You identify products as lead or secondary based on your entry in the Mode field. For more information, see Recording order information for each store product.
-
This checkbox is not applicable when a store has a commodity designated as a single product.
-
This setting is recommended for stations that are far from the terminal and blend at the pump. With this setting checked, the system is more likely to send off-products with the lead product, instead of sending the lead by itself.
-
This setting is not recommended when a high majority of the sales for a station are a lead product, and very little off products are sold. If full loads of a lead product are optimal for a station, do not select the checkbox.
-
This setting helps keep commodity proportions on orders similar to what is sold at the station.
Specific gravity for the full trailer amount
-
-
Click
Save, and then complete the forecast setup by recording order information for each store product.
Recording order information for each store product
When the Forecaster generates orders for a particular tank at a store, it must determine when an order is critical, and when it can wait. Your entries in the fields at the bottom of the Commodity Forecast Setup window’s Forecaster tab provide the Forecaster with the information it needs to make these evaluations.
Setting up the information for the lead product
If a store has one lead product, the Keep at Target Volume option should be selected in the Mode field. When you use this option, the Threshold field entry does not affect the Can Go or Critical order status.
| This option sets the Threshold Date in the Order Forecast Review window. |
You can make adjustments to ensure that the store is receiving product in the correct amounts and at the appropriate times.
-
If the product is arriving too soon or too late and you need to make adjustments:
-
Change the value in the Critical Adj. Hours field.
-
Change the value in the Target on Hand field slightly, if that is an option for the store.
-
-
If too much product is being delivered and you need to make adjustments:
-
Change the value in the Critical Adj. Hours field.
-
Adjust the Max Delivery or Target on Hand fields, if these are options for the store.
-
If the store has two lead products, you may want to send full loads of one of them. In this case, you would use the Keep at Target Volume (Single Product) option.
Setting up the information for secondary products
When entering the information for the store’s secondary product(s), the most frequently used Mode field options are:
-
Keep at Target Volume
Keeps the tank full, that is, at the level specified in the Target On Hand field.If too much product is being delivered and you need to make adjustments:
-
Change the value in the Critical Adj. Hours field.
-
Change the value in the Max Delivery or the Target on Hand fields, if these are options for the store.
If adjustments do not result in satisfactory amounts and/or delivery times, try a different Mode option.
-
-
Trigger on Threshold
This option normally delays how soon product is delivered in comparison with the Keep at Target Volume option.If product is delivered too early or too late and you need to make adjustments:
-
Change the value in the Critical Adj. Hours field.
-
If adjusting the Critical Adj. Hours value does not resolve the issue, change the Threshold value or the Target on Hand value, if these are options for the store.
-
If too much product is being delivered and you need to make adjustments:
-
Change the value in the Critical Adj. Hours field.
-
If adjusting the Critical Adj. Hours value does not resolve the issue, you can also try changing the Threshold, Max Delivery, or Target on Hand values, if these are options for the store.
If adjustments do not result in satisfactory amounts and/or delivery times, try a different Mode option.
-
Trigger on Target Min Delivery
This option is normally used when the store sets a secondary product requirement on orders for primary and secondary product, and will not accept the delivery if the order does not fulfill that requirement. This option may also be used when a store wants to take at least the volume equal to the smallest compartment on the trailer.
If you need to make adjustments when using this option, you can change both the Min Delivery and the Max Delivery values to have more control over the amount of product delivered and when it is delivered.
Note: When this option is used, it sets the Threshold Date on the Forecast Order Review window.
Recording tank-specific information
Use this procedure to record tank-specific information for a store’s tanks.
-
With the store displayed in the Commodity Forecast Setup window, select the Forecaster tab.
-
In the Tank grid in the middle of the tab, select the tank for which you want to record information.
The fields at the bottom of the tab pertain to the tank selected in the Tank grid.
-
At the bottom of the window, make entries in the following fields.
Required field: *
Default Shipper *
Physical location (terminal/rack) where product for this store is loaded onto the truck
Note: Company profiles and relationships are established in the Fuel Dispatch applications. For more information, refer to the Fuel Dispatch help system.
Desired level for when the product is delivered
For example, if the tank capacity is 12000 gallons, and the safe fill is 90%, the safe fill capacity is 10800 gallons. If you make an entry in this field of 7000, the Forecaster will create orders so that product is delivered to keep 7000 gallons in the tank.
An entry in this field is required only when the specified Mode for the tank is Trigger on Target Min Delivery Rules. For more information, see the description for the Rule field.
Supplier *
Entity that gets the product to the shipper for pickup
Note: Company profiles and relationships are established in the Fuel Dispatch applications. For more information, refer to the Fuel Dispatch help system.
Applicable to the Target On Hand value, used to further specify how that value is interpreted
Options are:
-
Volume
An order will have a Can Go status when its quantity is equal to the Target On Hand value. This option is used for primary products. When this option is selected, the value in the Target On Hand field is the number of units to keep on hand. -
Days
An order will have a Can Go status when its quantity is equal to the sales volume for the number of days specified in the Target On Hand field. This option is used for secondary products. When this option is selected, the value in the Target On Hand field is the number of days' worth of product to keep on hand.
Entry in this field can be used with any Rule field option but an entry is not required.
Account Of
Entity that pays for the product
Note: Company profiles and relationships are established in the Fuel Dispatch applications. For more information, refer to the Fuel Dispatch help system.
Critical Adj. Hours
Number of hours of sales before the tank reaches its shutdown level. The default value is 3.
Specific Gravity
Specific gravity of the product
Note: If you are entering this value as information for all of the store’s orders in the header section, it is the specific gravity for the full trailer amount.
Weight Class
Commodity weight classification
To create additional weight classifications, click
 .
.The most important factor when the Forecaster determines if loads are needed is the Mode specified for the tank. The options are all system codes. User-defined options are not supported.
These are the primary options:
-
Do Not Forecast This Tank
When you do not need a tank to be forecasted, you can mark it that way. When this option is selected, the Forecaster will not forecast the specific tank until you choose another option.
See xref:@fueldispatch:InventoryServices-FuelTMS:InvServFD-ReviewForecastedOrders.adoc[Marking a tank as do not forecast] for more information. -
Keep at Target Volume
Keeps the tank full, that is, at the level specified in the Target On Hand field. This is the default rule for primary products. It is also used for many secondary products.Note: You can use the
[InventoryService]SetForecastOrderArrivalDatesetting in your TTS50 to have the Forecaster move the Arrival Date earlier or later within an order’s delivery window. The earliest and latest dates remain unaltered. -
Keep at Target Volume (Single Product)
Keeps the tank at the level specified in the Target On Hand field. When this option is selected, the Forecaster will put only the specified single product on an order. This option is normally used for high volume diesel tanks. -
Trigger on Threshold
When the tank’s threshold is reached, an order will have a Can Go status. This option is normally used for secondary products, when the Keep at Target Volume option results in orders being sent too early. -
Trigger on Threshold (Runout OK)
An order will have a Can Go status only when the threshold is met. The order must be for only a single product. -
Trigger on Target Min Delivery
Used to enforce creating orders for the minimum number of units that fit in the smallest trailer compartment. This option is normally used for secondary products. -
Trigger on Target Min Delivery (Single Product)
Used to enforce creating orders for the minimum number of units that fit in the smallest trailer compartment. When this option is selected, the Forecaster will put only the specified single product on an order.Note: Your selection in this field will determine the values the system places in the Can Go and Critical fields.
Volume
The targeted fill volume for the commodity and tank
Entry in this field is provided by the system, based on your entries in these fields:
-
Target On Hand
-
Rule
Earliest the Forecaster will try to send a load
The value is read-only. This field is populated by the system, based on the entries in these fields:
-
Mode
-
Target on Hand
-
Threshold
Applicable only if the store’s Inventory Service Mode is set to Threshold. -
Min Delivery
Applicable only if the Trigger on Target Min Delivery Rules option is selected in the Rules field.
If the product reaches this level, the Forecaster will force a delivery. Normally, deliveries are made well before the critical level is reached.
This read-only field is populated by the system, based on the entries in these fields.
-
Mode
-
Critical Adj. Hours
-
Weekly Sales
-
Shut Down
-
-
Click
Save. -
Repeat Steps 1 - 4 for each store tank.
Adding splash-blended commodities to your commodity forecast
Before the Forecaster can generate orders for a store, you set up the store’s forecasted commodities. You do this using the Commodity Forecast Setup window’s Forecaster tab. If you want, you can set up the system to forecast and update orders that contain splash-blended commodities. To do this, you must have [InventoryService]AllowSplashBlendOrdersToBeReForecasted=Y in your TTS50.
A splash-blended commodity is made up of multiple grades of fuel, known as child commodities. If necessary, you can specify a different shipper, supplier, and Account Of company for each child commodity in a splash blend.
-
With the store displayed in the Commodity Forecast Setup window, select the Forecaster tab.
-
In the Tank grid in the middle of the tab, locate the splash-blended commodity for which you want to record information.
The Expand icon displays next to each splash-blended commodity.
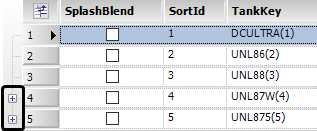
-
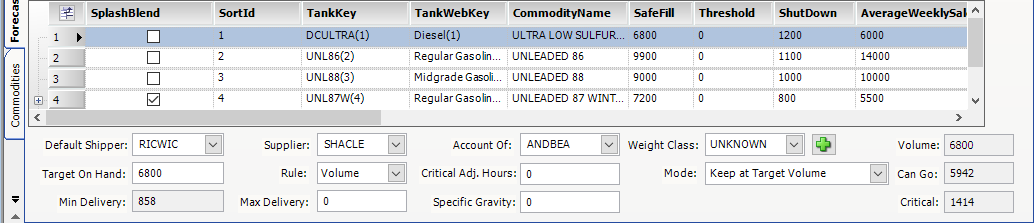
Select the SplashBlend checkbox for a splash-blended commodity.
The row expands to display the splash blend’s child commodities. In this illustration, the splash blend includes the UNL86 and ETHNL01 child commodities.
-
To specify the shipper, supplier, and Account Of company for a child commodity, select the row and complete the fields at the bottom of the window.

Default Shipper
Physical location (terminal/rack) where product for this store is loaded onto the trailer
Supplier
Entity that gets the product to the shipper for pickup
Account Of
Entity that pays for the product
Note: You create company profiles in the TMWSuite File Maintenance application. You establish company relationships in the Fuel Dispatch application. For more information about company relationships, refer to the Fuel Dispatch help system.
-
Click
Save. -
Repeat Steps 4-5 for each child commodity.
Note: Your splash-blended commodities also appear in the Order Forecast Review window’s Setup tab. If necessary, you can update the shipper, supplier, and Account Of company information there.
Updating a commodity forecast with a store’s latest tank information
There may be times when a store has added or replaced a tank. The Commodity Forecast Setup window must be in sync with the store’s tank setup to ensure that data flows smoothly throughout the system. Failure to update the commodity forecast can produce unexpected errors when entering tank readings or viewing forecasted orders.
Once a store’s new tank has been added in Setting up the store’s tanks, you must also add it to the commodity forecast setup for that store.
Use this procedure to update a commodity forecast with an additional tank.
-
Go to Maintenance > Commodity Forecast Setup.
The Commodity Forecast Setup window opens. -
In the Company field at the top left of the window, enter the store’s ID.
-
Tab out of the field or click
Open. -
Click
Fill Forecast Data.
The Tank grid displays a row for the new tank. -
Click
Save before making entries in any other field.