Tracking a commodity’s RVP
Reid Vapor Pressure (RVP) is a measurement of volatility commonly associated with gasoline. The RVP of gasoline available at the pump varies between approximately 7.5 for summer grades, and 9.0 for winter grades. Suppliers begin making the seasonal transition between summer and winter grades several weeks before the June and September deadlines. These adjustments help reduce automobile emissions during the summer driving season, while improving drivability during the winter.
During seasonal transitions, suppliers modify the RVP of gasoline at terminals, and deliveries shift the RVP in store tanks toward the desired target. Outside the seasonal transitional periods, the RVP of a given commodity at stores should be very close to the RVP at the terminal.
When the RVP tracking feature is enabled, it can calculate, track, and display the RVP of gasoline in a store’s tanks. These calculations use the following data for a commodity:
-
The RVP of the commodity supplied from the terminal
-
The volume of commodity supplied from the terminal
-
The RVP of the commodity in the store’s tank
-
The volume of commodity in the store’s tank
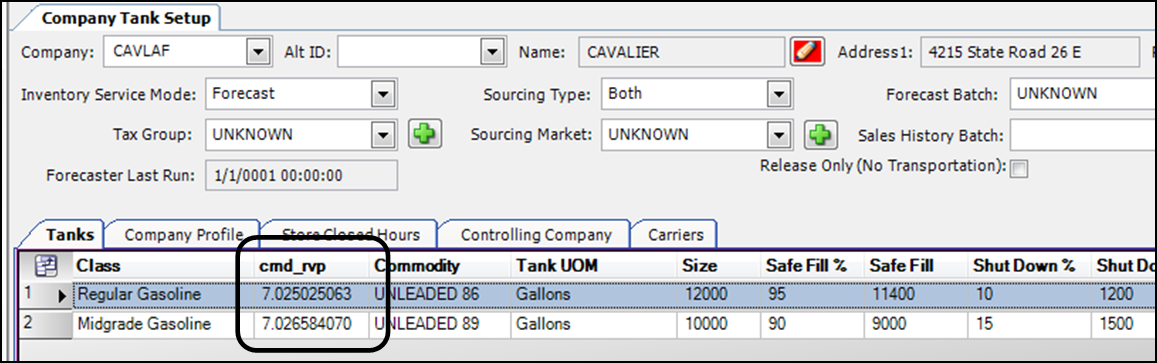
The current value of the commodity in a store’s tank can be viewed in the Inventory Services Company Tank Setup window. The Inventory Services module calculates RVP as:
[ Vol (delivered) x RVP (delivered) ] + [ Vol (old) x RVP (old) ] = Vol (new) x RVP (new)
where:
| Term | Definition |
|---|---|
Vol (delivered) |
Volume of the delivered commodity |
RVP (delivered) |
RVP of the delivered commodity, as recorded in the commodity profile |
Vol (old) |
Volume of the commodity in the store’s tank before delivery |
RVP (old) |
RVP of the commodity in the store’s tank before delivery |
Vol (new) |
Volume of the commodity in the store’s tank after delivery, calculated as Vol (old) + Vol (delivered) |
RVP (new) |
RVP of the commodity in the store’s tank after delivery |
Once set up, RVP calculation and tracking are transparent to both the store and the party managing the store’s inventory. Inventory Services derives the data it needs to calculate RVP from deliveries and tank readings. Whether your tank readings are imported, or recorded manually, the system updates the tank’s RVP.
Setting up the RVP feature
Setting up RVP calculation and tracking involves the following:
-
Enable RVP calculation
-
Record RVP values in commodity profiles
These are the RVP values of commodities delivered to the store. If a commodity’s RVP value changes seasonally, you must repeat this procedure to maintain the current RVP value in the profile. -
Record the initial RVP values of commodities in a store’s tanks
While not strictly required, this step is recommended. It establishes the initial RVP value in a store’s tank. As deliveries are made and you update tank readings, the tank’s displayed RVP value should settle quickly on the tank’s actual RVP. Typically, you enter this value only once, during company tank setup.
Enabling RVP calculation
The [InventoryService]CalculateRVP setting in your TTS50 turns on the RVP calculation function.
Recording commodity RVP values
To calculate the RVP in a store’s tank, the system requires the RVP value of the delivered commodity. You can record RVP in a commodity’s profile or in the Commodity Density window.
| The Commodity Density window is accessed in Fuel Dispatch. For details, see Reviewing commodity density values in the Fuel Dispatch help system. |
Setting up commodity profiles to include RVP values
You record a commodity’s RVP value in the Commodity Profile window’s cmd_rvp field. By default, the field is not visible. You must add it with QuickDesigner. The following illustration shows the cmd_rvp field in the General pane of the Information tab, but you can place the field in any convenient location on the tab.
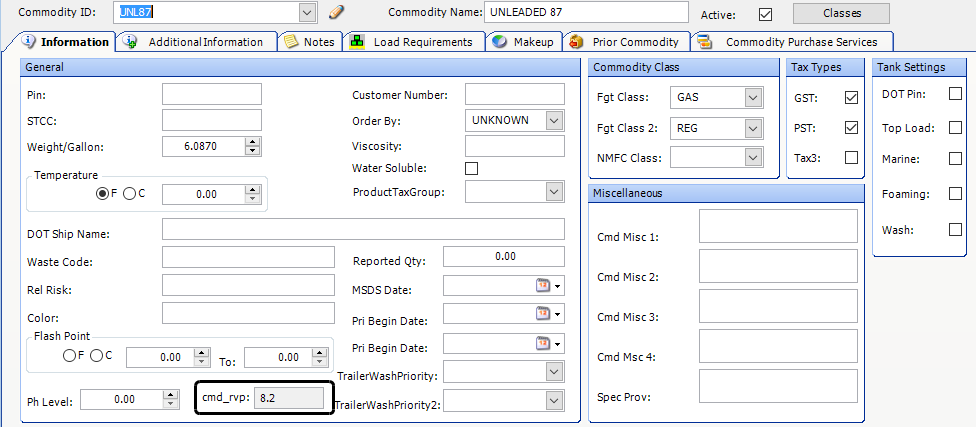
| You need to add the cmd_rvp field to the Commodity Profile window only once. The cmd_rvp field becomes available in all commodity profiles. |
To add the field to the Commodity Profile window, follow these steps.
-
Open a commodity profile.
-
Go to Tools > Commodity Scroll.
-
Retrieve a list of commodities.
-
Select a commodity and click Profile.
-
-
Select the Information tab.
-
Right-click on the Information tab and select Toggle QuickDesigner from the short-cut menu.
-
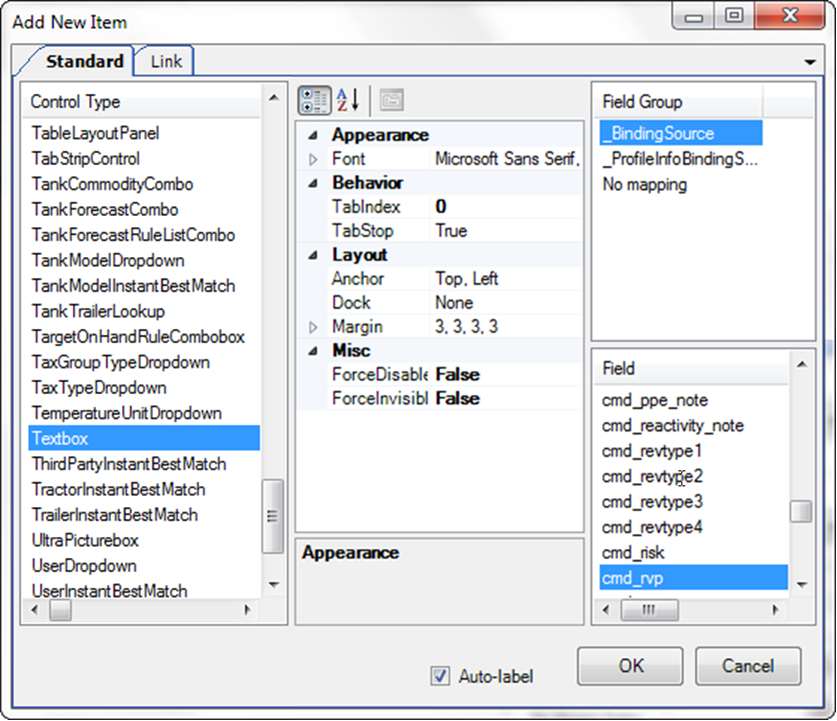
Right-click over the area where you want to add the cmd_rvp field, and select Add New Item.
The Add New Item window opens. -
Make the following selections:
-
Under Control Type, select Textbox.
-
Under Field Group, select _BindingSource.
-
Under Field, select cmd_rvp.
-
Select the Auto-label checkbox.
-
-
Click OK.
The field is added. -
Reposition and resize the cmd_rvp field as needed.
-
Right-click on the window and select Toggle QuickDesigner.
QuickDesigner closes, and the cmd_rvp field is now available. -
Assign the layout to users or groups of users.
Recording RVP in commodity profiles
To record RVP in a commodity profile, perform the following steps:
| If the commodity’s RVP value changes seasonally, you must repeat this procedure to maintain the current RVP value in the cmd_rvp field. |
-
Open a commodity profile.
-
Go to Tools > Commodity Scroll.
-
Retrieve a list of commodities.
-
Select a commodity and click Profile.
-
-
Select the Information tab.
-
In the cmd_rvp field, enter the commodity’s RVP and press TAB.
-
Click
 Save.
Save. -
To record the RVP for another commodity, enter its ID in the Commodity ID field and click
 Open.
Open.
Recording initial RVP values in a company’s tanks
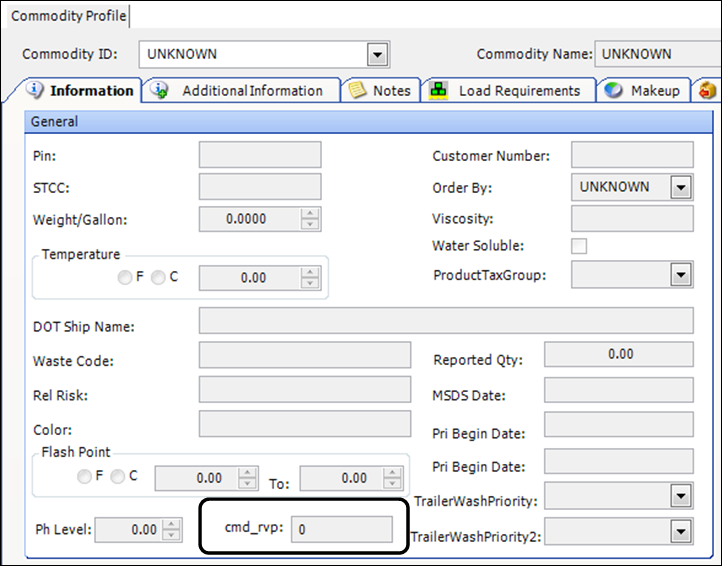
When you set up the RVP feature, the initial value for the cmd_rvp field in the Company Tank Setup window is zero (0) for each tank at a store. It is strongly suggested you enter the current RVP for each tank to provide an accurate starting point for RVP calculations.
This procedure applies to existing tanks already containing product. When you set up a new (empty) tank, the initial product volume is zero (0). After the first update of the tank’s readings, the cmd_rvp column should automatically display its RVP.
Follow these steps:
-
Go to Maintenance > Company Tank Setup.
-
In the Company field, enter the ID of the company and click
Open. -
Select the Tanks tab.
-
Place the cursor in a cmd_rvp field and enter the RVP value.
-
Press TAB.
-
Click
Save.
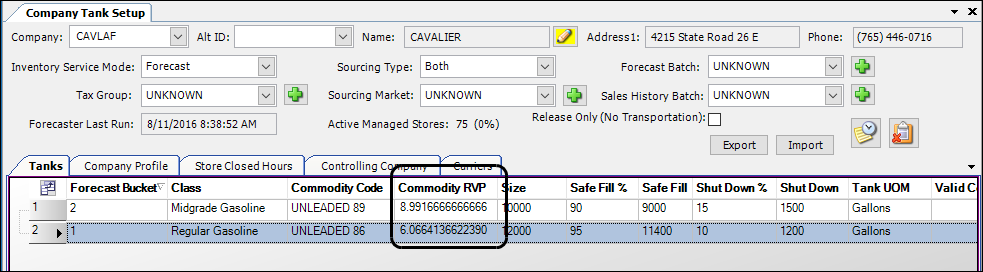
Viewing RVP in the Company Tank Setup window
You use the cmd_rvp column in the Company Tank Setup window to review RVP values for a store’s tanks.
| By default, the cmd_rvp column is located at the right end of the tab. Use the Field Chooser to move the column into view. |
Follow these steps:
-
Go to Maintenance > Company Tank Setup.
-
In the Company field, enter the store’s ID and click
Open. -
Select the Tanks tab.
-
Check the cmd_rvp column for each of the store’s tanks.
-
Repeat Steps 2-4 as needed.
Setting up seasonal commodity equivalents
During seasonal transitions, deliveries shift the RVP in store tanks to the commodity equivalent for the current date. The system’s calculation and tracking of RVP are transparent. Before setting up commodity equivalents, you must do the following:
| Commodity equivalents work with forecasted orders only. They cannot be added to orders in Call On Demand Order Entry. |
To set up the commodity equivalents for a parent commodity, follow these steps.
-
Open the Commodity Profile window.
-
In the Commodity ID field, select the commodity code and press TAB.
-
Select the Commodity Equivalent tab.
The Available Product Codes list displays the commodities that belong to the same 2nd commodity class as the parent commodity.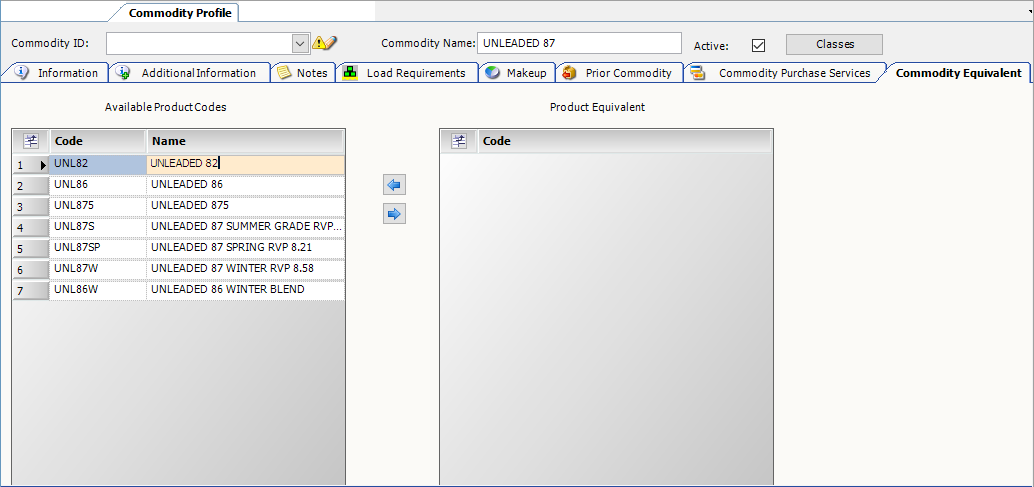
-
In the Available Product Codes list, select a commodity equivalent row.
-
Click
 to move the commodity to the Product Equivalent list.
Repeat for each commodity equivalent for the parent commodity.Note: To remove a commodity from the Product Equivalent list, select the row and click
 .
. -
Click
 Save.
Save.
This illustration shows three commodity equivalents for the UNL87 parent commodity: UNL87W, UNL87S, and UNL87SP.
Adding a commodity equivalent to a commodity forecast
After you assign a commodity equivalent to a parent commodity, you can add it to a store’s commodity forecast.
-
Go to Maintenance > Commodity Forecast Setup.
The Commodity Forecast Setup window opens. -
In the Company field, select the company you want to set up.
You add commodity equivalent information in the Commodity_EqId and CommodityEquivalentDescription fields. -
In the Commodity_EqId drop-down list, select the parent commodity for which you want to assign a commodity equivalent.
The commodity you select must match the parent commodity in the Commodity field.
Note: The number in the Commodity_EqId field is a system-assigned code.
-
Press TAB or click in the CommodityEquivalentDescription field.
The field displays the commodity ID and description.
-
Repeat Steps 2-4 for each commodity parent/commodity equivalent combination.
-
Click
Save.
How the system uses commodity equivalents
The first time you run the Forecaster with new commodity equivalents, only Available orders are updated with the new commodity code. The system does not update orders with the Planned, Dispatched, and Started status.
When the Forecaster creates an order, it uses the commodity equivalent that matches the order date. However, the various tabs in the Order Forecast Review window display the commodity ID and description of the parent commodity.
This illustration shows the UNL87 parent commodity in the Orders Projection tab of the Order Forecast Review window.

When you open the forecasted order in Call On Demand Order Entry, the commodity fields display the commodity ID and description for the commodity equivalent. The system applies the commodity equivalent that matches the order date.
This illustration shows that the UNL87S commodity equivalent applied to an order.

|