Working with the Certificate of Analysis
First available in Inventory Services 2018.4
Creating a Certificate of Analysis in Call On Demand Order Entry (Fuel Dispatch) allows you to verify specifications for the product requested by the customer and delivered by the shipper. Prior to creating the certificate, you identify these specifications as company tank attributes in Information Services. Tank attributes identify the chemical makeup of the product held in a company’s individual tank.
The certificate shows the applicable shipper and consignee tank attributes from their Company Tank Setup window in Inventory Services. The customer (consignee) provides specifications for the tank receiving the product and the shipper provides specifications for the tank providing the product.
If authorized by your company, you can make modifications to the Certificate of Analysis. If you do not have the authorization to make changes, you can view all the information in the certificate.
|
Verifying the Certificate of Analysis license is turned on
To use the Certificate of Analysis feature, you must apply the CERTIFICATEOFANALYSIS license to your database.
You can verify that the license is applied from within Fuel Dispatch and Inventory Services.
-
Go to Help > About.
The About window opens. -
Click More.
-
In the window that opens, look for CERTIFICATEOFANALYSIS in the Name column.

Note: If it is not listed, contact your Support Team.
-
If the Value column is set to Y, the license has been applied.
-
Click Close in both windows.
Working with tank attributes
Tank attributes identify the chemical makeup of a product in a company’s tank. The Tank Attribute Template window allows you to compile a list of tank attributes for a company. The template should show a comprehensive list of attributes that apply to a company’s tanks. You can choose to apply one, many, or all attributes from the list to any of a company’s individual tanks.
The template’s tank attributes show in the Tank Setup window in Inventory Services and in the Certificate of Analysis Creation window in Call On Demand Order Entry. If your company permits, you can modify tank attribute values with the proper security permissions. Your company provides the authorization for you to make changes in the Certificate of Analysis Creation window based on your user group assignment in System Administration. If you are not authorized to make a change, the value remains unchanged when you select it.
Creating a Tank Attribute Template
The Certificate of Analysis is based on the Tank Attribute Template. You add tank attributes to the template to identify a product’s chemical makeup. The tank attributes can apply to more than one product.
To create a tank attribute template:
-
In Inventory Services, go to Maintenance > Tank Attribute Setup.
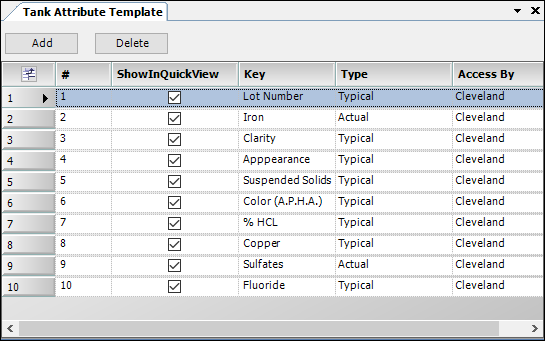
The Tank Attribute Template window opens. -
Click Add.
A tank attribute row is added to the grid. The Enter Value icon indicates that you must enter information in the row’s fields to save the attribute.
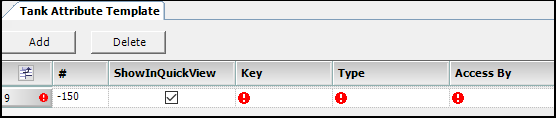
-
Enter tank attributes in the required fields.
Required field: *
Read-only field: §Field Definition # §
The system enters an attribute item number automatically when you save.
ShowInQuickView
Select this checkbox to have the attributes show in the ShipperTankID field’s drop-down list. The field is in Call On Demand Order Entry’s Freight grid.

Key *
Enter the attribute’s description.
Type *
Select an attribute type. Options are:
-
Actual
Tank values that remain constant for approximately 60-90 days and used until a new test shows updated values -
Typical
Tank values that need updating on a regular (daily) basis with each new LOT tested from the tank
Access By
Select a user group authorized to access tank attribute information.
Your company specifies the options available in this field.
-
-
When you are done, click Save.
Note: To remove an attribute, select the row and click Delete.
Setting up a company’s tank attributes
After you create a Tank Attribute Template, you use the Company Tank Setup window to specify a tank’s attribute values. This process allows you to enter the statistical data for the consignee tank (product ordered) and the shipper tank (product delivered).
|
The Certificate of Analysis is a licensed feature. The license adds two sections to the Company Tank Setup window’s Tanks tab:
|
To set up a company’s tank attributes:
-
In Inventory Services, go to Maintenance > Company Tank Setup.
The Company Tank Setup window opens. -
In the Company field, enter the company’s ID and press ENTER.
-
In the Tanks tab, select a tank row.
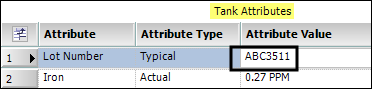
The Tank Attributes section shows attributes listed in the Tank Attribute Template. -
In the Tanks Attributes section, enter values in the Attribute Value fields as needed.
Read-only field: §
Field Definition Attribute §
Attribute’s description
The system shows the value entered in the Tank Attribute Template’s Key field.
Attribute Type §
Attribute’s type
The system shows the value entered in the Tank Attribute Template’s Type field.
Options are:
-
Actual
Tank values that remain constant for approximately 60-90 days and used until a new test shows updated values -
Typical
Tank values that need updated on a regular (daily) basis with each new LOT tested from the tank
Attribute Value
Enter values to identify the chemical makeup of the product in a company’s tank. You can enter text and numbers in this free-form text field.
Note: The tank attributes that display in the Tank Attributes section may apply to more than one product. You do not need to enter a value for each attribute listed, only those that pertain to a specific product in a tank.
-
-
To enter tank attribute values for other tanks, repeat Steps 3 - 4.
-
When you are done, click Save.
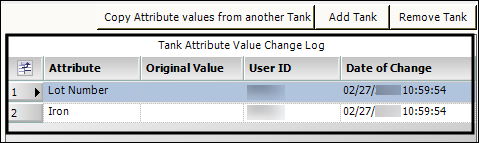
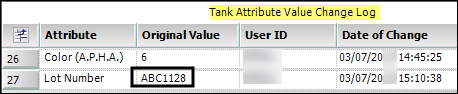
Changing tank attribute values
When you modify a tank attribute and save, the Tank Attribute Value Change Log identifies information about your change, including the date it occurred. Changes made to the Tank Attribute Template update automatically in the Company Tank Setup window. If your company permits, you can modify template values with the proper security permissions. Your company provides the authorization for you to make changes in the Certificate of Analysis Creation window based on your user group assignment in System Administration. If you are not authorized to make a change, the value remains unchanged when you select it.
To change tank attribute values:
-
In Inventory Services, go to Maintenance > Company Tank Setup.
The Company Tank Setup window opens. -
In the Company field, enter the company’s ID and press ENTER.
-
In the Tanks tab, select a tank row.
-
In the Tank Attributes section, make changes in the Attribute Value fields as needed and click Save.
The Tanks tab shows:
-
The new value in the Tank Attributes section
-
A record of the change in the Tank Attribute Value Change Log section
The log identifies the original value that was changed.
-
Copying tank attribute values from another tank
The Company Tank Setup window allows you to copy tank attributes from one company to another. You can choose to copy all or individual tank attributes.
To copy tank attributes:
-
Go to Maintenance > Company Tank Setup.
The Company Tank Setup window opens. -
In the Company field, enter the ID of the company to receive attribute values from another company.
-
On the Tanks tab, click Copy Attribute values from another Tank.
The Copy Tank Attribute Values window opens. -
In the Company field, enter the ID of the company whose tank attributes you want to copy and press ENTER.
The window shows the company’s tank rows, copy commands, and Tank Attributes section.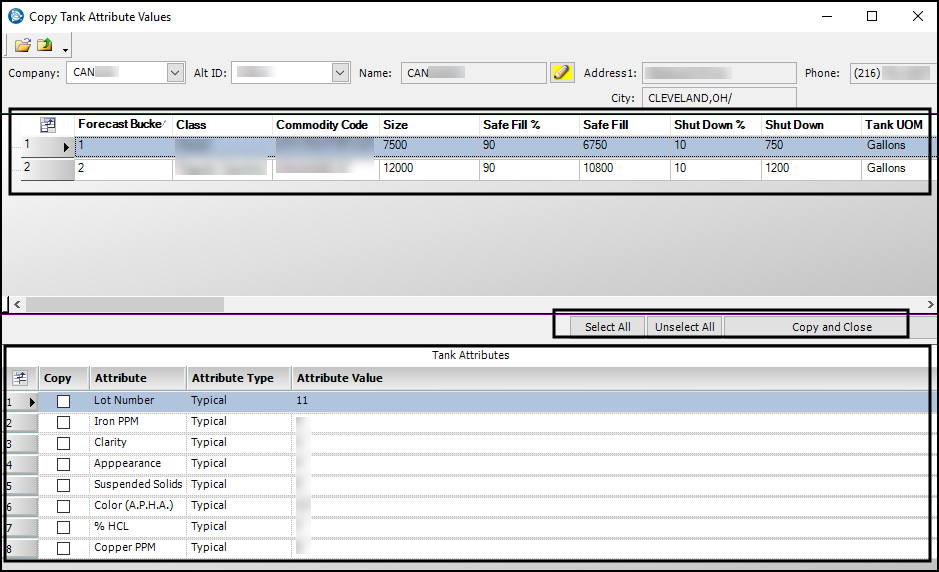
-
Select the tank row whose attributes you want to copy.
-
To copy attributes, do one of the following:
-
In the Copy column, select individual checkboxes for the attributes you want to copy.
-
Click Select All to copy all attributes.
-
-
Click Copy and Close.
The system:-
Closes the Copy Tank Attribute Values window
-
Copies the selected attributes to the Tank Setup window
-
-
Click Save.
The system identifies the copied attributes in the Tank Attribute Value Change Log section.