Adjusting sales anomalies
The Forecaster operates under the assumption that a store’s sales of a given commodity are consistent on each weekday, from week to week. Sales from day to day within the week can vary, but these daily trends are also assumed consistent, from week to week.
At different times during the year, a store can experience significant increased or decreased demand. Typically, these anomalies occur around holidays, special events, extended store or highway maintenance, periods of tourism, etc. A Forecaster sales model cannot predict sales for these periods using the usual sales model.
To accommodate these fluctuations in demand, you can adjust the Forecaster for a store for a set period. At the end of the adjustment period, forecasts return to normal.
This adjustment is set up in the Tank Forecast Adjustment window. To access the window, go to Maintenance > Adjust Tank Forecast.
Understanding the Tank Forecast Adjustment window
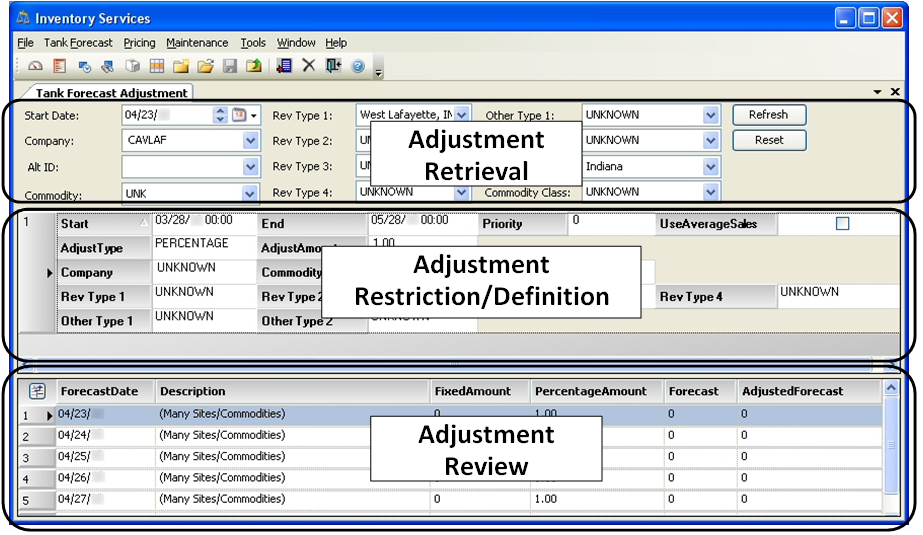
To access the Tank Forecast Adjustment window, go to Maintenance > Adjust Tank Forecast. The window consists of three sections.
-
Adjustment Retrieval
Enter a starting date, store ID, commodity ID, and other restrictions, and then retrieve existing Forecaster adjustments beginning with that date. These adjustments are displayed in the Adjustment Review section. -
Adjustment Restriction/ Definition
Allows you to define new Forecaster adjustments, by setting:-
Type and amount of the adjustment
Adjustments can be a fixed amount or a percentage. -
Start and end date
-
Other restrictions that filter the stores affected by the adjustment
For example, you can set and combine restrictions such that forecasts are applied to:
-
One of all commodities for a single store
-
All stores selling a certain commodity or class of commodities
-
A single store or group of stores that share a given revenue type
-
-
-
Adjustment Review
Displays existing adjustments for a store and commodity, as defined in the Adjustment Retrieval section, for review.
Adjusting a forecast
Forecaster adjustments are set up in the Tank Forecast Adjustment window’s Adjustment Restriction/Definition section. You can insert multiple records in this section, each record defining a different store, commodity, etc., and save them all at the same time.
To record an adjustment, follow these steps.
-
Go to Maintenance > Tank Adjustment.
The Adjust Tank Forecast window opens. -
Click Refresh.
Note: If you need to remove existing adjustment records, see Resetting the Adjustment Restriction/Definition section. -
Click
 Add.
Add.
A blank row is added to the Adjustment Restriction/Definition section.Note: If you want to make multiple adjustments, repeat this step as needed, and then perform the remaining steps in each record you have added.
-
Make entries in these fields:
Start
Set the start of the date range for applying the adjustment.
End
Set the end of the date range for applying the adjustment.
AdjustType
Set the adjustment method.
The options are:
-
Fixed
Adjustment will be applied as a set volume. -
Percentage
Adjustment will be applied as a percentage of sales.
AdjustAmount
Enter the amount of the adjustment.
-
If you selected Fixed as the method, enter the volume.
-
If you selected Percentage as the method, enter the percentage.
UseAverageSales
Select the checkbox to exclude the sales adjustment you are making from future sales model updates.
Normally, sales model updates are based on the last X weeks of sales history. When the UseAverageSales checkbox is selected, the forecaster updates the sales model based on sales that should have occurred, rather than sales resulting from the manual adjustment.
-
-
Set restrictions to filter the stores and commodities that will be affected by this Forecaster adjustment. Make entries in the following fields as needed.
Company
If the adjustment is for a single store, select the ID of the affected store.
CommodityClass
Select the affected commodity class.
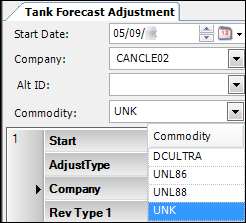
Commodity
Select the ID code that identifies the affected commodity.
Note: You can check which commodities a store carries in the Adjustment Retrieval section.
-
Select the store’s ID in the Company field and press TAB.
-
Click in the Commodity field to see the store’s commodities.
RevType1-4
Select revenue type options as needed.
Note: Your company defines these options using the RevType1-4 labels.
OtherType1-2
Select other type options as needed.
Note: Your company defines these options using the OtherType1 and OtherType2 labels.
Priority
Applicable only when you record multiple adjustments for a store, a commodity, or date range
Enter a whole number to identify the importance of this adjustment relative to other adjustments. A priority of 1 is the highest priority you can assign.
For example, you might want to apply an adjustment for all stores having a certain commodity class, but add a second adjustment within the same date range for some of those stores. You can define both types of adjustments and set the priority of one adjustment relative to the other.
-
-
Click
 Save.
Save.
A request for confirmation appears.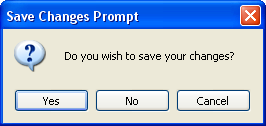
-
Click Yes to confirm the save.
The Adjustment Review grid displays the daily updated commodity forecasts beginning with the specified Start date. See Reviewing existing Forecaster adjustments for details.
Reviewing existing Forecaster adjustments
You can view a store’s existing Forecaster adjustments in the Adjustment Review section of the Tank Forecast Adjustment window.
To retrieve and review adjustments, follow these steps.
-
Go to Maintenance > Tank Adjustment.
The Tank Forecast Adjustment window opens. -
Make entries in the Adjustment Retrieval section to retrieve the needed adjustment records.
Note: If you have been working in the window and now want to retrieve existing records, you can clear all fields in the Adjustment Retrieval section, by clicking Reset.
Start Date
Enter the start of the date range for reviewing existing Forecaster adjustments.
Company
Enter the store’s unique ID, as recorded in its company’s profile.
Note: If an alternate ID code has been recorded for the store, it appears in the Alt ID field.
Commodity
Select the commodity’s unique ID.
CommodityClass
Select the commodity class
Classes are used to group commodities.
RevType1-4
Select revenue type options as needed.
Note: Your company defines these options using the RevType1-4 labels.
OtherType1-2
Select other type options as needed.
Note: Your company defines these options using the OtherType1-2 labels.
State
Select the state where the store is located.
-
Click Refresh.
-
Forecaster adjustments appear in the Adjustment Review grid. Fields are read-only.
-
The FixedAmount and PercentageAmount columns display the type and amount of the adjustment.
-
If the adjustment applies to a single store and commodity:
-
The Description fields display the store and commodity ID.
-
The Forecast column displays the pre-adjustment forecast volume.
-
The AdjustedForecast column displays the adjusted forecast volume.

-
-
If the adjustment applies to multiple stores or commodities:
-
The Description fields display (Many Sites/Commodities).
-
The Forecast and AdjustedForecast columns display 0 (zero).

-
-
Resetting the Adjustment Restriction/Definition section
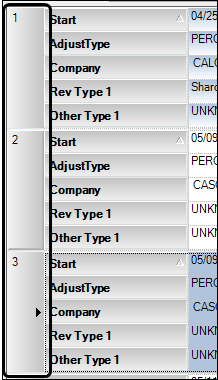
When you access the Tank Forecast Adjustment window and click Refresh, the Adjustment Restriction/Definition section displays the records for the last adjustment(s) you saved. To eliminate the need to scroll through all of these records, you can remove them.
| Removing records from the Adjustment Restriction/Definition section affects only the information display. The actual adjustments are not removed from the system. |
To remove some or all of these records, follow these steps.
-
Select the record(s) you want to remove.
-
To remove a single record, click anywhere in its row.
-
To remove multiple records, click their row numbers.
Hold down SHIFT to select adjacent rows or CTRL to select non-adjacent rows.
-
-
Click
 Delete Item.
A confirmation message appears, identifying the number of rows you have selected. -
Click Yes in the message to complete the deletion. Click No to cancel it.
-
Click
Save.