Set up non-real-time fuel vendors
Data for a select number of non-real-time fuel vendors is included with the TruckMate installation. These vendors are marked inactive by default. To set up Card Management for use with your fuel vendor, you must find the vendor and activate it. If the vendor is not in the system, you can add it.
Add a non-real-time fuel vendor
-
In Card Management, select Go > Setup > Vendors.
-
Select
 Insert. The Vendors tab reopens with blank fields.
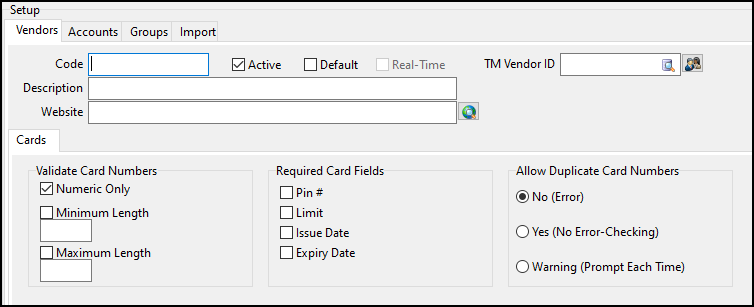
-
In the Code field, enter a unique value that will serve as the code for your fuel vendor.
-
Make entries in these fields:
-
Description: Enter a description of the fuel vendor.
-
Website Enter the URL for the fuel vendor’s website.
-
Activate a vendor
-
On the Setup > Vendors tab, find your fuel vendor:
-
Select
 Find. The Select Card Vendor window opens.
 -
Select your fuel vendor from the list.
-
Select OK. The Card Management vendor header displays your vendor’s information.
-
-
Select the Active checkbox.
-
If you want to make this vendor the default for your company, select the Default checkbox.
-
In the TM Vendor ID field, enter a TruckMate vendor ID to associate with the fuel vendor.
You can select
 Pick List to search for and select a TruckMate vendor ID. Select
  Vendor Profile to view the vendor’s profile.
 -
In the Validate Card Numbers section, set the validation rules that the system will use when a new fuel card is created:
Field Definition Numeric Only
When selected, a fuel card number must contain only numeric values.
Minimum Length
When selected, a fuel card number must have a minimum length. Enter the minimum length in the field provided.
Maximum Length
When selected, a fuel card number must have a maximum length. Type the maximum length in the field provided.
-
In the Required Card Fields section, choose the type of information that the system will require when a new fuel card is created:
Field Definition Pin #
When selected, the fuel card must have a Personal Identification Number (PIN) assigned to it.
Limit
When selected, the fuel card must have a dollar limit.
Issue Date
When selected, the fuel card must have an issue date.
Expiry Date
When selected, the fuel card must have an expiration date.
-
In the Allow Duplicate Card Numbers section, set whether the system will allow duplicate fuel cards for this vendor.
-
No (Error)
If the fuel card is a duplicate, a warning appears indicating that duplicates are not allowed. -
Yes (No Error-Checking)
The system will allow duplicate fuel cards without providing a warning. -
Warning (Prompt Each Time)
If the fuel card is a duplicate, a warning appears. The creator of the card can then choose to continue with creating a duplicate or cancel the process.
-
-
Select
 Post.
Post.
Create vendor accounts
After you activate a vendor, you can make an account for that vendor. Each card must be assigned to an account.
-
On the Setup > Accounts tab, select
Insert. -
Select
Pick List next to the Vendor field to search for and select an active fuel vendor. -
In the Code field, enter a value to use as the account code.
-
Enter a description of the account in the Description field.
-
Select the Active checkbox to make the account available for use in the system.
-
Select
Post.