Set up real-time fuel vendors
In Card Management, you can set up real-time updates on purchases made by the cardholder, down to the dollar amount and location of the purchase. Card Management supports these real-time fuel vendors:
-
Comdata
-
FleetOne
Subsidiary of WEX, Inc. -
QuikQ
-
T-Chek
T-Chek was acquired by EFS in 2012. EFS is a subsidiary of WEX. -
TCH
Merged with EFS in 2011. EFS is a subsidiary of WEX.
| While several of these companies have merged, they have their own tabs in TruckMate. |
To set up a real-time fuel vendor, you will need to:
-
Contact your fuel vendor.
-
Reach out to Trimble Transportation Support.
-
Work with Professional Services to configure the settings that match your business needs.
-
Import card data from the fuel vendor.
Gather information from your fuel vendor
To start the setup process, contact your fuel vendor. Let them know you need to set up a TruckMate integration. They will provide:
-
Your account information
-
Details to connect TruckMate to their servers
-
Fuel card information (such as a card listing file)
Contact Support
After you have details from your fuel vendor, contact Trimble Transportation Support. If you do not have an account, you can create one by selecting Sign Up.
Support will connect you with Professional Services.
Onboard with Professional Services
During onboarding, a member of the Professional Services team will walk you through:
-
Setting up your workstation to communicate with your fuel vendor
-
Entering your fuel vendor’s server details in TruckMate
-
Configuring your Card Management settings to fit your business needs
-
Importing fuel cards from your vendor
-
Training on how to use real-time fuel cards in TruckMate
| If you are an on-premises TruckMate user, you can change the real-time vendor settings later. |
Import card data
During onboarding, Professional Services will help you with the initial card import process. However, if you add more cards to your account with your fuel vendor, you can import them into TruckMate yourself using this process.
If your fuel vendor is Comdata, QuikQ, T-Chek, or TCH, you cannot create fuel cards manually. You must import card data provided to you by your vendor. If your fuel vendor is Fleet One, you can create new cards manually after the initial import process.
-
If your fuel vendor is Comdata, Fleet One, or T-Chek, contact your fuel vendor to get an updated card listing file.
-
In Card Management, go to Setup > Import.

-
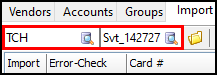
Enter the vendor in the first field and an account ID in the second field:
-
Select the checkboxes that apply:
-
Select the Load only new cards checkbox if you have previously imported card data from a specific file, and you want to import data using a newer version for that file. When you load the file, the grid will display only new card data records.
-
Select the Real-time update checkbox if you want the card’s properties to be updated each time a user interacts with the card in Card Management.
-
Select the Match By Power Unit checkbox if you want to only import cards with power units that match power units in your TruckMate database.
Note: If you do not select this option, the system will only import cards with drivers that match drivers in the database.
-
-
Select
 Load a card listing file supplied by the vendor. One of the following happens:
-
If your vendor is Comdata, Fleet One, or T-Chek, File Explorer opens. You can then select the card listing file provided by your fuel vendor.
-
If your vendor is QuikQ, the system automatically attempts to import cards for the account.
-
If your vendor is TCH, a calendar control opens. Select a date and time to import cards that were created in that date and time range.
-
-
Select OK. If the import was successful, the Import grid populates with card data.
-
After the card data appears on the grid, you can use these toolbar options to make changes:
Action Toolbar icon Keyboard shortcut Description Clear all rows

CTRL+ALT+N
Clears all data on the grid.
Check all error-free rows for import

CTRL+A
Validates each record and selects all error-free detail rows on the grid.
If a record contains an error, a description of the error appears in the Error-Check column.
Uncheck all rows

CTRL+N
Clears all the selected detail rows on the grid.
Re-test (error-check) each line

CTRL+R
Retests all records against any new information entered elsewhere on the Setup tab.
If the record does not contain any errors, the detail row is selected.
If a record contains an error, a description of the error appears in the Error-Check column.
Assign TruckMate driver ID

CTRL+D
Opens a list of drivers you can match with the cardholder ID for a selected detail row.
Assign TruckMate employee ID

CTRL+E
Opens a list of employee IDs you can match with the cardholder ID for a selected detail row.
Assign TruckMate power unit ID

n/a
Opens a list of power unit IDs you can match with the cardholder ID for a selected detail row.
Overwrite name/license in TruckMate

CTRL+O
For a selected detail row, overwrites the value in the TruckMate ID column with the value in the Holder ID column. Applies to driver and employee records only.
-
When you are ready to import the card data into your system, select
 Import checked rows into TruckMate. Card data in the selected detail rows is imported.
After cards have been imported, you can configure options for individual cards.