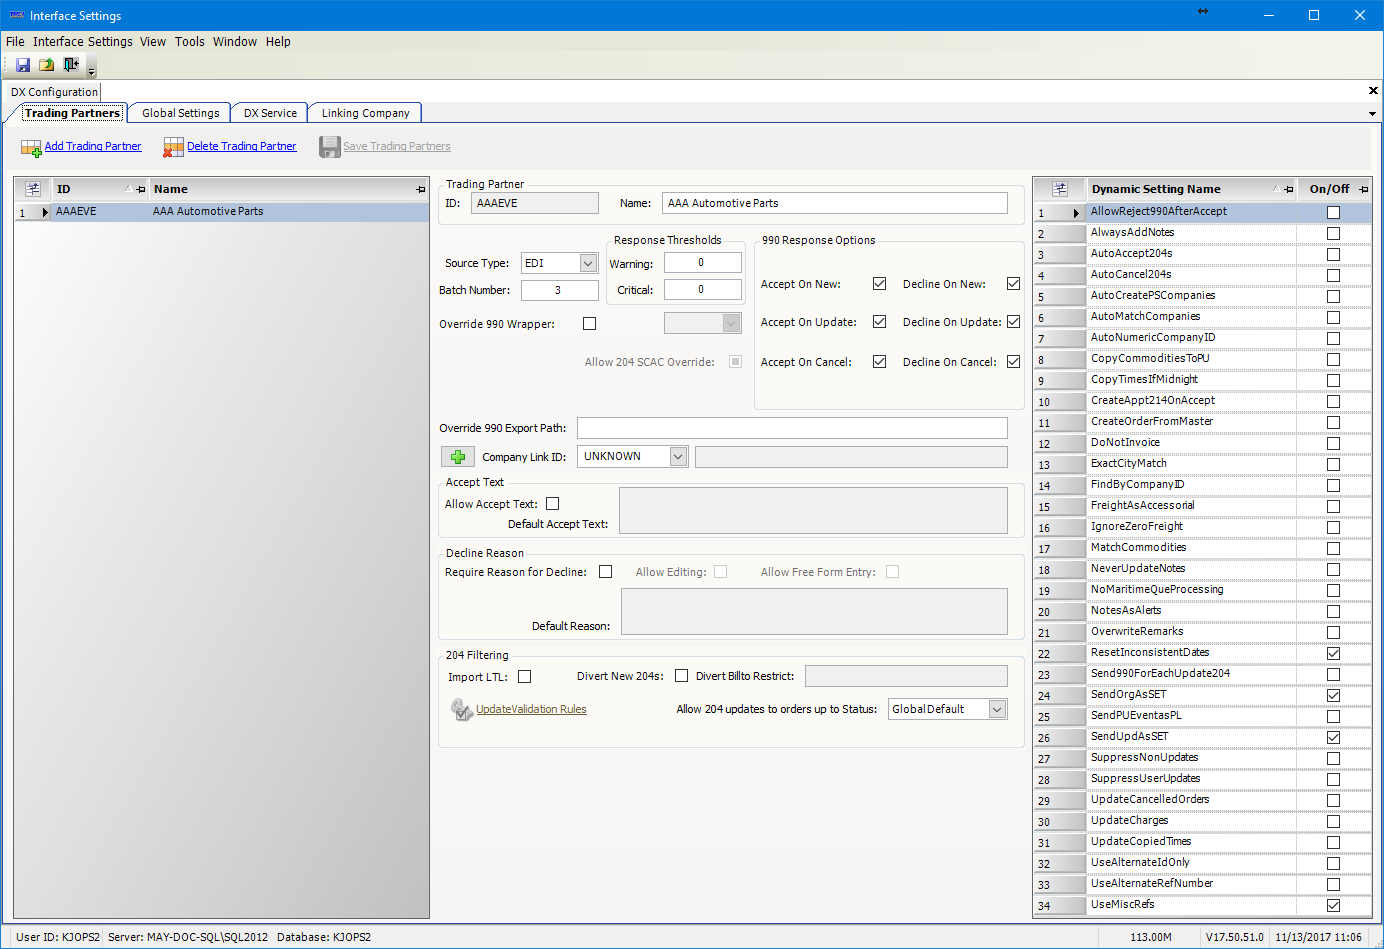
Creating a trading partner for inbound 204s and outbound 990s
In the DX Configuration window, you use the Trading Partners tab to create and set up trading partners. You also link each trading partner to its company profile in your TMWSuite database.
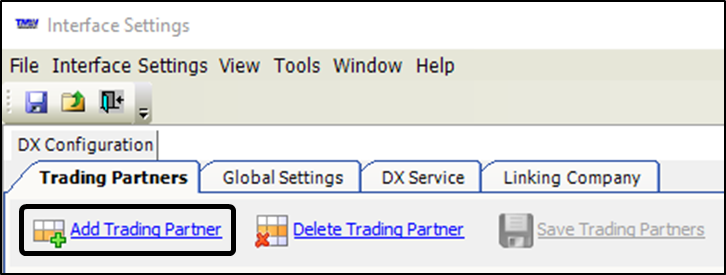
To create a new trading partner, follow these steps.
-
If needed, select the Trading Partners tab.
-
Click Add Trading Partner.
-
In the Trading Partner section, enter the following information for the new trading partner.
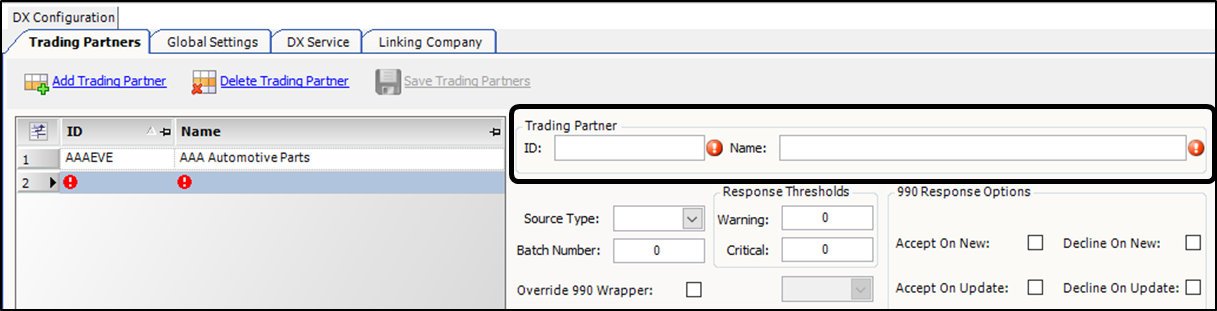 Field definitions
Required field: *
Field Definition ID *
Enter the trading partner’s sender ID.
Notes:
-
The entry must match the value specified for the trading partner (02 record) in the 204 flat file.
-
If the trading partner requires 990s, this ID will be placed on them.
The field allows a maximum of 14 alphanumeric characters. If the ID is greater than 14 characters, you must use an alias value on which to match.
Name *
Enter the trading partner’s name.
-
-
Click Apply to save the trading partner record.
Specifying a trading partner’s 204 and 990 settings
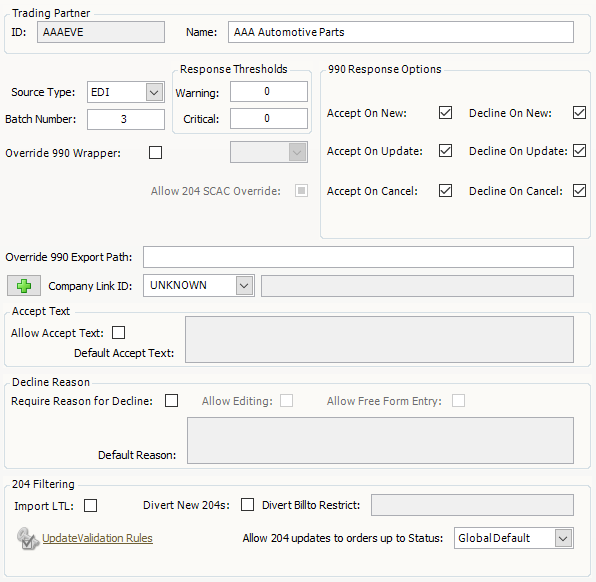
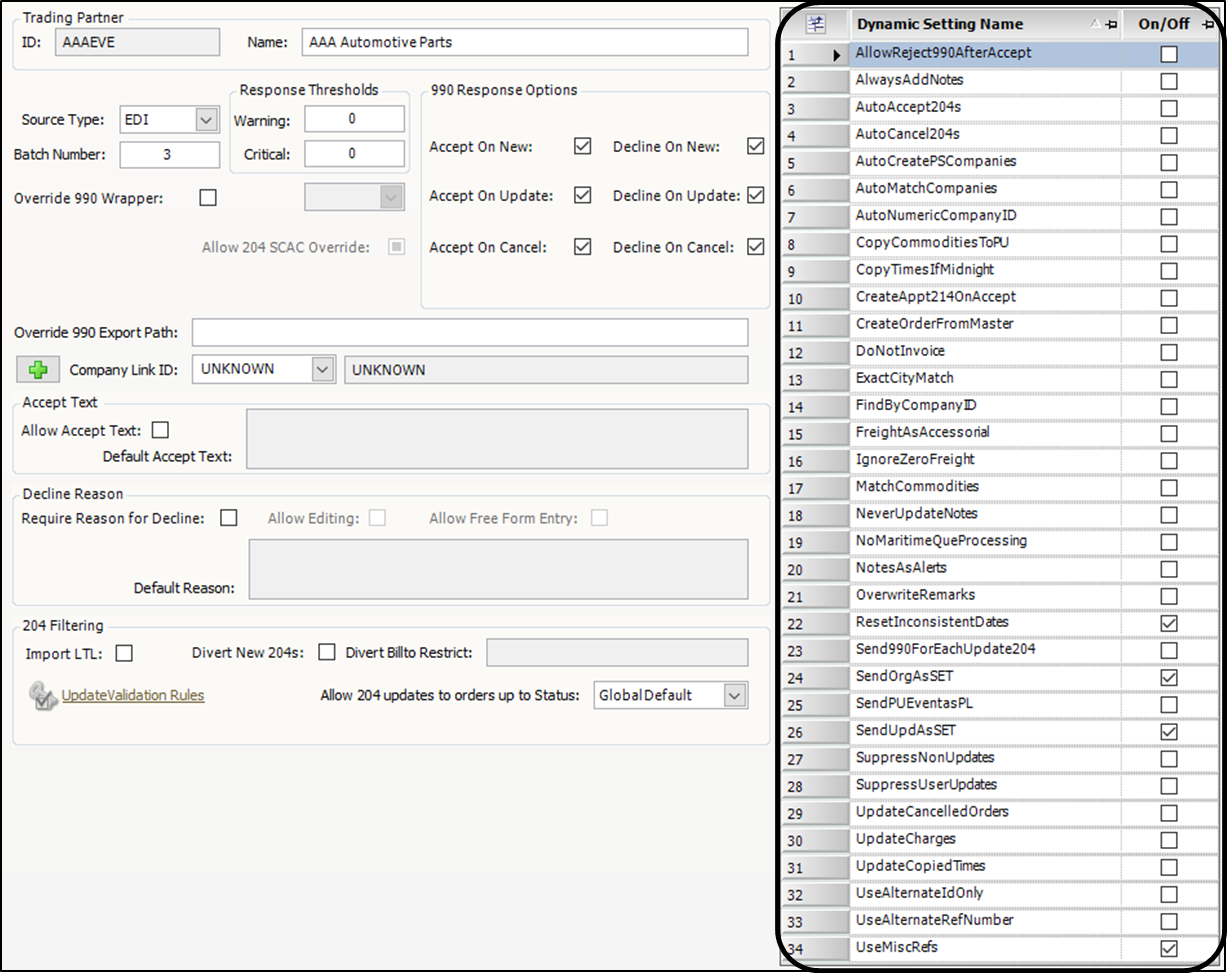
The DX Configuration window’s Trading Partners tab has three panes. The center and right panes contain fields used to set up the trading partner’s 204s and 990s
-
Center pane
-
Right pane
Note: The number of settings may change with each DX release. After upgrading DX, your system will automatically update the list when you log into Interface Settings.
To specify settings for a trading partner, follow these steps.
-
In the Trading Partners list, select a trading partner.
The ID and Name fields display the trading partner’s company ID and company name.
-
Complete the information for each field in the center pane.
Center pane field definitionsRequired field: *
Field Definition Source Type *
Select the EDI option.
Batch Number *
If you will be tracking exported 990 transactions for the trading partner, enter an initial control number value.
Notes: . This field is required for Kleinschmidt. . The default value is 0 (zero). The control number will increase by one for each 990 generated for the trading partner. . If you are transitioning from another system and your trading partner does not allow for duplicate batch 990s, you can adjust the batch number here.
Override 990 Wrapper
Select the Wrapper check box to choose a wrapper to replace the Trading Partner’s default wrapper. When the check box is selected, a drop-down list appears.
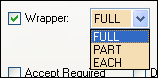
Select one of the following wrapper options.
-
FULL
Select to batch all records into one file, sorted by trading partner.Note: This setting is required for Kleinschmidt.
-
PART
Select for VANS other than Kleinschmidt. -
EACH
Select to send one file for each transaction.
Allow 204 SCAC Override
This is a visual indicator of whether the SCAC override from inbound 204 option is available.
990 Response Options
Accept On New
Select the check box to generate a 990 response for each new order that has been accepted.
Accept On Update
Select the check box to generate a 990 response for each updated order.
Accept on Cancel
Select the check box to generate a 990 response for each cancelled order.
Decline On New
Select the check box to generate a 990 response for each new order that has been declined.
Decline On Update
Select the check box to generate a 990 response for each updated order that has been declined.
Decline On Cancel
Select the check box to generate a 990 response for each cancelled order that has been declined.
Override 990 Export Path (overrides Global 990 Path)
Enter the location where the DX 990 service will place 990 files.
Note: This entry overrides the 990 directory specified in the 990 Export File Path field in the DX Service tab.
Company Link ID
Allows you to link to a trading partner by filling in the applicable company ID or clicking
 Create New Company to open the Company Profile window.
Trading partners are not automatically linked to a Bill To company when their 204 flat files are imported into TMWSuite. If you are setting up your orders to be identified by the trading partner, you can link a Bill To company to the trading partner.
You must link the trading partner to a TMWSuite Bill To company profile to:
-
Have the trading partner pull as the Order By company on an order
Note: The OrderByTradingPartner check box in the Global Settings tab must also be selected.
-
Populate the store location codes on the Location #s tab in the EDI Codes Maintenance window
Accept Text
Allow Accept Text
Select this check box if you want information included on a 990 to indicate that a load is accepted.
Default Accept Text
Enter the default text you want included in the 990 reply
Decline Reason
Require Reason for Decline
Select the check box to require the trading partner to supply a reason for each declined order.
Allow Editing
Select the check box to permit the default reason to be modified, or allow a reason to be selected from a drop-down list.
Note: Decline reasons are created in the EDIDeclineReason label.
Allow Free Form Entry
Select the check box to enter a free-form description of the decline reason.
Default Reason
Enter the default decline reason for the trading partner.
204 Filtering
Import LTL
This is a custom setting.
Divert New 204s
This is a custom setting.
Divert Billto Restrict
This is a custom setting.
UpdateValidation
RulesThis is a custom setting.
Allow 204 updates
to orders up to
StatusYou can make changes up until the order is in the identified status. Options are:
-
Global Default
Note: When you use this option, the Global Settings dictate the status after which you can no longer make changes. -
Dispatched
-
Started
-
Completed
-
-
Make entries for the settings in the right pane.
To apply a setting, select its check box.Notes:
-
The number of settings may change with each DX release. After upgrading DX, your system will automatically update the list when you log into Interface Settings.
-
To display a description of a setting, place the cursor over the setting name.

Right pane field definitionsField Definition AllowReject990After
AcceptAllows you to notify the trading partner that you are canceling an order after you accepted it.
AlwaysAddNotes
Allow notes to be added to user updates and canceled orders.
AutoAccept204s
Set up the trading partner to:
-
Import and accept 204s in TMWSuite.
-
Export accepted 990s without any user interaction.
Notes:
-
If you select this option, you must also select the Auto204 setting in the Global Settings tab.
-
Do not select AutoAccept204s if:
-
You must be able to reject 204 flat files.
-
The 204 requires additional information for 990s.
-
AutoCancel204s
Automatically cancel orders on receipt of a cancelation 204, unless the status for the load is Started or Dispatched.
Note: Orders with a status of Started or Dispatched cannot be automatically canceled on receipt of a cancelation 204. These orders must be canceled manually.
Create a new company profile for each company that, when imported, does not have a match.
Warning: Using this feature may create multiple company profiles for the same company, depending on the address and designation listed in the EDI file.
AutoMatchCompanies
When copying an order, automatically match company information to the companies on the copied order.
AutoNumericCompany
IDUse a system-generated numeric sequencing for new companies, rather than the default six-character company ID assignment.
Notes:
-
The default starting number is 10000.
-
Each new company ID created will increase by one digit.
-
This setting is used with the
[Misc]CompanyIDFormat=Numeric6Plus2INI setting.
CopyCommoditiesTo
PUFor 204 orders, copy freight details from the delivery stop lines to the pickup stop lines. This will allow a 214 (Shipment Status Report) to include the correct freight detail on pickup and delivery stops.
Note: Turn on this setting only if the following are true:
-
The 204 flat file has freight detail information only for deliveries.
-
The trading partner requires freight detail information for pickups to be included in a 214 flat file.
CopyTimesIfMidnight
When copying an order, use the times from the copied order if the time is midnight.
CreateAppt214On
AcceptWhen you click Accept on an order, the system sends an Appt 214 to confirm the time listed
CreateOrderFrom
MasterCopy a master order instead of creating a new order.
DoNotInvoice
Import 204s with an invoice status of Do Not Invoice.
ExactCityMatch
When searching for a matching TMWSuite company ID, use the city name exactly as it is spelled in the 204 file on the order.
Note: Activating this setting turns off city aliasing. City aliasing is the logic or algorithm performed by LTSL 2 to find a matching city in the TMWSuite database by using alternate spellings or abbreviations of common words used in city names. For example, for the word "Saint" in Saint Louis, the 204 import will try Saint, St., Snt, St, and so on.
FindByCompanyID
If the city name is blank, find company matches by using the company name as the company ID.
FreightAsAccessorial
Activate the ability to import invoice details from cargo records.
IgnoreZeroFreight
Do not import freight details when the quantity is zero (0).
MatchCommodities
Enable user-defined matching of commodity descriptions to commodity codes.
NeverUpdateNotes
For update 204s, add new note records instead of updating existing notes.
NoMaritimeQue
ProcessingThis is a custom setting.
NotesAsAlerts
Save notes as alerts.
OverwriteRemarks
Overwrite order remarks on update 204s.
ResetInconsistentDates
Review the scheduled, earliest, and latest dates on loads from the trading partner and place them in chronological order.
Note: It is recommended that you select this option.
Send990ForEach
Update204Send a 990 back to the trading partner for the first 204 and each subsequent 204 update submitted. Generally, this setting affects the system only when multiple 204s have been received before the user processes them on the EDI tab. If this check box is cleared, the system will only send a 990 response for the first 204 and the last 204 update.
By default, when an original 204 is imported and the order SID (shipment ID) exists in TMWSuite, the system will not automatically update the order.
The EDI Order State field on the Planning Worksheet’s EDI grid shows the load tender status as User Update Pending. When selected, the system will treat the original 204 as an update 204 and automatically apply the changes to the order.
SendPUEventasPL
If every order from the trading partner involves hooking a preloaded trailer, the system will set the first event on every order in TMWSuite as an HPL event, rather than an LLD event.
SendUpdAsSET
If an update 204 is received and the original order’s SID cannot be found, the system will create a new order and set the status to Tender Pending.
Note: By default, if an update 204 is received and the original SID cannot be found, the order has the User Update Pending status.
SuppressNonUpdates
If an update 204 is received and the system finds no changes from the original 204, the Planning Worksheet’s EDI grid will not display the load tender.
Note: A 990 response will not be sent for the update.
SuppressUserUpdates
User cannot update order settings.
UpdateCancelledOrders
Allows you to update orders that have been canceled.
UpdateCharges
If total charges are included in the 204, update the total charges.
UpdateCopiedTimes
When copying an order, update stop dates/times from the 204.
UseAlternateIdOnly
If an Alternate ID is included in the company record in the 204 file, match the company’s Alternate ID to an existing company’s Alternate ID (which is listed in the Company Profile) rather than matching by company name.
UseAlternateRef
NumberActivate use of the alternate reference number.
UseMiscRefs
This setting enables using a header-level PO reference to create a trading partner-designated header level reference record to use as a primary reference number. To enable this setting:
-
In the Dynamic Setting Name section of the Trading Partners tab, select UseMiscRefs.
-
In TMW Data Exchange, go to Edit > Edit Setup.
-
Go to File > Settings.
-
In the settingValue column, locate LtslTextPORefID.
-
In the settingDefault column field next to LtslTextPORefID, enter the specified reference type (for example, PO). The system will match this reference type with the PO Misc data record.
When the system receives an order from the configured trading partner that has an order-level PO reference number, the system will write that PO number to an order-level reference of the type specified in the LtslTextPORefID setting.
-
-
Click Save Trading Partners to save your changes.
Creating a new TMWSuite company from the Select Company window
In the Company Profile window, you can create a new TMWSuite company and link it to a trading partner.
-
If needed, select the Trading Partners tab.
-
In the middle of the center pane, click
Create New Company.
The Company Profile window opens.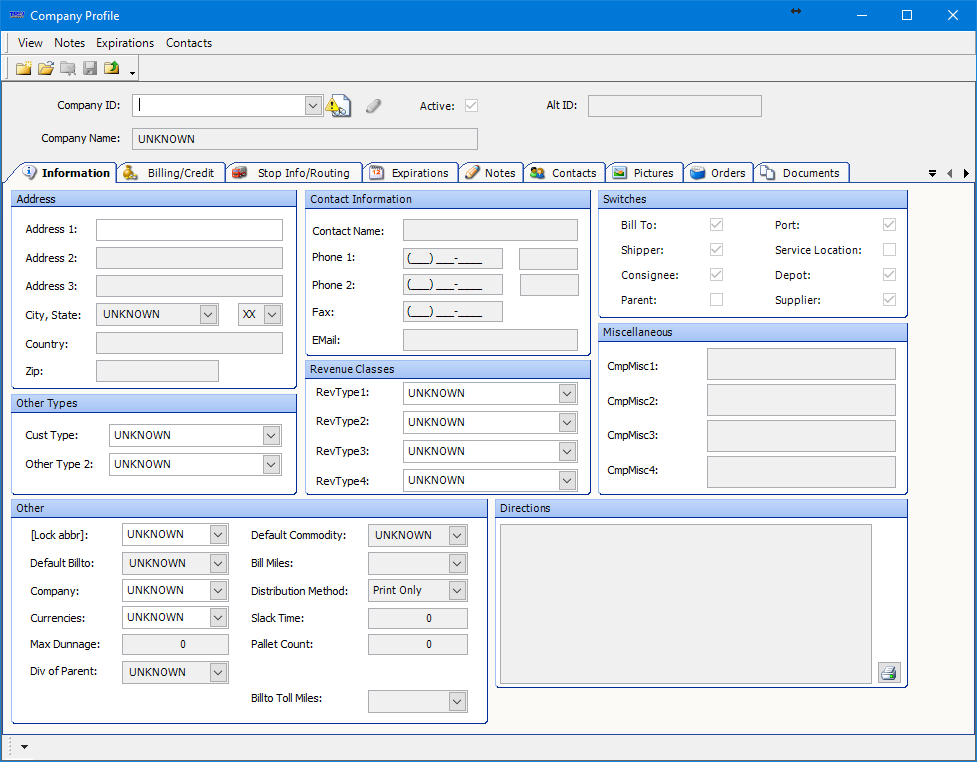
-
Click
 New.
New. -
Complete the following fields to create the company:
Field definitionsField Definition Company ID
Enter the company ID.
Company Name
Enter the company name.
Address 1-3
Enter the company’s street address.
City, State
Enter the city and state for the company address.
Country
Enter the country where the company is located.
Zip
Enter the ZIP Code for the company address.
Note: For more information about completing the information in the Company Profile window, see Company File Maintenance in the File Maintenance online help.
-
To create the company record, click
 Save.
Save. -
Click Save Trading Partners in the DX Configuration window to save your changes to the trading partner.
Editing settings for an existing trading partner
Follow these steps to edit settings for an existing trading partner:
-
Select the trading partner from the Trading Partners list.
-
Update the necessary settings.
-
Click Save Trading Partners to save your changes.
Deleting a trading partner
Follow these steps to delete a trading partner from the Tradin *Partners list.
-
In the Trading Partners list, select the trading partner’s name.
-
Click Delete Trading Partner at the top of the window.
The trading partner is deleted. -
Click Save.
The trading partner is deleted.
Automatically accept 204s
You can use the Auto204 feature to have the system complete these activities on the Planning Worksheet’s EDI tab:
-
Accept all 204s
-
Export 990s for accepted orders
This eliminates the need for a user to perform these tasks.
Setting up trading partners to auto-accept 204s
When setting up the system to automatically accept 204s, you can:
-
Set up each trading partner individually
-
Use a global setting that applies to all your trading partners
-
On the Trading Partners tab, select the trading partner.
-
Select the AutoAccept204s setting in the Dynamic Settings - 204 section.
-
Click Save Trading Partners.

Note: You must select this check box if you want to enable selection of any AutoAccept204s check boxes for any trading partners.
-
On the Global Settings tab, select the Auto204 check box.
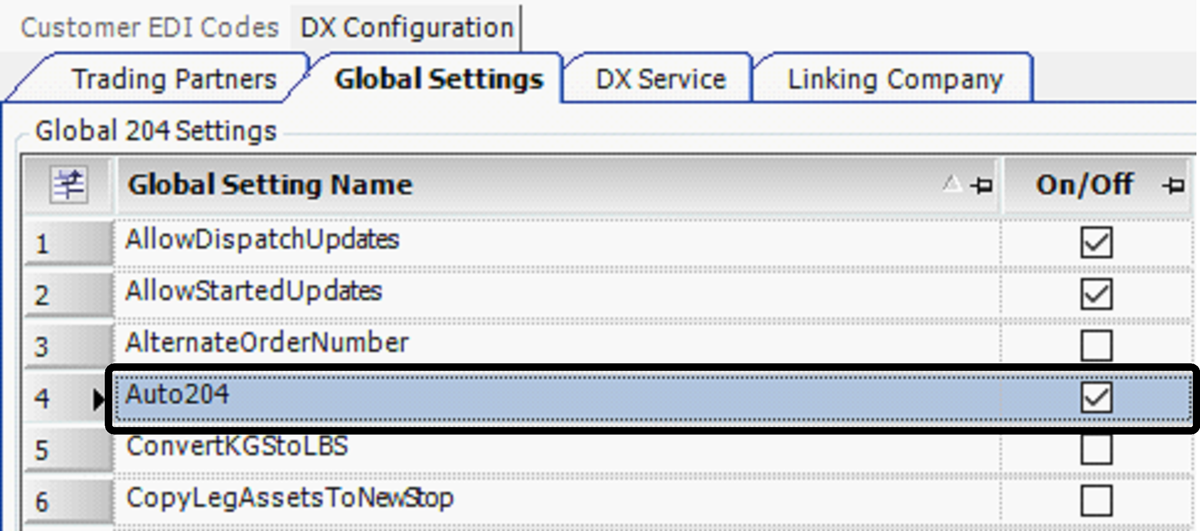
-
Click Save Global Settings.
Processing 204s for auto-acceptance
When Data Exchange processes 204 flat files, it accept the files automatically for trading partners set up for auto acceptance.
These exceptions prevent Data Exchange from auto-accepting a 204, even for a trading partner set up to accept them automatically:
-
A company match is required and the AutoCreatePSCompanies global setting is not activated.
-
An original 204 is received for a SID that already exists and the SendOrgAsSET dynamic setting is not activated.
-
An update 204 is received for a SID that does not exist and the SendOrgAsSET dynamic setting is not activated.
-
An update 204 is received which updates the load tender status to User Update Pending. For details, see Understanding the Planning Worksheet’s EDI grid in the TMW Operations online help.
-
A cancellation 204 is received. TMWSuite orders will not be cancelled automatically unless the AutoCancel204s setting is selected.
When any of these exceptions occur, the load tender will appear on the Planning Worksheet’s EDI tab so that a user may review the load and make a decision.
When Data Exchange automatically marks the load as Accepted, it will generate a 990 response automatically if the trading partner has been set up to require 990s for all accepted 204s.
| When an order is automatically accepted, the dispatcher may review the changes by right-clicking on the order in the Dispatch Trip Folder and selecting View EDI Details. |