Setting up trading partners for outbound 210s and 214s
Each trading partner is set up separately. You use the EDI Codes Maintenance window to set up parameters specific to each company’s EDI 210 and 214 requirements.
| Some clearinghouses charge by the character. To save on expenses, you can turn off outbound information using some 214 settings. |
Recording the starting batch number
On the EDI Codes Maintenance window’s Partner Info tab, you record:
-
The trading partner’s ID code for 210 invoices and 214 status update files
-
Specify the trading partner’s starting batch number
-
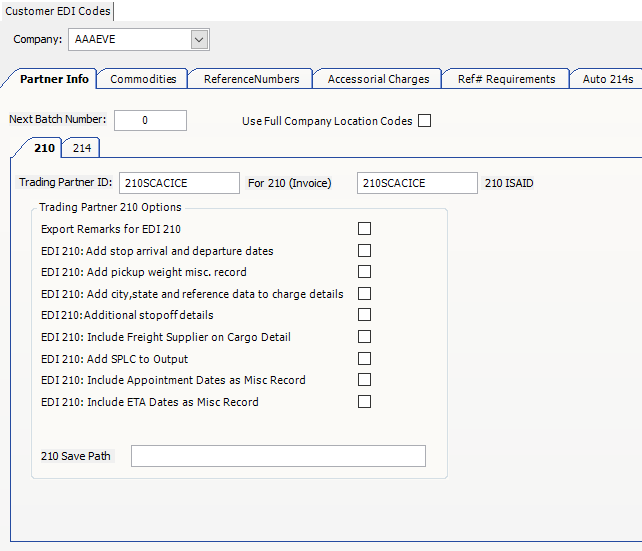
Go to Interface Settings > Customer EDI Codes.
The Customer EDI Codes window opens. -
In the Company field, enter the trading partner’s TMWSuite company ID and press ENTER.
-
In the Next Batch Number field, enter the starting batch number.
Note: The recommended number is 1. You may change this to reflect the next sequential number in your process.
-
Select the Use Full Company Location Codes check box.
-
Click Save.
-
Recording the trading partner ID and 210 requirements
On the Customer EDI Codes window’s Partner Info tab, you can specify the requirements for 210 invoice files. You do this for each trading partner.
-
On the 210 sub tab, enter the trading partner’s ID that will be used when sending 210 invoices. Make the entry in the Trading Partner ID For 210 (Invoice) field.

Note: If you are using ValuEDI services, contact your TMW EDI Support representative to obtain the correct ID.
-
In the 210 ISAID field, overwrite the entry with the sender ID used for 997 documents.
Note: The values in the 210 ISAID and 214 ISAID fields default from the value entered in the Trading Partner ID For 210 (Invoice) field. If you want, enter the trading partner ID used for 997 acknowledgements.
-
Specify the following requirements for 210 invoices:
Requirement Definition Export Remarks for EDI 210
Add the content of a TMWSuite note on the order and add the content to the 210.
Notes:
-
The trading partner must be the Bill To on the order for the note to be included.
-
The limit for EDI note text is 79 characters.
EDI 210: Add stop arrival and departure dates
Select the check box to add the arrival and departure dates/times to the 439 record.
EDI 210: Add pickup weight misc. record
Select the check box to record the total weight of all pickup stops in a 539 record in the EDI 210 flat file.
EDI 210: Add city, state and reference data to charge details
Select the check box to record the following information in the 339 record in the EDI 210 flat file:
-
City and state associated with a stop
-
Reference numbers associated with an invoice detail
EDI 210: Additional stopoff details
Select the check box to include the Address Line 2 for a stop company on the 439 record in the EDI 210 flat file.
EDI 210: Include Freight Supplier on Cargo Detail
Select the check box to add the name of the freight supplier to the 739 record.
EDI 210: Add SPLC to Output
Select the check box to add the Standard Point Location Code (SPLC) in the 239 type records and the 439 type records in the EDI 210 flat file.
Note: SPLC codes identify each location for originating/ receiving freight in North America. Codes are recorded in City File Maintenance.
EDI 210: Include Appointment Dates as Misc Record
Select the check box to record all appointment dates for the trip in the EDI 210 flat file.
EDI 210: Include ETA Dates as Misc Record
Select the check box to record the trip’s ETA dates in the EDI 210 flat file.
210 Save Path
-
Specify the directory to which 210 flat files will be written in the
[EDIfilesave]210datasetting in your TTS50. -
To set a customer-specific export path to write to an alternate directory, follow these steps.
-
Set String1 in the
EDI_ExtractByTPGeneral Info Table setting toY. -
Set String1 in the
EDIWrapGeneral Info Table setting toEACH. -
In the 210 Save Path field for the applicable customer, specify the alternate directory.
Note: If you do not specify a path, the system defaults to the
[EDIfilesave]210datasetting in your TTS50.
-
-
-
Save your entries.
Recording the trading partner ID and 214 requirements
On the Customer EDI Codes window’s Partner Info tab, you can specify the requirements for 214 status update files. You do this for each trading partner.
-
On the 214 sub tab, enter the ID of the trading partner that will be used when sending EDI trip status documentation. Make your entry in the Trading Partner ID for 214 (Trip Status) field.
Note: If you are using ValuEDI services, contact your TMW EDI Support representative to obtain the correct ID.
-
In the 214 ISAID field, overwrite the entry with the sender ID used for 997 documents.
Note: The values in the 210 ISAID and 214 ISAID fields default from the value entered in the Trading Partner ID For 210 (Invoice) field. If you want, enter the trading partner ID used for 997 acknowledgements.
-
Specify the following requirements for 214 trip status documentation:
Requirement Definition Do Not Send 214 if company is both shipper and consignee
Select the check box to prevent Auto-214s from being sent if the shipper and consignee IDs on the order are the same.
Note: When this option is selected, you can still send a manual 214.
Export Notes for EDI 214
Select the check box to add the content of a TMWSuite note on the order and add the content to the 214.
Notes:
-
The trading partner must be the Bill To on the order for the note to be included.
-
By default, the limit for EDI note text is 79 characters.
Minutes Between Location Reports
Enter the number of minutes that should elapse between the location reports that are recorded in the EDI 214 file. The largest gap you can have between location reports is 999 minutes.
EDI 214: Include ACE trip information
Select the check box to include the following information in the EDI 214 file:
-
Truck plate number
-
Truck plate state registration
-
Driver FAST ID
-
Equipment license plate
-
Equipment plate state registration
Note: To use this option, you must be licensed for the ACE add-on module.
EDI 214: Include POD Name
Select the check box to add the Proof of Delivery name from the Dispatch Trip Folder Stops grid to the EDI 214 file.
EDI 214: Include Total Pickup Weight Record
Select the check box to record the total weight of all pickup stops in the EDI 214 file.
EDI 214: Multi Stop Level Reference
Select the check box to activate the Ref Type field.
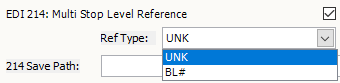
Ref Type
Select a stop reference number type. The system will create a separate 214 for each stop reference number of that type (for example, purchase order number).
Notes:
-
For each trading partner, you link the reference number types in the Ref# Requirements tab. For each type that you want to appear in this list, you must do the following:
-
Select Stops in the Ref Table Loc field.
-
Select the Export to 214 check box.
For details, see Specifying a trading partner’s required reference numbers. Although you can link multiple reference number types with a trading partner, you can select only one type in this field.
-
-
If you select the Multi Stop Level Reference 214s check box but do not select a reference number type, the system does not create a 214 for each stop reference number.
-
The
EDI214_MultiBOL=YGeneral Info Table setting allows you to create a separate 214 for each bill of lading (BOL) reference number recorded for an order header.However, if you select the Multi Stop Level Reference 214s check box and select a stop reference number type, the system will not create multiple header-level BOL reference numbers. It will create a 214 for each stop reference number of the specified stop.
For more information about the
EDI214_MultiBOLsetting, see:Guide: EDI Interface | Chapter: Working with EDI 214 status updates | Section: Creating a separate 214 for each bill of lading number recorded for an order header
214 Save Path
-
Specify the directory to which 214 flat files will be written in the
[EDIfilesave]214datasetting in your TTS50. -
To set a customer-specific export path to write to an alternate directory, follow these steps.
-
Set String1 in the
EDI_ExtractByTPGeneral Info Table setting toY. -
Set String1 in the
EDIWrapGeneral Info Table setting toEACH. -
In the 214 Save Path field for the applicable customer, specify the alternate directory.
Note: If you do not specify a path, the system defaults to the
[EDIfilesave]214datasetting in your TTS50.
-
-
-
Save your entries.