Trip Templates
You can use the Trip Template window to create trip templates. Trip templates are trip structures that you can use to create recurring trips and freight bills for your frequently used routes.
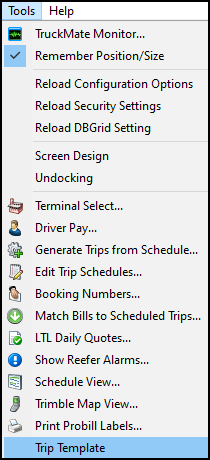
To access the Trip Template window in Multi Mode Dispatch, go to Tools > Trip Template.
Trip template modes
There are three main trip template modes:
The mode you select sets how the template functions.
Pickup mode
In Pickup mode, each of the trip’s legs are pickup points heading to the same consignee. For example, a warehouse might ask that you go to several different sites to pick up items, and then return them all to the same delivery point. Because of this, when you set the template to Pickup you are prompted to enter a consignee.
In Pickup mode, the Consignee client’s information populates automatically when you create the first leg of the template:
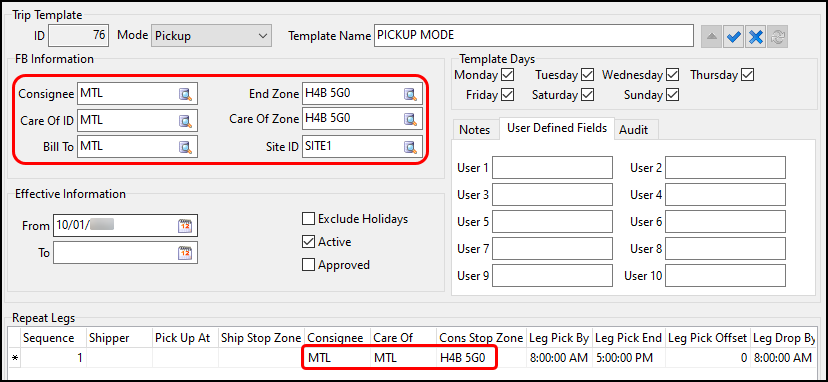
As you add legs, the client ID in the Consignee field remains the last consignee on the trip:

In this example, the trip layout is:
-
VAN > EDM
-
EDM > WPG
-
WPG > MTL
This is a pickup movement where multiple pickup sites are visited, then all the freight bills are delivered to the same consignee. Because of this, the mileage on the template and the freight bills calculates from each shipper on the leg directly to the consignee. If this template is used to create freight bills, the freight bills will be:
-
VAN > MTL
-
EDM > MTL
-
WPG > MTL
This causes the mileage calculations for the Leg Distance and FB Distance values to differ for each leg except the final leg.
To create times on the new bills, the Leg Pick By and Leg Pick End times are used to set the base pickup time at each shipper. The Leg Drop By and Leg Drop End times on the final leg of the trip determine the delivery time for all bills. All of the remaining Leg Drop By and Leg Drop End times will only be used for leg calculations, not freight bill creation.
| These values will be overridden by the Service Level Matrix if your system uses it. |
If you enter a different client from the Consignee for the Pick Up At or Care Of field, this will be reflected on the freight bills created by the template.
Delivery mode
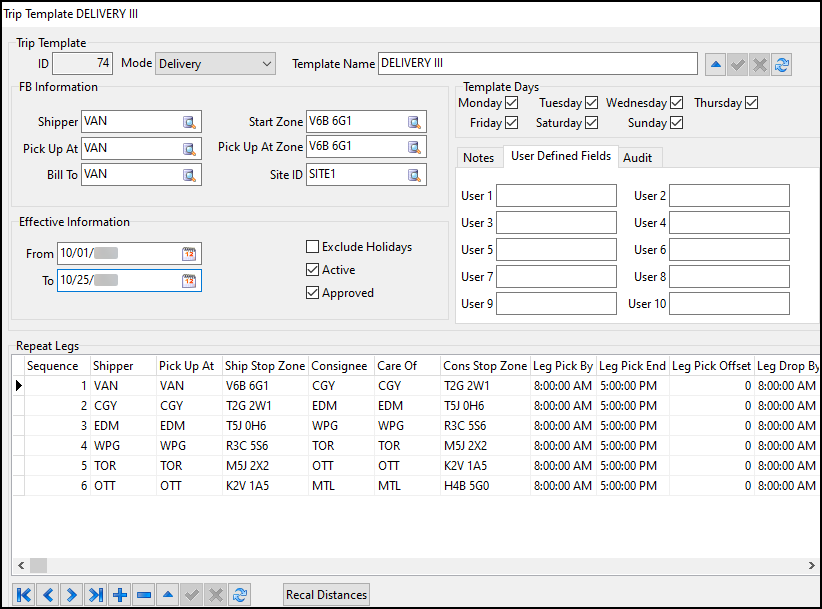
In Delivery mode, each of the legs in the trip are delivery points coming from the same shipper. For example, you might be asked to pick up a number of packages from a single location and then deliver them to individual locations one by one. Because of this, when you set the template to Delivery you are prompted to select a shipper.
In Delivery mode, the Shipper client’s information populates automatically when you create the first leg:
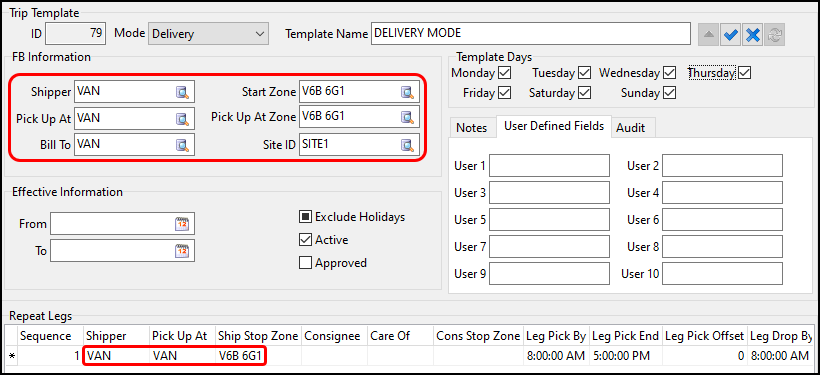
As you add legs, the client ID in the Shipper field remains the first shipper on the trip:

Using the same example, the trip layout is:
-
VAN > MTL
-
EDM > MTL
-
WPG > MTL
This is a delivery movement where each delivery site is visited after picking up from the same shipper. Because of this, the mileage on the freight bills calculates from the first leg’s shipper directly to the individual consignees on each leg. The freight bills created from this template will be:
-
VAN > EDM
-
VAN > WPG
-
VAN > MTL
This causes the mileage calculations for the Leg Distance and FB Distance values to differ for each leg except the first leg.
To create times on the new bills, the Leg Pick By and Leg Pick End times will be the same on all bills created, and are pulled from the first sequence. The Leg Drop By and Leg Drop End times on each leg of the trip are used to determine the delivery time for all bills.
| These values will be overridden by the Service Level Matrix if your system uses it. |
If you enter a different company from the Shipper for the Pick Up At or Care Of field, this will be reflected on the freight bills created by the template.
Pick/Drop mode
With Pick/Drop mode, each of the trip’s legs are individual moves going from point A to point B on each leg. With this mode you are prompted to select a shipper for the template, but this shipper only applies to the first move. Future moves will start from that leg’s shipper.
In Pick/Drop mode, the Shipper client’s information populates automatically as you create the first leg:

As you add legs, the client entered in the Shipper field remains the first shipper on the trip:

Using the same example, the trip layout is:
-
VAN > EDM
-
EDM > WPG
-
WPG > MTL
This example is a pick/drop movement that picks up and delivers at each site in sequence. Because of this, the mileage on the template and the bills calculates from the shipper and consignee on each leg. The freight bills created from this template will be:
-
VAN > EDM
-
EDM > WPG
-
WPG > MTL
This results in the Leg Distance and the FB Distance mileage calculations matching each other on each leg.
The Leg Pick By, Leg Pick End, Leg Drop By, and Leg Drop End values are used to create the times on the new bills.
| These values will be overridden by the Service Level Matrix if your system uses it. |
If you enter a different company from the Shipper for the Pick Up At or Care Of field, this will be reflected on the freight bills created by the template.
Create a trip template
-
From Dispatch or Multi Mode Dispatch, go to Tools > Trip Template. The Trip Template window opens.
-
Select
 Insert Record. The New Trip Template window opens. The ID field automatically populates.
The ID is not editable.
-
Select a mode from the Mode dropdown list.
The options are:
-
Select the Template Name field and enter a name for the template.
-
Enter a client ID in the Shipper or Consignee field.
The field is labeled Shipper if the Mode is Pickup. Only clients marked as shippers can be selected here.
The field is labeled Consignee if the Mode is Delivery or Pick/Drop. Only clients marked as consignees can be selected here.
-
Enter a client zone in the Start Zone or End Zone field.
This field is labeled End Zone if the template mode is Pickup. It is labeled Start Zone if the mode is Delivery or Pick/Drop.
While you can manually enter a zone, if you entered a client ID in the Consignee or Shipper field, this field is automatically populated with that client’s zone.
-
Enter a client ID in the Care Of ID or Pick up at ID field.
If the template mode is Pickup, this field is labeled as Care Of ID. Only clients marked as consignees can be selected here.
If the mode is Delivery or Pick/Drop, this field is labeled as Pick Up At ID. Only clients marked as shippers can be selected here.
-
Enter a client ID in the Care Of Zone or Pick Up At Zone field.
If the template mode is Pickup, this field is labeled as Care of Zone. If the mode is Delivery or Pick/Drop, this field is labeled as Pick Up At Zone.
-
Enter a client ID in the Bill To field.
This field specifies who will become the Bill To customer on any freight bills created from this template.
-
Enter a Site ID
This field specifies the site that will be used for freight bills that are created from this template.
This field only appears if the app config Trip Template for the Selection of Site ID is set to True. If the config is set to False, then the site ID is entered later in the trip creation process.
If both the Trip Template for the Selection of Site ID and the Create Bills When Generating Trips from Template app configs are set to False, then a site ID does not need to be specified because freight bills cannot be created from the trip template.
-
Enter dates in the From and To fields.
The dates you enter in these fields set when the template is active. This allows you to control when a template is allowed to be used:
-
If you do not enter any From or To date, the template is always valid.
-
If you just enter a From date, then the template is valid after that date. It does not expire.
-
If you just enter a To date, then the template is valid up until that date.
-
If you enter both a From and a To date, then the template is valid within that date range.
-
-
Select or clear the Exclude Holidays checkbox.
If you select this checkbox, trips cannot be generated using this template on weekends or holidays.
To use this functionality, your company must have defined the weekend days and holidays your company follows in the Holiday Setup tab of Codes Maintenance.
-
Select the Active checkbox to mark the template as active.
Inactive templates cannot be used to create trips.
-
Select the Approved checkbox to mark the template as approved.
Unapproved templates cannot be used to create trips.
-
Select the Template Days checkboxes for the days this template can be used to make trips.
When you create trips using a template, you specify a date range. The Template Days determine on which days within that date range the template can create trips.
For example, if you set the date range for seven days, and the trip template has Tuesday, Thursday, and Friday selected, then the template will only make a trip for Tuesday, Thursday, and Friday.
-
Select the Notes tab and enter any notes you want to include about the trip template.
-
Select the User Defined Fields tab to enter values for any user defined fields.
These fields are only valid for the template. Data entered in these user fields is not automatically populated into the trips' user defined fields.
Create trip legs
After you set up the basic template, you need to create trip legs. The Repeat Legs grid shows each leg in the trip. As you add legs to the template, they are added to this grid.
-
Select
Insert Record. A leg appears in the grid with data autopopulated based on what you have entered for the trip template. -
(Optional) Enter a client ID in the Shipper and Pick Up At fields.
-
Enter or change the client zone in the Ship Stop Zone field.
This field automatically populates with the client’s zone from the Shipper and Pick Up At fields. If there is a different client in each field, it populates with the Pick Up At zone ID.
-
(Optional) Enter a client ID in the Consignee and Care Of fields.
-
Enter a client zone in the Cons Stop Zone field.
This field automatically populates with the client’s zone from the Consignee and Care Of fields. If there is a different client in each field, it populates with the Care Of zone ID.
Adjust trip legs
You can make changes to the trip legs on the Repeat Legs grid.
This grid can be divided into several sections:

Adjust the customer fields

The customer fields populate automatically based on what you have entered in the trip template. They can also be edited manually. There are two ways to adjust these fields:
-
Select the field and enter the shipper ID, consignee ID, or zone manually.
-
Double-click the field. A list of valid shippers, consignees, or zones opens. You can then select a value from the list.
The Shipper, Pick Up At, Consignee, and Care Of fields are not mandatory to create a leg. However, if they are empty, you cannot create bills from the template.
Adjust the time fields

To set a time for any of these fields, select the field and enter the time in 24-hour format. For example, enter 7:30 for 7:30AM, or 19:00 for 7:00PM.
| Field name | Description |
|---|---|
Leg Pick By |
Sets the Pick Up By time on any freight bills created by the template. It is also sets the Leg Pick By and Planned Departure times on trips created by the template. |
Leg Pick End |
This field sets the Pick Up By End time on any freight bills created by the template. It also sets the Leg Pick End time on trips created by the template. |
Leg Pick Offset |
The number you enter into these fields sets how many days after the trips start date that this leg should begin and end. For example, if a trip is created using this template on a Tuesday, then a trip leg with a Leg Pick Offset of 2 would start two days later, on Thursday. The offset system allows the template to create trip legs flexibly on any day of the week. |
Leg Drop Offset |
There are some restrictions on the times you can enter:
-
The Leg Pick By time must be earlier than the Leg Pick End time.
-
The Leg Drop By time must be earlier than the Leg Drop End time.
-
The Leg Pick Offset cannot be higher than the Leg Drop Offset on the same leg.
-
The Leg Pick By time must be earlier than the Leg Drop End time, taking offsets into consideration (for example, the Leg Drop End time can be earlier than the Leg Pick By time if it has a higher offset, because that means the time falls on the next day).
Adjust the distance fields
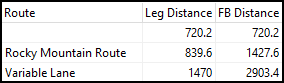
To edit any of the distance fields, select the field and then enter a number.
| Field name | Description |
|---|---|
Route |
You can enter name for or note about the leg in the Route field. What you enter here does not appear on any of the freight bills or legs created by the template. |
Leg Distance |
This field can serve two different purposes. It can either hold manually entered mileage (DMILE), or it can be used to show the actual mileage calculation based on your mileage engine in use.
|
FB Distance |
Similarly to the Leg Distance field, this field can either hold manually entered mileage (DMILE), or it can be used to show the actual mileage calculation based on your mileage engine in use. Unlike Leg Distance, however, FB Distance calculates differently depending on the template mode. |
Adjust resource fields
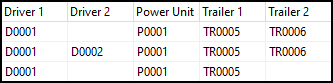
The resources you can adjust are drivers, power units, and trailers. For each resource field, you can either:
-
Select the field and then enter the driver, power unit, or trailer manually.
-
Double-click the field. A list of valid drivers, power units, or trailers opens. You can then select a value from the list.
Adjust vendor fields

If you specify a commodity unit, set a service level, and select an equipment unit, carrier rating can occur immediately after trip and freight bill creation.
| Field name | Description |
|---|---|
Vendor |
You can either enter a vendor ID manually, or double-click the field to select from a list of active vendors. |
Consolidated |
Double-click this field to toggle between True or False. |
Protected |
Double-click this field to toggle between True or False. |
Cost |
Select this field and enter a number to specify the cost associated with the leg. |
Currency |
Sets the currency unit for whatever value you entered into the Cost field. Double-click the field to open a list of currency code options. |
Commodity |
Sets the commodity unit for the leg. Double-click the field to open a list of commodity code options. |
Service Level |
Sets the service level for the leg. Double-click the field to open a list of service level code options. |
Equipment |
Sets the equipment class being used for the leg. Double-click the field to open a list of equipment class options. |
Cost Rule |
You can select any cost rule to apply to the leg. Select a cost rule from the dropdown menu. |
Create a trip from a template
To create trips from a template, the template must:
Trips will only be created for each day within the date range that is selected in the template. Take, for example, a template with Monday, Wednesday, Friday, and Saturday checked. If your selected date range is Sunday, October 9 through Saturday, October 15th:
-
The first trip would begin on Monday, Oct 10.
-
The second trip would begin on Wednesday, Oct 12.
-
The third trip would begin on Friday, Oct 14.
-
The final trip would begin on Saturday, Oct 15.
| If you have the app config Assign Trip Template Carrier By Each Leg set to True, then you must set the app config Carrier-Default Assign All Legs to Single Leg. This is because these two configs can clash with each other, since they both have a rule set they enforce. |
-
Open the Trip Template window.
-
Right-click a template. The shortcut menu opens.
-
Select Create Trips and Freight Bills. The Trip Template Options window opens.
If the app config Create Bills When Generating Trips from Template is set to False, then this option will instead just be called Create Trips.
-
Select a date range.
-
Confirm the Site ID is correct. The Site ID field’s appearance will vary depending on your app config settings:
-
If Create Bills When Generating Trips from Template is set to True, and Trip Template for the Selection of Site ID is set to False, this option will be editable.
-
If Create Bills When Generating Trips from Template is set to False, this option will be grayed out.
-
If Create Bills When Generating Trips from Template is set to True, but Trip Template for the Selection of Site ID is set to True, this option will be grayed out.
-
If Allow Multiple Trips on Trip Template is set to False, this option will not be visible.
-
If Allow Multiple Trips on Trip Template is set to True, this option will be visible.
-
-
Enter a number in the Trips per DOW (days of week) field.
The value you enter here is how many trips you want to create for each day within the date range. Using the example from Step 4 that created four trips, entering a 3 for Trips per DOW would create 12 trips (3 trips for each of the 4 days).
This also affects the number of freight bills created. If each of those 12 trips had 3 freight bills, then this would create 36 freight bills (4 days with 3 trips each with 3 freight bills each).
-
Select OK. The trips are created.