Clone unit properties with the Clone Unit page
With the Clone Unit page, you can use properties from one unit to affect one or more other units. In this topic, we’ll refer to the unit you want to clone from as the source unit, and the unit you are cloning properties to as the destination unit. You can only have one source unit, but you can have many destination units.
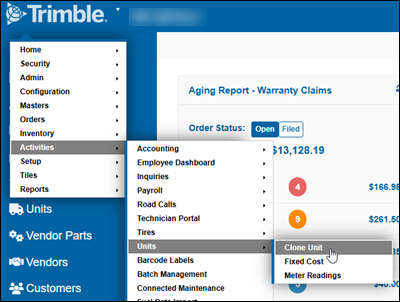
You open the Clone Unit page from the main menu by selecting Activities > Units > Clone Unit.
The page has two panes: Clone Attributes & Search Filters and Units.
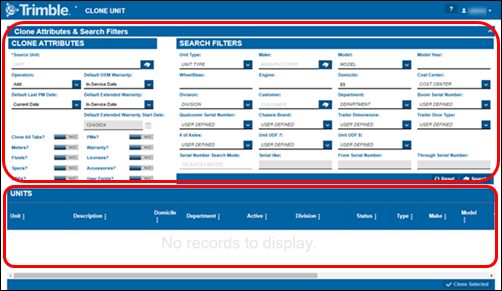
You will use both panes to clone unit properties. This workflow has five stages:
|
If you want to clone units, instead of a unit’s properties, see Clone a unit with the Clone Unit button. |
1. Select the source unit and background information
-
From the main menu, select Activities > Units > Clone Unit. The Clone Unit page opens.
-
In the Clone Attributes section Source Unit field, enter a unit ID. This field is required. If you don’t know the unit ID, select
 Search to find the unit.
 -
Complete these fields:
Field Definition Operation
Select an operation option from the dropdown list:
-
Add: Adds the selected properties to the selected units.
-
Delete: Deletes the selected properties from the selected units.
-
Replace: Replaces the current settings in the selected units with the properties you’ve selected.
-
Update: Revises the settings in the selected unit with the properties you’ve selected. Be aware that the Update option only affects units with similar records.
Default OEM Warranty
Select a value from the dropdown list. The options available depend on your setup.
Default Last PM Date
Select a value from the dropdown list. The options available depend on your setup.
Default Extended Warranty
Select a value from the dropdown list. The options available depend on your setup.
Default Extended Warranty Start Date
This field is read-only. The program completes the field based on your selected Default Extended Warranty option.
-
2. Set the properties you want to clone
Select the properties to clone using the property field toggle switches. All switches are set to NO by default. If you leave a toggle set to NO, the program will ignore that area of the source unit. For each toggle you set to YES, the program will review data from the source unit so it can apply the operation you selected to the destination unit or units.
| Property field | Collects from Parent Unit | Property field | Collects from Parent Unit |
|---|---|---|---|
Clone All Tabs? |
Selects data from all tabs |
PMs? |
Selects data from the PM (preventive maintenance) tab |
Meters? |
Selects data from the Meter Information section of the Meters/Fluids tab |
Warranty? |
Selects data from the Warranty tab |
Fluids? |
Selects data from the Fluid Information section of the Meters/Fluids tab |
Licenses? |
Selects data from the Licenses tab |
Specs? |
Selects unit specifications by component code data from the Specs tab |
Accessories? |
Selects data from the Accessories sub-tab of the Parts tab |
UDFs? |
Selects data from the User Defined section of the Definition tab |
User Fields? |
Selects data from the User Fields tab |
You must select at least one of the property fields in the Clone Attributes section to make the Clone Selected button available.
How the program handles the data depends on the operation you selected.
Add operation
Add copies data from the selected source unit tabs and adds it to the selected destination unit (or units) tabs. The table reviews the property fields and explains how they work with Add.
| Property | The Add operation… |
|---|---|
Clone All Tabs? |
Copies data from all the source unit’s tabs and adds it to all the destination unit’s tabs. This includes adding any settings that apply to the tabs. |
PMs? |
Adds PM tab data to the destination unit’s PM tab. |
Meters? |
Adds meter or meters from the Meters/Fluids tab. Sets the Primary Meter on the destination units to match the Primary Meter on the source data. |
Warranty? |
Copies Warranty tab data and adds it to the destination unit’s PM tab. |
Fluids? |
Adds fluids from the Meters/Fluids tab. |
Licenses? |
Adds Licenses tab data to the destination unit’s Licenses tab. |
Specs? |
Adds unit specifications by component code data from the Specs tab to the destination unit’s Specs tab. |
Accessories? |
Adds accessory data from the Parts > Accessories tab to the destination unit’s Parts > Accessories tab. |
UDFs? |
Adds data from the User Defined section of the source unit’s Definition tab to the destination tab. |
User Fields? |
Adds User Fields tab data to the destination unit’s User Fields tab. |
Delete operation
Delete removes data from the destination unit(s) based on the selected source unit. This table reviews the property fields and explains how they work with Delete.
| Property | The Delete operation… |
|---|---|
Clone All Tabs? |
Deletes data from all the destination unit tabs (meters, fluids, specs, etc.) based on the source unit data. |
Meters? |
If the meter in the source unit is in the destination units, the program deletes the similar meter record. It also deletes the meter’s history. If the meter is linked to an active warranty or PMs, the program cannot delete the meter unless you delete the warranty and PMs too. The program displays an error message. It states, "You cannot delete a meter from the Clone Unit screen if it is linked to an active warranty or PM. Please review the associated meters." |
Fluids? |
If the fluid in the source unit is in the destination units, the program deletes the fluid. |
Specs? |
If the specification in the source unit is in the destination units, the program deletes the specification. It matches specification records based on the component used. |
PMs? |
If the PM (dependent or independent) in the source unit is in the destination units, the program deletes the PM. If the PM has any PM Due record, that is deleted too. |
Warranty? |
If a warranty record in the source unit has a match in the destination units, the program deletes the records. |
Licenses? |
If the license in the source unit is in the destination units, the program deletes the license. It matches records using the license type, number, and description. |
Accessories? |
If the accessory in the source unit is in the destination units, the program deletes the accessory. It cannot delete the accessory if it is inactive, expired, or linked to a repair order. |
Replace operation
Replace swaps data in the selected destination unit or units with data from the selected source unit. This table reviews the property fields and explains how they work with Replace.
| Property | The Replace operation… |
|---|---|
Clone All Tabs? |
The program replaces data from all the destination unit tabs (meters, fluids, specs, etc.) with data from the source unit. |
Meters? |
|
Fluids? |
|
Specs? |
|
PMs? |
|
Warranty? |
|
Licenses? |
The program matches records using the license type, number, and description. |
Accessories? |
|
Update operation
Update revises the data in the selected destination unit or units to match data from the selected source unit. This table reviews the property fields and explains how they work with Update.
| Property | The Update operation… |
|---|---|
Clone All Tabs? |
If the destination unit has similar records, the program updates all meters, fluids, specifications, PMs, warranty, and licenses based on the data in the source unit. |
Meters? |
If the meter in the source unit is in the destination units, the program updates the similar meter records in these fields:
The program also sets the Primary Meter on the destination units to match the Primary Meter on the source unit. |
Fluids? |
If the fluid in the source unit is in the destination units, the program updates the Max Capacity field based on the source unit. |
Specs? |
If the specification in the source unit is in the destination units, the program updates these fields based on the source unit:
The program matches specification records based on the component used. |
PMs? |
|
Warranty? |
If a warranty record in the source unit has a match in the destination units, and the Warranty meter exists, the program updates the Meter Lifetime field based on the source unit. |
Licenses? |
If the license in the source unit is in the destination units, the program updates these fields based on the source unit:
The program matches records using the license type, number, and description. |
Accessories? |
When you select the Update operation, the Accessories option is turned off. |
3. Find appropriate destination units
-
Use the Search Filters section to find the units you want to clone the attributes to. For example, if you wanted to clone the attributes of tractors made by Ford, you would select Tractor from the Unit Type dropdown list and enter Ford in the Make field.
Note: The options available in the Search Filters fields depend on your setup. Your setup may not use the options mentioned in this example.
You can use these filters to find the units you want:
Unit Type
Make
Model
Model Year
WheelBase
Engine
Domicile
Cost Center
Division
Customer
Department
Boom Serial Number
Unit UDF 1
Unit UDF 2
Unit UDF 3
Unit UDF 4
Unit UDF 5
Unit UDF 6
Unit UDF 7
Unit UDF 8
Serial Number Search Mode
Serial like
From Serial Number
Through Serial Number
-
Select Search. The Units pane shows all units that match your search selections.
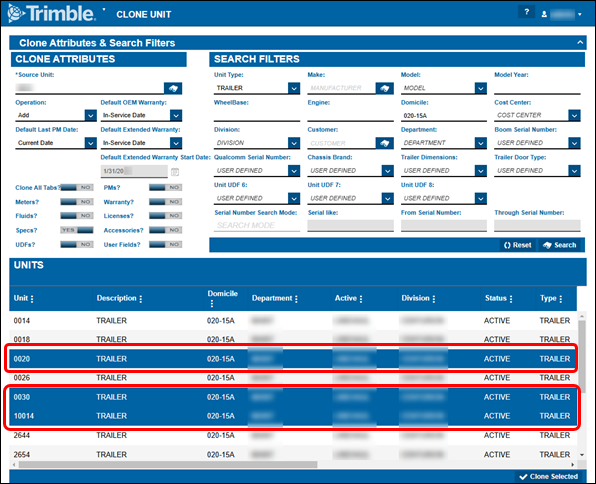
4. Select specific destination units
In the Units pane, select the rows for the destination units. You can select a range of units by holding down the SHIFT key and clicking the first and last rows in the range, or you can select multiple rows by pressing the CTRL key while clicking the rows you want.
Selected rows turn blue, as in this illustration. Selected rows are called out in red.