Trip Planning
-
Audience: Drivers
-
Conditions/restrictions:
-
Your company must be licensed for TruETA and TMWGoTripPlanning to use the Trip Planning functionality. If your company does not have both licenses, you will not see the
 Trip Planning icon or the Trip Planning screens.
 -
Your company must be licensed for and running SystemsLink 2018.3 or later.
-
To view your trip on the embedded map, your company must be licensed for Trimble Maps.
-
If your company uses TruETA to plan trips and is licensed for TMWGoTripPlanning, you can view these trips on the Trip Planning screen in TMW.Suite Go Driver.
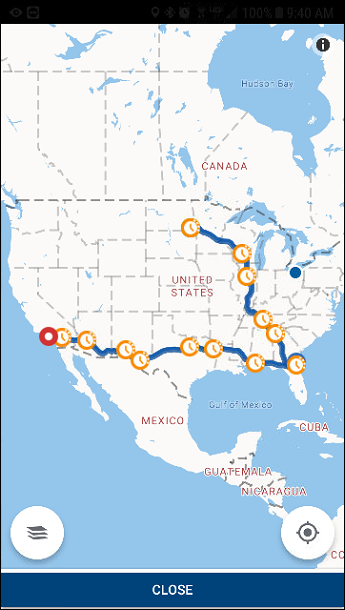
This illustration shows an example of a planned trip on the Trip Planning screen. This screen displays stop events along with suggest rest stops/rest times.
| Icon | Definition |
|---|---|
|
Opens the Hours of Service screen Note: Your company must use a Mobile Comm device (such as a PeopleNet device) for this feature to function. If you have questions, contact your Support representative. |
|
Opens the Map screen |
|
Indicates a weather alert has been issued for that stop event or rest stop |
|
First stop event (such as a LLD or a BMT) on the order or trip with earliest date/time |
|
Suggested rest stops with earliest date/time The number and location of rest stops are based on your company’s TruETA setup. If you have questions, contact your company’s system administrator. |
|
Indicates a completed stop event or rest stop |
|
Additional stops on the trip or order with earliest date/time The number inside of the circle is associated with the stop number on the Stops grid in TMW Operations. This number will change based on the number of stops between the stop events. Note: Open the Legs screen or the Orders screen to view details about additional stops. |
|
Last stop event (such as a LUL or a EMT) on the order or trip with earliest date/time |
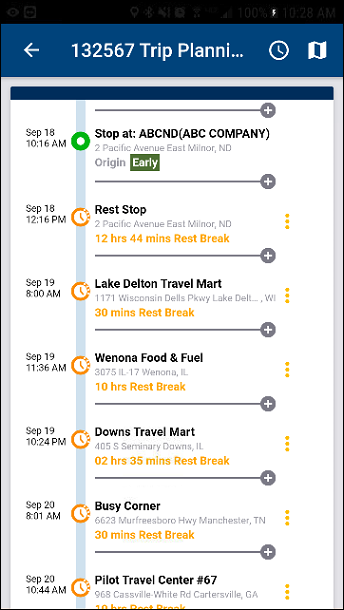
With the Trip Planning feature, you can:
-
View TruETA’s suggested trip route
-
View your pickup and drop stops
-
View suggested rest stops
-
Add rest stops or delete rest stops
-
Change a rest stop location or duration
-
View your Hours of Service
-
View your trip on the Trimble Maps
Loading the Trip Planning screen
To load the Trip Planning screen:
-
Tap
 Menu. If you are using a tablet, skip this step.
 -
Based on your company’s setup, tap Legs or Orders.
The Current Trips or Current Orders screen opens.
-
Do one of the following:
-
View trip planning for the current trip
Tap the
Trip Planning icon.
The Trip Planning screen opens. -
View trip planning for a different trip
-
Tap Next.
The Next Trips screen opens. -
Tap on the trip that you want to view.
Information about that trip is displayed. -
Tap the
Trip Planning icon.
The Trip Planning screen opens.
-
-
Viewing weather alerts
To view weather alerts:
-
Load the Trip Planner screen.
In this example, there are two weather alerts.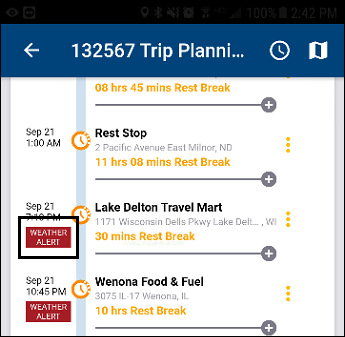
-
Tap the Weather Alert icon next to a stop event or a rest stop.
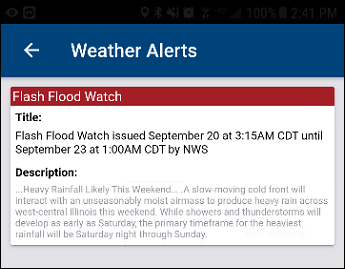
The Weather Alerts screen opens. It displays information about the weather alert. Weather alerts are generated by the National Weather Service.
Viewing Trip Planning Hours of Service
| Your company must use a Mobile Comm device (such as a PeopleNet device) for this feature to function. If you have questions, contact your Support representative. |
To view your hours of service:
-
Tap the Hours of Service
 icon.
icon.
The Hours of Service screen opens.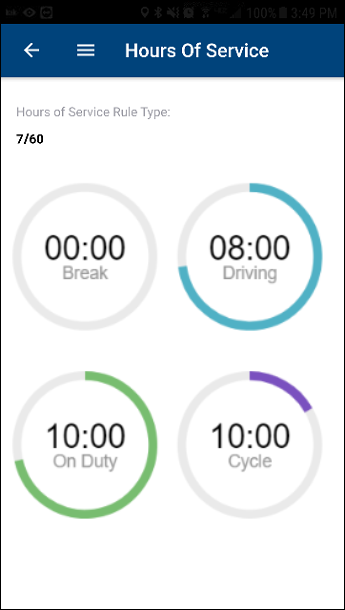
Field Definition Break
Currently not functional
Driving
Number of hours you have been driving for the current day
On Duty
Number of hours you have been on duty for the current day
Cycle
Number of hours you have been active for the current cycle
Note: This value is based on your service rule.