Adding resource records quickly
To ensure accuracy of system data, File Maintenance should have a complete profile for each company and resource (driver, tractor, trailer, and carrier). However, there may be times when the system does not contain a profile for a resource, and you do not have time to enter a complete profile. To enable you to continue with the task, the system allows you to add profiles quickly from most base TMWSuite applications. You record these mini-profiles using these Quick Add commands under the Tools menu:
-
Add Driver
-
Add Tractor
-
Add Trailer
-
Add Company
-
Add Carrier
Adding a driver record
To access the Add New Driver window, select Tools > Add Driver or press CTRL+SHIFT+ D.
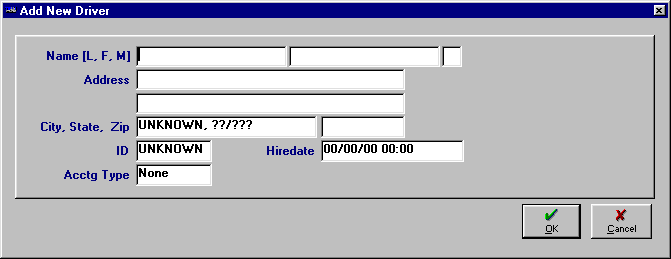
To add a driver record, make entries in these fields:
Name [L, F, M] |
Driver’s last name, first name, and middle initial. |
Address (Line 1) |
First of two address lines for the driver’s street address. A maximum of 30 alphanumeric characters is allowed. |
Address (Line 2) |
Second of two address lines for the driver’s street address. A maximum of 30 alphanumeric characters is allowed. |
City, State, ZIP |
The city, state/province, and ZIP code of the driver’s residence. |
ID |
Unique identification code for the driver record. The maximum length is eight alphanumeric characters.
Y ou can use the
You can also manually enter a user-defined driver ID. However, you must do so before saving the record. Note: When you tab out of the driver name fields, the system automatically assigns an ID that consists of, by default, the first three characters of the driver’s last name, and the first two characters of his/her first name. For example, suppose the driver’s name is Joseph A. Harmon. The driver’s system-assigned ID will be HARJO. If you subsequently add a record for another driver with the same ID, two digits are automatically added to the end of the ID to differentiate it from the first. For example, if you enter a record for Joan Harris and HARJO already identifies Joseph Harmon, the system will assign Joan the ID HARJO01. A third HARJO would be HarJO02, and so on. The numeric suffix increments by one for each driver added. |
Hire Date |
Date driver was hired by your company. |
Acctg Type |
Accounting system that will be used to pay the driver. The options are:
|
When you have completed your entries, click OK to save the record. The window automatically closes.
Adding a tractor record
The Add New Tractor window is accessed by selecting Tools > Add Tractor or by pressing CTRL+SHIFT+ T.
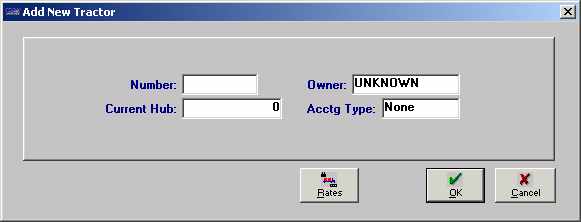
To add a tractor record, make entries in these fields.
Number |
Unique ID code used to identify the tractor. The maximum field length is eight alphanumeric characters. |
Owner |
The Pay To code that represents the entity that should receive payment for trips hauled by this tractor. Note: This field is not applicable for company-owned tractors. |
Current Hub |
Tractor’s current hub miles. |
Acctg Type |
Indicates the method of reimbursement for trips that the tractor hauled. The options are:
Note: Settlements looks at the Accounting Type flag in resource profiles to determine which resources are eligible to receive pay. The system retrieves trips for tractors that are marked as Accounts Payable. If the Actg Type field has been set incorrectly to Accounts Payable instead of None, this retrieval will include resources that should not get payment via TMWSuite. |
Do one of the following:
-
If the record is for a company tractor (i.e., you entered None in the Acctg Type field), click OK to save the record. The window automatically closes.
-
If the record is for an owner/operator’s tractor (i.e., you entered Accts Payable in the Acctg Type field) and you do not want to assign a pay rate to the tractor at this time, click OK to save the record. The window automatically closes.
-
If the record is for an owner/operator’s tractor (i.e., you entered Accts Payable in the Acctg Type field) and you want to assign a settlement rate to the tractor, click on the Rates button shown at the bottom of the window. The Assign Settlement Rates window will display.
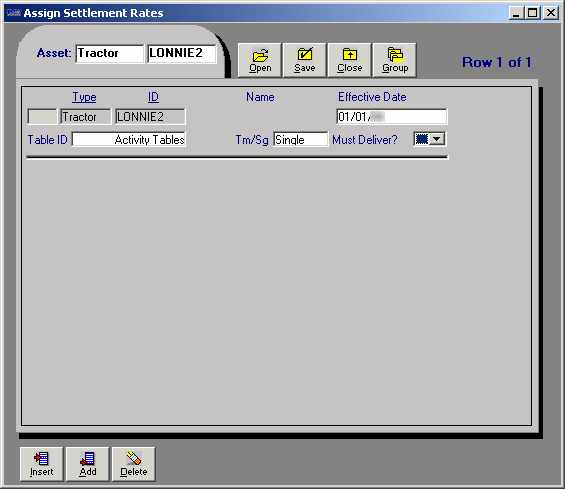
Click on the Add button. Make entries in these fields:
Table ID |
Select the settlement rate to be used when trip settlements are calculated. |
Tm/Sgl |
Specify whether the rate is for Single or Team miles. |
Must Deliver? |
Leave this field blank. |
Effective Date |
Date when the specified settlement rate is to go into effect. |
Click Save. Click Close to exit the window.
Adding a trailer record
The Add New Trailer window is accessed by selecting Tools > Add Trailer or by pressing CTRL+SHIFT+ L.
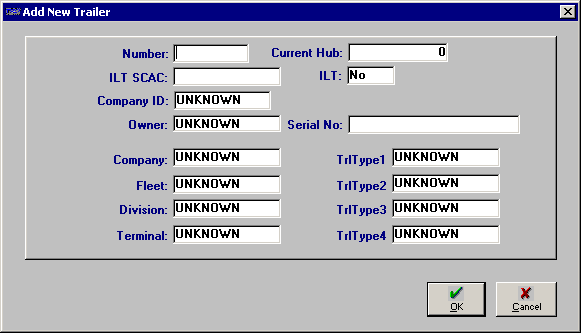
To add a trailer record, make entries in these fields:
Number |
Unique ID code assigned to the trailer. A maximum of eight alphanumeric characters is allowed. |
ILT SCAC |
Standard Carrier Alpha Code for the trailer. |
Company ID |
ID of the company that owns the trailer. Note: The company record must be set up prior to assigning the trailer to the company. |
Owner |
The Pay To code that represents the entity that should receive payment for trips hauled by this trailer. Note: This field is not applicable for company-owned trailers. |
Company |
If applicable, indicate the company with which the trailer is associated. Most commonly used for multi-company organizations. |
Fleet |
Indicate the fleet to which the trailer belongs. The options are defined in the Fleet label in the System Administration application. |
Division |
Identify the division with which the trailer is associated. The options are defined in the Division label file in the System Administration application. |
Terminal |
Indicate the terminal with which the trailer is associated. The options are defined in the Terminal label in the System Administration application. |
Current Hub |
Trailer’s current hub miles. |
ILT |
Indicates if the trailer is an Interline Trailer. The options are either Yes or No. |
Serial No. |
Serial number for the trailer. The maximum field length is twenty alphanumeric characters. |
TrlType1-4 |
The name and trailer type options for these fields are user-defined; setup occurs via the TrlType1-4 labels in the System Administration application. Assignment of trailers to trailer classifications allows you to track the revenue collected for trips to which those trailers were assigned. |
When you have completed your entries, click OK to save the record and close the window.
Setting default trailer types
In the TTS50, these settings have been added to set default options for TrlType1-4.
-
[Misc]DefaultTrlType1 -
[Misc]DefaultTrlType2 -
[Misc]DefaultTrlType3 -
[Misc]DefaultTrlType4
Adding a company record
The Add New Company window is accessed by selecting Tools > Add Company or by pressing CTRL+SHIFT+C.
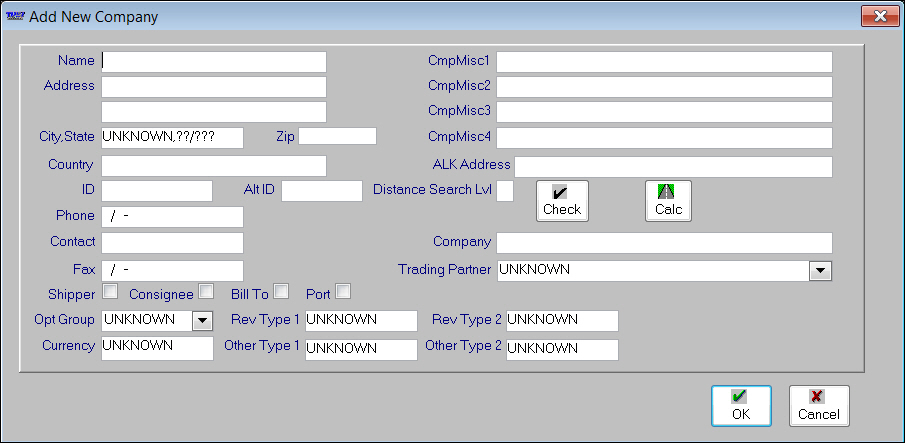
To add a company record, make entries in these fields:
Name |
The name of the company. The maximum length is 100 alphanumeric characters. |
Address (Line 1) |
First of two lines used to record the street address for the company. A maximum of 50 alphanumeric characters is allowed. |
Address (Line 2) |
Second of two lines used to record the street address for the company. A maximum of 50 alphanumeric characters is allowed. |
City, State |
City and state/province location of the company. Notes:
|
Zip |
Five-digit or nine-digit ZIP or postal code. |
Country |
Country in which the company is located. |
ID |
Identification code for the company When you tab out of the City, State field, the system automatically assigns an ID using the first three characters of the company’s name and the first three characters of the city name. For example, if the company’s name is Brennan Distributors and it is in Pittsburgh, PA, the ID will be BRENPIT. If you want to assign your own ID, you must enter it before saving the record. You can use up to eight alphanumeric characters. Note: If an existing company record has the same basic ID as the one you are adding, the system appends two-digits to the end of the ID. The system does this whether you are entering the ID yourself or letting the system assign it. |
Alt ID |
An alternate, user-defined code assigned to the company. A maximum of 10 alphanumeric characters is allowed. Note: An alternate ID is sometimes needed to identify the company in a separate computer system (such as an accounting package) to which TMWSuite interfaces. |
Phone |
Primary telephone number by which the company can be reached. Note: When making an entry, do not enter parentheses, dashes, or spaces. The system will format the field correctly. |
Contact |
Name of the person who is the primary telephone contact at the company. |
Fax |
The company’s area code and fax number. Note: When making an entry, do not enter parentheses, dashes, or spaces. The system will format the field correctly. |
Shipper |
Select the Shipper check box if the company will serve as a pickup location. |
Consignee |
Select the Consignee check box if the company will serve as a drop location. |
Bill To |
Select the Bill To check box if the company may be billed for work performed. |
Port |
Location from which your drivers and/or carriers pick up containers, and to which they will return them. The check box is used for the intermodal feature, which is available in TMWSuite’s Dispatch application. For details, see the Intermodal Feature guide. |
Opt Group |
The company’s Optimization Group. For rating purposes, a new company can be assigned to a group of Bill To companies that are created and maintained in System Administration. The field contains a drop-down list of the first 12 characters of the group names. Note: For more information, see "Assigning a Bill To to an optimization group" in Volume Optimization in the TMWSuite Optional Modules online help. |
Rev Type 1-2 |
The names and options for these fields are user-defined. Setup occurs in the RevType 1 and RevType 2 labels in the System Administration application. Assignment of orders to revenue classifications allows you to track revenue collected for different types of loads. |
Currency |
Enter the type of currency to be used when the company is billed. Note: The Currency options are user-defined in the Currency label, accessed in the System Administration application. |
Other Type 1 |
The name and options for this field are user-defined. Setup occurs in the Other Type 1 label in the System Administration application. |
Other Type 2 |
The name and options for this field are user-defined. Setup occurs in the Other Type 2 label in the System Administration application. Note: If you are using Microsoft Dynamics GP as your accounting package, your entry in this field can turn on the ability to transfer the first reference number recorded in the invoice header to the Document Number field in Microsoft Dynamics GP. To use the entry in this way, you must add an option to the Other Type 2 label that has REF as the value in its ABBR field. You also must select this option in the Other Type 2 field in the company profiles of the customers for which you want to transfer the reference number, as well as the TMW invoice number. For example, you may have Bill To companies that typically reference the reference number in the invoice header, often the Bill of Lading, when they remit payment. Using this feature allows the system to transfer the first reference number and the invoice number. So, if the first reference number is 45633 and the invoice number is 8776A, the document number would be sent to Microsoft Dynamics GP as 45633-8776A. A hyphen is always inserted to separate the reference number from the invoice number. |
CmpMisc1-4 |
The names for these fields are user-defined. Setup occurs in the CmpMisc1-4 labels in the System Administration application. You can use this field to enter a free-form comment about the company. A maximum of 43 characters is allowed. |
ALK Address |
When a company is set up for address-level mileage lookups (the Distance SearchLVL field is set to A), this address is passed to ALK. Notes:
|
Distance Search Lvl |
This field is available when the
|
Company |
Applicable for multi-company customers. Enter the classification for the parent company to which this company belongs. |
Trading Partner |
Identifies an EDI trading partner. |
When you have completed your entries, click OK to save the record and close the window.
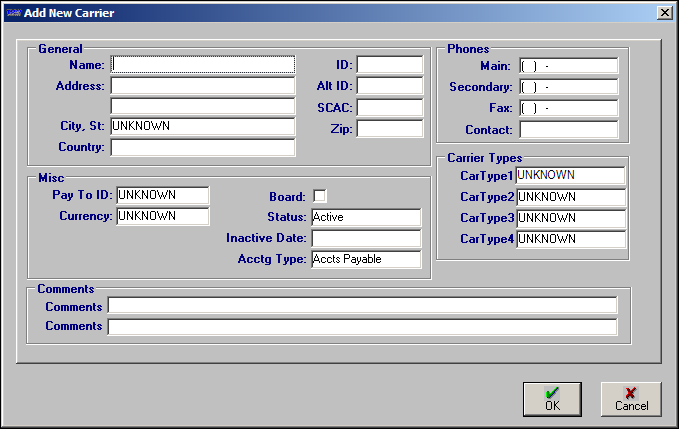
Adding a carrier record
The Add New Carrier window is accessed by selecting Tools > Add Carrier in Dispatch and Agent Order Entry. You can also press CTRL+SHIFT+I to open the window.
|
To add a carrier record, make entries in these fields:
Name |
The carrier’s name. A maximum of 64 alphanumeric characters is allowed. |
Address |
Two lines are provided for recording the carrier’s street address. A maximum of 64 alphanumeric characters is allowed in each line. |
City, State |
The carrier’s city and state/province location. Notes:
|
Country |
The country in which the carrier is located. |
ID |
The carrier’s unique identification code. The maximum length is eight alphanumeric characters. |
Alt ID |
An alternative identification code used to identify the carrier. The maximum length is eight alphanumeric characters. Note: This code may represent a code assigned to the carrier in another computer system, such as an accounting package. |
SCAC |
The carrier’s Standard Carrier Alpha Code. |
ZIP |
Five-digit or nine-digit ZIP/postal code for the city. |
Main Phone |
Primary telephone number at which the carrier can be reached. |
Secondary Phone |
The secondary telephone number at which the carrier can be reached. |
Fax |
Fax number for the carrier. |
Contact |
Name of the person who is the primary telephone contact for the carrier. |
Pay to ID |
Person or organization that should be paid for loads that this carrier hauls. Notes:
|
Currency |
The currency in which the carrier is paid. The system code options are US dollars and Canada dollars. Note: Your company can define additional options for this field in the Currencies label. Label file setup is performed in the system administration application. |
Board? |
A carrier can be an inside carrier or an outside carrier.
If the activities of the carrier’s resources will be tracked in the Planning Worksheet, the Board check box must be selected. |
Status |
The carrier’s status defaults to Active. |
Inactive Date |
The date the carrier became unavailable for dispatch, based on an expiration. |
Acctg Type |
The carrier’s accounting type defaults to Accts Payable. |
Car Type1 - 4 |
The names and options for these field are user-defined in the |
Comments |
Two lines are provided for you to enter free-form text. Your entries will appear in the Car Misc 1 and Car Misc 2 fields in the carrier’s profile in Carrier File Maintenance window. A maximum of 254 characters is allowed in each line. |
When you have completed your entries, click OK to save the record and close the window.
Obtaining a list of Quick-Add records
Because the profiles created with the Quick Add options contain only the most essential information, you must later fill in the missing data in File Maintenance. The Quick Entry Reports command under the Reports menu in File Maintenance allows you to print listings of the profiles that were quick added. You can use these listings to determine which profiles need to be completed.
The Print Quick Entry Reports window is shown here.
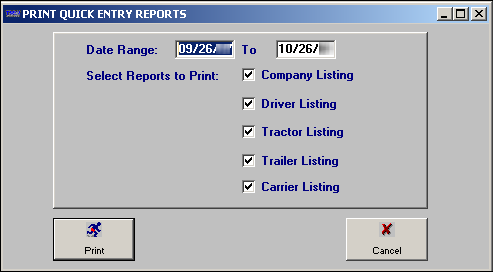
To print profile listing(s), make entries in these fields:
Date Range |
Enter the date range for which the system should search for profiles added with Quick Add option(s). For example, if you want a listing of profiles added during the month of January 2015, enter 01/01/15 in the first field and 01/31/15 in the second field. Note: The system automatically displays a date range that encompasses the past thirty days. |
Select Reports to Print |
Select the type of listing you want (company, driver, tractor, and/or trailer. If the box preceding a selection is marked with a check mark, the listing will print. Note: As the system default, all listings are selected automatically. If you do not want to print a specific type of listing, click in the box that precedes the selection to remove the check mark. |
Click the Print button in the lower left of the window. The Printer Setup box displays. Indicate whether you want to print to a printer or to the online print viewer. TMWSuite prints to the selected print device.
Company Quick Entry Listing
The Company Quick Entry Listing is a report that lists all companies whose profiles were added via the Add Company option under the Tools menu.
The report column headings include:
Company Id |
Company’s ID code. |
Company Name/Address |
Company’s name and street address. |
City, State |
City and state/province where the company is located. |
ZIP Code |
Company’s ZIP code. |
Phone No |
Company’s primary phone number. |
Driver Quick Entry Listing
The Driver Quick Entry Listing is a report that lists all drivers whose profiles were added via the Add Driver option under the Tools menu.
The report column headings include:
Driver Id |
Unique ID assigned to the driver. |
Driver Name/Address |
Driver’s name and street address. |
City, State |
City and state/province where the driver lives. |
ZIP Code |
Driver’s ZIP code of the driver. |
SS No. |
Driver’s social security number. |
Hire Date |
Date the driver was hired. |
Tractor Quick Entry Listing
The Tractor Quick Entry Listing is a report that lists all tractors whose profiles were added via the Add Tractor command under the Tools menu.
The report column headings include:
Tractor No |
Unique ID assigned to the tractor. |
Owner |
Name of the owner of the tractor. |
Current Hub |
Tractor’s current odometer reading. |
Status |
Current dispatch status of the tractor. |
Trailer Quick Entry Listing
The Trailer Quick Entry Listing is a report that lists all trailers whose profiles were added via the Add Trailer command under the Tools menu.
The report column headings include:
Trailer No |
Unique ID assigned to the trailer. |
Owner |
Name of the owner of the trailer. |
Current Hub |
Trailer’s current hub mile reading. |
Comp ID |
ID of the company to which the trailer belongs. |
ILT |
Indicates whether the trailer is an interline trailer. The options are Y (yes) or N (no). |
Serial No |
Serial number of the trailer. |
Status |
Current dispatch status of the trailer. |
Carrier Quick Entry Listing
The Carrier Quick Entry Listing is a report that lists all carriers whose profiles were added via the Add Carrier option under the Tools menu.
The report column headings include:
Carrier Id |
Carrier’s ID code. |
Carrier Name/Address |
Carrier’s name and street address. |
City, State |
City and state/province where the carrier is located. |
Zip Code |
Carrier’s zip code. |
Phone No |
Carrier’s primary phone number. |