Saving and loading grid configurations
A number of windows within TMWSuite allow you to look up lists of records. These lists are shown in grid form. Among the most used lookup windows are the scroll windows accessed in most base applications from the Tools menu, and the Available Trips and Available Resources grids on the Planning Worksheet in Dispatch. In most cases, if a window displays data in a grid form, you can customize that grid by:
-
Moving, resizing or deleting columns
-
Changing the sort order of the records listed
-
Filtering the record listing so that it only shows the data you want to see
Unless you save these changes, they remain in place only until you exit the window. To eliminate the need to repeat your changes in future sessions with the grid, you can save different configurations to the database.
Overview of Configure View menu commands
-
When you right-click on a grid, the Configure View command is listed last in the pop-up menu that is shown. It has several sub-commands, as shown here:
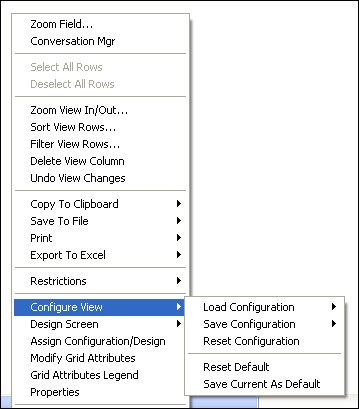
Sub-commands under Configure View allow you to:
-
Save column configurations.
-
Load a desired configuration during a session with the system.
-
Specify a particular configuration as the default for a grid so that it is applied automatically whenever a specific user or members of a user group access the grid.
The following table provides a brief explanation of each sub-command:
| Command | Purpose |
|---|---|
Load Configuration: Open |
This command allows you to:
|
Load Configuration: Import |
Use this command to open configurations saved as .PSR files in older versions of TMWSuite. Once .PSRs have been imported, they can be saved to the database. |
Save Configuration: Save Config |
Once a configuration is saved, you may want to make changes to it later. If those changes do not involve adding or deleting columns, this command allows you to update the configuration. The configuration that is currently loaded will be overwritten with the modifications you have made. |
Save Configuration: Save Config As |
This command allows you to:
|
Reset Configuration |
This command allows you to temporarily load the configuration that is the system default. The system default remains in place until you close the grid window. |
Reset Default |
This command allows you to permanently load the configuration that is the system default. The system default remains in place until you choose a customized configuration as the default. |
Save Current as Default |
This command allows you to save the current configuration as your default. It will remain as the default until you choose a different configuration as the default. |
The following subsections provide details on how to use these commands.
Moving a column to a different location in a grid
Most TMWSuite grids contain many columns, only some of which can be visible at one time. If a desired column is not visible, or if you want to modify the order in which columns display, you can change column locations. To move a column, do the following:
-
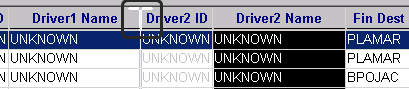
Position the cursor over the column name. The cursor displays as a white I-beam, shown here:
-
Click and hold the left mouse button and drag the column to where it is to be relocated.
-
Release the left mouse button.
Resizing a column
If a column is too wide, or not wide enough, you can resize it. Do the following:
-
Position the cursor over the line that separates the column to be resized from the one next to it. The cursor changes to a double-headed arrow.

-
Click and hold the left mouse button and drag the line until the column is the preferred width.
-
Release the left mouse button.
| You can hide a column if you drag the line until the column is too narrow to display. |
Saving a new grid configuration
Changes made to a grid are temporary. Once you close the window and reopen it, the grid will be back in its original configuration. If you want to retain your changes, you must save the configuration you have created. The following two sub-sections provide instructions on saving a grid configuration.
Saving a configuration if you are a System Administrator
If you are a TMWSuite System Administrator, you can save grid configurations for yourself or for all users. If your user profile is linked to a specific Revenue Type 1 classification, you also can save configurations for use by other users who are linked to the same Revenue Type 1 classification that you are. The link between a user and a Revenue Type 1 classification is established on the Edit User Profiles window in the System Administration application:
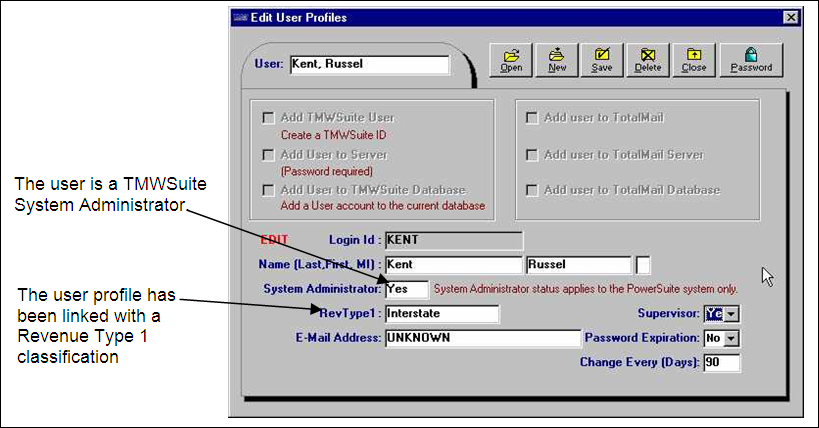
In the example above, the user profile is for a TMWSuite System Administrator, and has been linked with the Interstate Revenue Type 1 classification.Because the System Administrator field is set to Yes and the RevType1 field is set to Interstate, this user has the authority to:
-
Set up configurations for his/her own use.
-
Set up configurations for all users.
-
Set up configurations specifically for users who are linked to the Revenue Type 1 classification of Interstate.
Note: The text displayed for the RevType1 field reflects the name your company assigned to the RevType1 label in the label file. The options listed for the field are the RevType1 classifications defined by your company.
If the System Administrator field is set to Yes and the RevType1 field is set to UNKNOWN, the user will not have the option to set up configurations specifically for groups of users who are linked to a particular Revenue Type 1 classification.
To save a grid configuration, do the following:
-
Configure the grid as desired.
-
Right-click on the grid and select Configure View > Save Configuration > Save Config As.
-
The cursor appears in the Name field of the Grid View Properties window. Type the name to be assigned to the configuration.
-
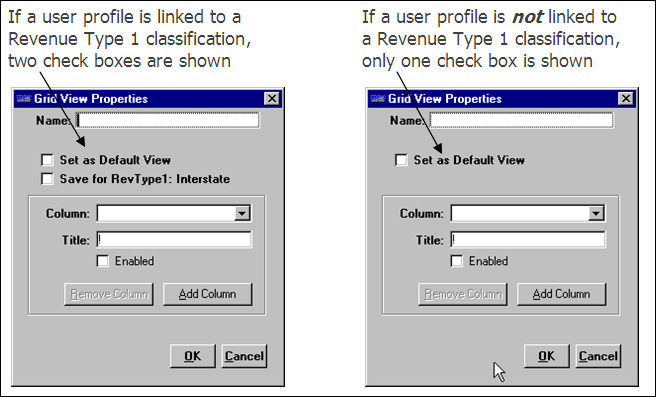
Use the check boxes at the top of the window to specify who is to have access to the view.
Save for all users
Select this box to make the configuration available for all users.
Note: If you do not select the check box, the configuration will be available only for your use.
Set as Default View
Select this box to make this your default configuration.
Save for RevType1
Select this box to make the configuration available only for users who are linked to the same RevType1 configuration.
Note: If you do not select the check box, the configuration will be available only for your use.
Note: The setup of your user profile determines which check boxes are available to you.

-
Do one of the following:
-
If you do not want to remove columns from the grid configuration, continue to Step 6.
-
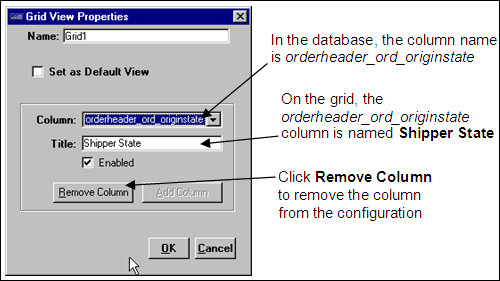
If you want to remove column(s) from the grid configuration, select the column name from the drop-down list in the Column field. The drop-down list shows the column names as they appear in the database. When you select a name, check the Title field to see the name of that column as it appears in the grid.
For example:
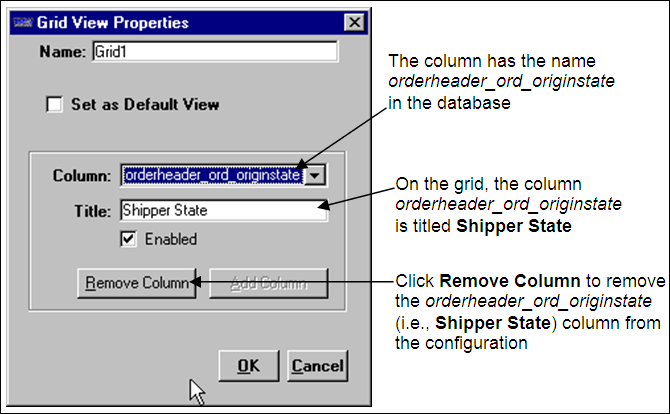
Click Remove Column. Repeat this step for each additional column to be removed.
-
-
Click OK. The grid configuration is now available for future access.
| There is no limit to the number of configurations that can be established for a grid. |
Saving a configuration if you are not a System Administrator
If you are not a TMWSuite System Administrator, you can save grid configurations for your own use. If your user profile is linked to a specific Revenue Type 1 classification, you also can save configurations for use by other users who are linked to the same Revenue Type 1 classification that you are.
The link between a user and a Revenue Type 1 classification is established on the Edit User Profiles window in the System Administration application:
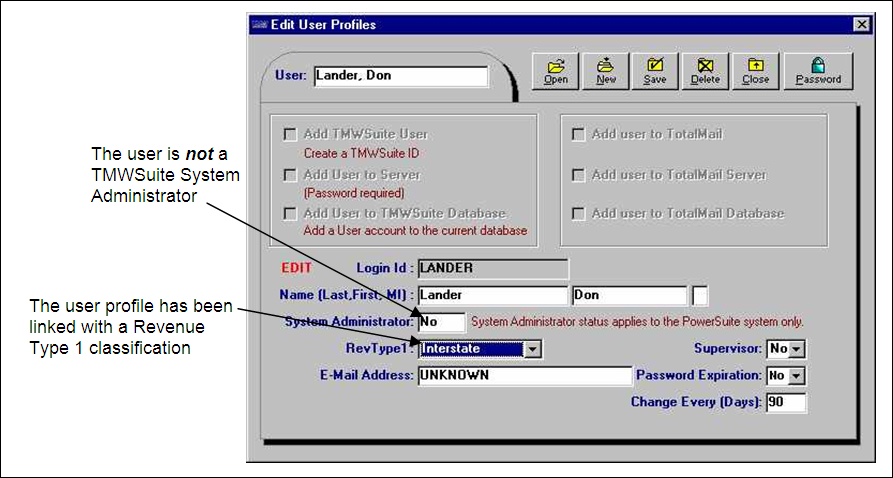
In the previous example, the user profile is not for a TMWSuite System Administrator and is linked with the Interstate Revenue Type 1 classification. Because the System Administrator field is set to No and the RevType1 field is set to Interstate, this user has the authority to:
-
Set up configurations for their own use.
-
Set up configurations specifically for other users who are also linked to the Revenue Type 1 classification of Interstate.
Note: The text displayed for the RevType1 field reflects the name your company assigned to the RevType1 label in the label file. The options listed for the field are the RevType1 classifications defined by your company.
If the System Administrator field is set to No and the RevType1 field is set to UNKNOWN, the user cannot set up configurations specifically for groups of users who are linked to a particular Revenue Type 1 classification.
To save a grid configuration, do the following:
-
Configure the grid as desired.
-
Right-click on the grid and select Configure View > Save Configuration > Save Config As.
-
The cursor appears in the Name field of the Grid View Properties window. Type the name to be assigned to the configuration.
-
Use the check boxes at the top of the window to specify who is to have access to the view.
Set as Default View
Select this box to make this your default configuration.
Save for RevType1
Select this box to make the configuration available only for users who are linked to the same RevType1 configuration.
Note: If you do not select the check box, the configuration will be available only for your use.
Note: The setup of your user profile determines which check boxes are available to you.
-
Do one of the following:
-
If you do not want to remove columns from the grid configuration, continue to Step 6.
-
If you want to remove column(s) from the grid configuration, select the column name from the drop-down list in the Column field. The drop-down list shows the column names as they appear in the database. When you select a name, check the Title field to see the name of that column as it appears in the grid.
For example:
Click Remove Column. Repeat this step for each additional column to be removed.
-
-
Click OK. The grid configuration is now available for future access.
| There is no limit to the number of configurations that can be established for a grid. |
Loading a customized grid configuration
There are two sub-commands available from the Configure View > Load Configuration command:
-
Open
Used to load configurations saved in Versions 2001 and greater.
-
Import
Used to open configurations saved as .PSR files in versions prior to V. 2001.
Instructions on using the Load Configuration commands are provided in the following sections.
Opening a grid configuration
To access a customized grid configuration already saved in TMWSuite, do the following:
-
Right-click on the grid and select the Configure View > Load Configuration command. The system lists up to ten configurations beneath the Open and Import commands. For example:
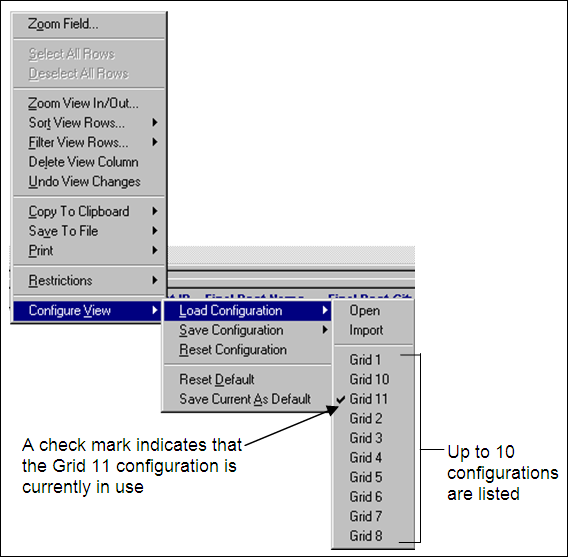
The system groups the configurations in the following order:
-
Those created by a user for his/her own use.
-
Those created for a group of users whose profiles are linked to a specific Revenue Type 1 classification.
-
Those created by a TMWSuite System Administrator for all users.
Within each group, configurations are listed in alphanumeric order according to configuration name. A check mark appears next to the configuration currently in use.
-
-
Do one of the following:
-
If the configuration you want to apply is shown in the list below the Open and Import commands, highlight it. The appearance of the grid is refreshed to reflect the configuration you selected.
-
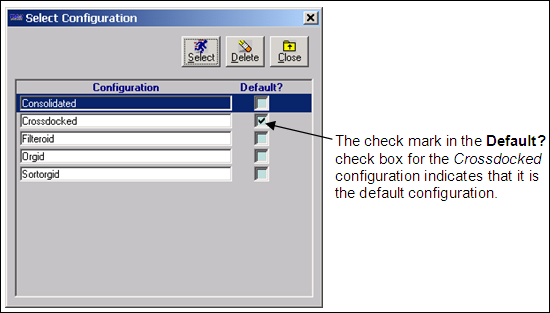
If the configuration you want to apply is not shown in the list, select the Open sub-command. The Select Configuration window displays all the configurations to which you have access:
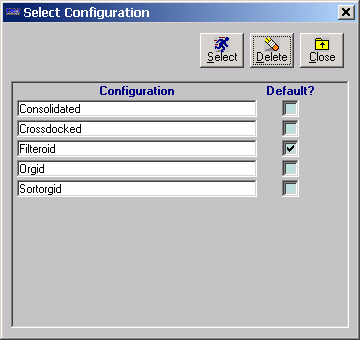
If more than 11 configurations have been saved, the Select Configuration window displays a scrollbar on the right so that you can view all the saved configurations.
Note: If the configuration you are loading is not the default view, but you would like to make it the default, you can select the Default? check box. A confirmation message is displayed. Click Yes to save your changes.
-
-
Highlight a configuration and click Select or double-click on your selection. The appearance of the grid is refreshed to reflect the configuration you selected.
Modifying an existing configuration
After you have created a configuration, you may decide subsequent changes are needed. The following subsections describe how to apply changes.
| You always have the authority to make changes to a configuration that you created. However, you do not have the authority to change configurations created by someone else. If you attempt to do so, the system will display a message that indicates this when you try to save. The grid will not be overwritten with your changes. As an alternative, you can copy the configuration, make the desired changes to the copy, and save it with a different name. For details, see Copying an existing configuration. |
Making changes that do not require the deletion or addition of columns
-
Right-click on the grid and select the Configure View > Load Configuration command.
-
Do one of the following:
-
If the configuration you want to change is shown in the list below the Open and Import commands, highlight it. The appearance of the grid is refreshed to reflect the configuration you selected.
-
If the configuration you want to change is not shown in the list, select the Open sub-command. The Select Configuration window displays. All the configurations to which you have access are shown. Highlight the configuration you want, then click the Select button, or double-click on your selection. The appearance of the grid is refreshed to reflect the configuration you selected.
-
-
Make the desired changes to the configuration.
-
Right-click on the grid and select Configure View > Save Configuration > Save Config. The system automatically overwrites the old configuration properties with the new ones.
Making changes that include the deletion or addition of column(s)
-
Right-click on the grid and select the Configure View > Load Configuration command.
-
Do one of the following:
-
If the configuration you want to change is shown in the list below the Open and Import commands, highlight it. The appearance of the grid is refreshed to reflect the configuration you selected.
-
If the configuration you want to change is not shown in the list, select the Open sub-command. The Select Configuration window displays. All the configurations to which you have access are shown. Highlight the configuration you want, then click the Select button, or double-click on your selection. The appearance of the grid is refreshed to reflect the configuration you selected.
-
-
If changes other than the addition or deletion of columns are needed, make those first.
-
Right-click on the grid and select Configure View > Save Configuration > Save Config As. The Grid View Properties window is shown. The Name field displays the name of the grid being modified.
-
To add or delete a column, select the column name from the drop-down list in the Column field. The drop-down list shows the column names as they appear in the database.
When you select a name, check the Title field to see the name of that column as it appears in the grid. Note that either the Remove Column button or the Add Column button is available for use, depending on whether the column currently exists in the grid.
-
Do one of the following:
-
To remove the column, click the Remove Column button.
In this example, the column orderheader_ord_originstate currently exists in the grid configuration named Grid1. Therefore, the Remove Column button is active:
-
To add the column, click the Add Column button.
In this example, the column orderheader_ord_invoicestatus does not currently exist in the grid configuration named Thomas1. Therefore, the Add Column button is active:

-
-
Repeat Step 5 for each additional column to be removed or added.
-
When all changes are complete, click OK.
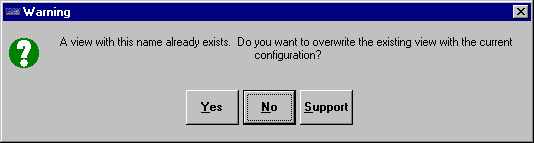
-
In the warning message, click OK to overwrite the configuration, or click No to prevent your changes from being applied.
Copying an existing configuration
After you have created a configuration, you may want to use it as a template to create another configuration that is similar. To do so, follow these steps:
-
Right-click on the grid and select the Configure View > Load Configuration command.
-
Do one of the following:
-
If the configuration you want to copy is shown in the list below the Open and Import commands, highlight it. The appearance of the grid is refreshed to reflect the configuration you selected.
-
If the configuration you want to copy is not shown in the list, select the Open sub-command. The Select Configuration window displays. All the configurations to which you have access are shown. Highlight the configuration you want, then click the Select button, or double-click on your selection. The appearance of the grid is refreshed to reflect the configuration you selected.
-
-
Modify the configuration as desired.
-
When all changes have been made, right-click on the grid and select Configure View > Save Configuration > Save Config As. In the Grid View Properties window, the Name field displays the name of the grid that you are using as a template.
-
In the Name field, highlight the existing grid name and replace it with a new name.
-
Click OK. The new grid is now available for use.
Deleting a configuration
If you find that one of the configurations you saved is no longer required, you can delete it.
| You always have the authority to delete a configuration that you created. However, you do not have the authority to delete configurations created by someone else. If you attempt to do so, the system will display a message that indicates this when you try to save. The configuration will remain active. |
-
Right-click on the grid and select the Configure View > Load Configuration > Open.
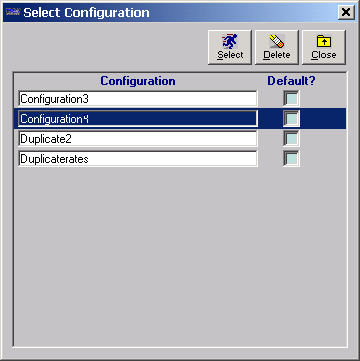
The Select Configuration window displays all the configurations to which you have access. For example:
-
Highlight the configuration that you want to delete.
-
Click the Delete button. The system displays the following warning:
-
To continue with the deletion, click OK. To cancel the deletion, click No.
| System administrators can delete configurations for any user/user group from within the System Administration application by means of the Edit > Delete Views command. |
Temporarily resetting a configuration to the system default
To temporarily load the configuration that is the system default for a grid, right-click on the grid. Then choose Configure View > Reset Configuration. The grid is refreshed to reflect the default setting. The system default remains in place until you close the window.
Permanently reinstating the system default configuration
To permanently load the system default configuration for a grid, right-click on the grid, then choose Configure View > Reset Default. The grid is refreshed to reflect the default setting. The system default remains in place until you choose a customized configuration as the default.
Setting the current configuration as the default
You can change the default configuration for the window to the one currently displayed. For example, suppose the current configuration for the Available Trips window is Consolidated, as shown by the checkmark next to it in the illustration below.
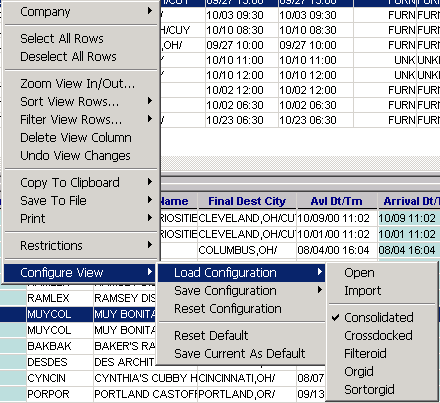
But you need to work with freight transfer orders, so you select the Crossdocked configuration. You can make Crossdocked the default configuration by right-clicking on the grid, then choosing Configuration View: Save Current as Default.
To verify that the configuration, in this case Crossdocked, has been made the default, right-click on the grid. Then choose Configuration View: Load Configuration > Open. The Select Configuration window shows that Crossdocked is now the default configuration.