Right-clicking your mouse for special functions
When placing the cursor in certain fields or in lookup windows, TMWSuite provides special functionality if you click on the mouse’s right button.
Accessing a read-only view of a master file record
Anywhere within the system, you can use the mouse’s right button to look up a profile of a master file record when you position the cursor in one of these data entry fields:
-
Company
-
Driver
-
Tractor
-
Trailer
-
Carrier
-
Commodity
-
City/state
Viewing a company’s profile, directions, or location on a map
In any core TMWSuite application, using the Company command from the right-click menu (also called shortcut menu) you can view a company’s profile and any directions for it that have been recorded in File Maintenance. Additionally, if you are using PC*MILER|Streets as your mileage lookup application, from within the Dispatch application, you can display a map of the company’s location.
| The ability to view a company’s location on a map is only available in the Dispatch application. The functionality is not available in other TMWSuite core applications. |
-
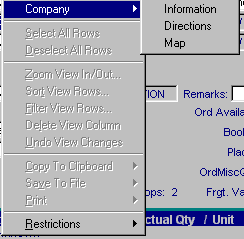
Position the cursor in a company field that has a company ID already entered. Click once on the right mouse button. A listing of functions is displayed. Highlight *Company*. Three additional options are shown:
-
Do one of the following:
-
To see a profile of the company, select Information.
-
To see directions recorded in File Maintenance for the company, select Directions.
-
To view the company’s location on a map, select Map.
-
-
To exit the profile, directions, or map window, do one of the following:
-
Click OK.
-
Click the Close command button.
-
Click the Close
 button in the upper right corner of the window.
-
Looking up the profile for a resource, commodity, or city/state
-
Position the cursor in a driver, tractor, trailer, carrier, commodity, or city/state field with an entry already made. Click once on the mouse’s right button. A list of functions is displayed. The first is Zoom Field.
-
Select Zoom Field. The profile for the record will display.
Note: The system displays the primary screen on which data was entered. For example, if you right-click in a driver field, you will see the Driver File Maintenance screen. You can click the tabs on the window to access information (such as expirations or qualifications) that was entered on secondary File Maintenance windows.
-
To exit the profile window, click OK.
Modifying the display of records in an online lookup window
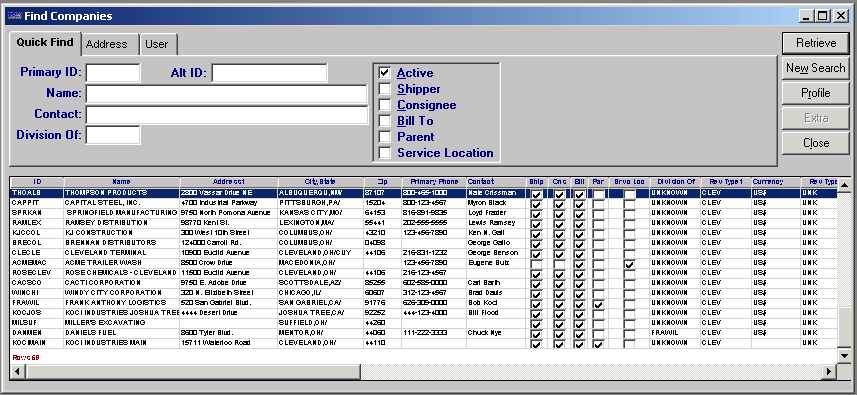
Several screens and scrolls within TMWSuite allow you to look up lists of records, e.g., the Planning Worksheet or the Find Companies scroll window. In such lookup windows, click once on the mouse’s right button when the cursor is positioned anywhere in the record listing. The system displays a pop-up list of options:
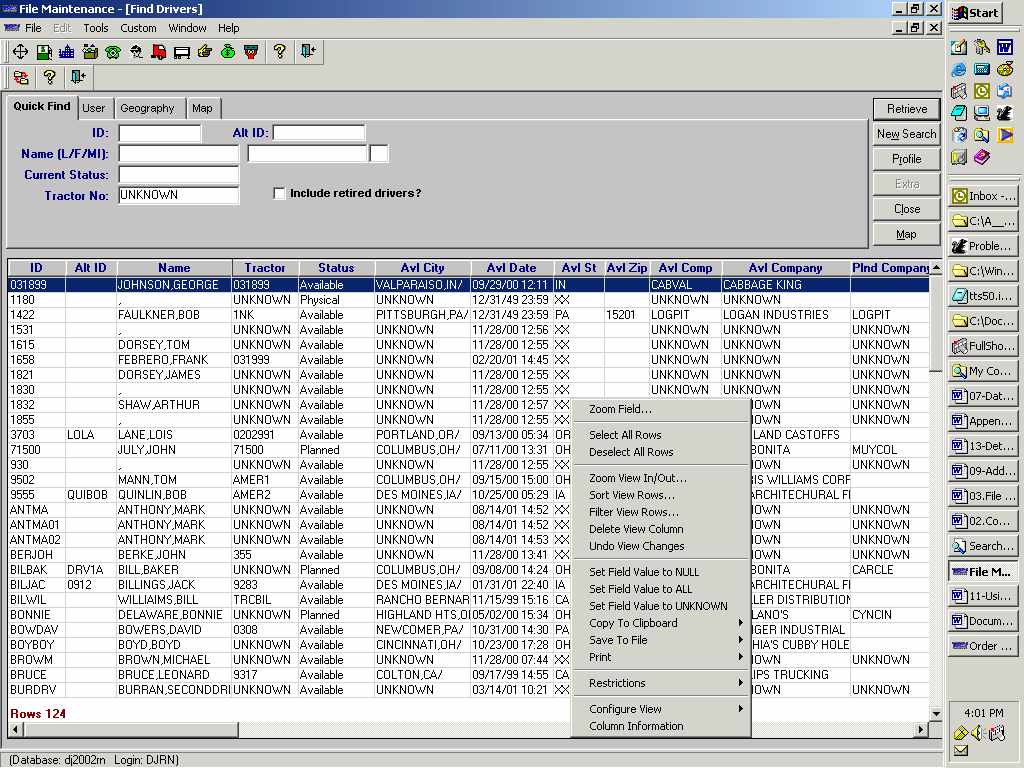
These selections allow you to modify the display of records so the list can be reduced to just the ones you want to see and in the order you want to see them.
| Some selections are not operational on some lookup windows. Non-operational selections will appear gray; you cannot use them. The Select All Rows and Deselect All Rows options have no real function in TMWSuite, and they will not be discussed. |
Viewing a data element in its entirety
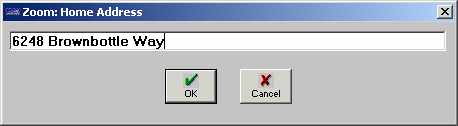
Lookup windows display many columns of data. To allow you to see as many columns at one time as possible, some columns are compressed. As a result, you may not be able to see a data element in its entirety. The Zoom Field option allows you to see the complete view of that data element.
For example, suppose Address1 is a column on a lookup window. You want to see the complete address, but this is not possible since the column is not wide enough. To see it:
-
Position the cursor over the Address1 name and click once on the right-mouse button.
-
The pop-up selection list is displayed.
-
Select Zoom Field for a complete view of the Address1 data element. A window like the following one is displayed.
-
Click OK or Cancel to close the Zoom window.
Zooming in or out on a display
Since lookup windows can display many columns of data, you may want to temporarily:
-
Reduce the magnification to see more information at one time.
-
Increase the magnification to make the information easier to read.
The Zoom View In/Out option allows you to change the magnification, i.e., reduce or increase the size of the font used in the record listing. When you select this option, the Zoom window is displayed:
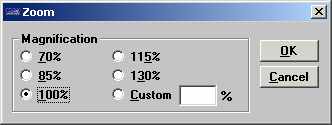
You can select a pre-defined magnification, or you can set a magnification percentage in the Custom field.
The following illustrations show how a record listing appears at different magnifications.
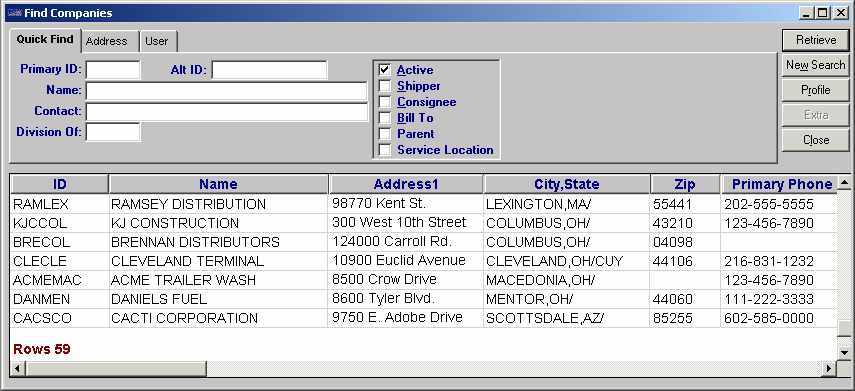
Sample display at 70% magnification:
Sample display at 100% magnification (default setting):
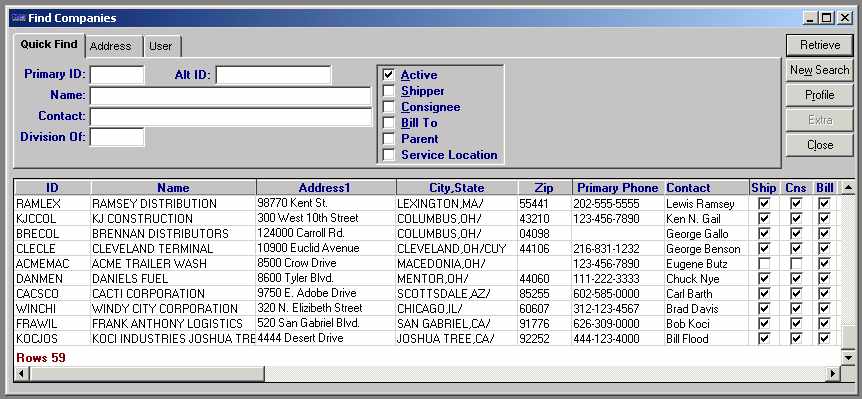
Sample display at 130% magnification:
Sorting rows
You can use the Sort View Rows option to sort the list of records displayed in a lookup window in ascending or descending order by any of the record’s data fields. The sort option supports nested sorts, i.e., records may be broadly sorted first by one field, and then sorted more precisely by another field within the first.
For example, suppose you have looked up invoices that are on hold. You want the invoice listing to be sorted first by the Invoice number, then by the ID of the bill to company, and then by the consignee. You would do the following to apply this sort order:
-
Position the cursor somewhere on the invoice listing, and click once with the right mouse button. When the pop-up selection list is displayed, select Sort View Rows. The Specify Sort Columns window will display.
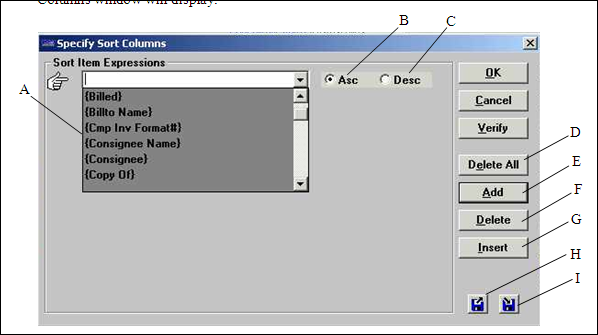
A
List of data columns by which records can be sorted.
B
Click here to have records listed in ascending order.
C
Click here to have records listed in descending order.
D
Deletes all existing sort items.
E
Adds a sort line to the bottom of the list.
F
Deletes a highlighted sort item.
G
Inserts a new sort item prior to the item that is highlighted.
H
Allows you to load sort settings that have been saved to a file.
I
Allows you to store sort settings to a file.
-
Click on the arrow at the right of the Sort Item Expressions field to see the list of data elements used for sorting. (The list is specific to the particular lookup window.)
-
To sort records by invoice number, bill to, and consignee, do the following:
-
In the Sort Item Expressions field, select Invoice# as the first sort item.
-
Click Add to add a second line. Select Bill To as the sort item.
-
Click Add to add a third line. Select Consignee as the sort item.
The window now looks like this:

-
-
Click OK to apply the changes. When the lookup window redisplays, the records are listed in the sort order you have specified.
Saving sort settings
There may be certain sort settings that you will use frequently when viewing information on a particular window. If you plan to use the same settings over and over again, you can eliminate data entry time by saving those settings to a .srt file (i.e., a sort file). To do so, follow these steps:
-
Position the cursor on the record listing in the lookup window. Click once with the right mouse button. When the pop-up selection list is displayed, select Sort View Rows.
-
In the Specify Sort Columns window, enter the desired sort settings.
-
There are two similar looking buttons in the lower right of the Sort window. The button on the right is the Store button. Click on it to display the Store Sort Definition window:

This window allows you to save your settings to a file.
-
In the File name field, assign a name to the .srt file. In the Save in field, select the directory where the file is to be saved.
Note: You can save the file to your local drive or to a network. Saving it locally allows you to ensure that it will not be moved, renamed, or updated by anyone else. Saving it to the network allows multiple users to have access to the same .srt file. You should discuss this issue with your TMWSuite system administrator.
-
After you have specified the filename and drive/directory location, click Save. The .srt file is now available for future use.
Note: To keep track of your .srt files, you may want to do a print screen of each set of sorts and note the file name, the drive/directory location, and the name of the screen to which the file applies.
Loading sort settings that have been saved to a file
If you have saved sort settings to a .srt file, you can "load" that file whenever you want to impose the settings it contains. To do so, do the following:
-
Position the cursor somewhere on the record listing in the lookup window. Click once with the right mouse button. When the pop-up selection list is displayed, select Sort View Rows.
-
There are two buttons in the lower right of the Sort window. The button on the left is the Load button. Click on it.
The Load Sort Definition window will display:

This window allows you to select the .srt file you want to load.
-
In the Look in field, select the drive and directory where the file is stored.
-
In the File name field, select the desired .srt file.
-
Click the Open button. The Load Sort Definition window closes. Note that the system automatically loaded the filter criteria from the .srt file into the Specify Sort Columns window.
-
In the Specify Sort Columns window, click OK. When the lookup window redisplays, the records are listed in the sort order you have specified.
| Individual .srt files are specific to the screen for which they were created. Therefore, you cannot "mix and match" .srt files for different screens in the same application or in different applications. If you have saved multiple .srt files, be sure to select only a file that applies to the screen currently displayed. |
Filtering rows
Most lookup windows provide you with restriction fields in which you can enter search criteria. This allows you to narrow down the record listing. However, there may be times when the window’s search criteria fields do not provide you with all the restriction options you want to employ. You can use the Filter View Rows option to set additional restrictions. When you select this option, the Specify Filter window is displayed. It is shown here with sample data:
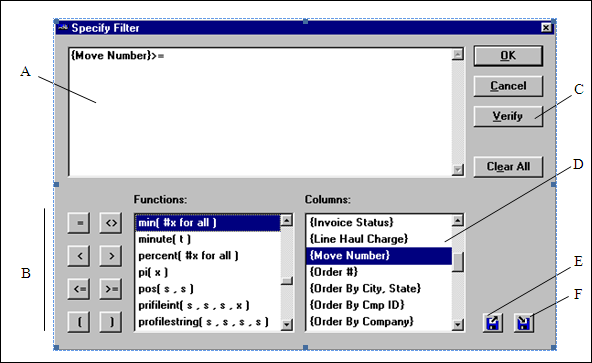
A |
Area of the window where you specify filter criteria. |
B |
Operators. |
C |
Allows you to verify that valid syntax was used for the filter criteria. |
D |
Columns within the grid window. |
E |
Allows you to load custom filters that have been saved to a file. |
F |
Allows you to save custom filters to a file. |
For example, suppose you have accessed the Scroll Orders window and you want to see all orders except those that have a status of Canceled. The restriction fields on the Scroll Orders window do not allow you to specify such an exclusion. This exception can be handled via the Filter window. To set it up:
-
Position the cursor somewhere on the record listing. Click once with the right mouse button.
-
When the pop-up selection list is displayed, select Filter View Rows. The Specify Filter window is shown.
-
Do the following:
-
From the Columns list, select the database column that you want to use in the filter. In this case, you would select Order Status.
-
From the Operators section of the window, select < >.
-
Type 'CAN'. (Use uppercase letters and enclose your entry with single quotes.)
-
These entries indicate that you do not want the list to include orders that have a status of Cancelled.
-
-
To check that you have used valid syntax to enter the filter criteria, click on the Verify button. If the entry is valid, the system will display this message: "Expression is OK"
-
Click OK.
-
The Filter window closes and the Scroll Orders window is redisplayed. The system lists orders having any status except Cancelled.
| For each lookup window, there are hundreds of possible ways to filter data. Therefore, it is not possible to describe all these filters here. If you need help creating a desired filter, contact your TMWSuite system administrator or Trimble Transportation Support. |
Saving filter settings
You may use certain restrictions frequently when viewing information on a particular window. If you plan to use the same restrictions repeatedly, you can eliminate data entry time by saving those restrictions to an .ftr file (i.e., a filter file). To do so, follow these steps:
-
Position the cursor somewhere on the record listing in the lookup window. Click once with the right mouse button. When the pop-up selection list is displayed, select Filter View Rows.
-
In the Specify Filter window, enter the desired filter settings.
-
There are two buttons in the lower right of the Filter window. The button on the right is the Store button. Click on it.
The Store Filter Definition window is displayed:

This window allows you to save your filter to a file.
-
In the File name field, assign a name to the .ftr file.
-
In the Save in field, select the directory where the file is to be saved.
Note: You can save the file to your local drive or to a network. Saving it locally allows you to ensure that it will not be moved, renamed, or updated by anyone else. Saving it to the network allows multiple users to have access to the same .ftr file. You should discuss this issue with your TMWSuite system administrator.
-
After you have specified the filename and drive/directory location, click OK. The .ftr file is now available for future use.
Note: To keep track of your .ftr files, you may want to do a print screen of each set of filter criteria and note the file name, the drive/directory location, and the name of the screen to which the file applies.
Loading filters that have been saved to a file
If you have saved filter criteria to an .ftr file, you can "load" that file whenever you want to impose the restrictions it contains. To load a filter file, do the following:
-
Position the cursor somewhere on the record listing in the lookup window. Click once with the right mouse button. When the pop-up selection list is displayed, select Filter View Rows. The Specify Filter window is shown.
-
There are two buttons in the lower right of the SpecifyFilter window. The button on the left is the Load button. Click on it.
The Load Filter Definition window allows you to select the .ftr file you want to load:

-
In the Look in field, select the drive and directory where the file is stored.
-
In the File name field, select the desired .ftr file. Then click on OK.
The Load Filter Definition window closes. Note that the Filter window now displays the filter criteria saved in the .ftr file you selected.
-
Click OK. The Filter window closes and the lookup window is redisplayed. The system automatically applies the restrictions saved in the .ftr file.
| Individual .ftr files are specific to the screen for which they were created. Therefore, you cannot "mix and match" .ftr files for different screens in the same application or in different applications. If you have saved multiple .ftr files, be sure to select only a file that applies to the screen currently displayed. |
Deleting columns from a display
Lookup windows provide many columns of data. There may be times when you want to hide some of them. The Delete View Column option allows you to remove a column from a display temporarily. The removal of the column is applied only during your current session with the lookup window.
For example, suppose you have looked up drivers in the Scroll Drivers window. You would like to remove the Division column from view. To do so, you would do the following:
-
Position the cursor in the Division column. Click once with the right mouse button.
-
When the pop-up selection list is displayed, select Delete View Column. The Delete Column window is displayed:
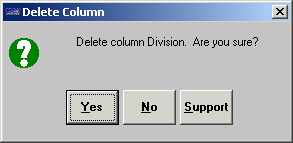
-
Click Yes to remove the column from view temporarily.
Undoing changes made to a display
The functions available by right-clicking allow you to change the display in a lookup window. After making changes, you may want to return the display to the way it looked originally. To do so, position the cursor anywhere on the record listing, right-click once, and select Undo View Changes.
Note: The system automatically removes all temporary changes when you exit a lookup window. The Undo View Changes option allows you to undo temporary changes without exiting the window first.
Copying selected rows to the clipboard
Choose the Copy to Clipboard option to copy highlighted rows or all rows in a display to the Windows clipboard. Rows copied in this fashion can then be pasted into another software package, such as a spreadsheet program or a word processing application.
| The column headings will not display as they appear in the lookup window. Instead, they will use the column names as they are in the database. |
Viewing field/column information
When you design a report or investigate data entry issues, it can be helpful to know more about where a data window gets it data. In any core TMWSuite application except Dispatch, you can right-click on any field or column and then select the Column Information command from the right-click menu.
A dialog box like those in the following examples will appear:
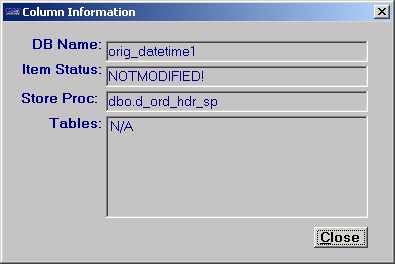
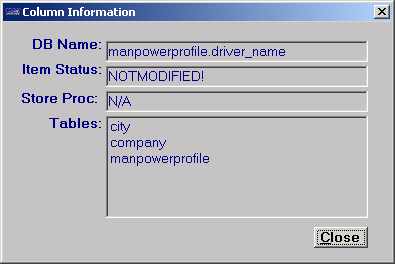
The Column Information window contains four fields:
DB Name |
This field contains the name of the database column associated with a table or stored procedure. |
Item Status |
The status options specify how data will be updated in the database.
|
Store Proc |
The name of the stored procedure that populates this field. |
Tables |
The name of the table(s) where the data is stored. |
Reverting to a default value in a data entry field
In some fields, the default value is UNKNOWN, All or a null (blank). There may be times when you make a selection in such a field, and then decide you want to revert to the default value. If the field does not offer UNKNOWN, All or null in a drop-down list, follow these steps to reinsert the desired default value:
-
Right-click on the field value to be replaced.
-
From the pop-up menu, select the option that is appropriate for the field’s default:
-
When you make your selection, the default value replaces the previous entry.