Reviewing a store’s tank readings
The Tank Reading Validation window is used to verify a store’s daily tank readings. Forecasted orders are based on a store’s sales history, which is gathered from these tank readings.
When a store is set up to be forecasted, rules are identified that help the system determine whether tank readings fall within expected parameters. If the difference between a tank’s actual and expected readings exceeds the amount permitted by the applicable tank audit rule, the reading is considered questionable.
A reading can be questionable because:
-
The reading was reported by a store incorrectly, or entered incorrectly
-
The reading was reported and entered correctly, but fluctuations in sales result in more than the expected difference between the actual and expected readings
-
There was no reading for the past 24 hours.
You must determine whether a questionable reading is correct or should be modified. Typically, this involves checking your company’s records concerning the questionable tank reading, or contacting the store to verify the reading.
Questionable readings must be resolved because they affect the volume of product in a store’s future deliveries. In a smoothly running forecasted environment, however, you should only need to modify tank readings when there are data errors.
Understanding the Tank Reading Validation window
To open the Tank Reading Validation window, select Tank Forecast > Tank Reading Validation.
The Tank Reading Validation window consists of the following sections:
| In some illustrations, columns have been moved or hidden. The grid configurations you see on your own system may be different. Refer to Using data grids for information about rearranging grids. |
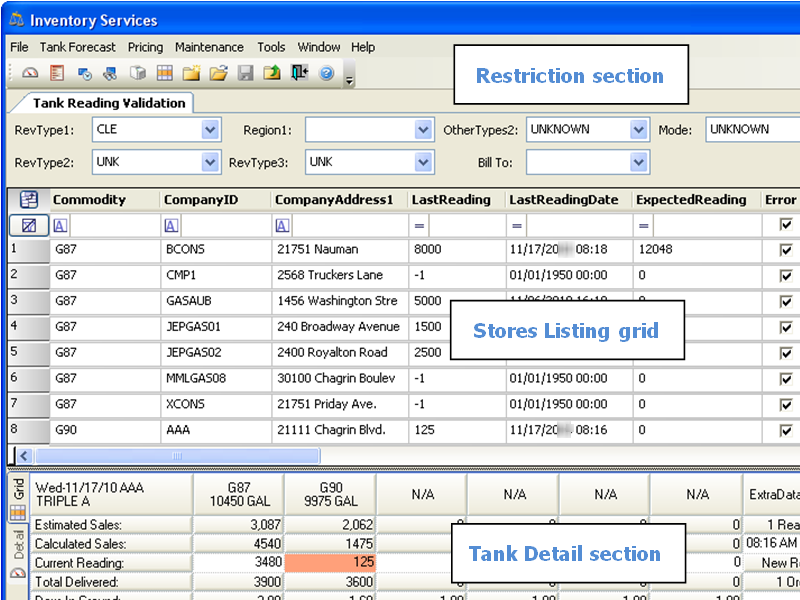
Restriction section
The Restriction fields in the window header are used to filter the stores appearing in the Stores Listing grid.
![]()
With the exception of the Bill To, Mode, and Filter fields, all fields in the Restrictions grid consist of drop-down lists containing options that are user-definable. These options are defined by your company in the TMWSuite label file.
Bill To |
A company appears in the Bill To option list if the Bill To checkbox is selected in the company’s profile. For information about setting up company profiles, see Entering company data in the Fuel Dispatch help system. |
Mode |
Determines the types of readings displayed in the Forecast Order Review window, based on the method used to generate orders. Note: Mode options are system codes required by the application. They can be viewed in the InventoryServiceMode label. System codes should never be changed or deleted. Additionally, you should not add options to the label. |
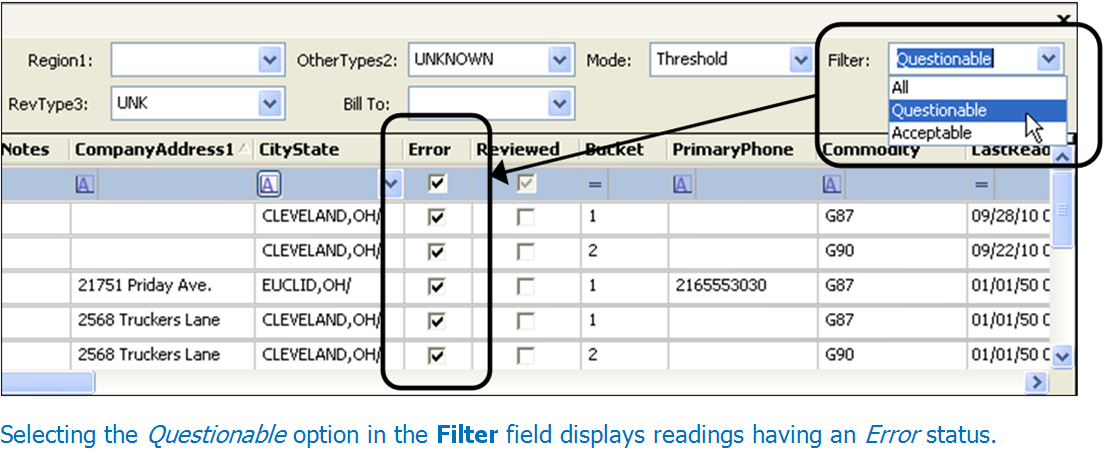
Filter |
The option you select in the Filter field determines the stores displayed in the Stores Listing grid, according to the status of the tank reading.
Notes:
|
Stores Listing grid
The Stores Listing grid is located beneath the Restriction section. It displays information about a company’s commodities, readings, sales, and deliveries.
The Stores Listing grid contains two header rows, both of which can be used to manipulate the grid. When you select a row in the Stores Listing grid, information is displayed in the Tank Detail section for the store and all its tanks.

The Stores Listing grid is read-only, except for the Error and Reviewed checkboxes in the header, and the checkboxes in the Reviewed column.
Error checkbox |
Depending on the option you select in the Filter field, the checkboxes in the Error column can be displayed as all selected, all cleared, or a combination of selected and cleared. Selecting or clearing the Error checkbox in the Stores Listing grid header toggles the readings according to the status you select. Refer to the Restriction fields section for details. |
Reviewed checkbox |
Allows you to indicate you have reviewed specific tank readings so that other dispatchers do not review the same tanks. |
Tank Detail section
The Tank Detail section displays tank readings, and is used chiefly to update questionable readings. When you select a row (store/tank) in the Stores Listing grid, the Tank Detail section displays data for all the store’s tanks.
The Tank Detail section consists of the Grid tab and the Detail tab. Either tab can display data for up to ten tanks.
|
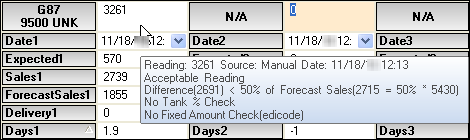
In the Detail and Grid tabs, you can move the cursor over a field for information about the displayed quantity and how it is calculated. Show me
|
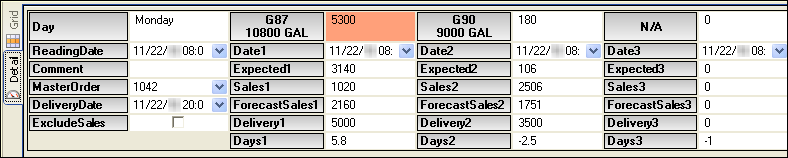
Detail tab
The Tank Detail section’s Detail tab displays tank data for the store you select in the Stores Listing grid. Data are shown for the current date.
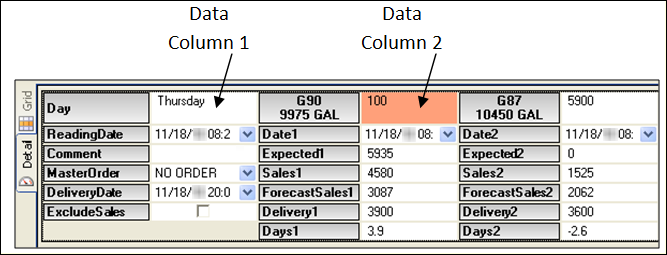
The Detail tab is arranged as sets of column pairs. Field names are displayed in gray. The corresponding data fields are white.
-
The first data column provides general information relevant to all tanks shown on the Detail tab.
-
The remaining data columns display readings and other data for the individual tanks.
For all tanks, you can edit:
ReadingDate |
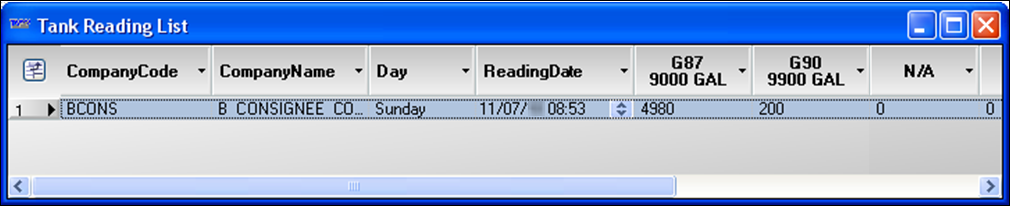
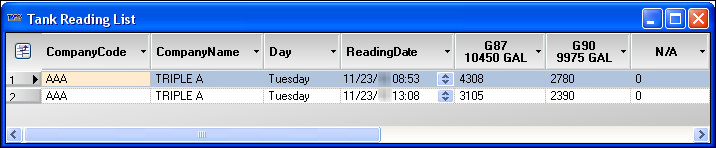
Displays the date and time of all tank readings. You can edit the date or time directly, or by using the date chooser. Note: You can also edit a ReadingDate field by double-clicking the field to open the Tank Reading List window. This window lets you edit the commodity reading(s) for the selected store as well as the date and time.
|
Comment |
Enter free-form text that can be accessed by other applications, such as reporting. |
MasterOrder |
Only stores having an Inventory Services Mode of Threshold or Audit Only use master orders. Forecasted stores do not use master orders. Notes:
|
DeliveryDate |
Displays the projected delivery date and time for the order. |
ExcludeSales |
Reserved for future use. |
For each tank, you can edit:
Reading |
The Reading field, which is to the right of a commodity ID, displays the tank’s reading. If the reading is questionable, the background will be orange. If you need to change a tank reading, you can do so in this field. |
ForecastSales |
Percentage of the expected weekly sales assigned to the day’s expected sales. For more information, see Creating a commodity forecast. |
Delivery |
Delivered amount. |
All other fields in the Detail tab are read-only, or should not be changed.
Note: If you must change a reading’s date or time, observe the rules for editing tank readings.
Grid tab
The Tank Detail section’s Grid tab displays tank readings, sales, delivery, and supply data for the store you select in the Stores Listing grid. Data are displayed for the current date.
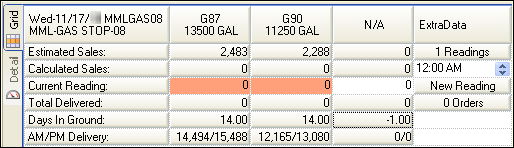
The Grid tab consists of:
Field name ID column (col. 1) |
This read-only column identifies the data displayed for each tank column in the rows to the right. The first row of column 1 displays today’s date, and the ID and name of the selected company. |
Tank column(s) |
Data for a store’s tanks are displayed in columns 2-11. The first row of each column displays the tank’s commodity ID and the safe fill level. All other fields in a column are read-only, except for the Current Reading field. The Current Reading field displays the tank’s last reading. Questionable readings are marked by an orange cell background. If you need to change a tank reading, you can do so in this field. Note: Headers of unused tank columns are labeled N/A. |
ExtraData column |
Allows you to inspect today’s tank readings and orders, and to add or modify tank readings. Active fields include:
|
ExtraData column |
|
| If you must change a reading’s date or time, observe the rules for editing tank readings. |
Observing rules for editing tank readings
The date and time of a store’s tank readings are recorded in the Tank Detail section ReadingDate field. Only one ReadingDate field is recorded with a set of tank readings, regardless of the number of tanks shown for a store in the Tank Reading Validation window. To maintain accurate Forecaster operation, observe the following rules when you update a questionable reading:
-
If a corrected tank reading is for the original date and time shown in the ReadingDate field, enter the new reading, but do not change the date and time.
Example
You call a store about a questionable tank reading of 200 gallons at 16:30, and find it was actually 2200 gallons at 16:30. Update the reading volume, but keep 16:30 as the reading time.
-
If a corrected reading is for a date and time other than what is shown in the ReadingDate field, get readings for all of the store’s tanks at that time, and record them in the Tank Detail section.
Example
The 8:30 reading for one of a store’s three tanks is questionable, but the other two readings are acceptable. You call and receive a new reading for the questionable tank as of 11:30. You should also get readings for the store’s other tanks at 11:30, and update all of them in the Tank Detail section.
Reviewing a store’s tank readings and orders
As part of the review process, you must determine whether each questionable reading for the current day is valid or needs to be changed. Use the following procedure to review and modify questionable tank readings:
-
In the Restriction fields, filter stores to appear in the Stores Listing grid.
-
Set the RevType1-3, Region1, OtherType2, and Bill To fields to the desired values.
-
Set the Mode field to Forecast.
-
Select a Filter option. If you are interested only in questionable readings, select Questionable. This will cause the Stores Listing grid to display stores for which the Error checkbox is selected.
-
Click
 Open.
Open.
-
-
In the Stores Listing grid, select a store and tank for review.
-
A store is listed once in the Stores Listing grid for each tank being managed by the Forecaster. If you want, first sort the grid.
Typical examples include:
-
If you selected the All option in the Filter field but now want to view only the stores with questionable or with acceptable readings, select or clear the Error box in the Stores Listing header.
-
To sort the grid by store, click the CompanyID field in the Stores Listing header.
Note: Sorting by Company ID will group all of a store’s tanks together, simplifying the review process.
-
-
Click the row for any of a store’s tank reading you want to review. Data for all the store’s tanks are displayed in the Tank Detail section.
-
-
Individually review the selected store’s tank reading(s) and save your work.
-
In the Tank Detail section, select the Grid tab or the Detail tab.
-
Check each of the tanks for questionable readings. Questionable readings are marked by an orange cell background.
-
Determine whether a questionable reading needs to be changed. Consult records, phone logs, call the store, etc. The process depends on your operation.
-
In the Tank Detail section, edit the tank’s Reading field if necessary. Be careful to observe the tank reading editing rules described earlier in this document.
Note: In the Grid tab, you can double-click a reading to open the Tank Reading List window. If there are multiple sets of readings for different times, each set of readings occupies one row. You can edit the ReadingDate and tank reading fields for the most recent reading.
Show me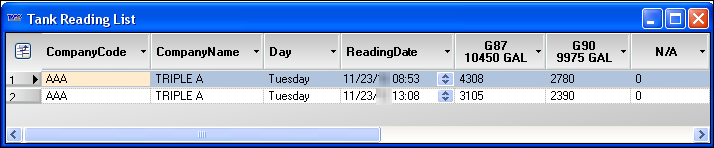
-
Click
 Save.
Save.
-
-
If you want, review the store’s orders/volumes.
-
In the Tank Detail section, click the Grid tab if it is not displayed.
-
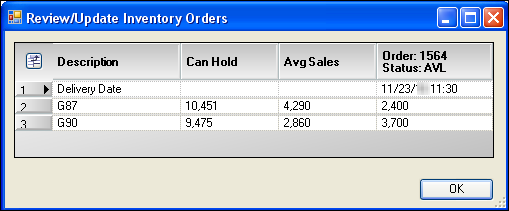
Click the # Orders field. The Review/Update Inventory Orders window opens.
Show me
-
Commodity information is shown for the next order, whether created or pending. For an actual order, a column is included showing the order number, status, date, and each commodity’s quantity.
-
Click OK to close the window.
-
-
If a store’s tank needs no further review, mark the tank as reviewed and save your work.
-
In the Stores Listing grid, select the Reviewed checkbox for the tank reading.
-
Click
Save.
-
-
Repeat Steps 2-5 for other stores/tanks in the Stores Listing grid.
Adding a reading
A store can have multiple readings per day. The most recent reading affects the next forecasted load, but all readings can help establish sales history and trends.
To add readings to a store, use the Grid tab in the Tank Detail section:
-
In the restriction fields, filter stores to appear in the Stores Listing grid.
-
Set the RevType1-3, Region1, OtherType2, and Bill To fields to the desired values.
-
Set the Mode field to Forecast.
-
Select a Filter option. If you are interested only in questionable readings, select Questionable. This will cause the Stores Listing grid to display stores for which the Error checkbox is selected.
-
Click
Open.
-
-
In the Stores Listing grid, select a store for which you want to add a reading.
-
A store is listed once in the Stores Listing grid for each tank being managed by the Forecaster. If you want, first sort the grid.
-
Click the row for any of a store’s tank reading you want to review.
Data for all the store’s tanks are displayed in the Tank Detail section.
-
-
In the Tank Detail section, select the Grid tab.
-
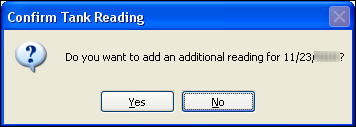
In the ExtraData column, click New Reading.
The Confirm Tank Reading window opens.Show me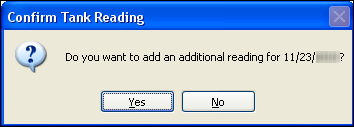
-
Click Yes. The # Readings field increments by one.
-
Click the # Readings field. The Tank Reading List window opens.
Show me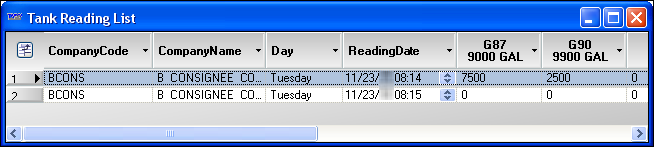
-
To edit the reading:
-
Enter the date or time in the ReadingDate field. For small adjustments in time, you can use the field’s spin box.
Note: As of Version 17.20, reading dates cannot be greater than the current date or more than 24 hours earlier than the original reading date. Entering a future date makes a Warning message open. It states that you are about to change the reading date from the original date value to what you entered in the field. It instructs you to save and refresh the window to recalculate the sales and readings. Click OK to close the message.
-
Click the reading field and enter the new reading.
Note: As of Version 17.20, the volume must be equal to or less than the maximum tank volume. Entering a quantity larger than the tank capacity makes the Reading Entry Error message appear. The message states the value entered is greater than the tank’s size. It instructs you to correct the reading. Click OK to close the message. The field value is reset to 0 (zero).
-
Press TAB to access the reading field for the next tank if necessary.
-
Click
 Close to exit the window.
 -
Click
 Save.
Save.
-