Degree Day preliminary setup
To use the Degree Day forecaster, you must set up access to weather data vendors, which predict fuel consumption for your customers. You must also set up a location profile for any location to which you deliver fuel.
Recording Degree Day vendor keys
In the Degree Day Vendor Keys window, you can set up the system to pull information from third-party weather forecasting services via an API. These vendors provide the forecast data your system uses to calculate a degree day. You enter account information for the vendor(s) you want to link to your Inventory Services application. Your vendor supplies the unique user name and password you need to access the service.
-
Go to Maintenance > Degree Day Vendors.
-
Make entries in these fields for each vendor you use:
Field definitionsRequired field: *
Code *
Name of the third-party weather service vendor
AccountKey
The username that links your third-party weather service account with your Inventory Services application
Note: Each vendor account requires a different account key.
SecurityKey
The password used to validate your connection with a specific third-party weather service
Note: Each vendor account requires a different security key.
-
Click Save.
Show me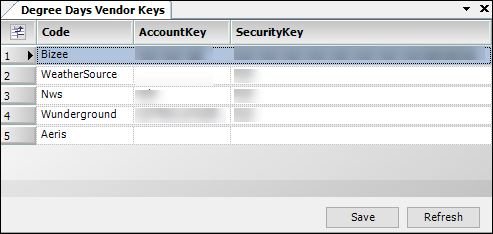
Weather data vendors
There are currently five weather data vendors that are supported by the Degree Day API. Each vendor provides various types of weather data and account options.
| As a courtesy, this document provides information on integrating specific third-party weather accounts with your Inventory Services application. The information included here is relevant as of version 2018.3. Trimble does not track updates to third party applications. Always consult the vendor’s user documentation for instructions. |
Weather vendor name |
Data available |
Bizee |
|
WeatherSource |
Provides historical and forecast data Note: Historical data does not include past hours of the current day. |
National Weather Service |
Provides forecast data only |
Weather Underground |
Provides historical and forecast data |
Aeris |
Provides historical and forecast data Note: Historical data does not include past hours of the current day. |
Recording location profiles
In the Location Setup window, you can record, view and edit information about the customer or tank receiving the fuel delivery. To do this, you use the window’s Profile tab.
-
Go to Maintenance > Location Setup
The Location Setup window opens. The Profile tab is displayed by default. -
Click New.
-
Make entries in these fields in the Profile tab’s header:
Note: For detailed instructions on setting up profiles for the companies, see Entering company data in the Fuel Dispatch online help.
Field definitionsRequired field: *
Company ID *
Identification code for the company
Typically, an ID is assigned by the system when a new company record is first saved. It consists of the first three letters of the company’s name, followed by the first three letters of the city’s name.
If you want, you can enter a user-defined ID before you save a new location record for the first time. A maximum of eight alphanumeric characters is allowed.
Company Name *
Name of the location
Forecast Mode *
Identifies the type of monitoring performed for the location.
Options are:
-
Degree (Recommended)
Note: Only sites with Degree as their monitoring type will have projected orders saved automatically. -
Threshold
-
Forecast
-
Audit Only
Note: Choose this option if you are not ready to save projected orders automatically, but would still like to use Degree Day forecasting for the site. -
Hold
Show me
-
-
On the Information sub-tab, make entries in these fields.
Field definitionsRequired field: *
City *
City in which the site is located
State *
State in which the site is located
Zip *
ZIP Code of the site’s location
-
Click
 Save.
Save.
Retrieving and editing existing location profiles
-
Go to Maintenance > Location Setup
The Location Setup window opens. -
In the Location field at the top left of the window, enter the location’s ID.
-
Click Retrieve.
The customer’s information is shown.
-
Make changes as needed and click
Save.
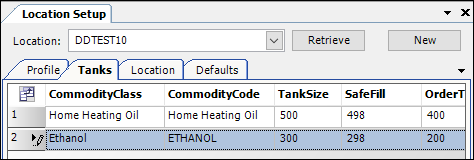
Recording tank information for each location
The Degree Day forecaster can show forecast data for a specified tank. You enter this information on the Location Setup window’s Tank tab.
-
With the location’s profile open, select the Tank tab.
-
To create a new tank for the selected location, click Add.
Show me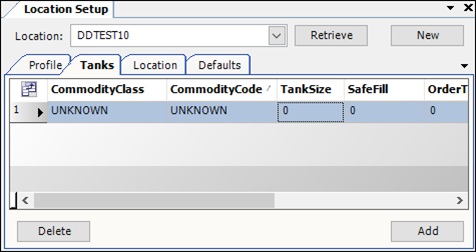
-
Make entries in these fields located at the top of the tab.
Field definitionsRequired field: *
CommodityClass *
Commodity classification to which the product has been assigned
CommodityCode *
ID of the product to be delivered
TankSize *
Capacity of the tank, in gallons
SafeFill *
Maximum volume to which the tank should be filled, e.g., 95%
OrderTriggerThreshold *
Point at which the forecaster should create an order
Tank_hours_offset *
Currently not functional.
Kfactor *
Burn factor for the tank
Note: This field must be filled, even if a K factor is unknown. After historical readings are recorded within the system, the K factor will update automatically.
volumeunits *
Unit of measure for the product the tank holds, such as, gallons
By default, this information comes from the Commodity profile.
LocationID
Unique ID of the company stored in the Azure database
LocationTankID
Unique ID of the tank stored in the Azure database
Show me
-
Click
Save.
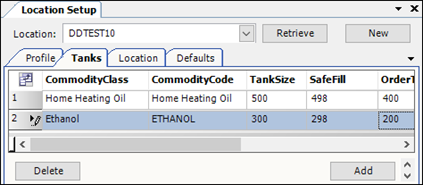
Retrieving and editing existing tank information
-
With the location’s profile open, select the Tank tab.
Recorded tank data for the location is shown. -
Click Add to enter data for an additional tank for the location.
-
Make changes as necessary to existing entries and click
Save. -
To delete a tank, select the entry you want to remove.
-
Click Delete.
-
Click
Save.
Recording location identifiers for each location
The Degree Day forecaster can pull degree day readings using the information on the Location Setup window’s Location tab.
| You can edit existing entries on this tab, but cannot create new entries. |
-
With the location’s profile open, select the Location tab.
The Location grid displays a row for each attribute saved in the database. Fields shared with the Profile tab are populated.Show me
-
Make entries in these fields located at the top of the tab.
Note: Required entries vary by vendor.Field definitionsLatitude
Latitude of the site’s location
Longitude
Longitude of the site’s location
PostalCode
Zip code of the site’s location
CountryCode
Country of the site’s location
StationID
ID of the weather station closest to the site
MaxLoadsToForecast
Maximum number of orders the forecaster will provide readings for the site
MaxDaysOutToForecast
Maximum limit (in days) the forecaster will provide readings for the site
Note: Weather predictions become more inaccurate as the limit increases. The recommended maximum limit is 10 days.
BaseTemperature
Median temperature (65°F)
MaxDeliveryAmount
Maximum amount that can be delivered to a tank at the location
HistoryDegreeDayServer
Weather data vendor that provides historical readings for the site
Note: Some weather vendors do not provide historical data. Always consult the vendor’s user documentation for instructions.
PreliminaryForecastDegreeDayServer
Currently not functional.
ForecastDegreeDayServer
Weather data vendor that provides forecasted readings for the site
Note: Some weather vendors do not provide forecasted data. Always consult the vendor’s user documentation for instructions.
CalculationType
Specifies how the system calculates degree days from vendor data.
Options are:
-
DegreeHours (recommended)
Select this option to calculate degree hours for each hour, then divide by 24 for the degree dayNote: This is the most accurate option.
-
AverageTemperature
Select this option to calculate the average hourly temperature for the day
-
-
Click
Save.
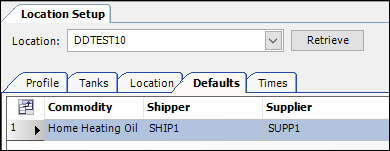
Recording default commodities for each location
You record the commodities your shippers and suppliers will deliver to a specific location on the Location Setup window’s Defaults tab.
| Data in this tab is only stored in the database and not the cloud. |
-
With the location’s profile open, select the Defaults tab.
-
Click Fill.
Show me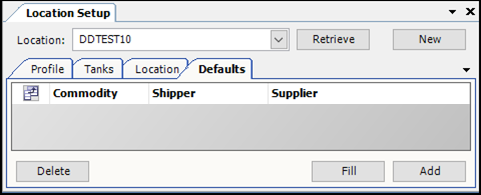
The Defaults grid displays a row for each of the location’s commodities. Fields shared with the Location Setup window’s Profile tab are populated.
-
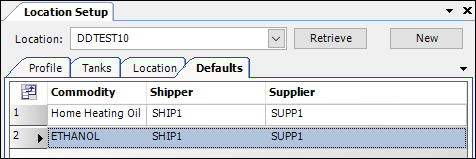
Click Add to enter new data for the location.
Show me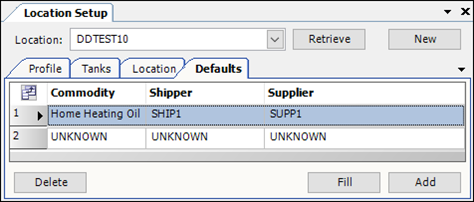
-
Make entries in these fields located at the top of the tab.
Field definitionsCommodity
Commodity delivered to the location.
Shipper
Company delivering the product.
Supplier
Company supplying the product.
-
Click
Save.
Retrieving and editing existing default commodities
-
With the location’s profile open, select the Defaults tab.
The Defaults grid displays a row for each of the location’s commodities. Fields shared with the Location Setup window’s Profile tab are populated. -
Make entries in each field as necessary and click
Save. -
To delete an entry, select the entry you want to remove.
-
Click Delete.
-
Click
Save.
Recording delivery times for each location
On the Times tab in the Location Setup window, you can record:
-
A range of time(s) a customer will accept a fuel delivery per day of the week
-
A range of time(s) a shipper will deliver fuel to a location or customer per day of the week
-
With the location’s profile open, select the Times tab.
Recorded data for the location is shown.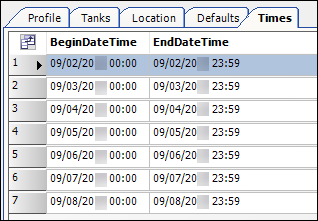
-
Click Add to enter new data for the location.
-
Make entries in these fields located at the top of the tab.
Field definitionsRequired field: *
BeginDateTime *
The earliest time fuel can be delivered to a location.
EndDateTime *
The latest time fuel can be delivered to a location.