Recording a store’s information
After setting up the company profiles in TMWSuite, Fuel Dispatch, or Inventory Services, you must, at least, do the following:
-
Identify the store’s service mode.
-
Create profiles for each of the store’s tanks.
-
Record when a store cannot accept deliveries.
Identifying a store’s service mode
The Forecaster generates orders automatically, based on a store’s historical sales data, actual inventory readings, and delivered product data. For threshold-based forecasting, projected orders are presented for review, but commodity quantities must be added, and orders must be saved manually.
To set up a store for forecasting, follow these steps.
-
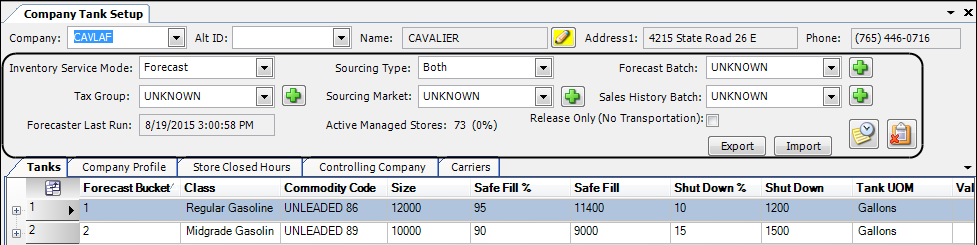
In Inventory Services, go to Maintenance > Company Tank Setup.
-
Retrieve the company to set up.
Show me
Note: If a note or an alert has been recorded for the store, the Note indicator background color changes from gray
 to yellow
  or red
  . Click the indicator to view notes recorded in the company’s profile in the Notes Order # window. Notes accessed in this window are read-only.
 -
Select the Inventory Services Mode.
-
Forecast
The Forecaster generates orders automatically Forecaster generates orders automatically, based on a store’s historical sales data, actual inventory readings, and delivered product data. -
Threshold
Projected orders are generated by the system, but must be reviewed and saved manually for dispatch. -
Audit Only
Orders are not automatically generated by the system. This option is used when stores call in orders as they need product.
Note: When changing from Forecast to a different mode, the system will display a warning message that it will delete available forecasted orders.
-
-
If you are going to forecast this store as part of a group or batch of stores, select the appropriate batch number.
Note: By default, this field includes options 1-5. Additional batches can be set up in the System Administration ForecastBatch label.
-
Verify the store’s profile includes a default Bill To company.
The Forecaster requires that stores have a default Bill To specified in their profiles. It uses the Bill To as the Order By entity on the orders it creates.
On the Company Profile tab, make sure a Bill To has been recorded for the store.
Show me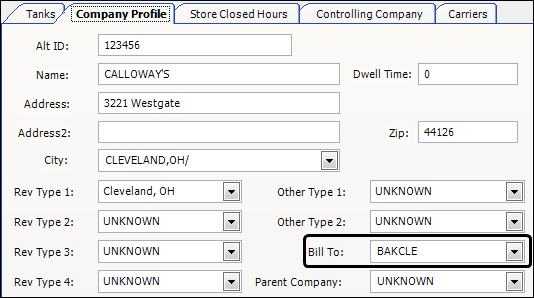
Note: You set up profiles for the companies used in Inventory Services in the Fuel Dispatch application. For detailed instructions, see Entering company data in the Fuel Dispatch online help.
-
If the store uses an Integrated Voice Response (IVR) system to submit its tank readings, on the Controlling Company tab, enter the appropriate information.
Note: Starting in V.2022.4 and later.
The Integrated Voice Response (IVR) system is no longer available. The Controlling Company tab has been removed.The company must be set up in the Fuel Dispatch application. For detailed instructions, see Entering company data in the Fuel Dispatch online help.
Show me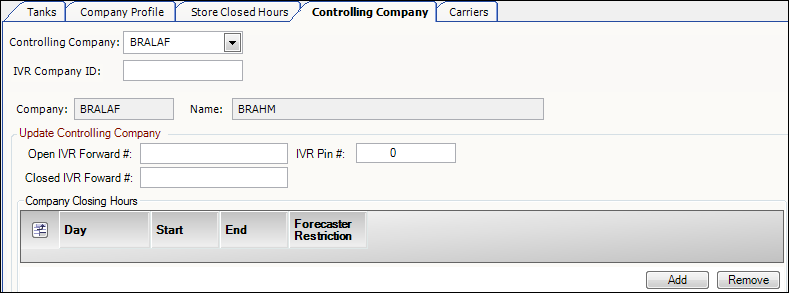
Working with forecasted stores
When using the forecaster, the system performs a license check that counts the number of forecasted stores and licenses listed in your database. This enables the system to validate your forecaster licensing.
Your store count should not exceed your license count. Exceeding your license count disables the forecaster functionality.
-
The forecaster does not generate new fuel orders.
-
The forecaster does not allow you to set up stores as forecasted locations.
The system displays license check results as follows:
-
InventoryStoreCount
Shows how many licenses you have to manage stores as forecasted locations. -
Active Managed Stores
Shows how many stores you actively manage as forecasted locations.
Determining your forecasted store and license counts
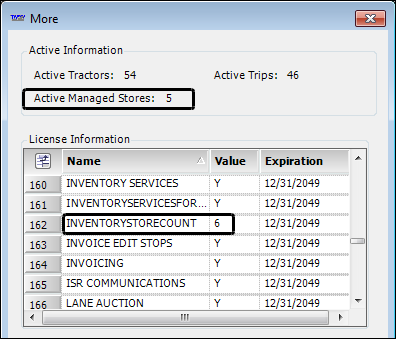
You can view both the InventoryStoreCount and the Active Managed Stores count in the More window from the Inventory Services application.
To access the More window, go to Help > About > More. Both the Active Managed Stores count and the InventoryStoreCount appear in the More window.
Viewing forecasted store information in the Company Tank Setup window
The Company Tank Setup window shows store count information. When you access the window, the system generates a warning message if your store count is equal to or greater than your license count.
To view the Active Managed Stores count in the Company Tank Setup window, go to *Maintenance > Company Tank Setup.*
The count shows the number of stores that have Forecast as their Service Mode. It also shows the percentage of your available licenses in use. For example, if your available license count is 6 and your Active Managed Stores count is 5, the percentage is 83%.
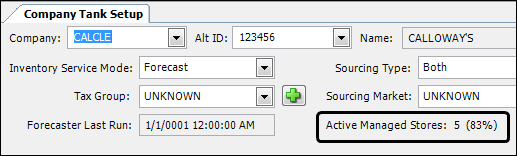
The count and percentage appear in red text.
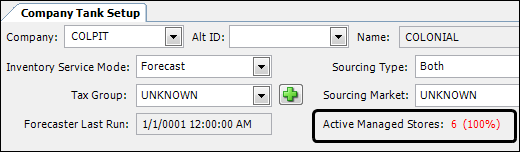
A percentage over 100% indicates that the Active Managed Stores count exceeds the license count. In this example, the percent value reached 200% because the license count was 6.
![]()
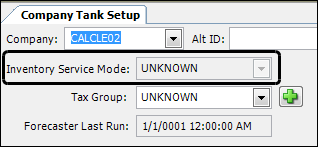
When the store count exceeds the license count, the Inventory Service Mode field is disabled. The field becomes gray when you enter a store’s ID in the Company field.
Viewing store count messages in the Company Tank Setup window
Based on your store and license counts, the system does one of the following:
-
If the store count is less than the license count, the system opens the Company Tank Setup window. You can record the store’s information.
-
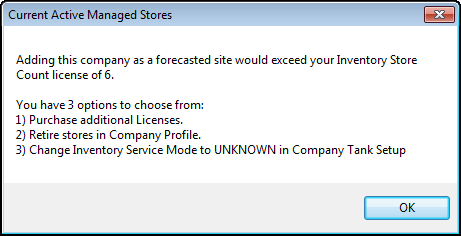
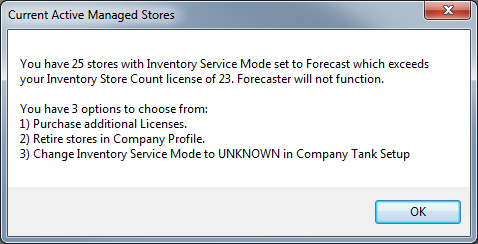
If the store count is equal to or greater than the license count, the system opens the Current Active Managed Stores window. It identifies the licensing issue and the options available to resolve the discrepancy. The message that is shown is based on whether the store count is equal to or greater than the license count.
The message warns that adding a company as a forecasted site will exceed your Inventory Store Count license. It instructs you to purchase additional licenses, retire stores in Company Profile, or change the Inventory Service Mode to UNKNOWN in the Company Tank Setup window.
The message states that exceeding your license count will result in the Forecaster not functioning. Again, you are instructed to purchase additional licenses, retire stores in Company Profile, or change the Inventory Service Mode to UNKNOWN in the Company Tank Setup window.
Note: The system also opens the Current Active Managed Stores window when you access the:
-
Order Forecast Review window in Inventory Services
-
Forecast Order Review window in Fuel Dispatch
Adjusting store counts
Inventory Services requires you to have valid forecaster licensing for all of your actively managed stores. When your store count is equal to or greater than your license count, the system provides options on how to resolve the issue. The options appear in the Current Active Managed Stores window as follows:
-
Purchase additional Licenses
To purchase additional licenses, contact your TMW Support Team. -
Retire stores in Company Profile
To retire a store, clear the check mark from the Active switch in the company’s profile.
For details,see: Deleting a company record -
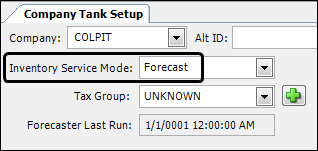
Change Inventory Service Mode to UNKNOWN in Company Tank Setup
To set a store’s Inventory Service Mode field to UNKNOWN, follow these steps.-
In Inventory Services, go to Maintenance > Company Tank Setup.
Note: If necessary, close the Current Active Managed Stores window. The Company Tank Setup window opens.Show me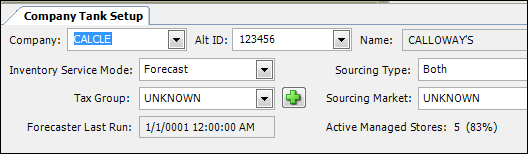
-
Select UNKNOWN in the Inventory Service Mode field drop-down list.
When changing from Forecast to a different mode, the system displays the Delete Confirmation message. It asks if you want to delete the store’s available forecasted orders.
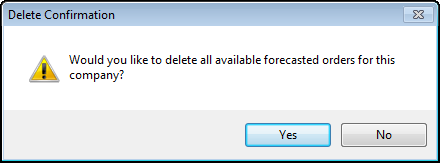
-
Do one of the following:
-
Click Yes to delete the forecasted orders.
-
Click No to retain them.
-
-
Click Save.
Note: For more information, see Identifying a store’s service mode.
-
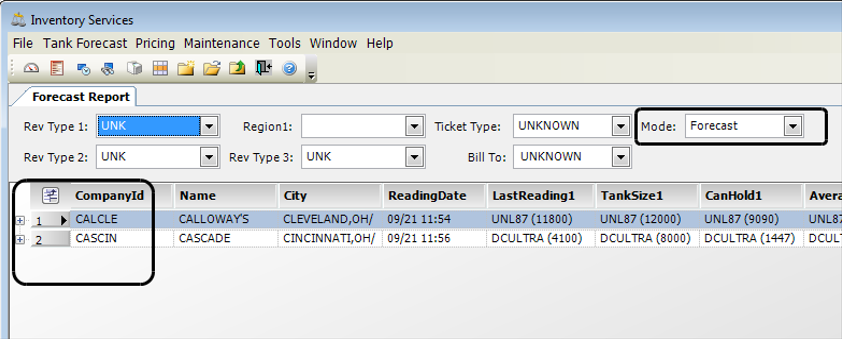
Viewing a list of your Active Managed Stores
You can retrieve a list of your active managed stores from the Company Scroll or the Forecast Report.
Viewing Active Managed Stores in the Company Scroll
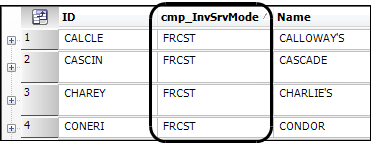
By default, a store’s inventory service mode data does not appear in the Company Scroll grid. Use this procedure to add the cmp_InvSrvMode field to the grid. Then you can view a list of actively managed stores based on inventory service mode.
-
In Inventory Services, go to Tools > Company Scroll.
-
Click
 Edit Views.
The Edit View Scrolls window opens. -
In the Board Type field drop-down list, select Company Scroll View.
-
Select All Users.
-
Select the Scroll Company row in the Edit View Scrolls grid.
-
Click Edit to open the Board Definition window.
-
Click Change View to open the Create/Edit Board Definitions window.
-
Click Edit columns.
-
Right-click the DB Column heading field and select Find.
-
Enter cmp_invsrvmode in the Find What field and click Find Next.
-
Select the cmp_InvSrvMode checkbox.

-
Close the View Editor window.
-
Click OK to close the Create/Edit Board Definitions window.
-
Click OK to close the Board Definition window.
-
Click Save in the Edit View Scrolls window.
-
View the cmp_InvSrvMode column in your Company Scroll grid.
To add and view the cmp_InvSrvMode column in your grid, follow these steps.
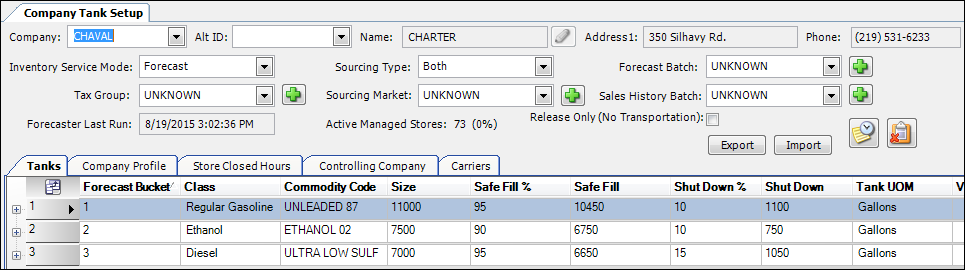
Setting up the store’s tanks
A store’s record must identify the properties of each of its tanks, such as commodity, size, and safe fill percent. The Forecaster combines this information with the tank readings to create accurate orders for a store.
-
In Inventory Services, go to Maintenance > Company Tank Setup.
-
Retrieve the company to set up.
-
On the Tanks tab, click Add.
Show me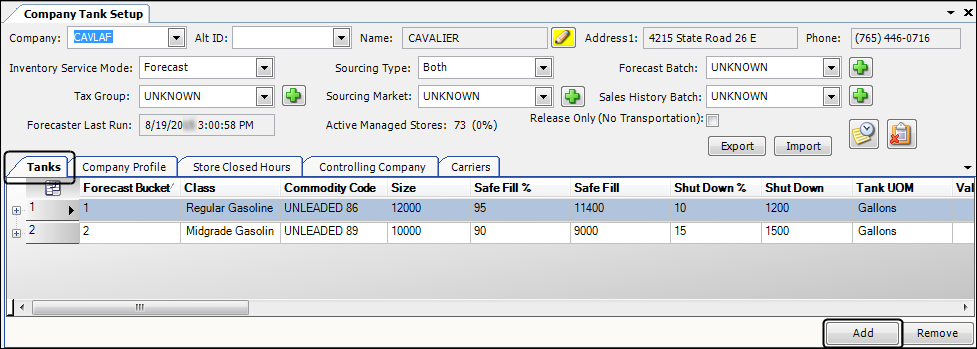
-
Record these properties on the Tanks tab.
Field definitionsClass
Select the freight class that categorizes the commodity the tank holds.
Commodity Code
Select one of the commodities that are included in the selected class.
Tank UOM
Select the unit of measurement for the tank, such as gallons or liters.
Size
Enter the number of units the tank is designed to hold. For example, 15,000 gallons.
Safe Fill %
Enter the percent to which the tank can be safely filled. This value is ordinarily 90 or 95 percent.
Safe Fill
The system automatically calculates the safe fill amount based on the values entered in the Size and Safe Fill % columns.
This amount is used when a tank audit rule is based on a percentage of tank volume.
Shut Down %
Enter the percent of tank size at which the tank runs out of product and can no longer pump the commodity. This value is ordinarily 5 or 10 percent.
Shut Down
The system automatically calculates the shut down amount based on the values entered in the Size and Shut Down % columns.
Forecast Bucket
Enter a number to indicate the bucket number of the tank you are forecasting. Since the sequence of numbers determines the order in which the commodities are displayed in other windows, you should assign the lead product a number 1.
Note: Tank bucket numbers must be unique and sequential.
Generation Rule
The Generation Rule may indicate to the Forecaster when the order should be created, and alerts the dispatcher when that threshold is going to be reached.
-
Simple Threshold
When a reading or a projected reading falls below the number in the Threshold Percent of Sales column, an order is created. -
Percentage of Sales
When a reading or a projected reading indicates that the store has sold the estimated percent recorded in the Threshold Percent of Sales column, an order is created.
Order Threshold
If you selected Simple Threshold as the Generation Rule, enter the number of gallons that the Forecaster should use when determining whether to create an order.
Threshold Percent of Sales
If you selected Percentage of Sales as the Generation Rule, enter the percentage of sales the Forecaster should use when determining whether to create an order.
The weekly sales for the tank are recorded in the Commodity Forecast Setup window.
If you have two or more manifolded tanks, you can set the percentage of sales for each. The total percentage must equal 100 across all tanks.
Is Manifolded
Select this checkbox when two or more tanks of the same product are connected with a pipe and you record a separate reading for each of the tanks. For more information, see Working with manifolded tanks for forecasted stores.
Notes:
-
If you receive only one reading for manifolded tanks, as you might in the case of self-leveling tanks, record them as one tank, rather than as manifolded.
-
If you have two manifolded tanks for forecasting, and identify them as one, you can use the same Forecast Bucket number for each.
Manifold Group
After adding a record for each of the manifolded tanks and selecting the IsManifolded checkbox, select the manifold group. Each set of manifolded tanks has its own group ID.
Note: By default, this field includes options 1-5. Additional groups can be set up in the System Administration ManifoldGroup label.
Is Pump Manifolded
Select this checkbox if the tank uses a pump to level out the manifolded tank.
Percent of Forecast
The percent of the overall volume forecasted allocated to the tank.
Valid Commodity List
Used with the Active Commodity field to identify available commodity blends, such as seasonal blends.
Enter the ID for each commodity that can be substituted for the commodity displayed in the Commodity Code field.
Notes:
-
Separate multiple commodity IDs with commas.
-
Each valid commodity must have a TMW commodity profile.
-
In the Commodity Profile window, the valid commodity and original commodity must be assigned to the same freight class.
Active Commodity
Select the ID of the currently active commodity. This commodity will be used by the Forecaster when creating orders as long as it remains in the field.
Notes:
-
The active commodity must be included in the Valid Commodity list.
-
In the Commodity Profile window, the active commodity and original commodity must be assigned to the same freight class.
Commodity RVP
Reid Vapor Pressure (RVP), the measurement of volatility commonly associated with gasoline.
Tank Model History
First available in Inventory Services: 2019.3
Tank models are used to store tank details and strapping measurements. Over time, a tank’s model may change.
Use this field to view the history of the tank models recorded for a store’s tank. In the row of the tank you want to view model history, click Edit in the Tank Model History field. The Tank Model History window opens.
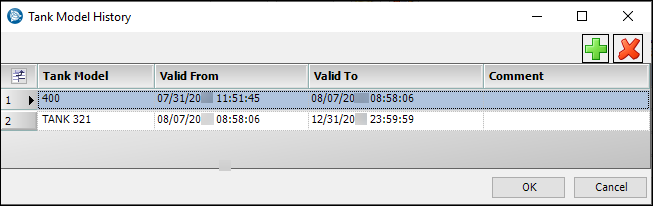
For more information on the Tank Model History window, see Viewing a tank’s model history in the Fuel Dispatch help system.
-
-
Repeat steps 3 and 4 for each tank you are setting up.
Copying a store’s tank setup
Once you have set up a store’s tanks, you might find that you can save time by duplicating the information for other stores. You must have company profile records for the target stores before you can copy or import tank setup information to these stores.
You can:
-
Copy selected tank setup information from one store to another, one at a time
-
Export all tank setup information from one store to a ZIP file, and then import all the information to any number of stores, even those in a different database
The information that is duplicated includes:
-
Tank Setup
-
Forecast fields on the window’s header
-
Commodity Forecast Setup
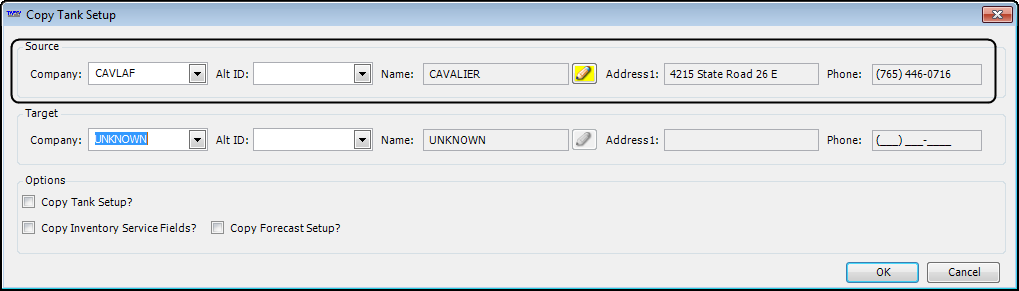
Copying a store’s tank setup one at a time
To copy any or all of the tank setup information from one store to another, follow these steps. You can select to copy all fields in the Tanks grid, the header forecast information, or the Commodity Forecast Setup information to the target company.
-
Go to Maintenance > Company Tank Setup.
-
Retrieve the company whose tank setup you want to copy.
-
Click
 Copy Tank Setup.
The Copy Tank Setup window opens.Show meThis sample shows that the source store information is automatically populated in the window.
-
In the Target group, select the target company.
-
Press TAB.
The target company information is displayed in the remaining fields.Show me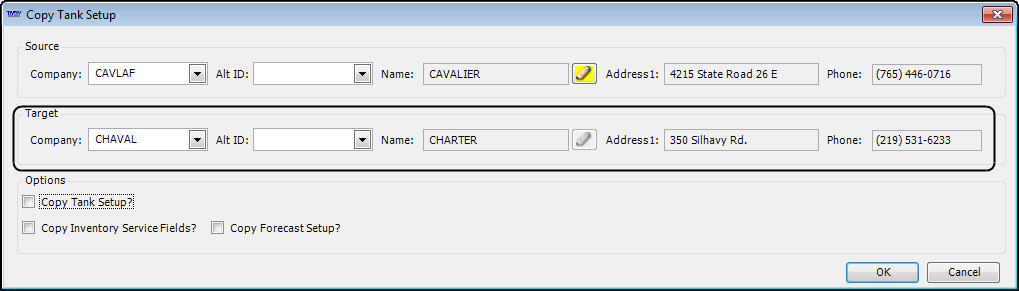
-
In the Options section, select what you want to copy.
-
Copy Tank Setup
Select this option to copy all fields in the Tanks grid to the target company. -
Copy Inventory Service Fields
Select this option to copy the source company’s header information to the target company. -
Copy Forecast Setup
Select this option to copy the Commodity Forecast Setup, if one exists, to the target company.
-
-
Click OK.
A confirmation window opens, warning you that the new information will replace any current information for the target company. -
Click Yes to continue with the copy.
If you decide not to copy the tank setup after all, click No instead.
The Company Tank Setup window now displays the copied information for the target company.
Exporting and importing a store’s tank setup
The tank and forecasting setup information for one location can be exported to a file. You can then import the setup information for other locations. This is helpful when you:
-
Have many stores that are set up in the same way
-
Need to copy these setups to a location that uses a different database
-
Need the assistance of your TMW Support representative for troubleshooting
To export and import all fields in the Tanks grid, the header forecast information, and the Commodity Forecast Setup information to target stores, follow these steps.
-
Go to Maintenance > Company Tank Setup.
-
Retrieve the company whose tank setup you want to export to a ZIP file.
-
Click Export.
Show me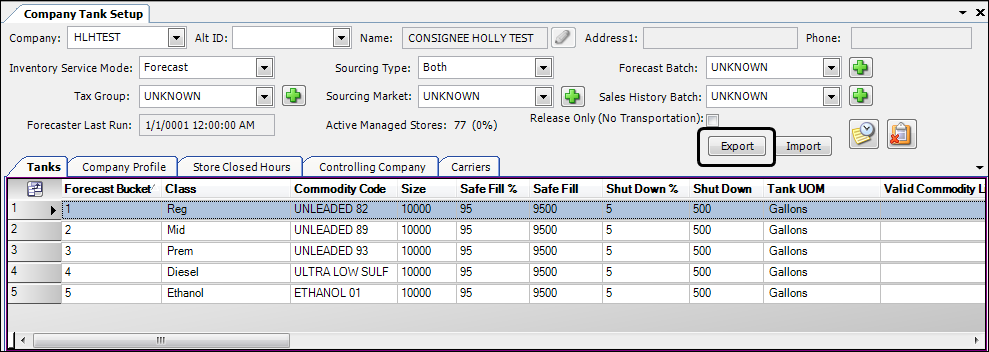
-
Locate and select the folder location where you want to save the exported file, and then click OK.
A message window opens, stating, "Exported Successfully and saved into the Selected Directory". -
Click OK.
Note: The file is exported as a ZIP file in the specified location. The filename includes the store’s ID and the date and time you exported the setup.

-
Import the tank setup data to a target store.
-
If the target store is in another database, switch to that database.
-
Open the Company Tank Setup window.
-
Retrieve the target store.
-
Click Import.
Note: If the target company already has setup data, a confirmation window asks if you want to overwrite the existing information. Click Yes to continue. -
Locate the folder location of the exported ZIP file.
-
Select the ZIP file and click Open.
After a short period of time, an information window informs you that the data was imported successfully and saved to the database.
-
Recording when a store cannot accept deliveries
The settings on the Company Tank Setup window’s Store Closed Hours tab serve these purposes:
-
When automatically generating orders, the store’s closed hours indicate to the Forecaster the days and times when a delivery should not be scheduled.
-
When planning, if the Forecaster Restriction checkbox is selected, a delivery window will not occur within the specified closed hours.
|
You can set up a store’s closed hours when the consignee profile is created in Fuel Dispatch. However, you must select the Forecast Restriction checkbox in either:
|
-
In Inventory Services, go to Maintenance > Company Tank Setup.
-
Retrieve the company to set up.
-
Click the Store Closed Hours tab.
Show me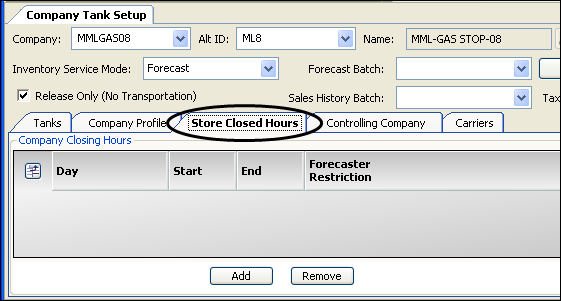
-
Click Add.
A new row is added to the grid. -
In the Day column, select the day of the week the store is closed.
Note: You can select individual days, weekdays, weekends, or the entire week.
Show me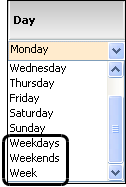
-
In the Start and End columns, enter the start and end times when the store is closed for deliveries.
Show meIn this example, the store cannot accept deliveries on Monday through Friday, from 8:00 AM to 9:00 AM, and from 4:00 PM to 6:30 PM.

-
Select the Forecast Restriction checkbox to prevent creation of orders having earliest/latest times within the restricted times.
Notes:
-
Do not select the Forecaster Restriction checkbox for stores that have an Inventory Service mode of Threshold or Audit Only.
-
You must select the Forecaster Restriction checkbox for a store that has the Do Not Span Delivery Window checkbox selected. For details, see Forcing the Forecaster to schedule retain and runout dates in a single delivery window.
-
Setting up a store when you don’t bill for transportation
Distributors who are not hauling the loads or billing for transportation can set up Inventory Services to:
-
Assign an identified carrier to a store’s forecasted orders automatically
-
Set the order status to either Planned or Completed
Activate the auto-assign carrier feature
To activate the feature, you must have [FuelDispatch]AutoAssignDefaultCarrier=Y in your TTS50.
Specifying a default carrier used on the store’s orders
To assign a store’s default carrier, follow these steps:
-
Go to Maintenance > Company Tank Setup.
-
Retrieve the company to set up.
-
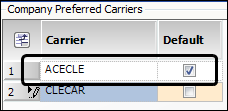
Click the Carriers tab.
-
Click Add.
A blank row appears in the Company Preferred Carriers section. -
In the Carrier field, enter the carrier’s ID.
Note: You can add multiple carriers to a company.
-
For the carrier you want to have assigned to the company’s orders automatically, select the Default checkbox.
Note: To remove a carrier from the list, select that row and click Remove.
-
Click
 Save.
Save.
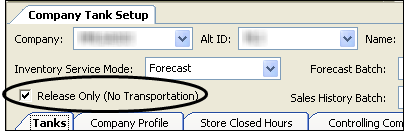
Automatically set the forecasted order status to Completed
To automatically set the forecasted order status to Completed, and the invoice status to Not Ready, you must also do the following:
-
Activate the feature by setting
[FuelDispatch]AutoCompleteReleaseOnly=Yin your TTS50. -
In Inventory Services, go to Maintenance > Company Tank Setup.
-
Retrieve the company.
-
Select the Release Only checkbox.
-
Click
Save.
Viewing past changes to a store’s Inventory Service mode
Changing a store’s mode of forecasting directly impacts whether orders are created for a store. You can readily view an audit log for changes to the Inventory Service Mode (that is, from UNKNOWN to Forecast to Threshold to Audit Only). When changing from Forecast to a different mode, the system will display a warning message that any available forecasted orders will be deleted.
To view the history of any changes to the forecasting mode, follow these steps.
-
In Inventory Services, go to Maintenance > Company Tank Setup.
-
Retrieve the company for which to view the changes.
-
Click
 Show Log.Show me
The Inventory Services Change Log window opens.
Show me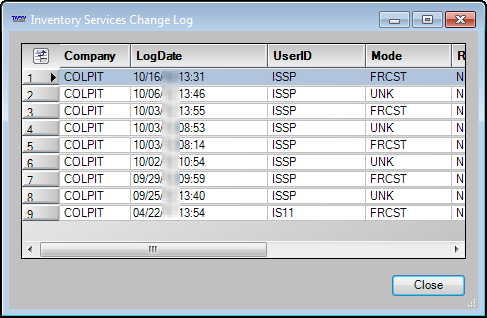
-
View the information.
The changes are listed from most recent to oldest.
Field definitionsCompany
Company’s ID
Log Date
Date and time the information was changed and saved
User ID
Login ID of the user who made the change
Mode
Inventory Services Mode that was selected when the record was saved
Release Only
Whether the Release Only checkbox, indicating whether you are hauling the loads, was selected when the record was saved
Forecast Batch
If you are forecasting this store as part of a group or batch of stores, the batch number that was selected when the record was saved
-
When finished, click Close.
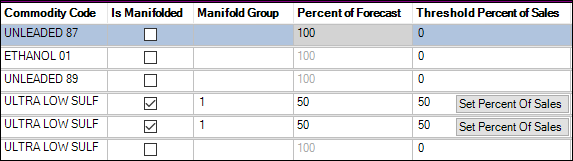
Working with manifolded tanks for forecasted stores
First available in Inventory Services: 16.30
You identify two or more tanks of the same product as manifolded when both of the following are true:
-
The tanks are connected with a pipe.
-
You want to record a separate reading for each tank.
You also specify the threshold percentage of sales for each tank.
You set up manifolded tanks in the Company Tank Setup window. You create a profile for each tank on the Tanks tab. After you add the tank records, you must record their product sales information before you can complete the manifolded tank setup.
-
Go to Maintenance > Company Tank Setup.
-
Add the tanks that are manifolded.
Note: See Setting up the store’s tanks for details.
-
For each of the connected tanks, make these entries:
Field definitionsIs Manifolded
Select the checkbox for each connected tank.
Manifold Group
Select the manifold group.
Note: Select the same manifold group for each connected tank.
Percent of Forecast
Enter the percentage of the total volume allocated to the tank.
Note: The values in the Percent of Forecast fields for all tanks in the manifold group must total 100.
Generation Rule
Select Percent of Sales.
-
Click Save.
Leave the Company Tank Setup window open. -
Go to Maintenance > Commodity Forecast Setup.
The Commodity Forecast Setup window opens. -
Import the store’s tank information.
The new manifolded tanks you recorded in the Company Tank Setup window are represented by a single row in the grid at the top of the window. To see details for each tank, click Expand for that row. The individual tank rows are displayed.
 -
In the grid’s Weekly Sales field, enter the number of units the store typically sells in a week.
Note: See Record product sales information for more information. -
In the Company Tank Setup window, reload the store.
-
In the Threshold Percent of Sales field, the Set Percent of Sales button becomes active.
-
Click Set Percent of Sales.
The Calculate Threshold Percent of Sales window opens. -
In the field, enter the total percent of sales used for the manifold group.
Show me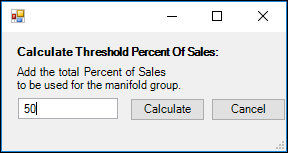
-
Click Calculate.
The values in the Percent of Forecast fields change to reflect the percent of sales entered. To see the exact calculation, hover your mouse over the Threshold Percent of Sales field.Show me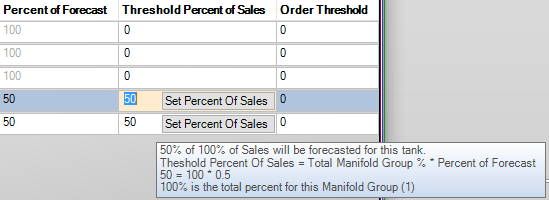
-
Click Save.
Adding a non-manifolded tank of the same product
You may have a single tank that contains the same product as the tanks in a manifolded group. To have the Forecaster reflect the percentage of sales for all tanks accurately, adjust the percent of sales values so that the total for all tanks equals 100 percent.
For example, this company has three tanks of diesel fuel. Two of the tanks are manifolded. Each tank in the manifold group will receive a forecast of 50 percent of sales. The total percent of forecast for the manifold group is 100 percent.
If you want 20 percent of sales from the third tank to be included in the forecast, enter 20 in its Threshold Percent of Sales field. Note that this increases the total threshold percent of sales across all tanks to 120 percent.
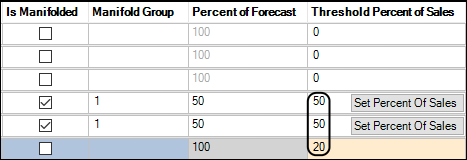
Because the percent of sales must equal 100, click Set Percent of Sales for either manifolded tank and change the Percent of Sales value to 80.

The Threshold Percent of Sales values reflect the new percentage, as shown in the ToolTip for the field.
