Setting up trailer compartments
First available in Inventory Services: 2018.3
The Forecaster Console uses trailer compartments when calculating the volumes on forecasted orders. This allows it to create orders that maximize gallons to what will fit in a trailer. Trailer compartments also determine the products that can be included on a load.
Use the Compartment tab to define a trailer’s compartments. You specify:
-
The number of compartments
-
The discharge side
-
Whether the trailer has a pump unit
-
Compartment sizes
-
How much light or heavy product a compartment can hold
-
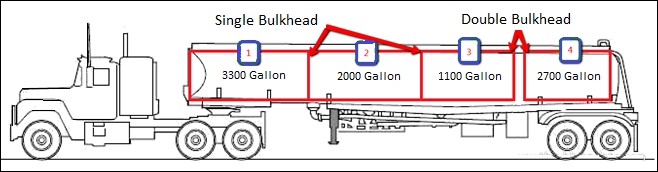
Whether compartments are separated by single or double bulkheads
| Trailers that only contain single bulkheads can only haul all light or all heavy product combinations. Double bulkheads help prevent cross contamination of incompatible products. |
By setting up trailer compartment profiles, you ensure that equipment is used efficiently.
The Forecaster will not create orders with light and heavy products for a trailer without double bulkheads.
You record a trailer’s compartment setup in its profile.
In the trailer profile, you can also:
-
Assign a trailer as a consignee’s default.
-
Clone the trailer configuration to other trailers in your fleet.
-
Go to Tools > Trailer Profile.
The Trailer Profile window opens. -
In the Trailer field, enter the trailer’s ID.
-
Press ENTER.
-
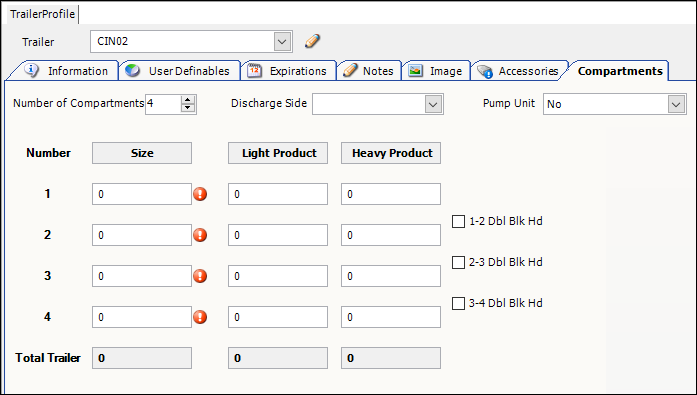
Select the Compartments tab.
-
Make entries in the fields that pertain to the trailer as a whole.
Field Definition Number of Compartments
Total number of compartments on the trailer
Discharge Side
Identifies which side of the trailer has the outlet location
Options are:
-
Unknown
-
Right
-
Left
-
Both
Pump Unit
Identifies whether the trailer has a built-in pump unit
Options are Yes and No.
The system adds the fields needed to configure each trailer compartment.
-
-
Make entries in the fields that define each trailer compartment.
Required field: *
Read-only field: §Field Definition Number §
Identifies the compartment’s position on the trailer
Compartments are listed from front to back.
Size *
Maximum number of gallons the compartment holds
Light Product
Maximum number of gallons of light product the compartment holds
Notes:
-
A commodity’s specific gravity value determines whether it is a light product. Products with a specific gravity between 0.71 and 0.75 are classified as light products.
-
As a safety measure, the system enforces a 75% of capacity validation when you enter the number of gallons a compartment can hold. If your entry is less than 75%, the field is flagged. A ToolTip appears telling you this. If you do not correct the entry before you save, you will continue to see the message.

Heavy Product
Maximum number of gallons of heavy product the compartment holds
Notes:
-
A commodity’s specific gravity value determines whether it is a heavy product. Products with a specific gravity between 0.80 and 0.85 are classified as heavy products.
-
As a safety measure, the system enforces a 75% of capacity validation when you enter the number of gallons a compartment can hold. If your entry is less than 75%, the field is flagged. A ToolTip appears telling you this. If you do not correct the entry before you save, you will continue to see the message.

#-# Dbl Blk Hd
Identifies whether the bulkhead between this compartment and the next is a double bulkhead
When the checkbox is:
-
Cleared
The bulkhead is a single bulkhead. -
Selected
The bulkhead is a double bulkhead.
-
-
Click
 Save.
Save.
-
Assigning a default trailer to a consignee
After you define a trailer’s compartment setup, you can assign that trailer to one or more consignees. When the Forecaster creates orders for them, it uses the default configuration to calculate the maximum gallons and product mix on a load.
-
Go to Tools > Trailer Profile.
The Trailer Profile window opens. -
In the Trailer field, enter the trailer’s ID.
-
Press ENTER.
-
Select the Compartments tab.
-
On the right side of the window, select Set Default Trailer to Consignees.
The grid lists the companies identified as consignees. By default, it shows the companies that do not have a default trailer. If you want, click in the Show field and select All to view all consignees.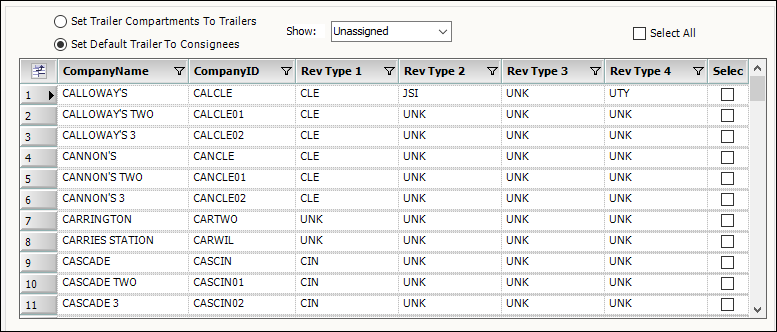
-
Do one of the following:
-
To assign a consignee to this trailer, select the checkbox in its row.
-
To assign all consignees to this trailer, select the Select All checkbox above the grid.
Note: You can clear the checkbox in the rows of individual consignees as needed.
-
-
Click Apply Default Trailer.
-
Click
Save.
Cloning a compartment configuration to other trailers
After you define a trailer’s compartment setup, you can clone that configuration to other trailers in your fleet.
-
Go to Tools > Trailer Profile.
The Trailer Profile window opens. -
In the Trailer field, enter the trailer’s ID.
-
Press ENTER.
-
Select the Compartments tab.
-
On the right side of the window, select Set Trailer Compartments to Trailers.
By default, the grid lists all of your trailers that do not have a compartment configuration recorded. If you want, click in the Show field and select All to view all trailers. When you do, the grid shows the Compartment field for each trailer. If the trailer’s compartments are set up, the configuration appears in this field. The field shows each compartment’s size. Single bulkheads appear as a vertical line between the compartment sizes. Double bulkheads appear as two vertical lines.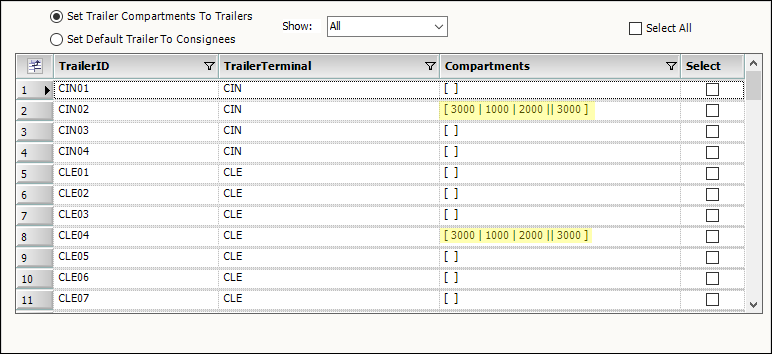
-
Do one of the following:
-
To set a trailer to this compartment configuration, select the checkbox in its row.
-
To set all trailers to this compartment configuration, select the Select All checkbox above the grid.
Note: You can clear the checkbox in the rows of individual trailers as needed.
-
-
Click Apply Compartments.
-
Click
Save.