Find Near
You can use the Find Near feature to find trips, freight bills, carriers, and resources that are near each other.
To use this feature effectively:
-
Zone codes must have latitude and longitude values set up in Codes Maintenance. The Find Near feature calculates distances using zone codes.
-
Mileage Server must be running.
-
Users who need to use the feature need to given access in Security Configuration.
Give a user access to Find Near
-
In the Security Configuration program, go to Security > Tabs Setting > Dispatch.
-
Select the User dropdown menu. A list of users opens.
-
Select a user. The list of users closes.
-
On the Find Near - Bottom Tabs pane, select the checkboxes next to the tabs.
The user will only be able to see the tabs in the Find Near window that you select.
-
Select Apply to User.
Access Find Near
In Multi Mode Dispatch, you can open the Find Near window from trips, freight bills, or resources.
Right-click a trip, freight bill, or resource to open the shortcut menu, and then select any option labeled Find Near.
The option’s name varies, but the window works the same way after you have opened it. The only difference is which tab it opens to and what information it populates.
Here is a table showing the options and how they look when they first open:
| Option name | Opened tab | Populated information |
|---|---|---|
Find Carrier Near (when you select a carrier) |
Resources |
|
Find Carrier Near (when you select a trip) |
Trips > Carriers > Area Service |
|
Find Chassis Near |
Resources > Chassis |
|
Find Containers Near |
Resources > Container |
|
Find Drivers Near |
Resources > Drivers |
|
Find Equipment Near |
Resources > Misc Equip |
|
Find Load for Driver > Driver’s Current Zone |
Resources > Freight |
|
Find Load for Driver > Driver’s Final Zone |
Resources > Freight |
|
Find Power Units Near |
Resources > Power |
|
Find Trailers Near |
Resources > Trailer |
|
Find Trips Near |
Resources > Trip |
|
After you have opened the Find Near window, you can change any of the details that were entered automatically. For example, if you opened the window by selecting Find Drivers Near, you can still edit the driver ID, enter a power unit or freight bill, or change the zone. The system populates values based the option you selected, but the window is still editable.
Set search parameters
You can set a distance or date range to limit search results.
-
Select a Search By option:
-
Proximity searches using the value in the Proximity field. The distance unit is kilometers.
-
Zone Tree searches within the zone in the Zone field and all its subzones.
-
-
Choose a Select Resources Using option:
-
Current Zone limits results to the resource’s current zone.
-
PTA Zone (Projected Time of Arrival Zone) limits results to the resource’s projected arrival zone.
-
-
Set a date range for Filter on Pickup By.
This limits the Shippers results list to shippers that have freight bills with a Pick Up By date within the date range. This option is only available when you have the History tab selected on the results pane.
-
Choose a Group by option. You can group by:
-
Shippers
-
Consignees
-
Callers
-
Bill-To’s
Note: This option is only available when you have the History tab selected on the results pane. It sets how search results are grouped.
-
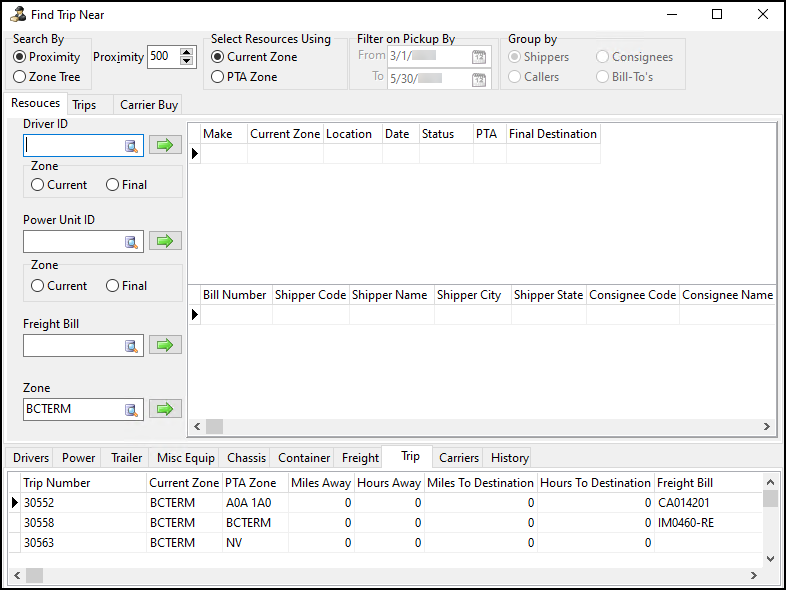
Resources search
You can choose to search for results near a specific driver, power unit, freight bill, or zone.
Search near a driver
-
Select Resources. The Resources tab opens.
-
Do one of the following:
-
Select the Driver ID field and enter a driver ID.
-
Select
 search and select a driver ID from a list.
-
-
On the Zone pane below the Driver ID field, select either Current or Final.
-
Current
Searches within the driver’s current zone. -
Final
Searches within the zone where the driver will be at the end of their current trip.
-
-
Select
 find. Resources that match the search parameters appear on the results tabs.
Search near a power unit
-
Select Resources. The Resources tab opens.
-
Do one of the following:
-
Select the Power Unit ID field and enter a driver ID.
-
Select
search and select a power unit ID from a list.
-
-
On the Zone pane below the Power Unit field, select either Current or Final:
-
Current uses the power unit’s current zone.
-
Final uses the zone where the power unit will be at the end of its current trip.
-
-
Select
find. Resources that match the search parameters appear on the results tabs.
Trips search
You can search for resources near a trip.
-
Select Trips. The Trips tab opens.
-
Enter a trip number in the Trip Number field.
-
Select Find. The trip’s legs appear.
-
Choose the trip legs you want to search near:
-
Right-click a trip leg and select Mark Start Sequence The leg is marked as the beginning of the search range.
-
Right-click a trip leg and select Mark End Sequence. The leg is marked as the end of the search range. Resources that match the search parameters appear on the results tabs.
-
View find results
After you select find, resources that match your search criteria appear on the results tabs.

Results on every tab except Freight are shown regardless of their status. For example, drivers and power units appear even if they are assigned to a trip.
The results tabs are:
-
Drivers
-
Power
-
Trailer
-
Misc Equip
-
Chassis
-
Container
-
Freight
Only freight bills in an Available or Docked status are shown. Freight bills that are assigned to trips are not included in the results. -
Trip
-
Carriers
-
History
The History tab has two grids.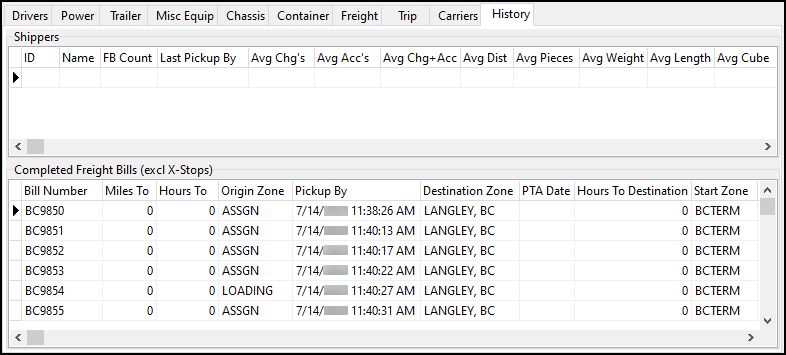
The Shippers grid shows a summary of each shipper. The Completed Freight Bills grid shows details for the shipper you select on the Shippers grid.
When you open this tab, the Filter on Pickup By and Group By filter options become available.

Find a carrier for a freight bill
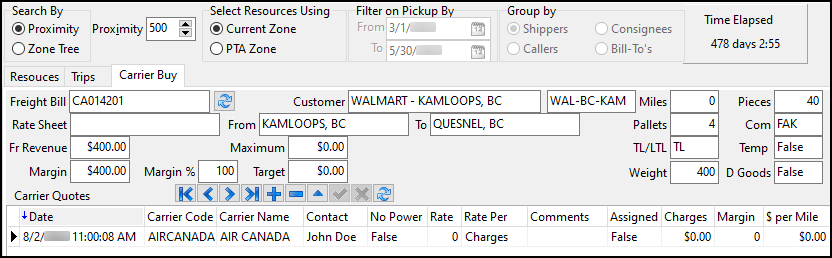
You can use the Carrier Buy tab to find a carrier for a freight bill. It shows target margin rates that you are expected to obtain when you secure a carrier to move the freight bill.
When you are viewing a freight bill you want to match to a carrier, a Time Elapsed timer appears.
This allows you to see if an order has not been tendered to a carrier within a specific period of time.
To enter a bill in the Freight Bill field on the Carrier Buy tab:
-
Select Trips. The Trips tab opens.
-
Select the Trip Number field and enter a trip number.
-
Select Find. The trip’s first freight bill populates the Freight Bill field on the Carrier Buy tab. The freight bill’s data populates automatically:
Field Description Freight Bill
Shows the first freight bill on the trip.
Customer
Shows the freight bill’s Bill-To client.
Rate Sheet
Shows the rate sheet attached to the default vendor.
If the Site ID type is LTL, reference the rate sheet that has a sheet class of LTL. If the Site ID type is Truckload, reference the rate sheet that has a sheet class of TL.
Miles
Shows the mileage for the freight bill.
Pieces
Shows the total pieces for the freight bill.
Pallets
Shows the total number of pallets for the freight bill.
Com
Shows the commodity for the freight bill.
TL/LTL
Shows either TL or LTL as the freight bill type.
Depending on the freight bill type, the Margin, Margin %, and Target fields change functionality.
Temp
Shows whether the commodity is temperature controlled.
Weight
Shows the freight bill’s weight.
D Goods
Shows whether the default commodity includes dangerous goods.
Fr Revenue
Shows the base freight bill charges.
Maximum
Shows the Max value that was entered against the freight bill on the Billing tab in Customer Service. It sets the maximum amount of IP charges that can be allocated against the bill. If the IP charges exceed this value, a warning appears if you select Use Carrier.
Depending on the Allow Edit of Maximum IP Amount security setting, you may not be able to assign the carrier on the Carrier Assign window itself. You can still adjust the IP charges there, however, so you can assign the carrier.
Margin
-
LTL: Calculated field based on the Margin % field using this formula:
(TLORDER.CHARGES-(TLORDER.CHARGES*MARGIN%)).
-
TL: Calculated field based on the Margin % field using this formula:
(TLORDER.CHARGES-(TLORDER.CHARGES*MARGIN%)
Margin %
-
LTL: The default configuration value that is set by the administrative user.
-
TL: Calculated field based on this formula:
(TLORDER.CHARGES-(TLORDER.ROLLUP_MILES*TARGET TO))/ TLORDER.CHARGES
Target
-
LTL: Shows the calculated rate from the rate sheet that has been assigned to the default vendor. The rate sheet that displays must have pick up and delivery zones that match and LTL as its sheet class.
-
TL:
-
Target From: Shows the minimum mileage rate from the rate sheet that has been assigned to the default vendor. The rate sheet that displays must have pick up and delivery zones that match and TL as its sheet class.
-
Target To: Shows the mileage rate from the rate sheet that has been assigned to the default vendor. The rate sheet that displays must have pick up and delivery zones match, TL as its sheet class, and the rate break not set as minimum.
-
-
Add a carrier quote
The Carrier Quotes grid shows records of contact with potential carriers. You can add contact records as needed.
-
Select
 Insert Record. A record for the current date and time appears on the grid.
 -
Do one of the following to enter a carrier code:
-
Select the Carrier Code field and enter a vendor ID.
-
Double-click the field to open a list of vendor IDs and select one from the list.
The carrier’s information from their vendor profile populates the grid.
-
-
Select the Contact field and enter the contact’s name.
This field populates automatically if the vendor has a contact set up in Customer and Vendor Profiles.
-
Double-click the No Power field to toggle it between True or False. Set this value to False if the carrier has power units.
-
Select the Rate field and enter a rate:
-
If the shipment is LTL, enter the total rate the carrier is providing.
-
If the shipment is TL, enter a dollar per mile rate.
The Charges, Margin, and $ per Mile fields calculate automatically.
-
-
(Optional) Select the Comments field and enter any comments.
-
(Optional) Select the Expire Date and enter a date.
-
Select
 Post Edit.
Carriers tab
The Carriers tab shows details about potential carriers. It has five subtabs:
Area Service
The Area Service tab shows carriers that match your search criteria.
You can use the Equipment field to restrict the carriers list to carriers that have a specific type of equipment. You can use the Travel Mode field to narrow the list by travel modes such as air, ocean, rail, or road.
If the values in the Driver Score, Vehicle Score, Safety Score, or Safety Rating fields fall below the default requirements set in Application Configurator, the carrier cannot be assigned to trips on the Trip grid. They will also not appear in the results when searching for carriers.
Rating
The Rating tab shows vendors that are attached to rate sheets that fit your search criteria. You can refine the results by Equipment, Travel Mode, Currency, Distance, Service Level, or Commodity.
Select the Consolidated checkbox to consolidate freight bills into one rate for the interliner for that trip. It also enables the Service Level and Commodity filters.
You can use the TruckMate, External, or Carrier Connect subtabs to search in different system areas.
Load Request
The Load Request tab shows load requests that match your search criteria.
You can create, edit, and delete load requests.
Create a load request
-
Right-click in the Load Request grid. The shortcut menu opens.
-
Select Enter a Load Request. The Enter a Load Request window opens.
-
Do one of the following:
-
Select the Vendor Code field and enter a vendor ID.
If the vendor is not in your system, you can enter their name manually. However, the vendor must be added to Vendor Profiles before being added to a trip.
-
Select
search and select a vendor ID from a list.
-
-
Enter contact information for the vendor, such as a contact name, phone number, and email address.
-
Enter the Current Zone or select
search to select a zone. -
Enter the Destination Zone or select
search to select a zone. -
Select the
 calendar to change the Dates fields.
The Dates range defaults to the current date/time as the start date and one day later as the end date. When the end date has passed, the load request is removed from the system.
-
Do one of the following:
-
Select the Equipment field and enter an equipment class.
-
Select
search to select an equipment class from a list.
-
-
Select OK. The load request appears on the grid.
After you have created a load request, you can edit or delete the request. The Edit Load Request and Delete Load Request options are available in the shortcut menu.
Carrier History
The Carrier History tab shows previous orders for the freight bill on the Carrier Buy tab. Carrier History has its own subtabs:
Filter search results
You can filter results on any of the Carrier History tabs using the Search Information pane.
| Field | Description |
|---|---|
From Zone/To Zone |
These fields default to the Start Zone and End Zone of the freight bill in the Freight Bill field on the Carrier Buy tab. You can change the zone codes, or you can clear the options to not filter by zone codes at all. |
From State/To State |
Select these checkboxes to filter based on the state or province. These fields populate based on the freight bill in the Freight Bill field on the Carrier Buy tab. |
Vendor |
Filters results by vendor ID. |
Commodity Class |
Filters results by commodity class. |
Date Range |
Filters results within a date range. Right-click this field to choose from preset date ranges.
Note: The app config DISPATCH.EXE > CarrierHist Days can be used to set a default date range for these fields. |
View Style |
There are two view style options:
|
Record Summary |
Choose from one of the two Record Summary options:
|
Select Options for Exact Match |
If you select any of these options, then an exact match will be done against the freight bill on the Carrier Buy tab. These options are only available if you are searching by freight bill in Resources, the Trips tab, or the Carrier Buy tab. The driver, power, and zone searches do not involve a freight bill, so these options are not available. |
Carrier Quotes
Shows all carrier quotes users have entered. When you enter a carrier rate quote on the Carrier Buy tab, it usually only applies to that specific trip or leg. However, this information might be relevant for other trips or legs. For example, you might want to see what quotes you received in the past for similar trips.
Assign a carrier
After you have evaluated your carrier options, you can begin the carrier assign process.
-
Go to any of these tabs:
-
Carrier Buy > Carrier Quotes
-
Carrier Buy > Carriers > Area Service
-
Carrier Buy > Carriers > Rating > TruckMate
-
Carrier Buy > Carriers > Rating > External
-
-
Right-click a carrier. The shortcut menu opens.
-
Select Use Carrier. This opens the Carrier Assign window so you can complete the carrier assignment process.